
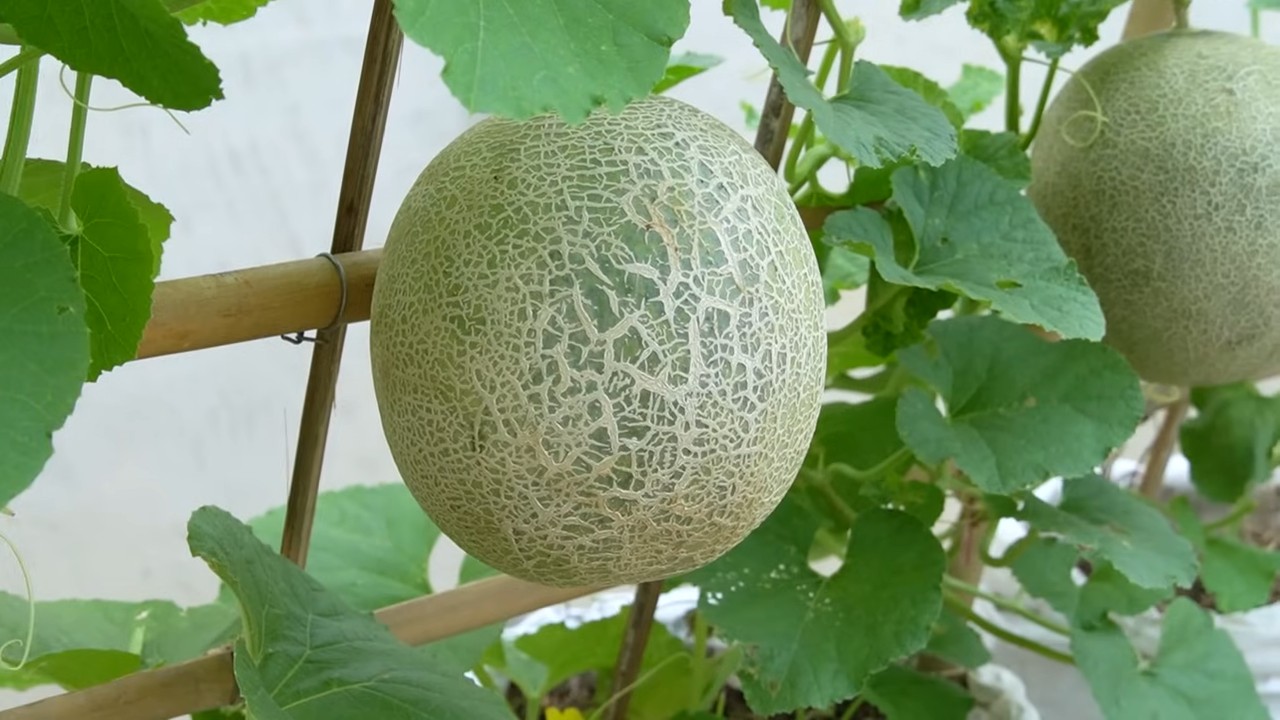
Grow bag cantaloupe: sounds like a summer dream, right? Imagine biting into a juicy, sweet cantaloupe that you nurtured from a tiny seed, all within the cozy confines of your own backyard (or even balcony!). Forget those bland, store-bought melons – we’re talking about homegrown flavor that bursts with sunshine.
For centuries, humans have cultivated melons, with evidence suggesting their origins trace back to Africa and Asia. These sweet fruits were prized by ancient Egyptians and Romans, symbolizing abundance and prosperity. Now, you can continue that tradition, even without acres of land!
But let’s be honest, growing cantaloupe can seem intimidating. They’re known for needing space and specific conditions. That’s where the magic of grow bags comes in! This DIY guide is your secret weapon to successfully grow bag cantaloupe, regardless of your gardening experience. I’ll walk you through every step, from choosing the right grow bag and soil to providing the perfect amount of sunlight and water.
Why do you need this? Because everyone deserves the joy of tasting a perfectly ripe, homegrown cantaloupe. Plus, it’s a fantastic way to reduce your grocery bill, eat healthier, and connect with nature. So, grab your gardening gloves, and let’s get started on this delicious adventure!
Wassermelonen-Anbau im Pflanzsack: Eine Schritt-für-Schritt-Anleitung
Hey Leute! Habt ihr auch so Lust auf frische, saftige Wassermelonen im Sommer? Aber keinen riesigen Garten, um sie anzubauen? Kein Problem! Ich zeige euch, wie ihr Wassermelonen ganz einfach im Pflanzsack ziehen könnt. Es ist einfacher als ihr denkt und das Ergebnis ist einfach köstlich!
Was ihr für den Wassermelonen-Anbau im Pflanzsack braucht:
* Wassermelonensamen: Wählt eine Sorte, die für den Anbau im Topf geeignet ist. Kleinere Sorten wie “Sugar Baby” oder “Bush Sugar Baby” sind ideal.
* Pflanzsack: Ein großer Pflanzsack ist wichtig! Mindestens 75 Liter Fassungsvermögen sollte er haben, besser noch 100 Liter. Wassermelonen brauchen Platz für ihre Wurzeln.
* Hochwertige Blumenerde: Eine gut drainierende, nährstoffreiche Blumenerde ist das A und O. Ich mische gerne noch etwas Kompost unter.
* Kompost: Sorgt für zusätzliche Nährstoffe und verbessert die Bodenstruktur.
* Perlit oder Vermiculit: Verbessert die Drainage und Belüftung des Bodens.
* Langzeitdünger: Wassermelonen sind Starkzehrer und brauchen ausreichend Nährstoffe.
* Gießkanne oder Schlauch: Zum regelmäßigen Gießen.
* Rankhilfe (optional): Je nach Sorte kann eine Rankhilfe sinnvoll sein, um die Pflanze zu stützen.
* Mulchmaterial (optional): Stroh oder Holzhackschnitzel helfen, die Feuchtigkeit im Boden zu halten und Unkraut zu unterdrücken.
* Geduld und Liebe: Das Wichtigste überhaupt!
Aussaat und Vorbereitung
1. Samen vorbereiten: Um die Keimung zu beschleunigen, könnt ihr die Samen vor der Aussaat für 24 Stunden in lauwarmem Wasser einweichen. Das macht die Samenschale weicher.
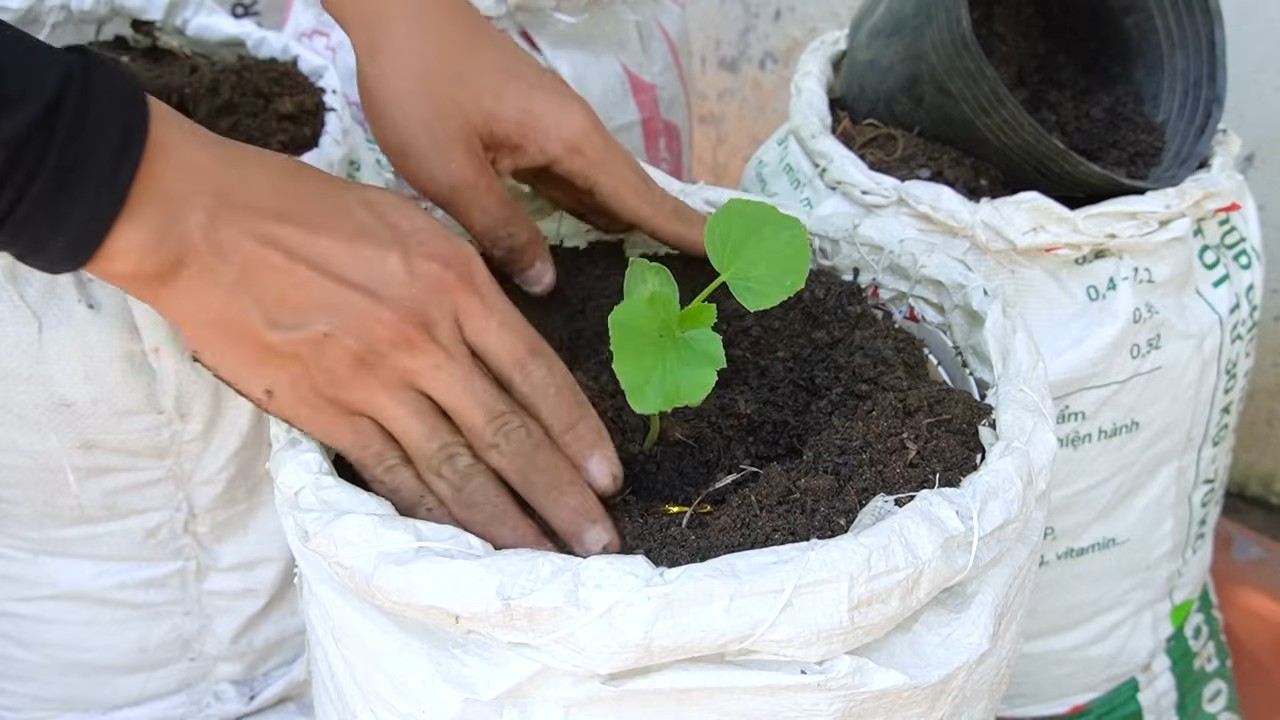
2. Vorkultur (empfohlen): Ich empfehle, die Wassermelonen im Haus vorzuziehen. Das gibt ihnen einen Vorsprung. Füllt kleine Anzuchttöpfe mit Anzuchterde und säet die Samen etwa 2 cm tief ein.
3. Warm und hell: Stellt die Töpfe an einen warmen und hellen Ort. Eine Temperatur von 22-25°C ist ideal. Haltet die Erde feucht, aber nicht nass.
4. Keimung abwarten: Nach etwa 7-14 Tagen sollten die Samen keimen.
5. Pflanzsack vorbereiten: Während die Samen keimen, könnt ihr den Pflanzsack vorbereiten. Füllt ihn mit der Blumenerde-Kompost-Mischung. Achtet darauf, dass der Sack gut gefüllt ist, aber nicht zu fest. Lasst oben etwa 5-10 cm Platz.
6. Langzeitdünger einarbeiten: Mischt den Langzeitdünger gemäß den Anweisungen auf der Packung unter die Erde.
Pflanzung der Wassermelonen
1. Abhärten: Bevor ihr die Jungpflanzen in den Pflanzsack setzt, solltet ihr sie einige Tage lang abhärten. Stellt sie tagsüber für ein paar Stunden ins Freie, aber schützt sie vor direkter Sonneneinstrahlung und Wind.
2. Pflanzen: Wenn die Jungpflanzen etwa 10-15 cm groß sind und kräftige Wurzeln haben, könnt ihr sie in den Pflanzsack pflanzen. Macht ein Loch in die Erde, das groß genug für den Wurzelballen ist. Setzt die Pflanze vorsichtig hinein und füllt das Loch mit Erde auf. Drückt die Erde leicht an.
3. Gießen: Gießt die Pflanzen nach dem Einpflanzen gründlich an.
4. Mulchen (optional): Verteilt eine Schicht Mulchmaterial um die Pflanzen herum. Das hilft, die Feuchtigkeit im Boden zu halten und Unkraut zu unterdrücken.
Pflege der Wassermelonenpflanzen
1. Gießen: Wassermelonen brauchen viel Wasser, besonders während der Fruchtbildung. Gießt regelmäßig und gründlich, besonders an heißen Tagen. Achtet darauf, dass die Erde nicht austrocknet. Am besten gießt ihr morgens, damit die Blätter über den Tag abtrocknen können. Vermeidet es, die Blätter direkt zu gießen, um Pilzkrankheiten vorzubeugen.
2. Düngen: Wassermelonen sind Starkzehrer und brauchen regelmäßig Dünger. Verwendet einen Flüssigdünger für Gemüse oder einen speziellen Wassermelonendünger. Düngt alle 2-3 Wochen gemäß den Anweisungen auf der Packung.
3. Rankhilfe (optional): Wenn ihr eine rankende Sorte angebaut habt, benötigt die Pflanze eine Rankhilfe. Ihr könnt einen Obelisken, ein Spalier oder einfach ein paar Stöcke verwenden. Bindet die Triebe vorsichtig an der Rankhilfe fest.
4. Ausgeizen: Entfernt regelmäßig Seitentriebe, um die Energie der Pflanze auf die Fruchtbildung zu konzentrieren. Lasst nur die Haupttriebe wachsen.
5. Bestäubung: Wassermelonen sind auf die Bestäubung durch Bienen und andere Insekten angewiesen. Wenn ihr wenig Insekten in eurem Garten habt, könnt ihr die Blüten auch von Hand bestäuben. Nehmt dazu einen weichen Pinsel und übertragt den Pollen von den männlichen auf die weiblichen Blüten. Die weiblichen Blüten erkennt ihr an dem kleinen Fruchtansatz direkt unter der Blüte.
6. Fruchtansatz unterstützen: Wenn die Früchte größer werden, kann es sinnvoll sein, sie mit einem Stück Stoff oder Stroh zu unterlegen, damit sie nicht direkt auf der Erde liegen. Das verhindert Fäulnis.
7. Schutz vor Schädlingen und Krankheiten: Achtet auf Schädlinge wie Blattläuse oder Schnecken. Bekämpft sie bei Bedarf mit natürlichen Mitteln. Auch Pilzkrankheiten können auftreten. Sorgt für eine gute Belüftung und vermeidet es, die Blätter direkt zu gießen.
Ernte der Wassermelonen
1. Reife erkennen: Die Reife der Wassermelonen zu erkennen, ist nicht immer einfach. Es gibt aber ein paar Anzeichen, auf die ihr achten könnt:
* Die Stelle, an der die Melone auf dem Boden liegt, wird gelblich.
* Die Ranke, die mit der Melone verbunden ist, wird trocken und braun.
* Wenn ihr auf die Melone klopft, sollte sie hohl klingen.
2. Ernten: Wenn die Melone reif ist, könnt ihr sie mit einem scharfen Messer oder einer Gartenschere von der Ranke abschneiden. Lasst dabei einen kleinen Stiel an der Melone.
3. Genießen: Jetzt könnt ihr eure selbst gezogene Wassermelone genießen! Sie schmeckt am besten, wenn sie gut gekühlt ist.
Zusätzliche Tipps für den erfolgreichen Wassermelonen-Anbau im Pflanzsack:
* Sonniger Standort: Wassermelonen brauchen viel Sonne! Wählt einen Standort, an dem die Pflanzen mindestens 6-8 Stunden Sonne pro Tag bekommen.
* Windschutz: Schützt die Pflanzen vor starkem Wind.
* Regelmäßige Kontrolle: Kontrolliert die Pflanzen regelmäßig auf Schädlinge und Krankheiten.
* Geduld: Der Anbau von Wassermelonen braucht Zeit und Geduld. Lasst euch nicht entmutigen, wenn es nicht gleich beim ersten Mal klappt.
Ich hoffe, diese Anleitung hilft euch dabei, eure eigenen Wassermelonen im Pflanzsack anzubauen. Es ist ein tolles Gefühl, die Früchte seiner Arbeit zu ernten und eine selbst gezogene Wassermelone schmeckt einfach unschlagbar! Viel Erfolg und lasst es euch schmecken!
Conclusion
So, there you have it! Growing cantaloupe in grow bags isn’t just a gardening trend; it’s a game-changer for anyone who dreams of savoring the sweet, juicy taste of homegrown cantaloupe, regardless of their space constraints. We’ve walked through the process, highlighting the benefits and addressing potential challenges, and hopefully, you’re now feeling confident and ready to embark on your own cantaloupe-growing adventure.
Why is this DIY trick a must-try? Because it democratizes cantaloupe cultivation! No longer do you need acres of land or a sprawling garden to enjoy this summer delicacy. Grow bags offer a contained, manageable environment that’s perfect for patios, balconies, or even small yards. They provide excellent drainage, prevent soilborne diseases, and allow you to move your plants to the sunniest spots as needed. Plus, the satisfaction of nurturing a cantaloupe from seed to harvest is simply unparalleled.
But don’t stop there! Experiment with different varieties of cantaloupe to find your personal favorite. Try ‘Athena’ for its disease resistance, ‘Hales Best Jumbo’ for its classic flavor, or even a smaller, personal-sized variety like ‘Sugar Cube’ if you’re particularly short on space. You can also explore companion planting to enhance your cantaloupe’s growth. Marigolds can deter pests, while basil can improve the flavor of the fruit. Consider adding a trellis or support system as your cantaloupe vines grow, especially if you’re using a smaller grow bag. This will help to keep the fruit off the ground and prevent rot.
Remember, gardening is a journey of learning and discovery. Don’t be afraid to make mistakes, experiment with different techniques, and adapt your approach as needed. The most important thing is to have fun and enjoy the process.
We are incredibly excited for you to try growing cantaloupe in grow bags! We are confident that you will be amazed by the results.
Now, we want to hear from you! Have you tried growing cantaloupe in grow bags before? What were your experiences? What tips and tricks did you learn along the way? Share your stories, photos, and questions in the comments below. Let’s create a community of cantaloupe enthusiasts and learn from each other. Your insights could be invaluable to someone just starting out. So, grab your grow bags, sow those seeds, and get ready to enjoy the sweet taste of success! Let us know how your **grow bag cantaloupe** journey unfolds!
Frequently Asked Questions (FAQ)
What size grow bag is best for cantaloupe?
The ideal grow bag size for cantaloupe is typically between 15 and 25 gallons. This provides ample space for the root system to develop and supports the vigorous growth of the vines. While you might be tempted to use a smaller bag, remember that cantaloupes are heavy feeders and need plenty of nutrients and water. A larger bag also helps to retain moisture, which is crucial during hot summer months. If you’re growing a smaller variety of cantaloupe, you might get away with a 10-gallon bag, but for most standard varieties, err on the side of larger.
What type of soil should I use in my grow bag for cantaloupe?
Cantaloupes thrive in well-draining, nutrient-rich soil. A good mix would be equal parts of compost, potting soil, and perlite or vermiculite. The compost provides essential nutrients, the potting soil offers a good base for root growth, and the perlite or vermiculite improves drainage and aeration. Avoid using garden soil directly in your grow bag, as it can be too heavy and compact, hindering root development. You can also amend your soil with slow-release fertilizer to provide a steady supply of nutrients throughout the growing season.
How often should I water my cantaloupe plants in grow bags?
Watering frequency depends on several factors, including the weather, the size of your grow bag, and the stage of plant growth. Generally, you should water deeply whenever the top inch of soil feels dry to the touch. During hot, sunny weather, this might mean watering daily, especially if your grow bag is smaller. Be careful not to overwater, as this can lead to root rot. Ensure your grow bag has adequate drainage holes to prevent waterlogging. A good way to check if your cantaloupe needs water is to lift the grow bag. If it feels light, it’s likely time to water.
How much sunlight do cantaloupe plants need in grow bags?
Cantaloupes are sun-loving plants and need at least 6-8 hours of direct sunlight per day to thrive. Choose a location for your grow bag that receives ample sunlight throughout the day. If you live in a particularly hot climate, you might consider providing some afternoon shade to prevent the plants from overheating. If you’re growing cantaloupe indoors or in a location with limited sunlight, you might need to supplement with grow lights.
How do I fertilize cantaloupe plants in grow bags?
Cantaloupes are heavy feeders and require regular fertilization to produce sweet, juicy fruits. Start by incorporating slow-release fertilizer into your soil mix at planting time. Then, supplement with liquid fertilizer every 2-3 weeks throughout the growing season. Use a balanced fertilizer (e.g., 10-10-10) early in the season to promote vegetative growth, and then switch to a fertilizer with a higher phosphorus and potassium content (e.g., 5-10-10) once the plants start to flower and set fruit. Avoid over-fertilizing, as this can lead to excessive foliage growth at the expense of fruit production.
How do I prevent pests and diseases from affecting my cantaloupe plants in grow bags?
Growing cantaloupe in grow bags can actually help to minimize pest and disease problems, as it isolates the plants from soilborne pathogens. However, it’s still important to take preventative measures. Regularly inspect your plants for signs of pests or diseases, such as aphids, squash bugs, or powdery mildew. Remove any affected leaves or plants promptly. You can also use organic pest control methods, such as insecticidal soap or neem oil, to control pests. Ensure good air circulation around your plants to prevent fungal diseases. Consider using companion planting to deter pests and attract beneficial insects.
How long does it take to grow cantaloupe in grow bags?
The time it takes to grow cantaloupe from seed to harvest varies depending on the variety, climate, and growing conditions. Generally, it takes between 75 and 90 days for cantaloupes to mature. Start seeds indoors 4-6 weeks before the last expected frost, and then transplant them into your grow bags once the weather has warmed up. Be patient, and don’t harvest the fruits until they are fully ripe. A ripe cantaloupe will have a sweet aroma, a slightly softened rind, and a stem that easily slips from the vine.
Can I grow more than one cantaloupe plant in a single grow bag?
While it’s technically possible to grow more than one cantaloupe plant in a large grow bag, it’s generally not recommended. Cantaloupe plants need plenty of space to spread out and develop a strong root system. Overcrowding can lead to stunted growth, reduced fruit production, and increased susceptibility to pests and diseases. For best results, stick to one cantaloupe plant per grow bag.
What are some signs that my cantaloupe is ready to harvest?
Knowing when to harvest your cantaloupe is crucial for enjoying its full flavor and sweetness. Here are some key signs to look for:
* **Aroma:** A ripe cantaloupe will have a sweet, musky aroma, especially near the stem end.
* **Color:** The rind will change color from green to a tan or yellowish hue, depending on the variety.
* **Stem Slip:** The stem will easily slip from the vine with a gentle tug. This is the most reliable indicator of ripeness.
* **Sound:** When you tap on the cantaloupe, it should sound hollow.
* **Softness:** The blossom end (opposite the stem end) will be slightly soft to the touch.
Don’t be afraid to taste a small piece of the cantaloupe to confirm its ripeness before harvesting the entire fruit.
Can I reuse grow bags for growing cantaloupe next year?
Yes, you can definitely reuse grow bags for growing cantaloupe or other crops in subsequent years. However, it’s important to properly clean and prepare the bags before reusing them. Remove any remaining plant debris and soil from the bag. Wash the bag thoroughly with soap and water to remove any dirt or pathogens. Allow the bag to dry completely before storing it. You might also consider amending the soil with fresh compost or fertilizer before planting again. Inspect the bag for any signs of damage, such as tears or holes, and repair them as needed. With proper care, grow bags can last for several seasons, making them a cost-effective and sustainable gardening solution.

Leave a Comment