
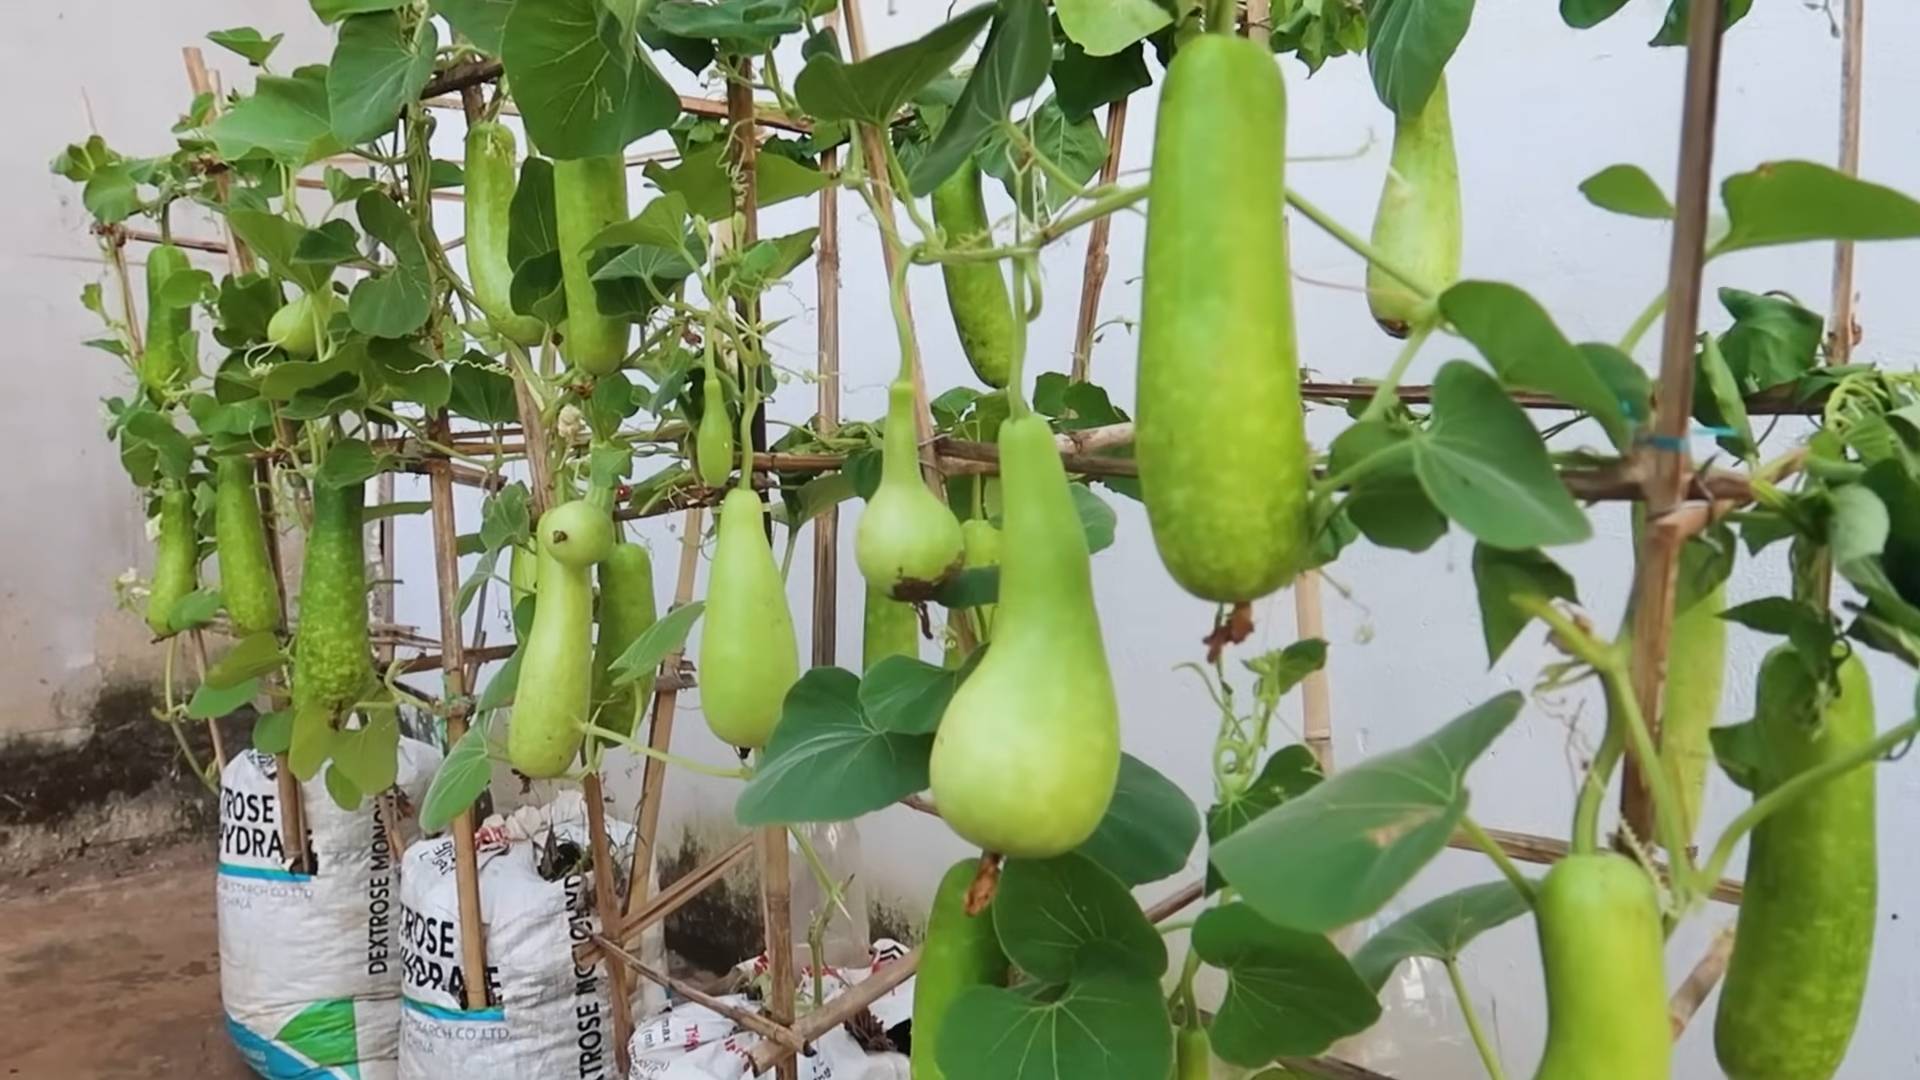
Grow Bag Gourd Harvest: Imagine stepping into your backyard and being greeted by a vibrant display of gourds, all grown effortlessly in simple grow bags! Sounds like a dream, right? Well, it doesn’t have to be! For centuries, gourds have held a special place in various cultures, used for everything from crafting musical instruments to creating beautiful decorative pieces. Think about the intricate designs painted on gourds in indigenous communities – a testament to their versatility and beauty.
But let’s be honest, not everyone has acres of land to dedicate to sprawling gourd vines. That’s where the magic of grow bags comes in! I’m going to show you how to achieve a bountiful grow bag gourd harvest, even if you’re working with a small balcony or patio. This DIY guide is packed with simple tricks and hacks that will transform your limited space into a gourd-growing paradise.
Why do you need this? Because growing your own gourds is incredibly rewarding! Not only will you have a unique and sustainable source of materials for crafts and decorations, but you’ll also experience the joy of nurturing something from seed to harvest. Plus, it’s a fantastic way to connect with nature and add a touch of whimsy to your outdoor space. So, grab your grow bags, and let’s get started on this exciting gourd-growing adventure!
Grow Bag Gourd Harvest: From Seed to Stunning Decor
Alright, gourd enthusiasts! Get ready to transform your outdoor space and your fall decor with this comprehensive guide to growing gourds in grow bags. I’ve found this method to be incredibly rewarding, especially if you’re short on space or dealing with less-than-ideal soil conditions. Let’s dive into everything you need to know, from selecting the right gourds to harvesting and curing your beautiful creations.
Choosing Your Gourd Varieties
First things first, you need to decide what kind of gourds you want to grow! The possibilities are endless, and this is where the fun really begins. Consider what you want to *do* with your gourds after harvest. Are you aiming for decorative pieces, birdhouses, dippers, or something else entirely?
Here are a few popular choices:
* Ornamental Gourds: These come in a dazzling array of shapes, sizes, and colors. Think warty gourds, apple gourds, pear gourds, and swan gourds. They’re perfect for fall displays and crafting.
* Luffa Gourds: Yes, you can grow your own sponges! Luffas require a long growing season and plenty of support, but the reward is a natural, exfoliating scrub.
* Birdhouse Gourds: These large, bottle-shaped gourds are ideal for creating cozy homes for your feathered friends.
* Dippers: Long-handled dipper gourds are perfect for, well, dipping! They add a rustic touch to your kitchen or garden.
* Bushel Gourds: These are the giants of the gourd world! They can grow to enormous sizes and are often used for carving or painting.
Important Tip: Check your local climate and growing season before selecting your gourd varieties. Some gourds require a longer growing season than others.
Gathering Your Supplies
Before we get our hands dirty, let’s make sure we have everything we need. Here’s a checklist:
* Grow Bags: I recommend using grow bags that are at least 15-20 gallons in size for most gourd varieties. Larger gourds, like bushel gourds, will need even bigger bags (25-30 gallons). Fabric grow bags are ideal because they allow for good drainage and aeration.
* Potting Mix: Use a high-quality potting mix that is well-draining and rich in organic matter. Avoid using garden soil, as it can become compacted in grow bags.
* Gourd Seeds: Purchase seeds from a reputable source.
* Trellis or Support System: Gourds are vines and need something to climb on. A sturdy trellis, fence, or even a DIY support system will work.
* Fertilizer: A balanced fertilizer (e.g., 10-10-10) or a fertilizer specifically formulated for vegetables will help your gourds thrive.
* Watering Can or Hose: For regular watering.
* Gloves: To protect your hands.
* Pruning Shears: For trimming vines and removing unwanted growth.
* Optional: Seed starting trays, heat mat, grow light (if starting seeds indoors).
Starting Your Gourd Seeds
You have two options here: direct sowing or starting seeds indoors. I prefer starting seeds indoors, especially if you live in a region with a shorter growing season.
Starting Seeds Indoors:
1. Sow Seeds: Fill seed starting trays or small pots with potting mix. Plant 2-3 gourd seeds per cell or pot, about 1 inch deep.
2. Water Gently: Water the soil gently to moisten it, but avoid overwatering.
3. Provide Warmth: Gourds need warmth to germinate. Place the trays or pots on a heat mat or in a warm location.
4. Provide Light: Once the seedlings emerge, provide them with plenty of light. A grow light is ideal, but a sunny windowsill can also work.
5. Thin Seedlings: Once the seedlings have developed a few true leaves, thin them to one seedling per cell or pot. Choose the strongest, healthiest seedling.
6. Harden Off: Before transplanting the seedlings outdoors, you need to harden them off. This means gradually exposing them to outdoor conditions over a period of 7-10 days. Start by placing them in a sheltered location for a few hours each day, gradually increasing the amount of time they spend outdoors.
Direct Sowing:
1. Prepare Grow Bags: Fill your grow bags with potting mix.
2. Sow Seeds: Plant 2-3 gourd seeds per grow bag, about 1 inch deep.
3. Water Gently: Water the soil gently to moisten it, but avoid overwatering.
4. Provide Support: Install your trellis or support system near the grow bags.
Transplanting and Growing Your Gourds
Once your seedlings are hardened off (or your direct-sown seedlings have emerged), it’s time to transplant them into their grow bags.
1. Prepare Grow Bags: If you haven’t already, fill your grow bags with potting mix.
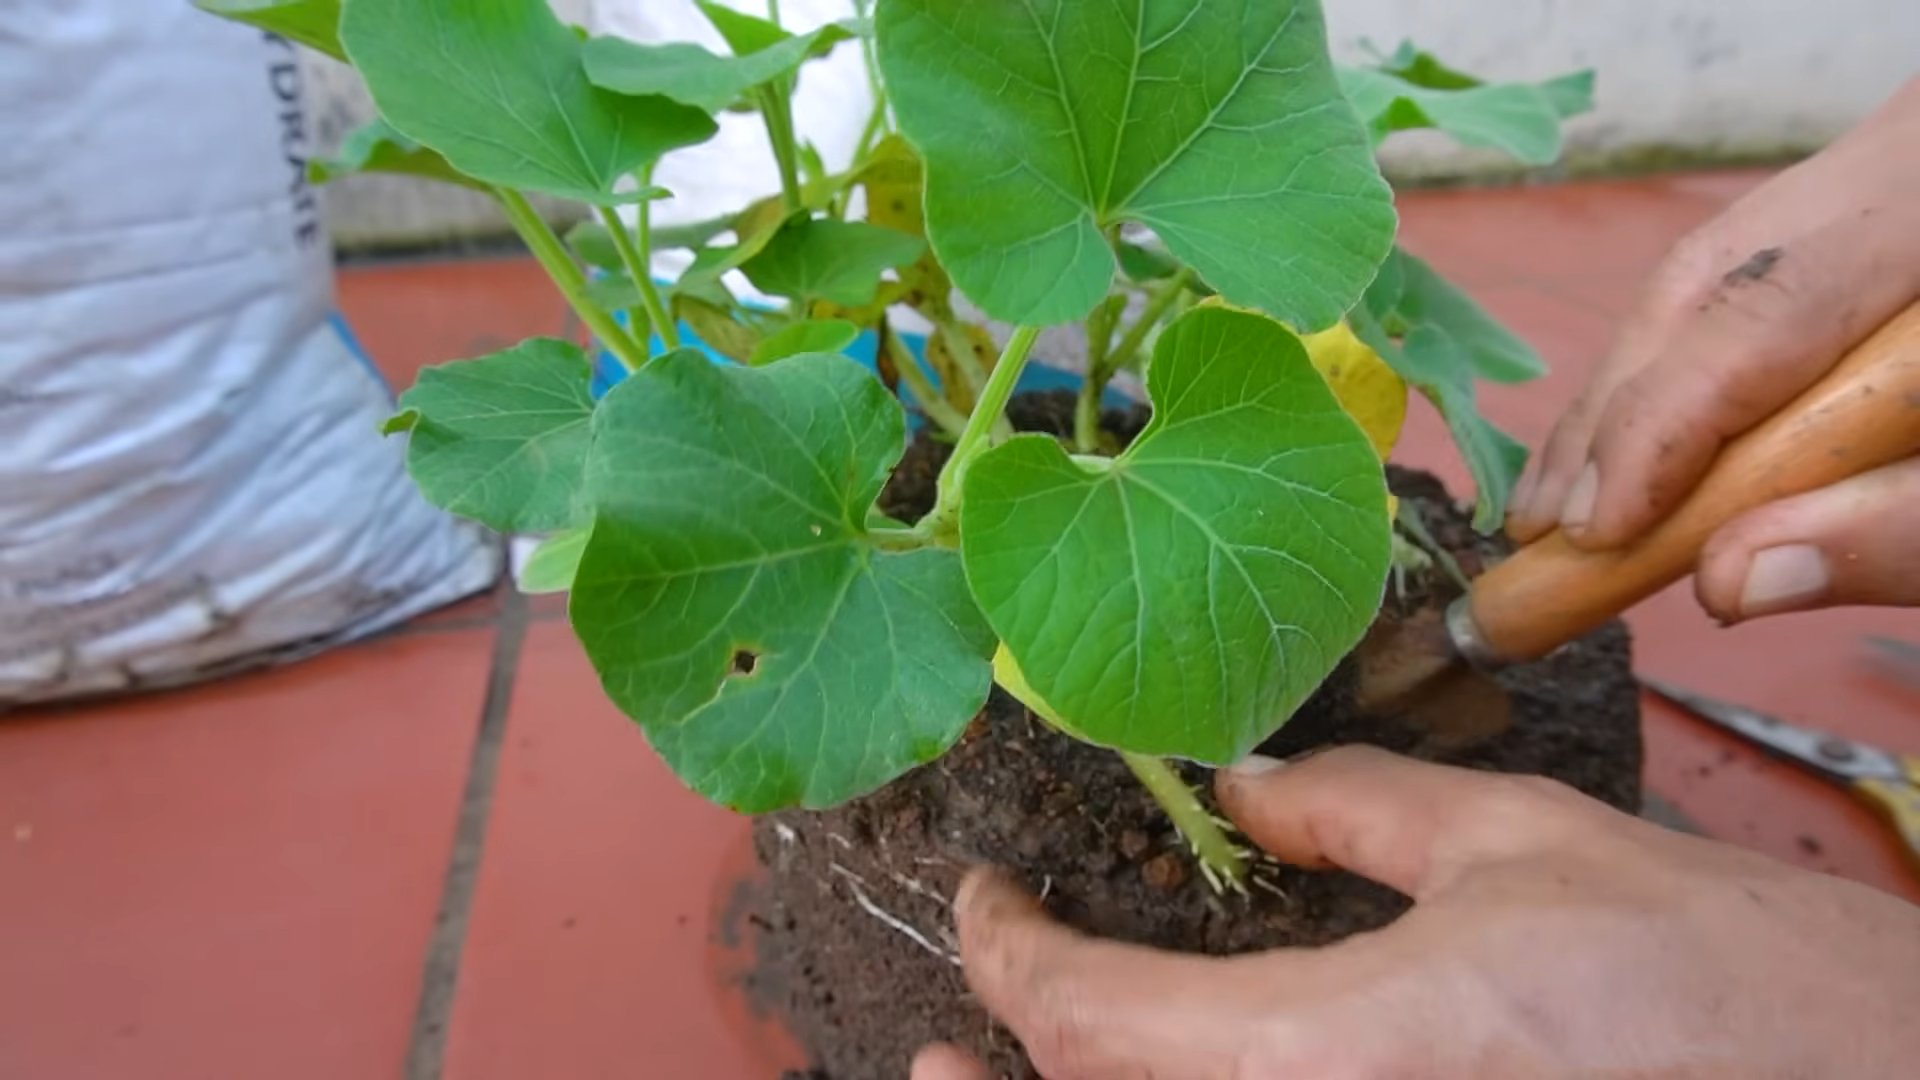
2. Transplant Seedlings: Gently remove the seedlings from their trays or pots and plant them in the grow bags. Space them according to the mature size of the gourd variety you’re growing.
3. Water Thoroughly: Water the seedlings thoroughly after transplanting.
4. Provide Support: Train the vines to climb your trellis or support system. You may need to gently tie them to the support structure as they grow.
5. Fertilize Regularly: Feed your gourds with a balanced fertilizer every 2-3 weeks. Follow the instructions on the fertilizer package.
6. Water Regularly: Gourds need consistent moisture, especially during hot weather. Water deeply whenever the top inch of soil feels dry.
7. Prune as Needed: Prune away any dead or diseased leaves or vines. You can also prune the vines to encourage bushier growth and more fruit production.
8. Pollination: Gourds have separate male and female flowers. Bees and other pollinators are essential for pollination. If you’re not seeing many bees in your garden, you may need to hand-pollinate the flowers. To hand-pollinate, use a small paintbrush to transfer pollen from the male flowers to the female flowers. Female flowers have a small, immature gourd at the base of the flower.
Harvesting Your Gourds
The timing of your harvest will depend on the gourd variety you’re growing. Generally, gourds are ready to harvest when the stems have dried and turned brown. The gourd itself should feel hard and heavy.
1. Check for Maturity: Before harvesting, make sure the gourd is fully mature. The stem should be completely dry and brown, and the gourd should feel hard and heavy.
2. Cut the Stem: Use pruning shears to cut the stem, leaving about 2-3 inches of stem attached to the gourd.
3. Handle with Care: Gourds can bruise easily, so handle them with care.
Curing Your Gourds
Curing is essential for preserving your gourds and preventing them from rotting.
1. Clean the Gourds: Gently wash the gourds with a mild soap and water solution to remove any dirt or debris.
2. Dry the Gourds: Place the gourds in a well-ventilated area, such as a garage or shed. Avoid direct sunlight, as this can cause the gourds to crack.
3. Elevate the Gourds: Place the gourds on a wire rack or pallets to allow for good air circulation.
4. Monitor for Rot: Check the gourds regularly for signs of rot. Discard any gourds that show signs of decay.
5. Curing Time: Curing can take several weeks or even months, depending on the size and variety of the gourd. The gourds are fully cured when they are lightweight and the seeds rattle inside.
Decorating and Crafting with Your Gourds
Once your gourds are cured, the real fun begins! The possibilities for decorating and crafting with gourds are endless.
* Painting: Paint your gourds with acrylic paints to create colorful and unique designs.
* Carving: Carve intricate designs into your gourds using carving tools.
* Wood Burning: Use a wood-burning tool to create detailed patterns on your gourds.
* Decoupage: Decoupage your gourds with paper, fabric, or other materials.
* Birdhouses: Turn your birdhouse gourds into cozy homes for your feathered friends.
* Lamps: Create unique lamps by drilling holes in your gourds and adding a light fixture.
* Bowls and Containers: Cut your gourds in half and use them as bowls or containers.
Important Tip: Always wear a dust mask when sanding or carving gourds, as the dust can
Conclusion
So, there you have it! Transforming your gourd-growing experience with this simple, yet incredibly effective, grow bag method is a game-changer. We’ve walked you through the process, highlighting the benefits of improved drainage, enhanced root aeration, and the overall convenience of container gardening. But why is this DIY trick a must-try?
Simply put, it’s about maximizing your yield and minimizing the hassle. Traditional in-ground gardening can be unpredictable, subject to soil conditions, pests, and drainage issues that can significantly impact your gourd harvest. Grow bags offer a controlled environment, allowing you to tailor the soil composition, manage watering more effectively, and even move your plants to optimize sunlight exposure. This level of control translates to healthier plants, more abundant gourds, and a more rewarding gardening experience overall.
Beyond the core method, there’s plenty of room for experimentation and personalization. Consider these variations to further enhance your gourd-growing journey:
* Vertical Support Systems: For vining gourd varieties, integrate a trellis or other vertical support system directly into or alongside your grow bag. This will not only save space but also improve air circulation around the plant, reducing the risk of fungal diseases.
* Companion Planting: Plant compatible herbs or flowers around the base of your gourds in the grow bag. Marigolds, for example, are known to deter pests, while basil can enhance the flavor of nearby vegetables (if you’re growing edible gourds).
* Nutrient Boosters: While a well-prepared soil mix is crucial, supplementing with organic fertilizers or compost tea throughout the growing season can provide an extra boost of nutrients, leading to even larger and healthier gourds. Consider adding bone meal for phosphorus and kelp meal for potassium.
* Gourd Variety Selection: Experiment with different gourd varieties to find the ones that thrive best in your grow bag setup and climate. Some gourds are naturally more compact and well-suited for container gardening than others.
* Watering Techniques: Implement a drip irrigation system or use self-watering grow bags to ensure consistent moisture levels, especially during hot and dry periods. This will prevent the soil from drying out too quickly and stressing your plants.
We are confident that this grow bag gourd harvest method will revolutionize your gardening efforts. It’s a cost-effective, space-saving, and highly efficient way to cultivate beautiful and bountiful gourds, regardless of your gardening experience level.
Now, it’s your turn! We wholeheartedly encourage you to try this DIY trick and witness the difference it makes in your gourd garden. Don’t be afraid to experiment with different variations and find what works best for you. And most importantly, share your experiences with us! We’d love to hear about your successes, challenges, and any innovative techniques you discover along the way. Post photos of your grow bag gourds on social media using #GrowBagGourds and tag us so we can celebrate your harvest with you. Let’s build a community of passionate gourd growers and learn from each other’s experiences. Happy gardening!
Frequently Asked Questions (FAQ)
Q: What size grow bag is best for growing gourds?
A: The ideal grow bag size depends on the specific gourd variety you’re planning to grow. For smaller, bush-type gourds, a 10-gallon grow bag may suffice. However, for larger, vining varieties, we recommend using a 20-gallon or even a 30-gallon grow bag to provide ample space for root development. Remember, the larger the bag, the more soil volume and nutrients available to support the plant’s growth.
Q: What type of soil should I use in my grow bag for gourds?
A: Gourds thrive in well-draining, nutrient-rich soil. A good mix would be equal parts of high-quality potting mix, compost, and perlite or vermiculite. The potting mix provides a base for nutrients, the compost adds organic matter and improves soil structure, and the perlite or vermiculite enhances drainage and aeration. Avoid using garden soil directly in your grow bag, as it can be too heavy and compact, hindering root growth.
Q: How often should I water my gourds in grow bags?
A: Watering frequency depends on several factors, including the weather, the size of the grow bag, and the gourd variety. Generally, you should water your gourds when the top inch of soil feels dry to the touch. During hot and dry periods, you may need to water daily or even twice a day. Ensure that the water drains freely from the bottom of the bag to prevent waterlogging. Overwatering can lead to root rot, so it’s crucial to monitor the soil moisture levels carefully.
Q: Do I need to fertilize my gourds in grow bags?
A: Yes, gourds are heavy feeders and benefit from regular fertilization, especially when grown in grow bags. Start with a slow-release fertilizer incorporated into the soil mix at planting time. Then, supplement with liquid fertilizer every 2-3 weeks throughout the growing season. Choose a fertilizer that is specifically formulated for vegetables or fruits, and follow the instructions on the label. Look for a balanced fertilizer with equal amounts of nitrogen, phosphorus, and potassium (e.g., 10-10-10).
Q: How much sunlight do gourds need when grown in grow bags?
A: Gourds require at least 6-8 hours of direct sunlight per day to thrive. Choose a location for your grow bags that receives ample sunlight throughout the day. If you live in a particularly hot climate, you may need to provide some afternoon shade to prevent the plants from overheating.
Q: How do I prevent pests and diseases from affecting my gourds in grow bags?
A: Prevention is key when it comes to pests and diseases. Start by using disease-resistant gourd varieties and ensuring that your plants have good air circulation. Regularly inspect your plants for signs of pests or diseases, such as aphids, squash bugs, or powdery mildew. If you spot any problems, take action immediately. You can use organic pest control methods, such as insecticidal soap or neem oil, to control pests. For fungal diseases, try spraying with a copper fungicide or baking soda solution.
Q: Can I reuse grow bags for growing gourds next year?
A: Yes, grow bags can be reused for several seasons if properly cared for. After harvesting your gourds, empty the grow bag and remove any remaining plant debris. Wash the bag thoroughly with soap and water to remove any dirt or pathogens. Allow the bag to dry completely before storing it in a cool, dry place. Before reusing the bag, amend the soil with fresh compost and fertilizer to replenish nutrients.
Q: What are some common problems when growing gourds in grow bags and how can I fix them?
A: Some common problems include:
* Poor drainage: Ensure that your grow bag has adequate drainage holes and that the soil mix is well-draining.
* Nutrient deficiencies: Fertilize regularly with a balanced fertilizer.
* Pests and diseases: Monitor your plants regularly and take action immediately if you spot any problems.
* Sunscald: Provide some afternoon shade during hot weather.
* Pollination issues: Hand-pollinate your gourds if necessary, especially if you’re not seeing many bees or other pollinators in your garden.
Q: Can I grow different types of gourds in the same grow bag?
A: While it’s technically possible to grow multiple gourd plants in a single large grow bag, it’s generally not recommended. Different gourd varieties may have different growth habits and nutrient requirements, which can lead to competition and reduced yields. It’s best to give each gourd plant its own dedicated grow bag to ensure optimal growth and development.
Q: How do I know when my gourds are ready to harvest from the grow bag?
A: The timing of harvest depends on the specific gourd variety and your intended use. Generally, gourds are ready to harvest when the stems have dried and turned brown, and the skin is hard and resistant to scratching. For ornamental gourds, allow them to dry completely on the vine before harvesting. For edible gourds, harvest them when they are mature but still tender.
Leave a Comment