
Grow Bean Sprouts Container: Unlock the secrets to fresh, crunchy sprouts right in your kitchen! Forget those bland, store-bought sprouts – I’m going to show you how incredibly easy it is to cultivate your own vibrant batch using a simple container. For centuries, sprouting has been a cornerstone of healthy diets in many cultures, particularly in Asian cuisine, where they’re prized for their nutritional value and delicate flavor. Think of the crisp bean sprouts in your favorite Pad Thai or the fresh crunch they add to a Vietnamese spring roll – now you can have that freshness at your fingertips!
But why should you bother with this DIY project? Well, for starters, it’s incredibly cost-effective. A handful of beans can yield a surprisingly large harvest of sprouts. Plus, you have complete control over the growing process, ensuring they’re free from pesticides and other unwanted chemicals. In today’s world, where we’re all looking for ways to eat healthier and be more sustainable, learning to grow bean sprouts container style is a game-changer. I’ll guide you through the entire process, from selecting the right beans to maintaining optimal growing conditions, so you can enjoy a continuous supply of delicious, nutritious sprouts. Get ready to ditch the grocery store and embrace the joy of homegrown goodness!
DIY Bean Sprout Growing Container: Fresh Sprouts in Your Kitchen!
Hey there, fellow DIY enthusiasts! Are you ready to ditch those store-bought, sometimes-questionable bean sprouts and grow your own fresh, crunchy goodness right in your kitchen? I’m going to walk you through building a super simple, effective bean sprout growing container. Trust me, it’s easier than you think, and the reward of having fresh sprouts on hand is totally worth it.
What You’ll Need
Before we dive in, let’s gather our supplies. This is a budget-friendly project, so you probably have most of these items lying around already.
* Two Plastic Containers: One should fit comfortably inside the other. Think yogurt tubs, margarine containers, or even repurposed takeout containers. The key is that the inner container needs to have drainage holes.
* Drill or Awl: For creating those all-important drainage holes.
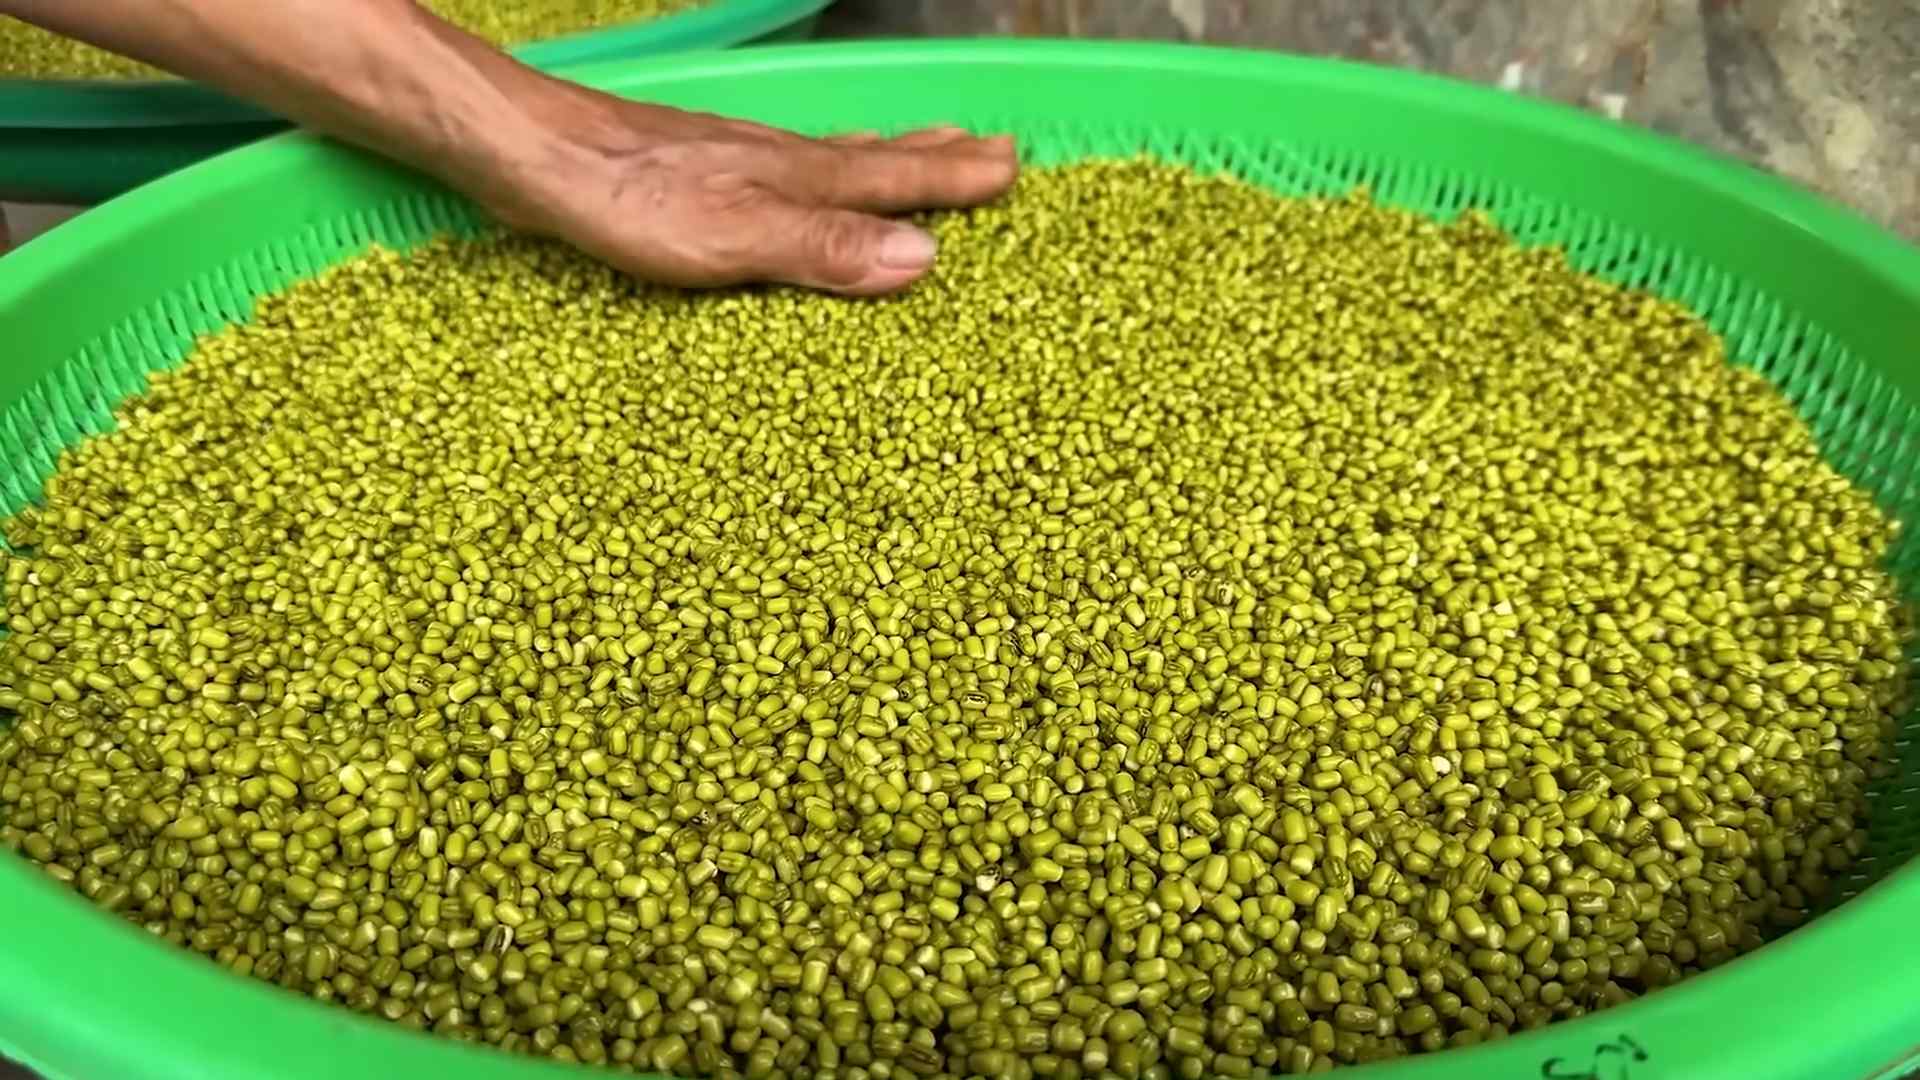
* Bean Sprouts Seeds: Mung beans are the classic choice, but you can also experiment with adzuki beans, lentils, or even alfalfa seeds. Make sure they’re specifically labeled for sprouting!
* Dark Cloth or Towel: To block out light, which is crucial for sprout growth.
* Water: Filtered water is best, but tap water works too.
* Spray Bottle (Optional): For misting the sprouts.
* Weight (Optional): A small plate or jar filled with water to gently press down on the sprouts. This encourages thicker, crunchier sprouts.
Building Your Bean Sprout Container
Okay, let’s get our hands dirty (well, not really dirty, since we’re working with plastic!). This part is super straightforward.
1. Prepare the Inner Container: This is where the magic happens. Take your inner container and, using your drill or awl, create drainage holes in the bottom. I usually aim for about 10-15 holes, evenly spaced. You want enough drainage so the sprouts don’t sit in water, but not so many that the seeds fall through. If you’re using a drill, be careful not to crack the plastic. Go slow and steady.
2. Nest the Containers: Place the inner container (the one with the holes) inside the outer container. The outer container will catch the excess water that drains from the inner container. Make sure the inner container sits comfortably inside the outer one without being too snug. You need some airflow.
3. Test the Drainage: Before we move on, let’s make sure our drainage system works. Pour some water into the inner container and watch it drain into the outer container. If the water drains quickly and easily, you’re good to go! If not, you might need to add a few more drainage holes.
Sprouting Your Beans: A Step-by-Step Guide
Now for the fun part: growing those sprouts! This process takes a few days, but it’s mostly hands-off.
1. Soak the Seeds: Place your bean sprout seeds in a bowl and cover them with plenty of water. The amount of seeds you use depends on the size of your container. I usually start with about 1/4 to 1/2 cup of mung beans for a medium-sized container. Let the seeds soak for at least 8 hours, or preferably overnight. This rehydrates the seeds and gets them ready to sprout. You’ll notice they’ll swell up considerably.
2. Drain and Rinse: After soaking, drain the seeds thoroughly. Rinse them with fresh water and drain again. This removes any debris or impurities.
3. Transfer to the Container: Spread the soaked seeds evenly in the inner container of your bean sprout grower. Don’t overcrowd them; they need room to grow.
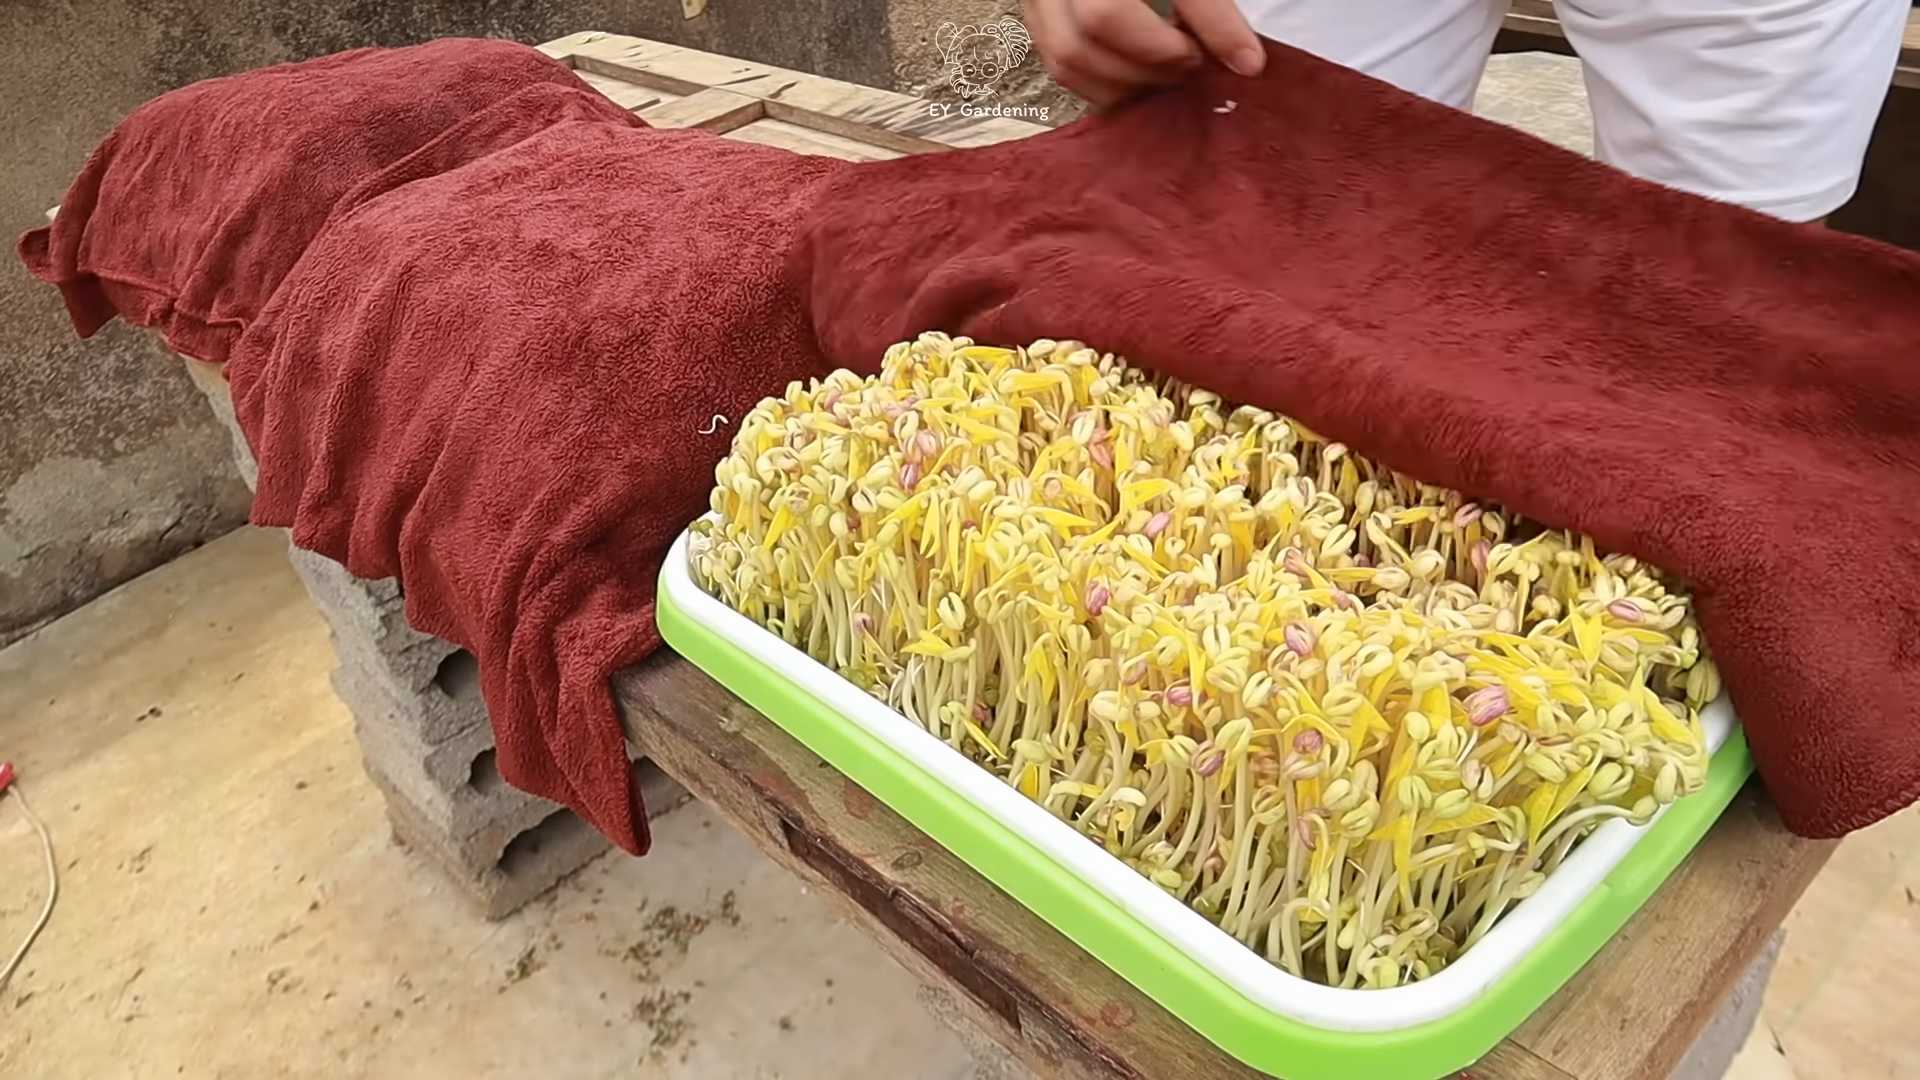
4. Cover and Weigh (Optional): Cover the seeds with a dark cloth or towel. This is essential because bean sprouts need darkness to grow properly. If you’re using a weight, place it gently on top of the cloth. The weight helps the sprouts grow thicker and crunchier. I often use a small plate with a jar of water on top.
5. Rinse and Drain Regularly: This is the most important step! Rinse and drain the sprouts at least twice a day, morning and evening. Remove the cloth and weight (if using), gently rinse the sprouts with fresh water, and then drain thoroughly. Make sure no water is pooling in the bottom of the inner container. Replace the cloth and weight after each rinse. This keeps the sprouts hydrated and prevents mold growth.
6. Maintain Darkness: Keep the container in a dark, cool place. A cupboard, pantry, or even under the sink works well. The ideal temperature is around 70-75°F (21-24°C).
7. Observe and Adjust: Check on your sprouts daily. You should start to see tiny sprouts emerging within a day or two. If the sprouts seem dry, mist them with a spray bottle in addition to rinsing. If you notice any mold growth, discard the batch and start over. Mold is usually a sign of poor drainage or insufficient rinsing.
8. Harvest Time: Your bean sprouts will be ready to harvest in about 3-5 days, depending on the type of bean and your desired length. They should be about 1-2 inches long.
9. Harvesting: To harvest, simply rinse the sprouts one last time and remove any remaining seed hulls. You can eat the entire sprout, including the root.
10. Storage: Store your harvested bean sprouts in an airtight container in the refrigerator. They’ll stay fresh for about a week.
Troubleshooting Tips
Even with the best instructions, sometimes things don’t go exactly as planned. Here are a few common issues and how to fix them:
* Mold Growth: As I mentioned earlier, mold is usually caused by poor drainage or insufficient rinsing. Make sure your container has adequate drainage holes and that you’re rinsing the sprouts thoroughly at least twice a day. If you see mold, discard the entire batch.
* Slow Growth: Slow growth can be caused by several factors, including low temperature, insufficient moisture, or poor seed quality. Make sure your container is in a warm place and that you’re rinsing the sprouts regularly. If you’re still having trouble, try using a different batch of seeds.
* Dry Sprouts: If the sprouts seem dry, mist them with a spray bottle in addition to rinsing. You can also try placing a damp paper towel over the cloth to help retain moisture.
* Bitter Taste: A bitter taste can be caused by overgrowth or exposure to light. Harvest the sprouts when they’re young and tender, and make sure they’re kept in a dark place.
Experimenting with Different Beans
Mung beans are the classic choice for bean sprouts, but don’t be afraid to experiment with other types of beans and seeds! Adzuki beans, lentils, alfalfa seeds, and even radish seeds can be sprouted. Each type of bean has a slightly different flavor and texture. Just be sure to use seeds that are specifically labeled for sprouting, as some seeds may be treated with chemicals that are not safe for consumption.
Using Your Homegrown Bean Sprouts
Now that you have a bounty of fresh bean sprouts, what are you going to do with them? The possibilities are endless! Here are a few ideas:
* Salads: Add bean sprouts to your favorite salads for a crunchy, refreshing boost.
* Stir-fries: Bean sprouts are a classic ingredient in stir-fries. Add them towards the end of cooking to retain their crispness.
* Sandwiches and Wraps: Add bean sprouts to sandwiches and wraps for extra texture and flavor.
* Soups: Bean sprouts can be added to soups for a nutritious and flavorful garnish.
* Spring Rolls: Bean sprouts are a key ingredient in fresh spring rolls.
* Just Eat Them Raw: I love snacking on them straight from the container!
Why Grow Your Own Bean Sprouts?
Besides being incredibly easy and cost-effective, growing your own bean sprouts has several other advantages:
* Freshness: You can’t beat the taste of freshly grown bean sprouts. They’re much more flavorful and crunchy than store-bought sprouts.
* Nutrition: Bean sprouts are packed with vitamins, minerals, and enzymes.
* Control: You have complete control over the growing process, so you know exactly what you’re eating.
* Sustainability: Growing your own bean sprouts reduces your reliance on commercially produced food, which can have a significant environmental impact.
* It’s Fun! Seriously, it’s really satisfying to watch those little sprouts grow.
So, there you have it! A complete guide to building your own bean sprout growing container and growing your own fresh, delicious bean sprouts. I hope you give it a try. Happy sprouting!
Conclusion
So, there you have it! Growing your own bean sprouts at home using a simple container is not only incredibly easy, but also a rewarding experience that puts fresh, nutritious ingredients right at your fingertips. Forget those limp, flavorless sprouts from the grocery store – with this DIY trick, you’ll be enjoying crisp, vibrant bean sprouts bursting with flavor in just a few days.
Why is this a must-try? Because it’s cost-effective, sustainable, and gives you complete control over the quality of your food. You know exactly what’s going into your sprouts – no hidden chemicals or preservatives. Plus, it’s a fantastic way to reduce your reliance on store-bought produce and minimize your environmental impact. Imagine the satisfaction of adding your own homegrown bean sprouts to salads, stir-fries, sandwiches, or even enjoying them as a healthy snack!
But the fun doesn’t stop there! Feel free to experiment with different types of beans. Mung beans are the classic choice, but you can also try adzuki beans, lentils, or even chickpeas for a unique flavor profile. Consider adding a layer of cheesecloth or burlap to your container for even better drainage and sprout support. You can also adjust the sprouting time to achieve your desired sprout length and texture. Some people prefer shorter, crunchier sprouts, while others like them longer and more tender.
Ready to embark on your bean sprouting adventure? We highly encourage you to give this simple container method a try. It’s a fun, educational activity for the whole family, and the results are delicious and nutritious. Don’t be intimidated – it’s much easier than you think!
Once you’ve harvested your first batch of homegrown goodness, we’d love to hear about your experience. Share your photos, tips, and variations in the comments below. Let’s build a community of bean sprout enthusiasts and inspire others to embrace the joy of growing their own food. Happy sprouting! This method of growing your own bean sprouts container is a game changer.
Frequently Asked Questions (FAQs)
What kind of container is best for growing bean sprouts?
The ideal container for growing bean sprouts should be food-grade, clean, and allow for good drainage and airflow. A wide-mouthed jar, a plastic container with drainage holes, or even a repurposed yogurt container can work well. The key is to ensure that the container is not too deep, as this can lead to poor air circulation and mold growth. A container with a lid or cover is also beneficial to maintain humidity and darkness during the sprouting process. Make sure the container is thoroughly cleaned before each use to prevent bacterial contamination.
How often should I rinse my bean sprouts?
Rinsing your bean sprouts is crucial for their healthy growth and to prevent the formation of mold or bacteria. You should rinse them at least two to three times a day with cool, clean water. This helps to keep them hydrated and removes any accumulated waste products. When rinsing, ensure that all the sprouts are thoroughly wetted and that the water drains completely. Avoid letting the sprouts sit in stagnant water, as this can promote spoilage. In warmer climates, you may need to rinse them more frequently to maintain optimal conditions.
How long does it take for bean sprouts to grow?
The sprouting time for bean sprouts typically ranges from three to five days, depending on the type of bean, the temperature, and the humidity. Mung beans, for example, usually sprout within three to four days, while other varieties may take slightly longer. Keep the sprouts in a dark, well-ventilated area and maintain consistent moisture levels by rinsing them regularly. You’ll know they’re ready to harvest when they have reached your desired length and have developed small, white roots.
What if my bean sprouts start to smell bad?
A foul odor is a sign that your bean sprouts have likely been contaminated with bacteria or mold. This can happen if the container is not clean, the sprouts are not rinsed frequently enough, or the environment is too warm and humid. If you notice a bad smell, it’s best to discard the entire batch of sprouts to avoid any potential health risks. To prevent this from happening in the future, ensure that you use a clean container, rinse the sprouts thoroughly and regularly, and maintain a cool, well-ventilated environment.
Can I eat the bean sprout roots?
Yes, the roots of bean sprouts are perfectly edible and are often consumed along with the sprouts themselves. They are a good source of nutrients and add a slightly crunchy texture to your dishes. However, some people prefer to trim the roots before eating, as they can sometimes have a slightly bitter taste. Ultimately, it’s a matter of personal preference.
How do I store bean sprouts after harvesting?
After harvesting your bean sprouts, it’s important to store them properly to maintain their freshness and prevent spoilage. Rinse them thoroughly with cold water and gently pat them dry with a clean towel or paper towel. Store them in an airtight container or a resealable plastic bag in the refrigerator. They should last for up to a week if stored properly. Avoid storing them in a humid environment, as this can promote mold growth.
What are the nutritional benefits of bean sprouts?
Bean sprouts are a nutritional powerhouse, packed with vitamins, minerals, and antioxidants. They are a good source of vitamin C, vitamin K, folate, and fiber. They also contain essential minerals like iron, potassium, and magnesium. Bean sprouts are low in calories and fat, making them a healthy addition to any diet. They are also a good source of plant-based protein, which is essential for building and repairing tissues.
Can I grow bean sprouts in direct sunlight?
No, bean sprouts should not be grown in direct sunlight. They thrive in dark, humid environments. Exposure to direct sunlight can cause them to dry out, turn bitter, and inhibit their growth. Keep your sprouting container in a dark cupboard, pantry, or other shaded area. If you don’t have a completely dark space, you can cover the container with a towel or cloth to block out the light.
What types of beans are best for sprouting?
While mung beans are the most common and widely used for sprouting, you can experiment with other types of beans as well. Adzuki beans, lentils, chickpeas, and even soybeans can be sprouted. Each type of bean will have a slightly different flavor and texture. Keep in mind that some beans, like kidney beans, should not be eaten raw or sprouted, as they contain toxins that need to be cooked to be neutralized. Always research the specific type of bean before attempting to sprout it.
My bean sprouts are growing mold, what did I do wrong?
Mold growth on bean sprouts is usually caused by insufficient rinsing, poor air circulation, or a contaminated container. Ensure that you are rinsing your sprouts at least two to three times a day with cool, clean water. Make sure the container has adequate drainage and ventilation. Thoroughly clean the container with soap and water before each use. If you live in a humid environment, you may need to increase the frequency of rinsing. If you see any signs of mold, discard the entire batch of sprouts and start over with a fresh container and beans.
Leave a Comment