
Grow Bigger Watermelons Easily – imagine sinking your teeth into a juicy, incredibly large watermelon that you nurtured from a tiny seed right in your own backyard! It’s not just a summer dream; it’s an achievable reality with a few clever tricks and DIY hacks. For centuries, watermelons have been a symbol of summer abundance and shared joy, from ancient Egyptian paintings depicting them as offerings to the afterlife, to their prominent place in modern-day picnics and celebrations.
But let’s be honest, getting those prize-winning, enormous watermelons can feel like a challenge. We’ve all been there – carefully tending to our vines, only to end up with fruits that are… well, underwhelming. That’s where these DIY secrets come in! I’m going to share some simple, effective techniques that will help you grow bigger watermelons easily than you ever thought possible.
Why do you need these tricks? Because who doesn’t want bragging rights for growing the biggest, juiciest watermelon on the block? More importantly, these hacks will help you maximize your yield, ensuring you get the most out of your gardening efforts. Plus, it’s incredibly rewarding to know you’ve mastered the art of watermelon cultivation. So, grab your gardening gloves, and let’s dive into the secrets to unlocking watermelon greatness!
Wassermelonen-Wachstums-Hack: So erntest du riesige Früchte!
Hallo liebe Gartenfreunde! Ich liebe Wassermelonen, und ich wette, ihr auch! Aber was noch besser ist als eine Wassermelone zu essen, ist, sie selbst anzubauen – und zwar riesig! Ich habe im Laufe der Jahre einige Tricks gelernt, um meine Wassermelonen so richtig groß werden zu lassen. Und heute teile ich mein Wissen mit euch! Keine Sorge, es ist einfacher als es klingt. Lasst uns loslegen!
Die Grundlagen: Vorbereitung ist alles!
Bevor wir uns in die Details stürzen, müssen wir sicherstellen, dass unsere Wassermelonenpflanzen die bestmöglichen Startbedingungen haben. Das bedeutet:
* Die richtige Sorte wählen: Nicht alle Wassermelonen sind gleich. Einige Sorten sind von Natur aus größer als andere. Beliebte Riesensorten sind ‘Carolina Cross’, ‘Charleston Gray’ und ‘Black Diamond’. Informiert euch, welche Sorten in eurer Region gut gedeihen.
* Der richtige Standort: Wassermelonen lieben die Sonne! Sie brauchen mindestens 6-8 Stunden direkte Sonneneinstrahlung pro Tag. Wählt einen sonnigen Platz in eurem Garten.
* Der richtige Boden: Wassermelonen bevorzugen gut durchlässigen, sandigen Lehmboden mit einem pH-Wert zwischen 6,0 und 6,8. Wenn euer Boden schwer oder lehmig ist, müsst ihr ihn mit Kompost und Sand verbessern.
* Der richtige Zeitpunkt: Wassermelonen sind frostempfindlich. Pflanzt sie erst, wenn keine Frostgefahr mehr besteht und der Boden sich erwärmt hat (mindestens 18°C). In kälteren Regionen könnt ihr die Samen drinnen vorziehen.
Schritt-für-Schritt-Anleitung: So geht’s!
Jetzt, wo wir die Grundlagen geklärt haben, können wir uns dem eigentlichen Hack widmen. Hier ist eine detaillierte Anleitung, wie ihr eure Wassermelonen zum Wachsen bringt:
1. Boden vorbereiten:
* Lockert den Boden an der Pflanzstelle gründlich auf.
* Mischt reichlich Kompost und gut verrotteten Mist unter. Das sorgt für eine gute Drainage und liefert wichtige Nährstoffe. Ich verwende gerne eine Mischung aus Kompost, Kuhmist und etwas Knochenmehl.
* Formt kleine Hügel oder Dämme, um die Drainage zu verbessern. Wassermelonen mögen keine Staunässe.
2. Pflanzen oder Säen:
* Wenn ihr Samen direkt in den Boden säen wollt, legt 2-3 Samen pro Hügel.
* Wenn ihr vorgezogene Pflanzen verwendet, pflanzt sie vorsichtig in die vorbereiteten Hügel. Achtet darauf, die Wurzeln nicht zu beschädigen.
* Haltet einen Abstand von mindestens 90-120 cm zwischen den Pflanzen ein. Wassermelonen brauchen viel Platz zum Wachsen.
3. Bewässerung:
* Wassermelonen brauchen viel Wasser, besonders während der Fruchtbildung. Gießt sie regelmäßig und gründlich, besonders bei trockenem Wetter.
* Vermeidet es, die Blätter zu benetzen, um Pilzkrankheiten vorzubeugen. Gießt am besten direkt an der Basis der Pflanze.
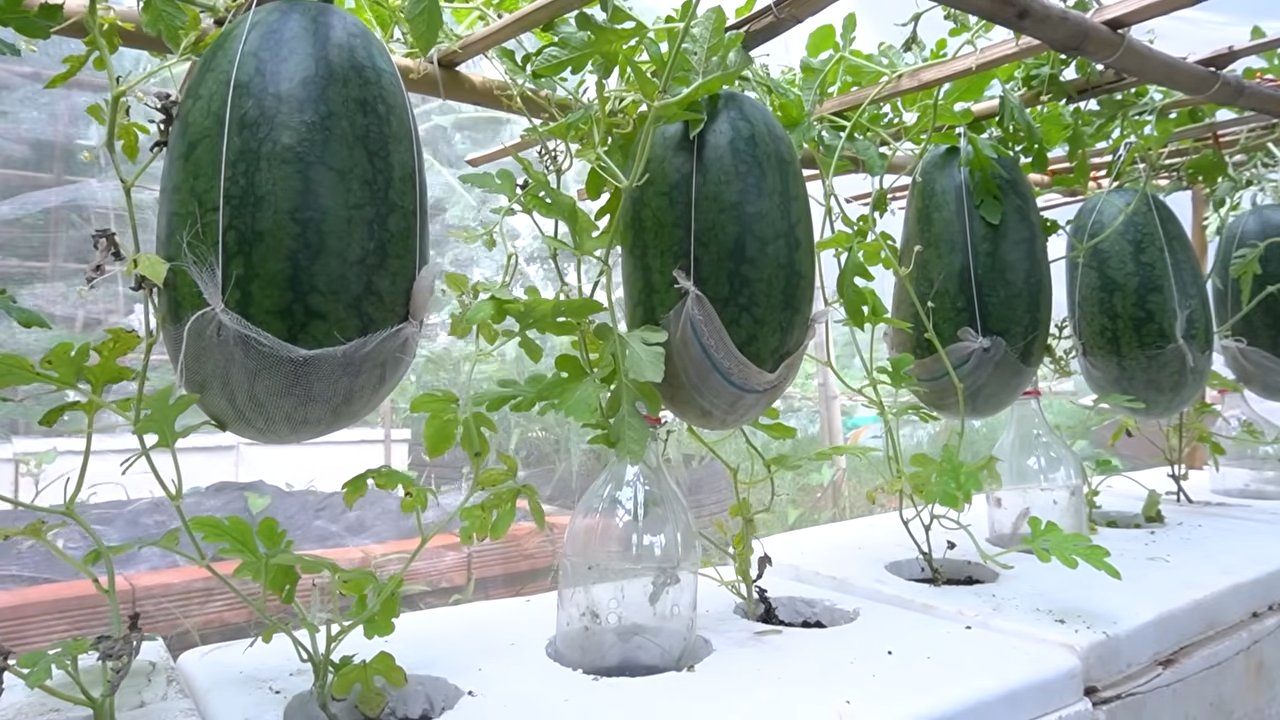
* Verwendet eine Tröpfchenbewässerung, um Wasser zu sparen und die Wurzeln gleichmäßig zu versorgen.
4. Düngung:
* Wassermelonen sind Starkzehrer. Sie brauchen regelmäßige Düngung, um gut zu wachsen und große Früchte zu produzieren.
* Verwendet einen ausgewogenen Dünger (z.B. 10-10-10) während der Wachstumsphase.
* Sobald die Früchte anfangen zu wachsen, wechselt zu einem Dünger mit höherem Kaliumgehalt (z.B. 5-10-15). Kalium fördert die Fruchtbildung und die Süße der Melonen.
* Ich dünge meine Wassermelonen alle 2-3 Wochen mit einer verdünnten Düngerlösung.
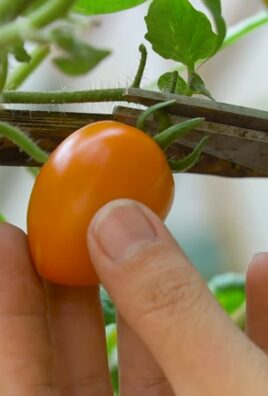
5. Beschneiden:
* Das Beschneiden von Wassermelonen kann helfen, die Energie der Pflanze auf die Fruchtbildung zu konzentrieren.
* Entfernt Seitentriebe, die keine Blüten oder Früchte tragen.
* Lasst pro Pflanze nur 2-3 Früchte wachsen. Das mag hart klingen, aber es ermöglicht der Pflanze, ihre ganze Energie in diese wenigen Früchte zu stecken, was zu größeren Melonen führt.
* Entfernt beschädigte oder kranke Blätter.
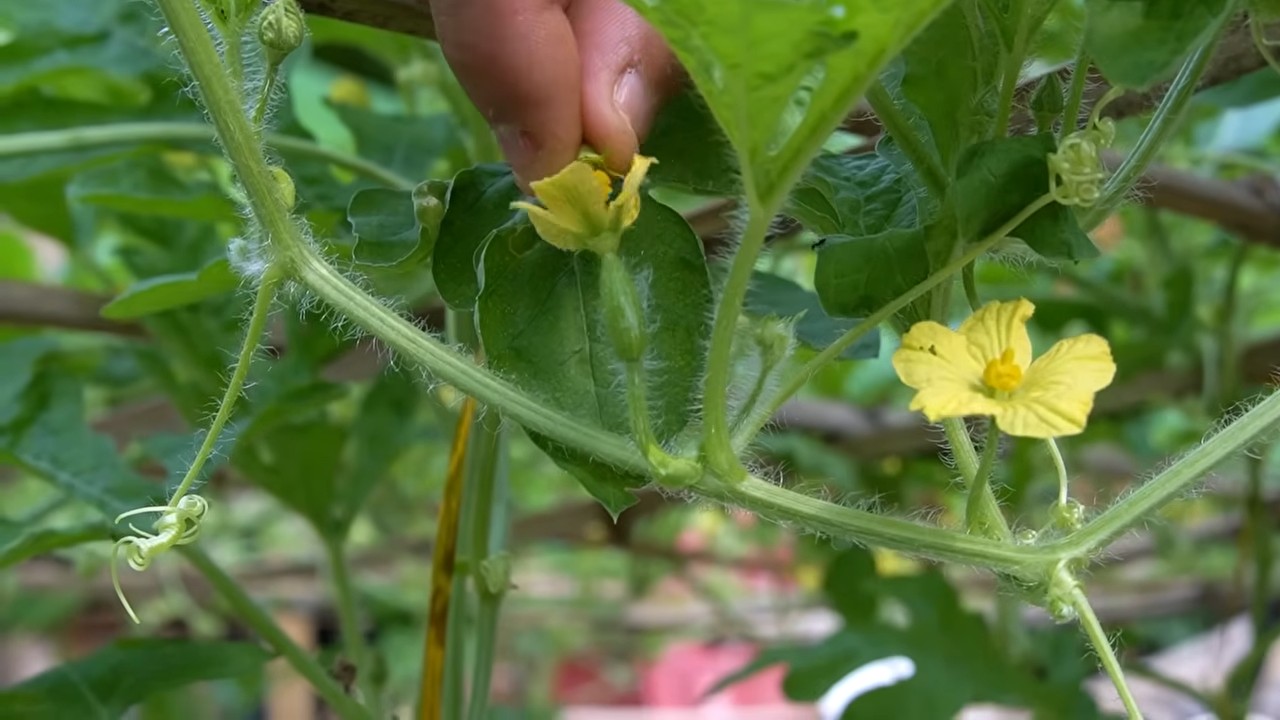
6. Bestäubung:
* Wassermelonen brauchen Bienen oder andere Bestäuber, um Früchte zu bilden.
* Wenn ihr nicht genügend Bienen in eurem Garten habt, könnt ihr die Blüten von Hand bestäuben.
* Die weiblichen Blüten erkennt man an dem kleinen Fruchtansatz direkt hinter der Blüte.
* Um die Blüten von Hand zu bestäuben, nehmt einen kleinen Pinsel und übertragt Pollen von den männlichen Blüten (die nur einen Stiel haben) auf die Narbe der weiblichen Blüten.
* Macht das am besten am frühen Morgen, wenn die Blüten geöffnet sind.
7. Fruchtpflege:
* Legt die wachsenden Wassermelonen auf Stroh oder Pappe, um sie vor Bodenkontakt und Fäulnis zu schützen.
* Dreht die Melonen regelmäßig, damit sie gleichmäßig reifen.
* Überprüft die Melonen regelmäßig auf Schädlinge und Krankheiten.
8. Ernte:
* Die Erntezeit hängt von der Sorte und den Wetterbedingungen ab.
* Es gibt verschiedene Anzeichen, dass eine Wassermelone reif ist:
* Der Stiel, der die Melone mit der Pflanze verbindet, wird trocken und braun.
* Die Stelle, an der die Melone auf dem Boden liegt, wird gelblich.
* Wenn man auf die Melone klopft, sollte sie hohl klingen.
* Schneidet die Melone vorsichtig vom Stiel ab und genießt eure Ernte!
Zusätzliche Tipps für riesige Wassermelonen:
* Mulchen: Mulchen hilft, die Feuchtigkeit im Boden zu halten, Unkraut zu unterdrücken und die Bodentemperatur zu regulieren. Ich verwende gerne Stroh oder Holzhackschnitzel.
* Schutz vor Schädlingen: Wassermelonen können von verschiedenen Schädlingen befallen werden, wie z.B. Blattläusen, Gurkenkäfern und Melonenfliegen. Überwacht eure Pflanzen regelmäßig und ergreift bei Bedarf Maßnahmen. Ich verwende gerne natürliche Schädlingsbekämpfungsmittel wie Neemöl oder Insektizidseife.
* Schutz vor Krankheiten: Wassermelonen können auch von verschiedenen Krankheiten befallen werden, wie z.B. Mehltau, Alternaria-Blattflecken und Fusarium-Welke. Sorgt für eine gute Belüftung und vermeidet es, die Blätter zu benetzen. Bei Bedarf könnt ihr Fungizide verwenden.
* Geduld: Wassermelonen brauchen Zeit zum Wachsen. Seid geduldig und gebt euren Pflanzen die Zeit, die sie brauchen, um zu reifen.
H3: Die richtige Bewässerung: Ein Schlüssel zum Erfolg
Die richtige Bewässerung ist entscheidend für das Wachstum großer Wassermelonen. Hier sind einige wichtige Punkte, die ihr beachten solltet:
* Regelmäßigkeit: Wassermelonen brauchen regelmäßige Bewässerung, besonders während der Fruchtbildung. Gießt sie am besten früh am Morgen, damit die Blätter Zeit haben, vor der Nacht zu trocknen.
* Tiefe Bewässerung: Gießt gründlich, damit das Wasser tief in den Boden eindringt und die Wurzeln erreicht. Oberflächliche Bewässerung führt dazu, dass die Wurzeln an der Oberfläche bleiben und die Pflanzen anfälliger für Trockenheit sind.
* Vermeidung von Staunässe: Wassermelonen mögen keine Staunässe. Sorgt für eine gute Drainage und vermeidet es, die Pflanzen zu überwässern.
* Tröpfchenbewässerung: Tröpfchenbewässerung ist eine ideale Methode, um Wassermelonen zu bewässern. Sie liefert das Wasser direkt an die Wurzeln und minimiert den Wasserverlust durch Verdunstung.
Conclusion
So, there you have it! This simple yet effective DIY trick to grow bigger watermelons easily is more than just a gardening hack; it’s a pathway to unlocking the full potential of your watermelon plants. We’ve explored the science behind it, the straightforward steps involved, and the incredible results you can expect. But why is this a must-try?
Firstly, it’s about maximizing your yield. Imagine sinking your teeth into a watermelon that’s not just sweet and juicy, but also significantly larger than anything you’ve grown before. This trick helps your plants direct their energy more efficiently, resulting in fewer, but much larger and more robust fruits. It’s about quality over quantity, and who wouldn’t want a prize-winning watermelon gracing their summer table?
Secondly, it’s about control. As gardeners, we strive to nurture and guide our plants to achieve their best. This DIY method gives you a tangible way to influence the growth of your watermelons, allowing you to actively participate in the process and witness the fruits (literally!) of your labor. It’s empowering to know that you can play a direct role in the size and quality of your harvest.
But the beauty of gardening lies in experimentation, so don’t be afraid to get creative! Consider these variations to personalize the technique to your specific needs and environment:
* Nutrient Boost: While the core method focuses on strategic pruning, you can enhance the results by supplementing your plants with a balanced fertilizer rich in potassium and phosphorus during the fruit development stage. This provides the necessary building blocks for larger, sweeter watermelons.
* Grafting for Vigor: For even more impressive results, explore grafting your watermelon scion onto a more vigorous rootstock, such as a squash or gourd. This can significantly improve the plant’s ability to absorb nutrients and water, leading to even larger fruits.
* Sunlight Management: Ensure your watermelons receive ample sunlight, but in particularly hot climates, consider providing some afternoon shade to prevent sunscald. This will protect the developing fruits and allow them to reach their full potential.
* Pollination Assistance: If you’re struggling with pollination, especially in enclosed spaces like greenhouses, consider hand-pollinating your watermelon flowers. This ensures that each female flower has a chance to develop into a fruit.
Ultimately, the best way to discover the true potential of this DIY trick is to try it yourself. We encourage you to embrace the challenge, experiment with different variations, and most importantly, share your experiences with us! Did you notice a significant increase in watermelon size? Did you encounter any challenges along the way? What tips and tricks did you discover?
Your feedback is invaluable, not only to us but also to the entire gardening community. By sharing your successes and failures, you can help others grow bigger watermelons easily and enjoy the satisfaction of harvesting their own homegrown giants. So, grab your gardening gloves, get your pruning shears ready, and embark on this exciting watermelon-growing adventure. We can’t wait to hear about your results! Happy gardening!
Frequently Asked Questions (FAQ)
Q: How many watermelons should I leave on a single vine after pruning?
A: The ideal number is typically one to two watermelons per vine. This allows the plant to focus its energy and resources on developing those fruits to their maximum size and sweetness. Trying to grow too many watermelons on a single vine will result in smaller, less flavorful fruits. Remember, quality over quantity is key when aiming for larger watermelons.
Q: When is the best time to start pruning my watermelon plants?
A: Begin pruning your watermelon plants once they have established themselves and started to produce several lateral vines. This is usually around the time the first female flowers appear. It’s important to prune before the watermelons start to develop significantly, as this allows the plant to redirect its energy more effectively.
Q: What tools do I need for pruning watermelon plants?
A: You’ll need a pair of sharp, clean pruning shears or scissors. Make sure your tools are sterilized with rubbing alcohol or a bleach solution before and after each use to prevent the spread of diseases. Avoid tearing or crushing the vines, as this can damage the plant and make it more susceptible to infection.
Q: How do I identify the lateral vines that I need to prune?
A: Lateral vines are the smaller vines that grow out from the main vine. They often produce smaller, less developed leaves and may not have as many flowers or developing fruits. Focus on removing the lateral vines that are furthest away from the main stem and those that appear weak or unproductive.
Q: Will pruning my watermelon plants damage them?
A: When done correctly, pruning is beneficial for watermelon plants. It helps to improve air circulation, reduce the risk of disease, and direct the plant’s energy towards developing larger, higher-quality fruits. However, excessive or improper pruning can stress the plant, so it’s important to follow the guidelines carefully.
Q: How often should I water my watermelon plants after pruning?
A: Watermelon plants need consistent moisture, especially during fruit development. After pruning, continue to water your plants deeply and regularly, ensuring that the soil remains moist but not waterlogged. The frequency of watering will depend on your climate and soil type, but generally, aim for at least an inch of water per week.
Q: What type of fertilizer should I use to help my watermelons grow bigger?
A: A balanced fertilizer with a higher ratio of phosphorus and potassium is ideal for promoting fruit development. Look for a fertilizer with an NPK ratio of around 5-10-10 or 10-10-10. Apply the fertilizer according to the manufacturer’s instructions, and avoid over-fertilizing, as this can damage the plants.
Q: How long does it take for a watermelon to mature after pruning?
A: The time it takes for a watermelon to mature after pruning will depend on the variety of watermelon, the climate, and the growing conditions. Generally, it takes around 30-50 days for a watermelon to reach full maturity after the female flower is pollinated. You can tell a watermelon is ripe when the tendril closest to the fruit turns brown and dry, and the underside of the watermelon turns yellow.
Q: Can I use this DIY trick for other types of melons?
A: While this trick is specifically designed for watermelons, the principles of strategic pruning and nutrient management can also be applied to other types of melons, such as cantaloupe and honeydew. However, the specific pruning techniques may vary depending on the growth habits of each melon variety. Research the specific needs of each type of melon before applying this trick.
Q: What if I don’t have a lot of space to grow watermelons?
A: Even if you have limited space, you can still grow bigger watermelons easily by choosing a compact or bush variety of watermelon. These varieties are specifically bred to be smaller and more manageable, making them ideal for container gardening or small gardens. You can also use vertical gardening techniques, such as trellising, to maximize your space.
Leave a Comment