
Grow Celery at Home, you say? Absolutely! Imagine stepping into your backyard and snipping fresh, crisp celery stalks for your salads, soups, or even a healthy snack with peanut butter. No more limp, store-bought celery that’s been sitting on the shelf for days. This is about bringing the vibrant taste of homegrown goodness right to your table, and I’m here to show you how surprisingly easy it is.
Celery, while a common sight in our grocery stores, has a fascinating history. Originating in the Mediterranean region, it was initially valued for its medicinal properties before becoming a culinary staple. Ancient Greeks and Romans used it to crown victors and flavor wines. Now, we can bring that same historical plant into our own gardens!
But why should you bother to grow celery at home? Well, beyond the superior taste and freshness, it’s about control. You know exactly what’s going into your food – no harmful pesticides or chemicals. Plus, it’s incredibly rewarding to nurture a plant from start to finish. In this DIY guide, I’ll share simple, effective tricks and hacks to help you cultivate thriving celery plants, even if you’re a complete beginner. Get ready to ditch the grocery store celery and embrace the joy of homegrown flavor!
Zieh dein eigenes Staudensellerie zu Hause: Ein umfassender DIY-Leitfaden
Hey Gartenfreunde! Habt ihr euch jemals gefragt, wie ihr frischen, knackigen Staudensellerie direkt in eurer Küche oder eurem Garten anbauen könnt? Ich zeige euch, wie das geht! Es ist einfacher als ihr denkt und unglaublich befriedigend, euer eigenes Gemüse zu ernten. Lasst uns gemeinsam in die Welt des Staudensellerie-Anbaus eintauchen!
Was du brauchst: Die richtige Vorbereitung
Bevor wir loslegen, brauchen wir natürlich die richtigen Materialien. Hier ist eine Liste, damit ihr alles griffbereit habt:
* Ein Staudensellerie-Strunk: Am besten einen frischen, festen Strunk aus dem Supermarkt oder vom Markt. Achtet darauf, dass er noch eine intakte Basis hat.
* Ein Glas oder eine Schale: Groß genug, um den Strunk aufzunehmen und mit Wasser zu bedecken.
* Wasser: Leitungswasser ist völlig ausreichend.
* Ein Messer: Zum sauberen Abschneiden des Strunks.
* Blumenerde: Hochwertige Blumenerde für den späteren Umzug in einen Topf oder ins Beet.
* Ein Topf oder ein Beet: Je nachdem, wo ihr euren Staudensellerie weiterziehen möchtet.
* Dünger (optional): Ein organischer Dünger kann das Wachstum fördern.
* Geduld: Staudensellerie braucht etwas Zeit, um zu wachsen.
Phase 1: Den Strunk zum Leben erwecken
Dieser erste Schritt ist entscheidend, um den Staudensellerie-Strunk wieder zum Leben zu erwecken und ihm die Möglichkeit zu geben, neue Wurzeln zu bilden.
1. Den Strunk vorbereiten: Nehmt euer Messer und schneidet den Staudensellerie-Strunk etwa 5 cm vom unteren Ende ab. Achtet darauf, dass ihr einen sauberen Schnitt macht, um Fäulnis zu vermeiden.
2. Ins Wasser stellen: Füllt euer Glas oder eure Schale mit Wasser. Stellt den Strunk mit der Schnittfläche nach unten ins Wasser. Achtet darauf, dass die Basis des Strunks gut mit Wasser bedeckt ist, aber die oberen Teile nicht im Wasser stehen.
3. Der richtige Standort: Stellt das Glas mit dem Strunk an einen hellen Ort, aber nicht in die pralle Sonne. Ein Fensterbrett ist ideal.
4. Wasser wechseln: Wechselt das Wasser alle ein bis zwei Tage, um Fäulnis zu verhindern und das Wasser frisch zu halten.
5. Geduld haben: Nach etwa 5-7 Tagen solltet ihr sehen, wie kleine Wurzeln aus der Unterseite des Strunks sprießen. Auch in der Mitte des Strunks sollten neue grüne Blätter wachsen.
Phase 2: Umzug in die Erde
Sobald der Strunk Wurzeln gebildet hat und neue Blätter wachsen, ist es Zeit, ihn in die Erde umzupflanzen.
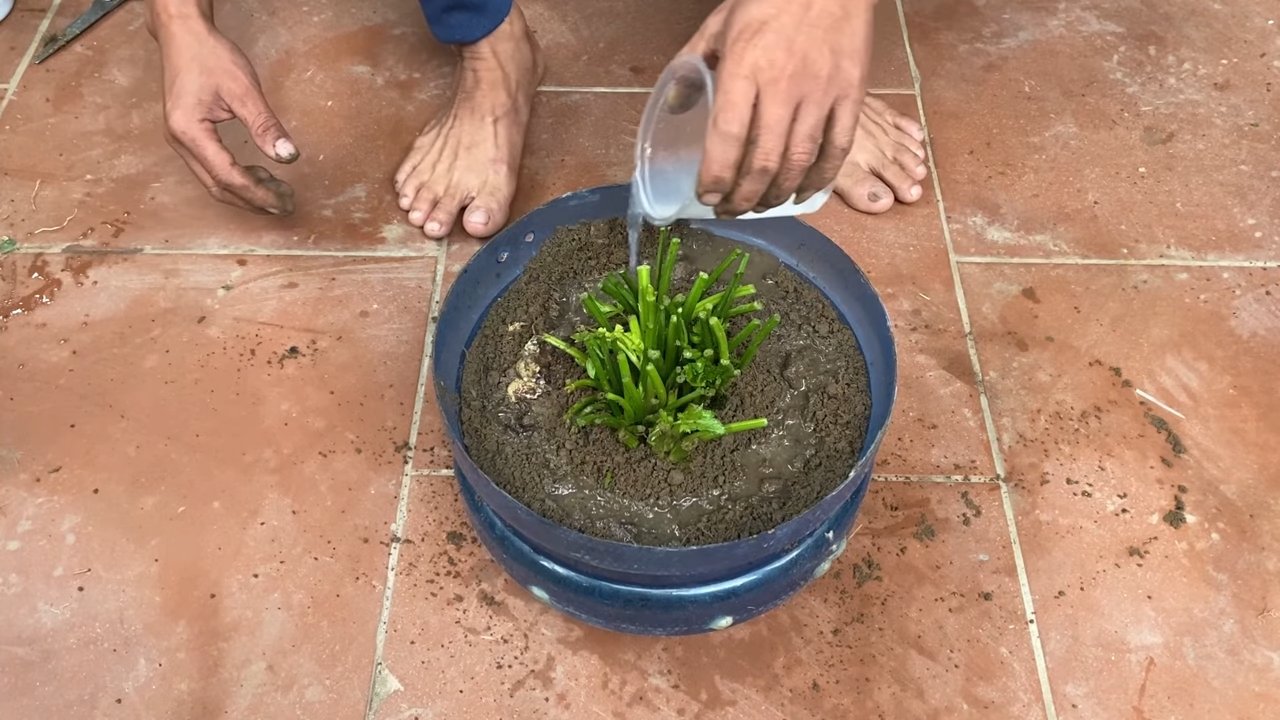
1. Den Topf vorbereiten: Füllt euren Topf mit Blumenerde. Macht ein Loch in die Mitte, das groß genug ist, um den Strunk aufzunehmen.
2. Den Strunk einpflanzen: Nehmt den Strunk vorsichtig aus dem Wasser und setzt ihn in das Loch im Topf. Achtet darauf, dass die Wurzeln gut mit Erde bedeckt sind.
3. Angießen: Gießt den Staudensellerie nach dem Einpflanzen gründlich an.
4. Der richtige Standort: Stellt den Topf an einen hellen Ort, aber vermeidet direkte Sonneneinstrahlung, besonders in den ersten Tagen nach dem Umzug.
5. Alternative: Ins Beet pflanzen: Wenn ihr ein Beet habt, könnt ihr den Staudensellerie auch direkt dort einpflanzen. Achtet darauf, dass der Boden gut vorbereitet ist und der Standort sonnig bis halbschattig ist.
Phase 3: Pflege und Wachstum
Jetzt geht es darum, den Staudensellerie gut zu pflegen, damit er prächtig wächst.
1. Gießen: Staudensellerie braucht viel Wasser. Gießt ihn regelmäßig, besonders an heißen Tagen. Die Erde sollte immer feucht, aber nicht nass sein.
2. Düngen (optional): Wenn ihr möchtet, könnt ihr den Staudensellerie alle paar Wochen mit einem organischen Dünger düngen. Das fördert das Wachstum und die Gesundheit der Pflanze.
3. Schädlinge und Krankheiten: Achtet auf Schädlinge wie Blattläuse oder Schnecken. Bei Bedarf könnt ihr natürliche Schädlingsbekämpfungsmittel einsetzen.
4. Bleichen (optional): Um hellere Stangen zu erhalten, könnt ihr den Staudensellerie bleichen. Das bedeutet, dass ihr die Stangen etwa zwei Wochen vor der Ernte mit Erde oder speziellem Bleichmaterial bedeckt. Dadurch werden sie weniger bitter und zarter.
5. Geduld haben: Staudensellerie braucht Zeit, um zu wachsen. Je nach Sorte und Standort kann es mehrere Monate dauern, bis ihr ihn ernten könnt.
Phase 4: Die Ernte
Endlich ist es soweit! Ihr könnt euren selbstgezogenen Staudensellerie ernten.
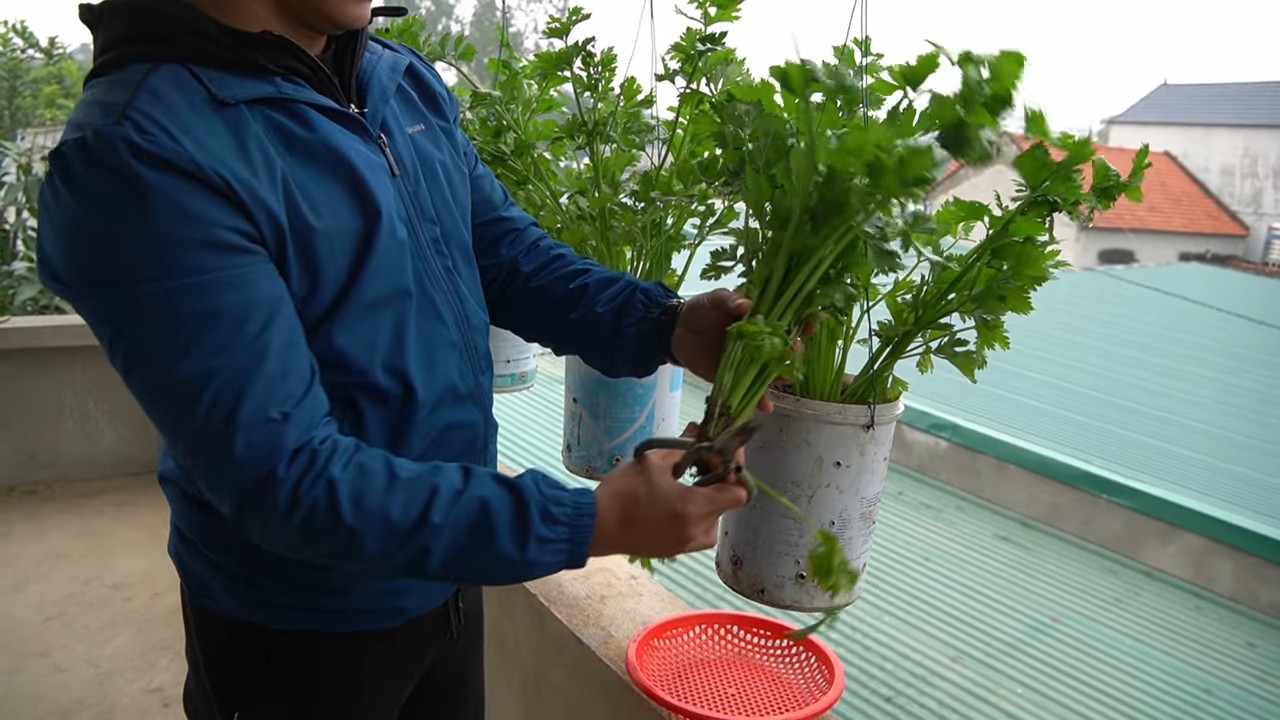
1. Erntezeitpunkt: Der Staudensellerie ist erntereif, wenn die Stangen eine ausreichende Größe erreicht haben und fest sind.
2. Ernten: Schneidet die Stangen mit einem Messer am unteren Ende ab. Ihr könnt entweder den ganzen Strunk ernten oder nur einzelne Stangen.
3. Lagerung: Im Kühlschrank hält sich der Staudensellerie einige Tage. Am besten wickelt ihr ihn in ein feuchtes Tuch.
Zusätzliche Tipps und Tricks
* Sortenwahl: Es gibt verschiedene Staudensellerie-Sorten. Informiert euch, welche Sorte für eure Region und eure Bedürfnisse am besten geeignet ist.
* Aussaat: Ihr könnt Staudensellerie auch aus Samen ziehen. Das ist etwas aufwendiger, aber es ermöglicht euch, eine größere Vielfalt an Sorten anzubauen.
* Überwinterung: In milden Regionen kann Staudensellerie im Freien überwintert werden. In kälteren Regionen solltet ihr ihn frostfrei lagern.
* Verwendung: Staudensellerie ist vielseitig verwendbar. Er schmeckt roh in Salaten, als Dip-Gemüse oder gekocht in Suppen und Eintöpfen. Auch die Blätter können verwendet werden, zum Beispiel als Würze in Suppen.
Häufige Probleme und Lösungen
* Fäulnis: Wenn der Strunk fault, liegt das meist an zu viel Feuchtigkeit oder mangelnder Hygiene. Wechselt das Wasser regelmäßig und achtet darauf, dass der Strunk nicht zu tief im Wasser steht.
* Schlechter Wuchs: Wenn der Staudensellerie schlecht wächst, kann das an Nährstoffmangel, zu wenig Licht oder zu wenig Wasser liegen. Düngt regelmäßig, stellt den Staudensellerie an einen helleren Ort und gießt ihn ausreichend.
* Schädlinge: Bei Schädlingsbefall könnt ihr natürliche Schädlingsbekämpfungsmittel einsetzen, zum Beispiel Neemöl oder Schmierseifenlösung.
Ich hoffe, dieser Leitfaden hilft euch dabei, euren eigenen Staudensellerie zu Hause anzubauen. Es ist ein tolles Gefühl, frisches Gemüse aus dem eigenen Garten oder von der Fensterbank zu ernten. Viel Erfolg und viel Spaß beim Gärtnern!
Conclusion
So, there you have it! Growing celery at home from scraps isn’t just a fun experiment; it’s a sustainable way to reduce food waste, enjoy fresh, flavorful celery, and connect with the natural world. It’s a surprisingly simple process that yields impressive results, even for those without a green thumb. Forget buying bunches of celery that wilt in the fridge before you can use them all. With this easy DIY trick, you can have a continuous supply of crisp, homegrown celery right at your fingertips.
This method is a must-try because it transforms what would otherwise be kitchen waste into a valuable resource. Imagine the satisfaction of watching a discarded celery base sprout new life and eventually provide you with stalks for your salads, soups, and snacks. It’s an incredibly rewarding experience that promotes a more conscious and eco-friendly lifestyle.
But the fun doesn’t stop there! Feel free to experiment with different varieties of celery. Try growing organic celery for an even healthier harvest. You can also adjust the growing conditions to influence the flavor and texture of your celery. For example, providing more sunlight can result in sweeter, more robust stalks.
Consider planting your regrown celery in a larger container or even directly in your garden for optimal growth. Adding compost or other organic matter to the soil will provide essential nutrients and encourage healthy development. You can also try companion planting with herbs like parsley or basil, which can help deter pests and enhance the flavor of your celery.
We wholeheartedly encourage you to give this DIY trick a try. It’s an inexpensive, environmentally friendly, and ultimately rewarding way to enjoy fresh celery. Don’t be intimidated if you’ve never grown anything before; this is a perfect project for beginners.
Once you’ve successfully regrown your celery, we’d love to hear about your experience! Share your photos, tips, and variations in the comments below. Let’s create a community of home gardeners who are passionate about reducing waste and enjoying the fruits (or vegetables!) of their labor. Your insights could inspire others to embark on their own celery-growing adventures. So, grab a celery base, follow these simple steps, and get ready to witness the magic of regeneration. Happy growing!
Frequently Asked Questions (FAQ)
Why should I bother growing celery from scraps? Isn’t it easier to just buy it at the store?
While buying celery at the store is certainly convenient, growing your own from scraps offers several compelling advantages. First and foremost, it’s a fantastic way to reduce food waste. Instead of tossing the celery base into the trash, you’re giving it a second life and turning it into a valuable resource. Secondly, homegrown celery often tastes fresher and more flavorful than store-bought varieties. You have complete control over the growing conditions, ensuring that your celery is free from harmful pesticides and chemicals. Finally, it’s a fun and educational project that connects you with the natural world and promotes a more sustainable lifestyle. It’s a great way to teach children about where their food comes from and the importance of reducing waste. Plus, the satisfaction of harvesting your own celery is simply unmatched!
How long does it take to grow celery from a base?
The time it takes to grow celery from a base can vary depending on several factors, including the variety of celery, the growing conditions, and the overall health of the plant. Generally, you can expect to see new growth within a week or two of placing the celery base in water. After about 3-4 weeks, you should have a small plant that’s ready to be transplanted into soil. From there, it can take another 2-3 months for the celery to mature and be ready for harvest. Be patient and provide your celery with the proper care, and you’ll be rewarded with a bountiful harvest.
What kind of water should I use to regrow celery?
It’s best to use filtered or dechlorinated water to regrow celery. Tap water often contains chlorine and other chemicals that can inhibit growth. If you don’t have a water filter, you can simply let tap water sit out in an open container for 24 hours to allow the chlorine to evaporate. Change the water every 1-2 days to prevent bacterial growth and keep the celery base healthy.
How much sunlight does regrown celery need?
Regrown celery thrives in bright, indirect sunlight. Avoid placing it in direct sunlight, especially during the hottest part of the day, as this can scorch the leaves. A spot near a window that receives morning sun is ideal. If you don’t have access to a sunny window, you can supplement with a grow light.
What kind of soil should I use for planting celery?
Celery prefers rich, well-draining soil that is high in organic matter. A good potting mix amended with compost or other organic material is ideal. Make sure the soil is loose and airy to allow for proper root development. You can also add a slow-release fertilizer to provide essential nutrients.
How often should I water my celery plant?
Celery needs consistent moisture to thrive. Water your plant regularly, keeping the soil consistently moist but not waterlogged. Check the soil moisture daily and water when the top inch feels dry to the touch. Avoid letting the soil dry out completely, as this can stress the plant and affect its growth.
What are some common problems when growing celery, and how can I fix them?
Some common problems when growing celery include pests, diseases, and nutrient deficiencies. Pests like aphids and slugs can damage the leaves and stems. You can control these pests with insecticidal soap or by handpicking them off the plant. Diseases like celery blight can cause leaf spots and stem rot. Prevent these diseases by providing good air circulation and avoiding overhead watering. Nutrient deficiencies can cause yellowing leaves or stunted growth. Fertilize your plant regularly with a balanced fertilizer to provide essential nutrients.
Can I grow celery indoors year-round?
Yes, you can grow celery indoors year-round, provided you provide it with the proper growing conditions. This includes adequate light, consistent moisture, and a nutrient-rich soil. You may need to supplement with a grow light during the winter months when natural light is limited.
How do I know when my celery is ready to harvest?
Celery is ready to harvest when the stalks are at least 6-8 inches long and have reached the desired thickness. You can harvest individual stalks as needed or harvest the entire plant at once. To harvest, simply cut the stalks at the base of the plant with a sharp knife.
Can I grow celery from seed instead of scraps?
Yes, you can grow celery from seed. However, growing from seed is a more involved process and requires more patience. Celery seeds are very small and can be difficult to germinate. It’s also important to start the seeds indoors several weeks before the last frost. Growing celery from scraps is a much easier and faster way to get started.

Leave a Comment