
Grow Chinese Cabbage Home with ease! Have you ever dreamt of harvesting your own crisp, delicious Chinese cabbage right from your backyard? Imagine the satisfaction of creating vibrant stir-fries and flavorful kimchi with ingredients you nurtured yourself. This isn’t just a dream; it’s an achievable reality with a few simple DIY tricks and hacks!
For centuries, Chinese cabbage, also known as Napa cabbage, has been a staple in Asian cuisine, symbolizing prosperity and good fortune. Its cultivation dates back to the 15th century in the Yangtze River Delta region of China. Now, you can bring this rich culinary heritage to your own garden, no matter how small your space may be.
Why should you embark on this home gardening adventure? Well, store-bought vegetables often lack the freshness and flavor of homegrown produce. Plus, you have complete control over what goes into your plants, ensuring they’re free from harmful pesticides and chemicals. Learning how to grow Chinese Cabbage Home is not only rewarding but also a healthier and more sustainable choice. I’m excited to share some easy-to-follow DIY tips and tricks that will help you cultivate a thriving Chinese cabbage patch, even if you’re a complete beginner. Let’s get started!
Chinakohl selbst anbauen: Dein DIY-Guide für den eigenen Garten
Hey Gartenfreunde! Chinakohl ist nicht nur super lecker und vielseitig in der Küche, sondern auch überraschend einfach selbst anzubauen. Ich zeige dir, wie du mit ein paar einfachen Schritten deinen eigenen Chinakohl im Garten oder sogar im Topf ziehen kannst. Los geht’s!
Was du für den Chinakohl-Anbau brauchst
Bevor wir loslegen, hier eine Liste mit allem, was du benötigst:
* Chinakohl-Samen: Achte auf eine hochwertige Sorte, die für dein Klima geeignet ist.
* Anzuchterde: Für die Voranzucht im Haus.
* Gartenerde: Gut durchlässig und nährstoffreich.
* Anzuchttöpfe oder -schalen: Für die Voranzucht.
* Gießkanne oder Sprühflasche: Zum Bewässern.
* Kompost oder organischer Dünger: Zur Bodenverbesserung.
* Schneckenkorn (optional): Zum Schutz vor Schnecken.
* Gartenvlies (optional): Zum Schutz vor Schädlingen und Frost.
* Pflanzkelle oder Spaten: Zum Pflanzen.
* Etiketten und Stift: Zum Beschriften der Anzuchttöpfe.
Die Vorbereitung: Der Grundstein für eine reiche Ernte
Eine gute Vorbereitung ist das A und O für einen erfolgreichen Chinakohl-Anbau. Hier sind die Schritte, die du beachten solltest:
1. Den richtigen Zeitpunkt wählen: Chinakohl ist ein Herbstgemüse. Die beste Zeit für die Aussaat ist von Mitte Juli bis Mitte August. So vermeidest du, dass die Pflanzen zu früh schießen (blühen) und keinen Kopf bilden.
2. Den Standort vorbereiten: Chinakohl liebt einen sonnigen bis halbschattigen Standort. Der Boden sollte locker, humos und gut durchlässig sein. Schwere Böden solltest du mit Kompost oder Sand verbessern.
3. Bodenverbesserung: Arbeite vor dem Pflanzen reichlich Kompost oder organischen Dünger in den Boden ein. Das sorgt für eine gute Nährstoffversorgung und fördert das Wachstum der Pflanzen.
4. Beet vorbereiten: Lockere den Boden gründlich auf und entferne Unkraut. Eine ebene Oberfläche erleichtert das Pflanzen.
Die Aussaat: So ziehst du deine eigenen Chinakohl-Pflänzchen
Es gibt zwei Möglichkeiten, Chinakohl anzubauen: direkt ins Beet säen oder die Pflanzen vorziehen. Ich empfehle die Voranzucht, da du so die Kontrolle über die Keimung hast und die jungen Pflanzen besser vor Schädlingen schützen kannst.
1. Anzuchttöpfe vorbereiten: Fülle die Anzuchttöpfe oder -schalen mit Anzuchterde. Drücke die Erde leicht an.
2. Samen aussäen: Lege in jeden Topf 2-3 Samen. Bedecke die Samen mit einer dünnen Schicht Erde (ca. 0,5 cm).
3. Bewässern: Befeuchte die Erde vorsichtig mit einer Sprühflasche oder Gießkanne. Die Erde sollte feucht, aber nicht nass sein.
4. Warm stellen: Stelle die Anzuchttöpfe an einen warmen, hellen Ort (ca. 18-20°C). Ein Mini-Gewächshaus oder eine Fensterbank eignen sich gut.
5. Feucht halten: Halte die Erde gleichmäßig feucht. Vermeide Staunässe.
6. Keimung abwarten: Die Keimung dauert in der Regel 5-10 Tage.
7. Pikieren: Sobald die Keimlinge 2-3 Blätter haben, kannst du sie pikieren. Das bedeutet, du setzt die stärksten Pflanzen in separate Töpfe um. So haben sie mehr Platz zum Wachsen.
Das Auspflanzen: Ab ins Beet!
Nach ca. 4-6 Wochen sind die Chinakohl-Pflänzchen bereit für das Auspflanzen ins Beet.
1. Abhärten: Bevor du die Pflanzen ins Beet setzt, solltest du sie abhärten. Das bedeutet, du stellst sie für einige Tage tagsüber ins Freie, damit sie sich an die Sonne und die Temperaturen gewöhnen.
2. Pflanzabstand: Pflanze die Chinakohl-Pflänzchen im Abstand von 30-40 cm zueinander. Zwischen den Reihen solltest du einen Abstand von 50-60 cm einhalten.
3. Pflanzlöcher graben: Grabe Pflanzlöcher, die etwas größer sind als die Wurzelballen der Pflanzen.
4. Pflanzen einsetzen: Setze die Pflanzen vorsichtig in die Pflanzlöcher und fülle sie mit Erde auf. Drücke die Erde leicht an.
5. Angießen: Gieße die Pflanzen nach dem Einsetzen gründlich an.
Die Pflege: So wächst dein Chinakohl prächtig
Chinakohl ist relativ pflegeleicht, aber ein paar Dinge solltest du beachten, damit er gut wächst und eine reiche Ernte bringt.
1. Bewässerung: Chinakohl braucht regelmäßig Wasser, besonders in trockenen Perioden. Achte darauf, dass die Erde immer leicht feucht ist. Vermeide aber Staunässe.
2. Düngung: Dünge die Pflanzen regelmäßig mit Kompost oder organischem Dünger. Eine zusätzliche Düngung mit Brennnesseljauche ist ebenfalls empfehlenswert.
3. Unkraut entfernen: Halte das Beet unkrautfrei. Unkraut konkurriert mit dem Chinakohl um Nährstoffe und Wasser.
4. Schutz vor Schädlingen: Chinakohl ist anfällig für verschiedene Schädlinge, wie z.B. Schnecken, Erdflöhe und Kohlweißlinge. Schütze die Pflanzen mit Schneckenkorn, einem Kulturschutznetz oder einem Gartenvlies.
5. Schutz vor Krankheiten: Achte auf Anzeichen von Krankheiten, wie z.B. Pilzbefall. Entferne befallene Blätter sofort. Eine gute Belüftung und ein lockerer Boden können Krankheiten vorbeugen.
Die Ernte: Endlich Chinakohl aus dem eigenen Garten!
Je nach Sorte und Witterung ist der Chinakohl nach ca. 8-12 Wochen erntereif.
1. Erntezeitpunkt: Der Chinakohl ist erntereif, wenn der Kopf fest und geschlossen ist.
2. Ernten: Schneide den Chinakohl mit einem scharfen Messer oder einer Gartenschere knapp über dem Boden ab.
3. Lagerung: Chinakohl lässt sich im Kühlschrank einige Tage lagern. Am besten wickelst du ihn in ein feuchtes Tuch.
Zusätzliche Tipps für den Chinakohl-Anbau
* Fruchtfolge beachten: Baue Chinakohl nicht jedes Jahr am selben Standort an. Eine Fruchtfolge mit anderen Gemüsearten hilft, Krankheiten und Schädlinge zu vermeiden.
* Mischkultur: Chinakohl verträgt sich gut mit anderen Gemüsearten, wie z.B. Salat, Spinat oder Radieschen.
* Sortenwahl: Wähle eine Sorte, die für dein Klima und deine Anbaubedingungen geeignet ist. Es gibt verschiedene Sorten mit unterschiedlichen Reifezeiten und Eigenschaften.
* Schneckenkorn: Ich weiß, Schneckenkorn ist nicht jedermanns Sache, aber gerade bei Chinakohl kann es wirklich helfen, die Ernte zu retten. Alternativ kannst du auch Schneckenzäune aufstellen oder Schnecken absammeln.
* Gartenvlies: Ein Gartenvlies schützt die jungen Pflanzen nicht nur vor Schädlingen, sondern auch vor Frost. Gerade im Herbst kann das sehr nützlich sein.
Häufige Probleme beim Chinakohl-Anbau und ihre Lösungen
* Schneckenbefall: Schneckenkorn, Schneckenzäune, Absammeln
* Erdflöhe: Kulturschutznetz, regelmäßiges Gießen
* Kohlweißlinge: Kulturschutznetz, Absammeln der Raupen
* Falscher Mehltau: Gute Belüftung, Entfernen befallener Blätter
* Schossen (Blütenbildung): Zu frühe Aussaat, zu hohe Temperaturen
Chinakohl im Topf anbauen: Geht das?
Ja, klar! Auch wenn du keinen Garten hast, kannst
Conclusion
So, there you have it! Growing Chinese cabbage at home is not only achievable but also incredibly rewarding. From the crisp, tender leaves perfect for stir-fries to the satisfying feeling of nurturing your own food, this DIY project offers a multitude of benefits. We’ve walked you through the essential steps, from selecting the right seeds and preparing the soil to providing adequate sunlight and protection from pests.
But why is this DIY trick a must-try? Beyond the obvious cost savings and access to fresher, healthier produce, growing your own Chinese cabbage allows you to control exactly what goes into your food. You can avoid harmful pesticides and herbicides, ensuring that your family is consuming only the purest, most natural ingredients. Plus, it’s a fantastic way to connect with nature, learn about the growing process, and instill a sense of accomplishment.
Consider these exciting variations to elevate your home-grown Chinese cabbage experience:
* Experiment with different varieties: Explore the diverse world of Chinese cabbage! Try Napa cabbage for its mild flavor and versatility, or Bok Choy for its vibrant green color and slightly peppery taste. Each variety offers a unique culinary experience.
* Companion planting: Enhance your cabbage’s growth by planting it alongside beneficial companions like dill, chamomile, or marigolds. These plants can deter pests and attract pollinators, creating a thriving ecosystem in your garden.
* Ferment your harvest: Transform your abundant harvest into delicious and healthy fermented foods like kimchi or sauerkraut. These probiotic-rich delicacies are not only flavorful but also beneficial for your gut health.
* Succession planting: Extend your harvest season by planting new seeds every few weeks. This ensures a continuous supply of fresh Chinese cabbage throughout the growing season.
Growing Chinese cabbage at home is more than just a gardening project; it’s an investment in your health, well-being, and connection to the natural world. It’s a chance to embrace sustainability, reduce your carbon footprint, and enjoy the unparalleled taste of homegrown goodness.
We wholeheartedly encourage you to embark on this exciting DIY adventure. Don’t be afraid to get your hands dirty, experiment with different techniques, and learn from your experiences. Every gardener, regardless of experience level, can successfully grow Chinese cabbage with a little patience and dedication.
Now, it’s your turn! Grab your seeds, prepare your soil, and get ready to witness the magic of growing your own Chinese cabbage. We are confident that you’ll be amazed by the results.
And most importantly, we want to hear about your journey! Share your experiences, successes, and challenges in the comments below. Post pictures of your thriving cabbage plants, share your favorite recipes, and connect with fellow gardeners. Let’s create a community of passionate home growers who are dedicated to cultivating fresh, healthy, and delicious Chinese cabbage. Your insights and experiences will inspire others to take the plunge and discover the joys of homegrown produce. Happy gardening!
Frequently Asked Questions (FAQ)
What is the best time of year to plant Chinese cabbage?
The ideal time to plant Chinese cabbage depends on your climate. Generally, it’s best to plant in late summer or early fall for a fall or winter harvest. This avoids the intense heat of summer, which can cause the cabbage to bolt (go to seed prematurely). In areas with mild winters, you can also plant in early spring for a spring harvest. Check your local climate and planting guides for specific recommendations.
How much sunlight does Chinese cabbage need?
Chinese cabbage thrives in full sun, requiring at least 6 hours of direct sunlight per day. However, in hotter climates, some afternoon shade can be beneficial to prevent bolting. If you’re growing indoors, use grow lights to supplement natural sunlight.
What kind of soil is best for growing Chinese cabbage?
Chinese cabbage prefers well-drained, fertile soil that is rich in organic matter. Amend your soil with compost or well-rotted manure before planting to improve its fertility and drainage. The ideal soil pH is between 6.0 and 7.5.
How often should I water Chinese cabbage?
Chinese cabbage needs consistent moisture to thrive. Water deeply and regularly, especially during dry periods. Aim to keep the soil consistently moist but not waterlogged. Mulching around the plants can help retain moisture and suppress weeds.
What are some common pests and diseases that affect Chinese cabbage?
Common pests that affect Chinese cabbage include aphids, cabbage worms, flea beetles, and slugs. Diseases include clubroot, black rot, and downy mildew. Regularly inspect your plants for signs of pests or diseases and take appropriate action. Organic pest control methods, such as introducing beneficial insects or using insecticidal soap, can be effective. Ensure good air circulation to prevent fungal diseases.
How do I prevent Chinese cabbage from bolting?
Bolting is a common problem with Chinese cabbage, especially in hot weather. To prevent bolting, choose bolt-resistant varieties, plant at the right time of year, provide adequate shade during hot afternoons, and ensure consistent watering.
When is Chinese cabbage ready to harvest?
Chinese cabbage is typically ready to harvest 60-80 days after planting, depending on the variety. The head should be firm and compact. You can harvest the entire head at once or harvest individual leaves as needed.
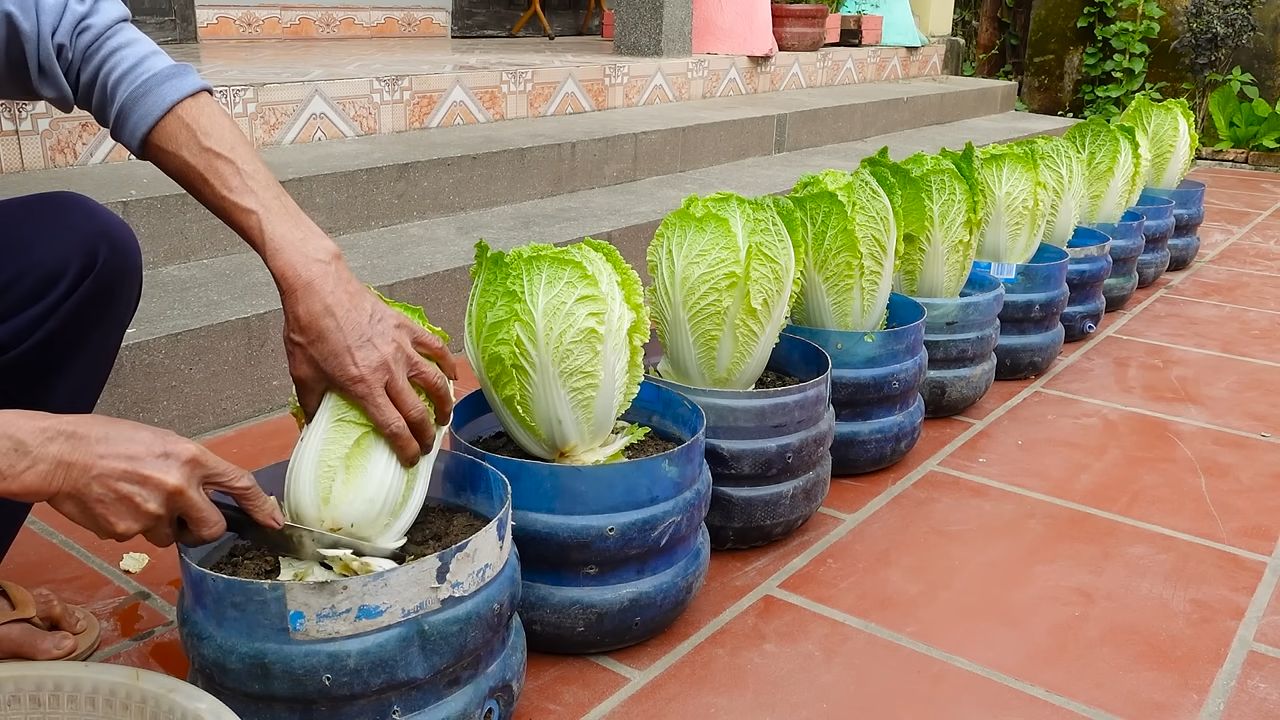
Can I grow Chinese cabbage in containers?
Yes, you can grow Chinese cabbage in containers, provided that the container is large enough to accommodate the plant’s root system. Choose a container that is at least 12 inches in diameter and 12 inches deep. Use a well-draining potting mix and provide adequate sunlight and water.
How do I store harvested Chinese cabbage?
Store harvested Chinese cabbage in the refrigerator. Wrap the head loosely in a plastic bag or damp paper towel to help retain moisture. It can typically be stored for up to two weeks.
What are some ways to use Chinese cabbage in cooking?
Chinese cabbage is a versatile vegetable that can be used in a variety of dishes. It can be eaten raw in salads, stir-fried, steamed, boiled, or fermented. It’s a key ingredient in dishes like kimchi, stir-fries, soups, and dumplings.
Is growing Chinese cabbage at home organic?
Growing Chinese cabbage at home can be organic if you use organic seeds, soil amendments, and pest control methods. Avoid using synthetic fertilizers, pesticides, and herbicides.
Can I save seeds from my Chinese cabbage plants?
Saving seeds from Chinese cabbage can be challenging because it is a biennial plant, meaning it typically flowers and produces seeds in its second year. If you want to save seeds, you’ll need to overwinter the plants and allow them to flower the following spring. However, cross-pollination can occur, so the seeds may not produce true-to-type plants.
What are the nutritional benefits of Chinese cabbage?
Chinese cabbage is a nutritious vegetable that is low in calories and high in vitamins and minerals. It is a good source of vitamin C, vitamin K, folate, and potassium. It also contains antioxidants and fiber.


Leave a Comment