
Grow Dragon Beans and unlock a world of vibrant color and delicious flavor right in your own backyard! Have you ever dreamed of cultivating something truly unique and eye-catching? Imagine the look on your neighbor’s faces when they see these stunning, purple-streaked beans climbing up your trellis. This isn’t just about growing vegetables; it’s about adding a touch of magic to your garden.
For centuries, beans have been a staple crop in cultures around the globe, symbolizing sustenance and community. While the Dragon Bean might not have the same ancient history as some of its cousins, its striking appearance and exceptional taste have quickly made it a favorite among modern gardeners. I think you’ll find that growing these beans is not only rewarding but also surprisingly easy!
In today’s busy world, finding moments of peace and connection with nature can be a challenge. That’s where this DIY guide comes in. I’m going to show you simple, effective tricks and hacks to successfully grow Dragon Beans, even if you’re a complete beginner. Forget complicated gardening jargon and expensive equipment. I’ll walk you through every step, from selecting the right seeds to harvesting your bountiful crop. Get ready to transform your garden into a vibrant oasis and enjoy the satisfaction of growing your own delicious, and beautiful, Dragon Beans!
Drachenbohnen selbst anbauen: Ein umfassender DIY-Leitfaden
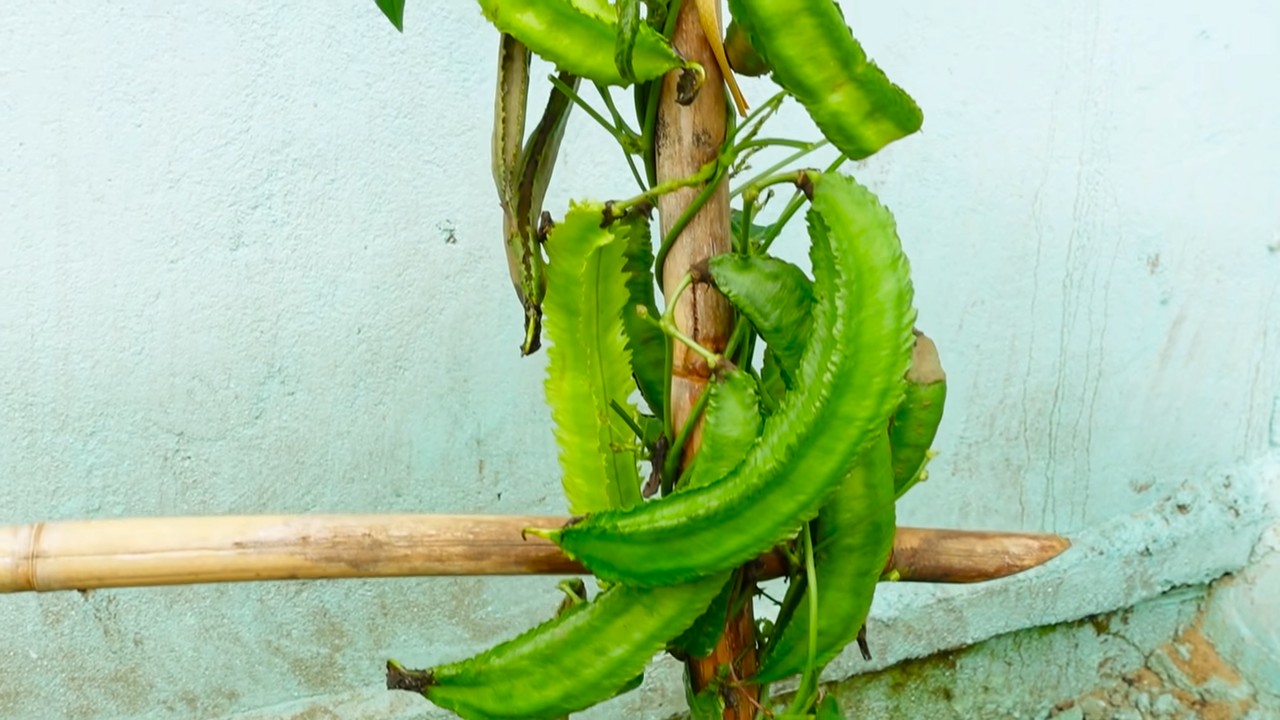
Hallo liebe Gartenfreunde! Habt ihr schon mal von Drachenbohnen gehört? Diese faszinierenden Pflanzen, auch bekannt als Spargelbohnen oder Meterbohnen, sind nicht nur unglaublich lecker, sondern auch ein echter Hingucker im Garten. Ihre langen, schlanken Schoten können bis zu einem Meter lang werden – daher der Name! Ich zeige euch heute, wie ihr diese exotischen Schönheiten ganz einfach selbst anbauen könnt. Keine Angst, es ist einfacher als ihr denkt!
Was sind Drachenbohnen und warum sollte man sie anbauen?
Drachenbohnen (Vigna unguiculata subsp. sesquipedalis) sind eine Unterart der Kuhbohne und stammen ursprünglich aus Asien. Sie sind nicht nur optisch ansprechend, sondern auch reich an Vitaminen und Mineralstoffen. Außerdem sind sie relativ pflegeleicht und bringen einen hohen Ertrag. Hier sind einige Gründe, warum ihr Drachenbohnen in eurem Garten anbauen solltet:
* Ungewöhnliche Optik: Die langen, herabhängenden Schoten sind ein echter Blickfang.
* Hoher Ertrag: Eine einzige Pflanze kann eine große Menge an Bohnen produzieren.
* Gesund und lecker: Drachenbohnen sind reich an Vitaminen, Mineralstoffen und Ballaststoffen.
* Einfache Pflege: Sie sind relativ anspruchslos und widerstandsfähig.
* Lange Erntezeit: Bei guter Pflege könnt ihr über mehrere Wochen hinweg ernten.
* Platzsparend: Da sie klettern, benötigen sie wenig Bodenfläche.
Die richtige Vorbereitung: Was ihr braucht
Bevor wir loslegen, solltet ihr sicherstellen, dass ihr alles Notwendige zur Hand habt. Hier ist eine Liste der Materialien und Werkzeuge, die ihr benötigt:
* Drachenbohnensamen: Am besten kauft ihr sie im Fachhandel oder online. Achtet auf eine gute Qualität.
* Anzuchttöpfe oder -schalen: Für die Voranzucht im Haus.
* Anzuchterde: Spezielle Erde für die Anzucht von Jungpflanzen.
* Gartenerde: Für das Beet oder den Kübel.
* Kompost oder organischer Dünger: Zur Verbesserung der Bodenqualität.
* Pflanzstäbe oder Rankhilfe: Drachenbohnen sind Kletterpflanzen und benötigen Unterstützung.
* Gießkanne oder Gartenschlauch: Zum Bewässern der Pflanzen.
* Gartenschere: Zum Ernten der Bohnen.
* Spitzhacke oder Spaten: Zum Umgraben des Bodens.
* Handschuhe: Zum Schutz eurer Hände.
* Optional: Mulchmaterial (z.B. Stroh oder Holzhackschnitzel) zur Bodenabdeckung.
Schritt-für-Schritt-Anleitung: Drachenbohnen anbauen
Jetzt geht es ans Eingemachte! Ich zeige euch Schritt für Schritt, wie ihr eure eigenen Drachenbohnen erfolgreich anbauen könnt.
1. Die Voranzucht (optional)
Die Voranzucht im Haus ist optional, aber sie gibt den Pflanzen einen Vorsprung und verlängert die Erntezeit.
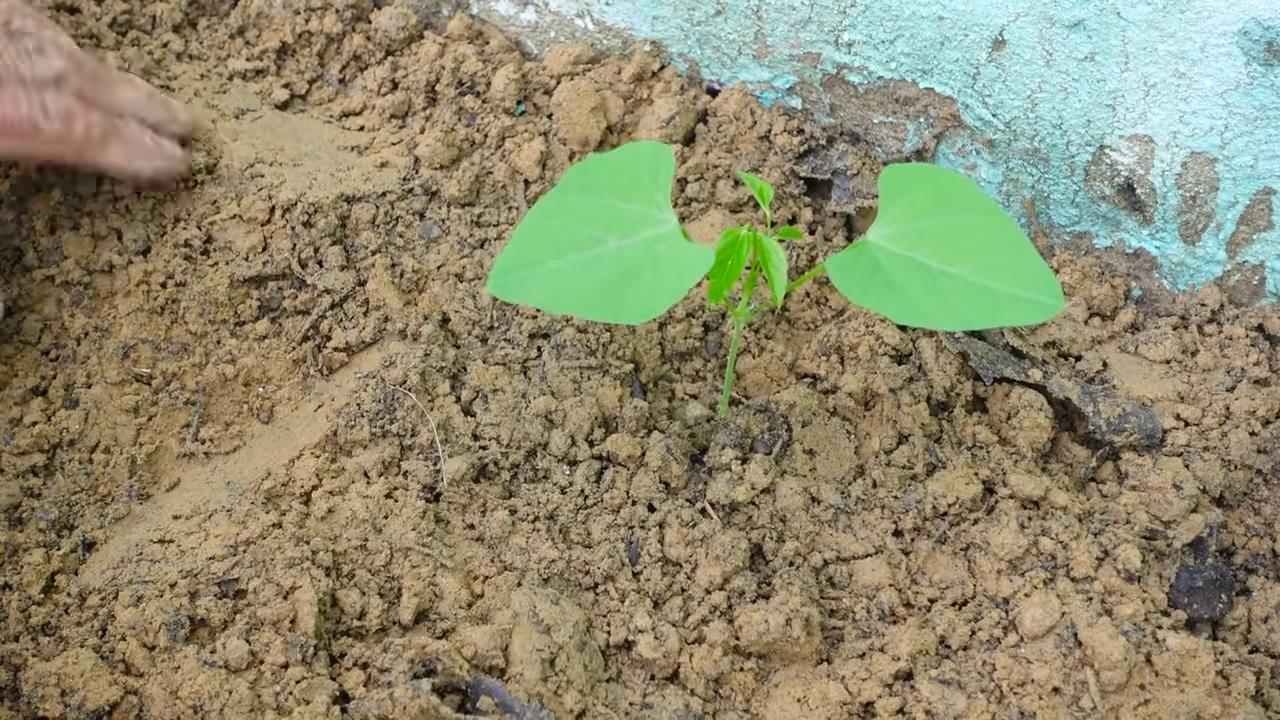
1. Aussaat: Füllt die Anzuchttöpfe mit Anzuchterde und drückt sie leicht an. Legt in jeden Topf 2-3 Samen und bedeckt sie mit etwa 1-2 cm Erde. Gießt die Erde vorsichtig an.
2. Standort: Stellt die Töpfe an einen hellen und warmen Ort (z.B. auf eine Fensterbank). Die ideale Keimtemperatur liegt bei 20-25°C.
3. Feuchtigkeit: Haltet die Erde feucht, aber nicht nass. Vermeidet Staunässe.
4. Keimung: Die Samen keimen in der Regel innerhalb von 7-14 Tagen.
5. Pikieren: Sobald die Jungpflanzen 2-3 Blätter haben, könnt ihr sie pikieren. Das bedeutet, dass ihr die schwächeren Pflanzen entfernt und die stärksten in größere Töpfe umpflanzt.
2. Die Vorbereitung des Beetes oder Kübels
Drachenbohnen bevorzugen einen sonnigen Standort mit lockerem, humusreichem Boden.
1. Standortwahl: Wählt einen sonnigen Standort, der vor starkem Wind geschützt ist.
2. Bodenbearbeitung: Lockert den Boden gründlich auf und entfernt Unkraut. Mischt Kompost oder organischen Dünger unter, um die Bodenqualität zu verbessern.
3. Rankhilfe: Installiert eine Rankhilfe, bevor ihr die Pflanzen setzt. Das kann ein Zaun, ein Spalier, ein Obelisk oder einfach nur ein paar stabile Stäbe sein. Achtet darauf, dass die Rankhilfe hoch genug ist, da die Bohnen bis zu 3 Meter hoch klettern können.
4. Kübel: Wenn ihr die Bohnen in Kübeln anbauen möchtet, wählt ausreichend große Kübel (mindestens 20 Liter Volumen) mit guter Drainage.
3. Das Auspflanzen
Sobald keine Frostgefahr mehr besteht (in der Regel ab Mitte Mai), könnt ihr die Jungpflanzen ins Freie pflanzen.
1. Abhärten: Gewöhnt die Jungpflanzen vor dem Auspflanzen langsam an die Bedingungen im Freien. Stellt sie dazu tagsüber für einige Stunden ins Freie und holt sie abends wieder herein.
2. Pflanzabstand: Pflanzt die Jungpflanzen im Abstand von etwa 30-40 cm entlang der Rankhilfe.
3. Einsetzen: Grabt kleine Löcher und setzt die Jungpflanzen vorsichtig ein. Achtet darauf, dass der Wurzelballen nicht beschädigt wird.
4. Angießen: Gießt die Pflanzen nach dem Einsetzen gründlich an.
4. Die Pflege
Drachenbohnen sind relativ pflegeleicht, aber einige Dinge solltet ihr beachten, um eine reiche Ernte zu erzielen.
1. Bewässerung: Gießt die Pflanzen regelmäßig, besonders während trockener Perioden. Achtet darauf, dass die Erde immer leicht feucht ist, aber vermeidet Staunässe.
2. Düngung: Düngt die Pflanzen während der Wachstumsphase regelmäßig mit einem organischen Dünger oder Kompost.
3. Unkrautbekämpfung: Entfernt regelmäßig Unkraut, um die Pflanzen nicht zu konkurrieren.
4. Mulchen: Mulcht den Boden um die Pflanzen herum mit Stroh oder Holzhackschnitzeln. Das hilft, die Feuchtigkeit im Boden zu halten und Unkraut zu unterdrücken.
5. Anbinden: Helft den Pflanzen beim Klettern, indem ihr sie regelmäßig an der Rankhilfe festbindet.
6. Schädlinge und Krankheiten: Achtet auf Schädlinge wie Blattläuse oder Schnecken. Bei Bedarf könnt ihr biologische Schädlingsbekämpfungsmittel einsetzen. Drachenbohnen sind relativ widerstandsfähig gegen Krankheiten, aber bei feuchtem Wetter können Pilzkrankheiten auftreten. Achtet auf eine gute Belüftung und entfernt befallene Blätter.
5. Die Ernte
Die Erntezeit beginnt in der Regel etwa 2-3 Monate nach der Aussaat.
1. Erntezeitpunkt: Erntet die Bohnen, wenn sie noch jung und zart sind. Die Schoten sollten etwa bleistiftdick sein und sich leicht biegen lassen.
2. Erntetechnik: Schneidet die Bohnen mit einer Gartenschere ab. Achtet darauf, die Pflanze nicht zu beschädigen.
3. Regelmäßige Ernte: Erntet die Bohnen regelmäßig, um die Produktion neuer Schoten anzuregen.
4. Lagerung: Frische Drachenbohnen sind nur begrenzt haltbar. Ihr könnt sie im Kühlschrank für einige Tage aufbewahren oder einfrieren.
Zusätzliche Tipps und Tricks
Hier sind noch ein paar zusätzliche Tipps, die euch beim Anbau von Drachenbohnen helfen können:
* Samen gewinnen: Wenn ihr eure eigenen Samen gewinnen möchtet, lasst einige Schoten an der Pflanze ausreifen. Die Samen sind reif, wenn die Schoten trocken und braun sind.
* Fruchtfolge: Baut Drachenbohnen nicht jedes Jahr am selben Standort an, um Krankheiten vorzubeugen.
* Begleitpfl
Conclusion
So, there you have it! Growing your own dragon beans isn’t just a fun gardening project; it’s a rewarding experience that brings a touch of the extraordinary to your backyard. From the vibrant purple pods to the delicious, nutty flavor, these beans are a conversation starter and a culinary delight.
Why is this DIY trick a must-try? Because it empowers you to connect with your food source, cultivate a unique and beautiful plant, and enjoy a harvest that’s far more satisfying than anything you can buy at the store. Imagine the pride you’ll feel serving a dish made with dragon beans you nurtured from seed to table. It’s a tangible connection to nature and a testament to your green thumb.
But the benefits extend beyond the personal. Growing dragon beans is also an environmentally conscious choice. You’re reducing your reliance on commercially grown produce, minimizing transportation emissions, and potentially avoiding pesticides and herbicides. Plus, these beans are nitrogen fixers, meaning they enrich the soil as they grow, benefiting your garden ecosystem.
Don’t be afraid to experiment! Once you’ve mastered the basic technique, consider exploring different variations. Try growing dragon beans on a trellis for a stunning vertical display. Plant them alongside other climbing vegetables like cucumbers or squash to create a vibrant and productive garden wall. You can even save the seeds from your best-performing plants to ensure a continuous supply of dragon beans year after year.
For a spicier kick, consider adding companion plants like peppers or onions nearby. The subtle flavors can infuse into the soil and subtly alter the taste of your dragon beans. Alternatively, if you prefer a sweeter profile, plant them near strawberries or other berry bushes.
Ready to embark on your dragon bean adventure? We encourage you to give this DIY trick a try. It’s easier than you might think, and the rewards are well worth the effort. Remember to start with high-quality seeds, provide ample sunlight and support, and be patient as your dragon beans climb towards the sky.
And most importantly, share your experience! We’d love to hear about your successes, challenges, and creative variations. Post photos of your dragon bean plants, share your favorite recipes, and connect with other gardeners in the comments below. Let’s build a community of dragon bean enthusiasts and inspire others to discover the joy of growing their own food.
Growing dragon beans is more than just a gardening project; it’s an invitation to connect with nature, nourish your body, and cultivate a sense of accomplishment. So, grab your seeds, get your hands dirty, and prepare to be amazed by the magic of dragon beans!
Frequently Asked Questions (FAQ)
What exactly are dragon beans, and why should I grow them?
Dragon beans, also known as borlotti beans or cranberry beans, are a type of shelling bean prized for their beautiful purple-streaked pods and creamy, nutty-flavored beans. They are a fantastic addition to any garden for several reasons:
* Unique Appearance: The vibrant purple pods add a splash of color and visual interest to your garden.
* Delicious Flavor: The beans themselves have a rich, nutty flavor that is delicious in soups, stews, salads, and more.
* Nutritional Value: Dragon beans are packed with protein, fiber, and essential vitamins and minerals.
* Garden Benefits: As nitrogen fixers, they improve soil health and reduce the need for synthetic fertilizers.
* DIY Satisfaction: Growing your own dragon beans is a rewarding experience that connects you to your food source.
How do I start growing dragon beans?
Growing dragon beans is relatively straightforward. Here’s a step-by-step guide:
1. Choose the Right Location: Dragon beans need at least 6-8 hours of sunlight per day. Select a sunny spot in your garden with well-drained soil.
2. Prepare the Soil: Amend the soil with compost or other organic matter to improve drainage and fertility.
3. Plant the Seeds: Sow the seeds directly into the ground after the last frost, spacing them about 2-3 inches apart and 1 inch deep.
4. Provide Support: Dragon beans are climbing plants, so they need a trellis, fence, or other support structure to grow on.
5. Water Regularly: Keep the soil consistently moist, especially during dry periods.
6. Fertilize Sparingly: Avoid over-fertilizing, as this can lead to excessive foliage growth and fewer beans. A light application of compost tea or a balanced organic fertilizer is sufficient.
7. Harvest the Beans: Harvest the pods when they are plump and the beans inside are fully developed. You can shell the beans and use them fresh, or dry them for later use.
What are some common problems when growing dragon beans, and how can I prevent them?
While dragon beans are relatively easy to grow, there are a few common problems to watch out for:
* Pests: Aphids, bean beetles, and slugs can sometimes attack dragon bean plants. Inspect your plants regularly and take action if you see signs of infestation. Organic pest control methods, such as insecticidal soap or diatomaceous earth, can be effective.
* Diseases: Fungal diseases like powdery mildew and bean rust can also affect dragon beans. Ensure good air circulation around your plants and avoid overhead watering to prevent these diseases.
* Poor Germination: Sometimes, dragon bean seeds may not germinate properly. To improve germination rates, soak the seeds in water for 24 hours before planting.
* Lack of Pollination: While dragon beans are self-pollinating, providing support for bees and other pollinators can help increase yields. Plant flowers near your dragon beans to attract pollinators.
Can I grow dragon beans in containers?
Yes, you can grow dragon beans in containers, but you’ll need to choose a large container (at least 12 inches in diameter) and provide adequate support for the vines. Use a well-draining potting mix and water regularly. Container-grown dragon beans may require more frequent fertilization than those grown in the ground.
How do I dry dragon beans for storage?
To dry dragon beans for storage, shell the beans and spread them out in a single layer on a baking sheet or screen. Place them in a warm, dry place with good air circulation for several weeks, or until they are completely dry and hard. Store the dried beans in an airtight container in a cool, dark place.
What are some delicious ways to use dragon beans in cooking?
Dragon beans are incredibly versatile in the kitchen. Here are a few ideas:
* Soups and Stews: Add them to your favorite soup or stew recipes for a hearty and flavorful boost.
* Salads: Toss cooked dragon beans with fresh vegetables, herbs, and a vinaigrette for a refreshing salad.
* Pasta Dishes: Combine them with pasta, pesto, and Parmesan cheese for a simple and satisfying meal.
* Side Dishes: Serve them as a side dish with roasted meats or vegetables.
* Dips and Spreads: Puree cooked dragon beans with garlic, olive oil, and lemon juice for a delicious dip or spread.
How long do dragon beans take to mature?
Dragon beans typically take 60-80 days to mature from planting to harvest. The exact time will depend on the variety, growing conditions, and climate.
Are dragon beans safe for pets?
While dragon beans themselves are generally considered safe for pets in small quantities, it’s best to avoid feeding them to your pets. The pods and leaves may contain compounds that can be harmful if ingested in large amounts. Always consult with your veterinarian if you have any concerns about your pet’s diet.

Leave a Comment