
Grow Eggplants Faster and harvest plump, delicious fruits sooner than you ever thought possible! Have you ever dreamt of biting into a perfectly grilled eggplant, fresh from your own garden, but felt discouraged by the long growing season? I know I have! Eggplants, with their glossy skin and versatile flavor, are a staple in cuisines around the world, from the Mediterranean’s moussaka to Asia’s stir-fries. Their cultivation dates back thousands of years, originating in India, and they’ve since become a beloved vegetable in countless cultures.
But let’s face it, waiting for eggplants to mature can test even the most patient gardener. That’s where these DIY tricks and hacks come in! We all want to enjoy the fruits (or vegetables!) of our labor as quickly as possible. These simple, yet effective techniques will help you grow eggplants faster, maximizing your yield and shortening the time between planting and enjoying your homegrown bounty. I’m excited to share these secrets with you, so you can savor the taste of success – and delicious eggplants – sooner than you think!
Grow Eggplants Faster: My Secret DIY Tricks!
Hey everyone! I’m so excited to share my tried-and-true methods for getting those gorgeous, glossy eggplants to grow faster and bigger. I’ve experimented for years, and these techniques have consistently given me a bumper crop. Let’s dive in!
Choosing the Right Variety and Starting Early
Before we even get our hands dirty, let’s talk about variety and timing. These are crucial for a head start.
* Variety Matters: Opt for eggplant varieties known for their shorter growing seasons. ‘Black Beauty’ is a classic, but ‘Early Long Purple’ and ‘Ichiban’ are also excellent choices for faster results. Do some research and see what thrives in your local climate!
* Start Indoors: Eggplants need a long growing season, so starting them indoors is key, especially if you live in a cooler climate. I usually start my seeds about 8-10 weeks before the last expected frost.
Step-by-Step Seed Starting Guide
1. Gather Your Supplies: You’ll need:
* Eggplant seeds
* Seed starting trays or small pots
* Seed starting mix (a light, well-draining mix is essential)
* A spray bottle filled with water
* A heat mat (optional, but highly recommended)
* A grow light (also optional, but provides consistent light)
2. Sow the Seeds: Fill your seed starting trays or pots with the seed starting mix. Moisten the mix thoroughly with the spray bottle. Make a small indentation (about ¼ inch deep) in the center of each cell or pot. Place 2-3 seeds in each indentation. Cover the seeds lightly with more seed starting mix.
3. Water Gently: Gently mist the surface of the soil with the spray bottle. Avoid overwatering, as this can lead to damping off (a fungal disease that kills seedlings).
4. Provide Warmth: Eggplant seeds need warmth to germinate. Place the seed starting trays or pots on a heat mat, if you have one. The ideal soil temperature is around 80-90°F (27-32°C). If you don’t have a heat mat, place the trays in a warm location in your house.
5. Provide Light: Once the seedlings emerge (usually in 7-14 days), they’ll need plenty of light. Place them under a grow light or in a sunny window. If using a window, rotate the trays regularly to prevent the seedlings from leaning towards the light.
6. Thin the Seedlings: Once the seedlings have their first true leaves (the second set of leaves), thin them to one seedling per cell or pot. Choose the strongest, healthiest-looking seedling and snip off the others at the soil line. Don’t pull them out, as this can disturb the roots of the remaining seedling.
7. Harden Off the Seedlings: Before transplanting the seedlings outdoors, you’ll need to harden them off. This process gradually acclimates them to the outdoor environment. Start by placing the seedlings outdoors in a sheltered location for an hour or two each day, gradually increasing the amount of time they spend outdoors over the course of a week or two. Protect them from strong winds and direct sunlight during this process.
Preparing the Garden Bed for Eggplant Success
Now, let’s get the garden ready for our eggplant babies!
* Sunlight is Key: Eggplants need at least 6-8 hours of direct sunlight per day. Choose a location in your garden that receives plenty of sun.
* Soil Matters: Eggplants prefer well-drained, fertile soil with a pH of 6.0-7.0. Amend your soil with compost or well-rotted manure to improve its fertility and drainage. I also like to add a little bit of bone meal to provide phosphorus, which is essential for root development.
* Raised Beds are Your Friend: If your soil is heavy clay or poorly drained, consider growing your eggplants in raised beds. Raised beds provide better drainage and allow the soil to warm up faster in the spring.
Transplanting and Initial Care
Okay, the seedlings are hardened off, and the garden bed is prepped. Time to transplant!
1. Choose a Cloudy Day: Transplanting on a cloudy day will help prevent the seedlings from getting stressed by the sun.
2. Dig the Holes: Dig holes that are slightly larger than the root balls of the seedlings. Space the holes about 18-24 inches apart.
3. Add Some Goodies: Before placing the seedlings in the holes, I like to add a handful of compost and a tablespoon of Epsom salts to each hole. Epsom salts provide magnesium, which can help prevent blossom-end rot (a common problem with eggplants).
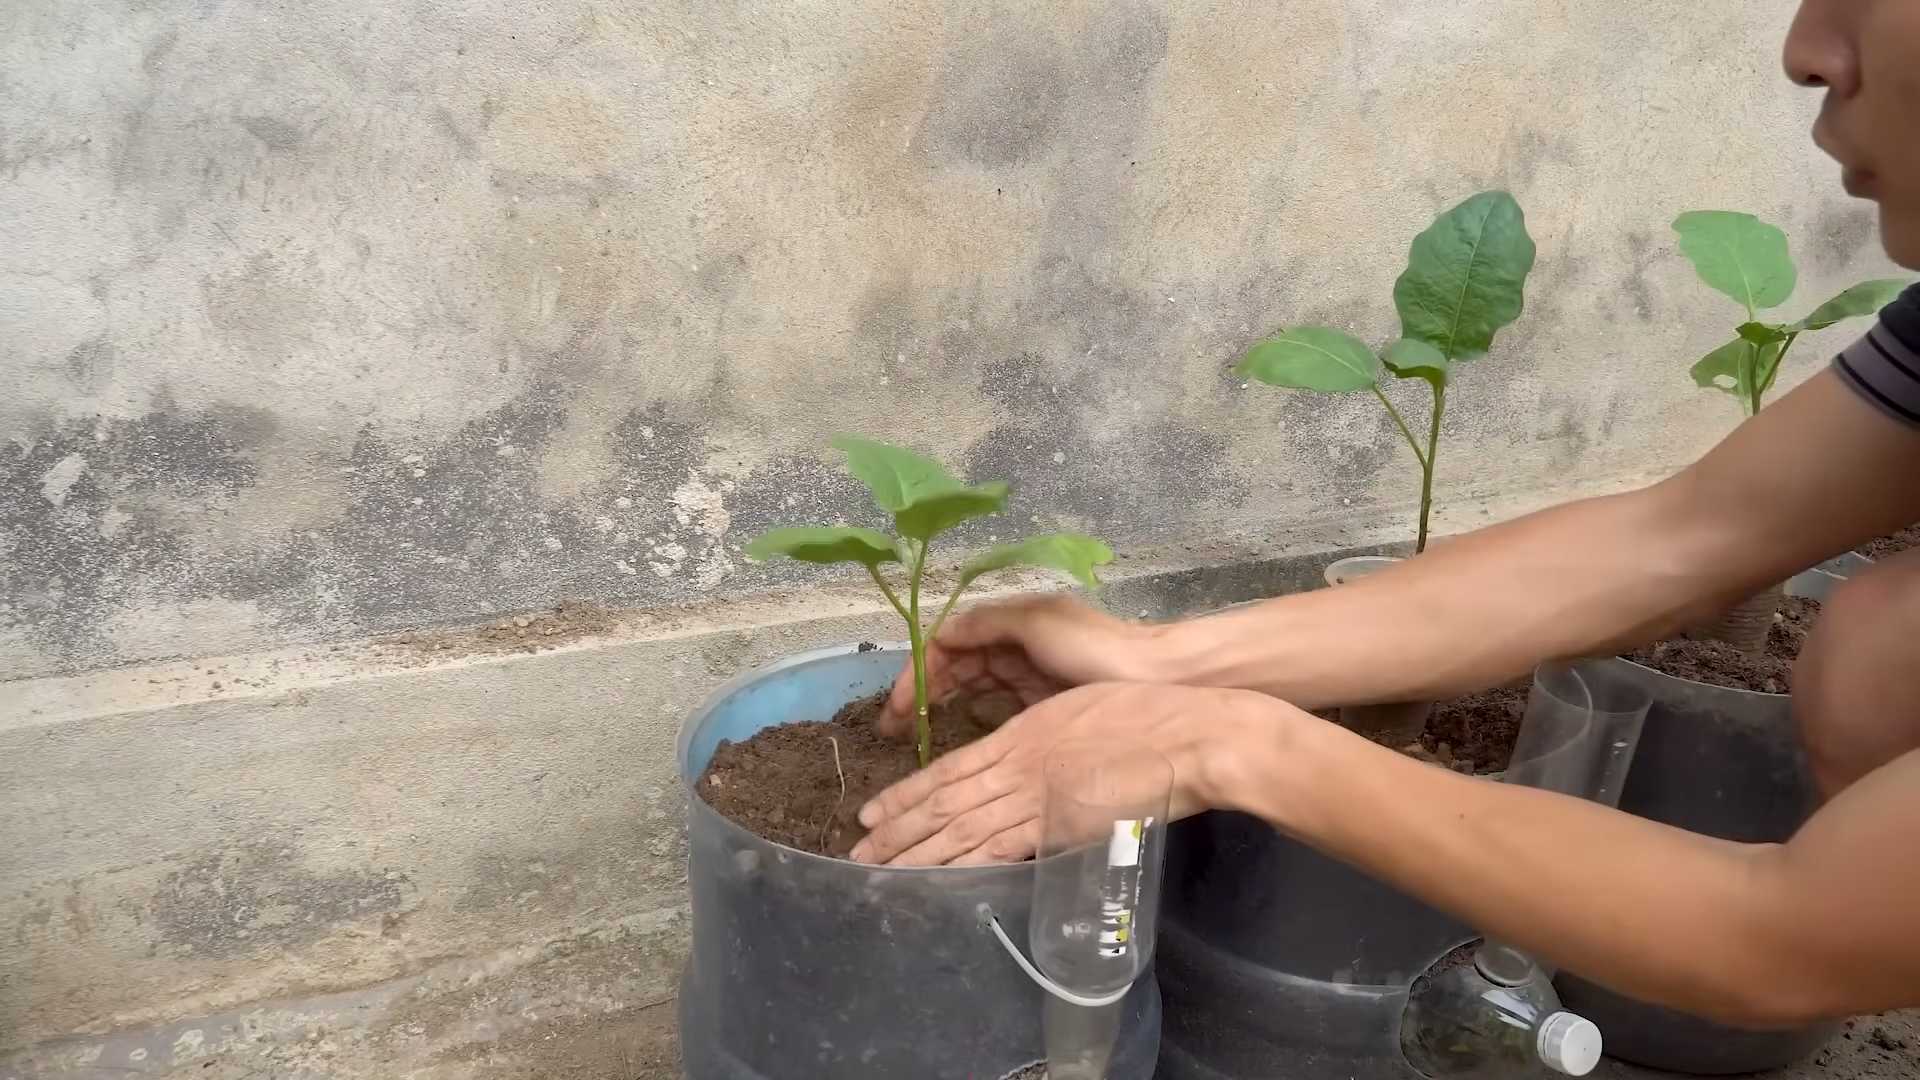
4. Gently Remove the Seedlings: Gently remove the seedlings from their pots, being careful not to damage the roots.
5. Plant and Water: Place the seedlings in the holes and backfill with soil. Water thoroughly.
6. Mulch, Mulch, Mulch!: Apply a layer of mulch around the plants to help retain moisture, suppress weeds, and regulate soil temperature. I like to use straw or shredded leaves.
Boosting Growth with Smart Watering and Feeding
Consistent watering and feeding are essential for fast eggplant growth.
* Water Deeply and Regularly: Eggplants need consistent moisture, especially during hot weather. Water deeply and regularly, aiming for about 1-2 inches of water per week. Avoid overhead watering, as this can promote fungal diseases. Drip irrigation or soaker hoses are ideal.
* Fertilize Regularly: Eggplants are heavy feeders, so they need regular fertilization. I like to use a balanced organic fertilizer every 2-3 weeks. You can also side-dress the plants with compost or well-rotted manure.
* Foliar Feeding: In addition to regular fertilization, I also like to give my eggplants a foliar feeding every couple of weeks. Foliar feeding involves spraying the leaves with a diluted fertilizer solution. This allows the plants to absorb nutrients directly through their leaves, which can give them a quick boost. I use a seaweed extract or fish emulsion for foliar feeding.
Pruning for Bigger and Better Eggplants
Pruning might seem scary, but it’s a game-changer for eggplant production.
* Why Prune?: Pruning helps to improve air circulation, reduce disease, and encourage the plant to focus its energy on producing fewer, larger fruits.
* When to Prune: Start pruning your eggplants when they are about 12-18 inches tall.
* How to Prune:
1. Remove Suckers: Remove any suckers (small shoots that grow from the base of the plant). These suckers will only drain energy from the plant without producing fruit.
2. Remove Lower Leaves: Remove any yellowing or damaged leaves from the bottom of the plant. This will improve air circulation and reduce the risk of disease.
3. Pinch Off Flowers: In the early stages of growth, pinch off some of the flowers to encourage the plant to focus its energy on vegetative growth. Once the plant is well-established, you can let it produce flowers and fruit.
4. Top the Plant: Once the plant has reached a desired height (usually around 2-3 feet), you can top it by pinching off the growing tip. This will encourage the plant to branch out and produce more fruit.
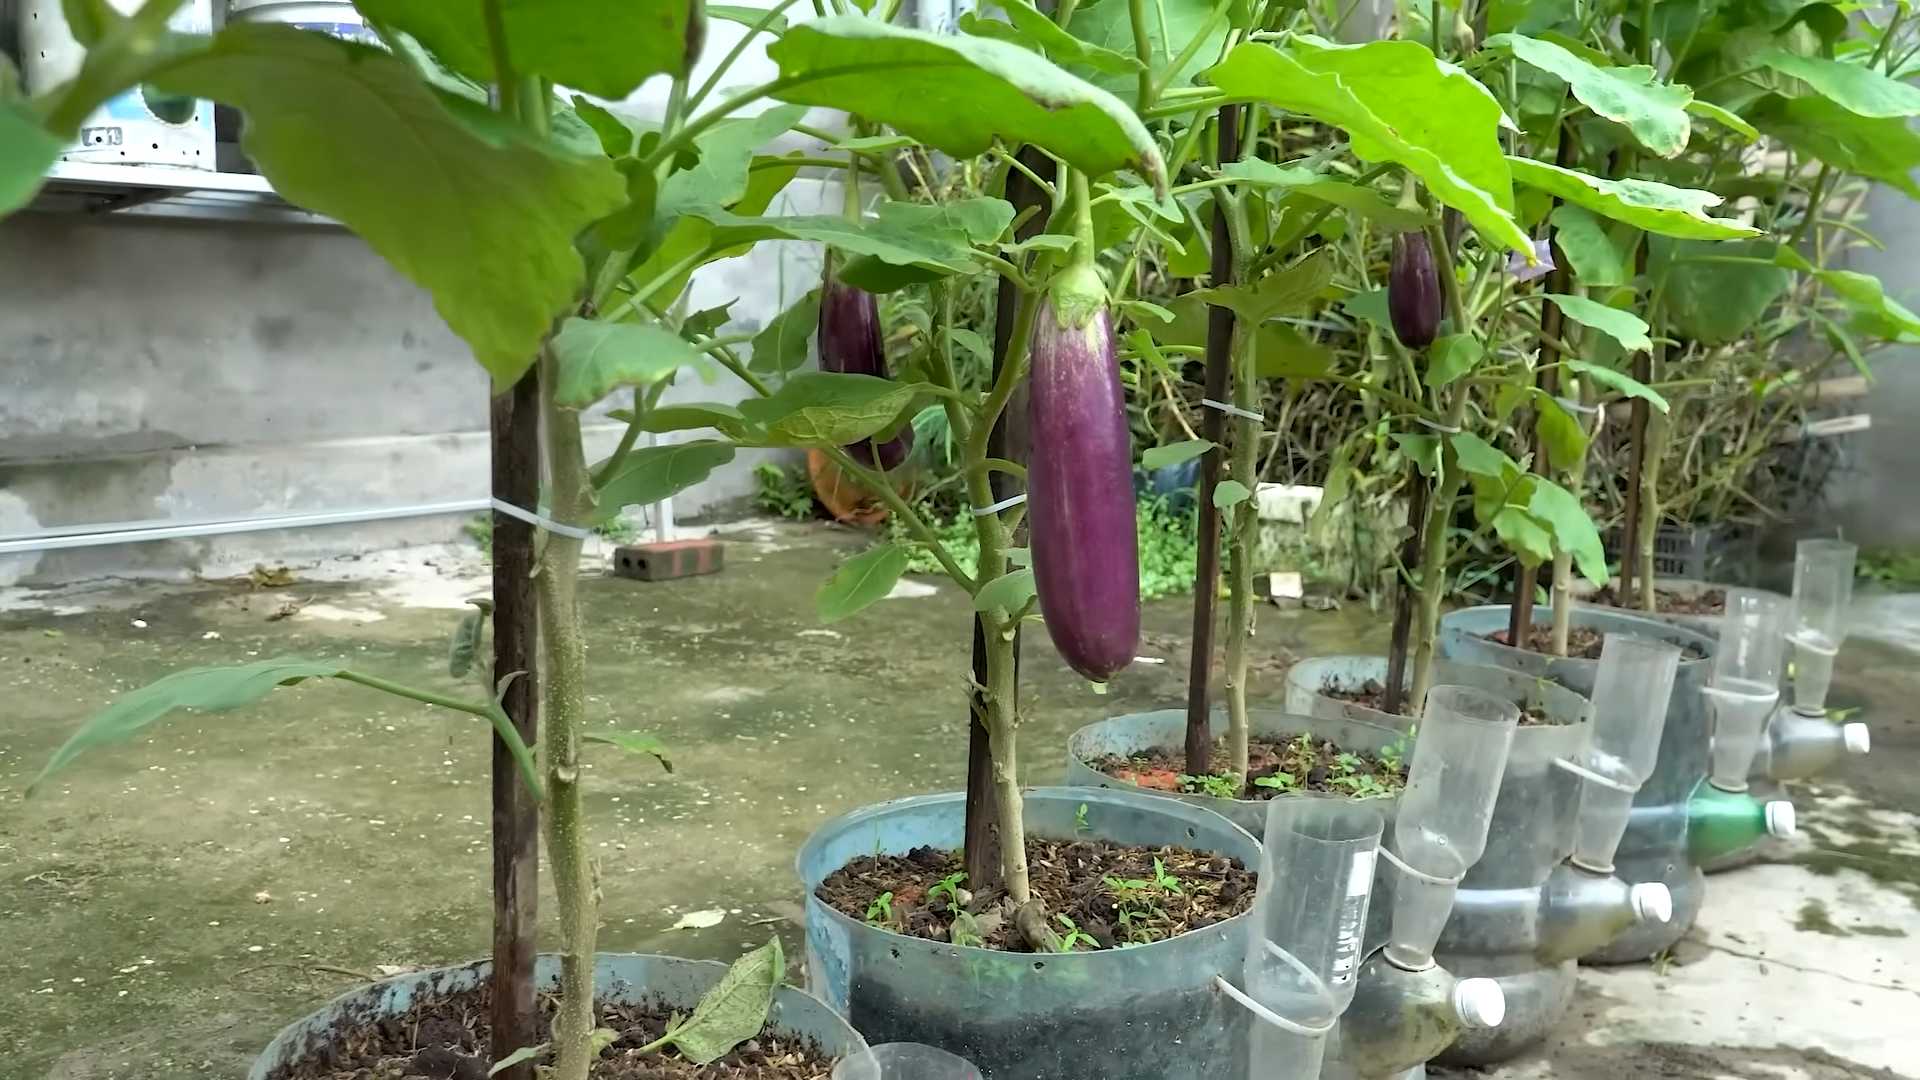
Supporting Your Eggplant Plants
Eggplant fruits can get heavy, so providing support is crucial to prevent the branches from breaking.
* Staking: Use stakes to support the plants. Drive a stake into the ground near each plant and tie the plant to the stake with soft twine.
* Caging: Use tomato cages to support the plants. Place the cages around the plants when they are young.
Protecting Your Eggplants from Pests and Diseases
Pests and diseases can slow down eggplant growth, so it’s important to take preventative measures.
* Common Pests: Common eggplant pests include aphids, flea beetles, and spider mites.
* Common Diseases: Common eggplant diseases include blossom-end rot, verticillium wilt, and powdery mildew.
* Prevention is Key:
* Inspect Plants Regularly: Regularly inspect your plants for signs of pests or diseases.
* Use Organic Pest Control Methods: If you find pests, use organic pest control methods such as insecticidal soap or neem oil.
* Provide Good Air Circulation: Good air circulation will help prevent fungal diseases.
* Water Properly: Avoid overhead watering, as this can promote fungal diseases.
* Rotate Crops: Rotate your crops each year to prevent soilborne diseases.
My Secret Weapon: Epsom Salt Magic!
I mentioned Epsom salts earlier, but I want to emphasize their importance. I give my eggplants a boost with Epsom salts throughout the growing season.
Conclusion
So, there you have it! This simple yet effective DIY trick to grow eggplants faster is a game-changer for any gardener, regardless of experience level. We’ve walked you through the process, highlighting the science behind why it works and providing clear, easy-to-follow instructions. But why is this method a must-try?
Firstly, it significantly reduces the time it takes for your eggplants to mature and produce fruit. Imagine enjoying fresh, homegrown eggplants weeks earlier than you normally would! This is particularly beneficial in regions with shorter growing seasons, where maximizing every day is crucial. Secondly, this technique often leads to a more abundant harvest. By giving your eggplant seedlings a head start and protecting them from early environmental stressors, you’re setting them up for stronger, healthier growth and, ultimately, more delicious eggplants.
Beyond the core method, there are several variations you can explore to tailor it to your specific needs and preferences. For instance, if you live in an area with particularly harsh weather, consider using a slightly thicker plastic or even a mini-greenhouse structure for added protection. You can also experiment with different types of organic fertilizers to further boost growth. Some gardeners have found success using diluted seaweed extract or compost tea to nourish their seedlings during this crucial early stage. Another variation involves using different types of containers. While plastic cups are convenient, biodegradable pots can be a more environmentally friendly option. Just ensure the container is large enough to accommodate the seedling’s root system.
Don’t be afraid to experiment and find what works best for you and your garden. Gardening is all about learning and adapting!
We are confident that this DIY trick will revolutionize your eggplant growing experience. It’s a small investment of time and effort that yields significant rewards. The satisfaction of harvesting your own plump, juicy eggplants, knowing you played a direct role in their success, is truly unparalleled.
We wholeheartedly encourage you to give this method a try. Plant your eggplant seeds, follow our simple steps, and witness the remarkable difference it makes. And most importantly, we want to hear about your experience! Share your results, tips, and variations in the comments section below. Let’s build a community of eggplant enthusiasts and learn from each other’s successes (and even failures!). Your feedback will not only help other gardeners but also contribute to refining and improving this technique for everyone. So, get your hands dirty, embrace the joy of gardening, and prepare to be amazed at how quickly you can grow eggplants faster with this simple DIY trick! Happy gardening!
FAQ
What exactly does this DIY trick entail?
This DIY trick focuses on creating a mini-greenhouse environment for your eggplant seedlings during their initial growth stages. This involves starting your seeds indoors and then transplanting the seedlings into individual containers (like plastic cups) covered with clear plastic wrap or a similar material. This creates a humid and warm environment that promotes faster germination and growth. The plastic covering is gradually removed as the seedlings mature and acclimate to outdoor conditions.
Why does covering the seedlings with plastic help them grow faster?
The plastic covering creates a mini-greenhouse effect. It traps heat and moisture, which are essential for seed germination and early seedling growth. The increased humidity prevents the seedlings from drying out, while the warmer temperature accelerates their metabolic processes, leading to faster development. This is especially beneficial in cooler climates or during early spring when outdoor temperatures are still unpredictable.
How long should I keep the plastic covering on the seedlings?
The duration depends on the weather conditions and the growth of your seedlings. Generally, you should keep the plastic on until the seedlings have developed their first set of true leaves (the leaves that appear after the initial seed leaves, or cotyledons). Once they have true leaves, you can start gradually removing the plastic for a few hours each day to acclimate them to the outdoor environment. This process, called hardening off, typically takes about a week.
What is “hardening off” and why is it important?
Hardening off is the process of gradually exposing your seedlings to outdoor conditions before transplanting them into the garden. Seedlings grown indoors are accustomed to a controlled environment and are vulnerable to sun, wind, and temperature fluctuations. Hardening off allows them to gradually adjust to these conditions, making them more resilient and increasing their chances of survival after transplanting.
Can I use any type of plastic wrap for this trick?
While most clear plastic wraps will work, it’s best to use a thicker, more durable plastic to prevent tearing. You can also use clear plastic bags or even repurposed plastic containers with clear lids. The key is to ensure the plastic is transparent enough to allow sunlight to reach the seedlings.
What type of soil should I use for starting eggplant seeds?
Use a well-draining seed starting mix. These mixes are typically lightweight and sterile, which helps prevent fungal diseases that can affect young seedlings. Avoid using garden soil, as it can be too heavy and may contain pathogens.
How often should I water the seedlings while they are covered with plastic?
Water sparingly. The plastic covering will help retain moisture, so overwatering can lead to fungal problems. Check the soil moisture regularly and water only when the top inch feels dry to the touch. Use a spray bottle to gently mist the soil to avoid disturbing the delicate seedlings.
What if I see condensation forming inside the plastic covering?
Condensation is normal and indicates that the plastic is effectively trapping moisture. However, excessive condensation can create a breeding ground for fungal diseases. If you see a lot of condensation, remove the plastic for a short period each day to allow for ventilation.
When is the best time to transplant the seedlings into the garden?
Transplant your eggplant seedlings into the garden when the danger of frost has passed and the soil has warmed up to at least 60°F (15°C). Eggplants are sensitive to cold temperatures, so it’s crucial to wait until the weather is consistently warm.
What are some common problems I might encounter when growing eggplants, and how can I prevent them?
Common problems include pests like aphids and flea beetles, as well as diseases like blossom-end rot and fungal infections. To prevent these problems, choose disease-resistant varieties, practice good garden hygiene (remove weeds and debris), and monitor your plants regularly for signs of pests or diseases. Use organic pest control methods like insecticidal soap or neem oil if necessary. Ensure your soil is well-drained and rich in nutrients to prevent blossom-end rot.
Can I use this trick for other vegetables besides eggplants?
Yes, this trick can be used for other heat-loving vegetables like peppers and tomatoes. The principle is the same: creating a warm and humid environment to promote faster germination and early growth.
What if I don’t have a sunny windowsill to place my seedlings?
If you don’t have a sunny windowsill, you can use grow lights. Place the grow lights a few inches above the seedlings and keep them on for 14-16 hours per day. This will provide the seedlings with the light they need to grow strong and healthy.
How can I tell if my eggplant seedlings are getting enough light?
If your seedlings are getting enough light, they will be stocky and green. If they are leggy (tall and spindly) and pale, they are not getting enough light. Move them to a sunnier location or use grow lights.
Is it necessary to fertilize the seedlings while they are still indoors?
Yes, fertilizing the seedlings is beneficial. Once the seedlings have developed their first set of true leaves, you can start feeding them with a diluted liquid fertilizer specifically formulated for seedlings. Follow the instructions on the fertilizer package.
What should I do if my eggplant seedlings start to look unhealthy?
If your eggplant seedlings start to look unhealthy, first identify the problem. Check for signs of pests, diseases, or nutrient deficiencies. Adjust your watering and fertilizing practices as needed. If the problem persists, consult with a local gardening expert or extension office for advice.
Leave a Comment