
Peanut harvesting DIY sack method – sounds intriguing, right? Imagine effortlessly gathering your homegrown peanuts without the back-breaking labor and messy digging! For generations, peanut farming, especially on a smaller scale, has been a labor of love, deeply intertwined with cultural traditions in many parts of the world. From the American South to regions in Asia and Africa, the humble peanut holds a significant place in culinary history and agricultural practices.
But let’s be honest, pulling those peanuts from the ground can be a real pain! That’s where this ingenious DIY trick comes in. I’m going to show you how to create a simple, effective sack system that makes peanut harvesting a breeze. No more struggling with stubborn roots or losing precious peanuts in the soil. This method is perfect for home gardeners who want to maximize their yield and minimize the effort.
Why do you need this? Because time is precious, and your back will thank you! Plus, this DIY sack method is incredibly cost-effective and environmentally friendly. So, let’s dive in and discover how to make peanut harvesting a joyful and rewarding experience!

DIY Peanut Harvesting Sack: A Back-Saving Method
Okay, peanut lovers! Are you tired of breaking your back harvesting those delicious legumes? I know I was! After years of bending, stooping, and aching, I finally devised a method that’s not only efficient but also saves my poor spine. This DIY peanut harvesting sack is a game-changer, and I’m so excited to share it with you.
What You’ll Need
Before we dive in, let’s gather our supplies. This project is relatively inexpensive and uses materials you might already have lying around.
* A sturdy burlap sack (or similar heavy-duty fabric bag): Think potato sack material. The size depends on how much you want to harvest at once, but a standard potato sack size is a good starting point. Make sure it’s strong enough to hold a decent amount of peanuts and soil without tearing.
* PVC pipe (approximately 1-inch diameter): You’ll need enough to create a frame around the top of the sack. Measure the circumference of the sack’s opening and add a few inches for overlap.
* PVC pipe cutter or saw: For cutting the PVC pipe to the correct length.
* PVC pipe cement: To securely join the PVC pipe pieces.
* Heavy-duty staples or rivets: To attach the sack to the PVC frame. I prefer rivets for extra durability.
* Staple gun or rivet gun: Depending on your chosen method of attachment.
* Gloves: Protect your hands from dirt and potential scrapes.
* Scissors or a utility knife: For trimming excess fabric.
* Measuring tape or ruler: For accurate measurements.
* Optional: Shoulder strap (old belt or heavy-duty webbing): For easier carrying.
* Optional: Metal eyelets and eyelet pliers: If you’re adding a shoulder strap.
Building the Peanut Harvesting Sack: Step-by-Step
Alright, let’s get our hands dirty! This project is pretty straightforward, and I promise, the results are worth the effort.
1. Prepare the Burlap Sack:
* First, inspect your burlap sack for any holes or weak spots. If you find any, reinforce them with some heavy-duty thread or patches.
* Next, turn the top edge of the sack down about 2-3 inches to create a hem. This will provide a stronger surface for attaching the PVC frame.
* Secure the hem by folding it over again and either sewing it in place or using fabric glue. I prefer sewing for a more robust hem.
2. Cut and Assemble the PVC Frame:
* Measure the circumference of the sack’s opening. This is the length of PVC pipe you’ll need. Remember to add a few extra inches for overlap when joining the ends.
* Using your PVC pipe cutter or saw, carefully cut the PVC pipe to the measured length. Make sure the cut is clean and straight.
* Apply PVC pipe cement to the inside of one end of the PVC pipe and the outside of the other end.
* Quickly join the two ends together, twisting slightly to ensure a secure bond. Hold them firmly in place for a few seconds until the cement sets. You should now have a circular PVC frame.
3. Attach the Sack to the PVC Frame:
* Position the PVC frame inside the hemmed opening of the burlap sack. Make sure the hem is evenly distributed around the frame.
* Now, using your staple gun or rivet gun, attach the sack to the PVC frame. Start by placing staples or rivets at even intervals around the circumference (e.g., every 2-3 inches).
* Make sure the staples or rivets are securely fastened and don’t tear through the fabric. If you’re using staples, you might want to fold the fabric over the staple before securing it for extra strength.
* Continue adding staples or rivets until the sack is firmly attached to the PVC frame. The more secure the attachment, the longer your harvesting sack will last.
4. Add a Shoulder Strap (Optional):
* If you want to make carrying the sack even easier, adding a shoulder strap is a great idea. An old belt or some heavy-duty webbing works perfectly.
* Decide where you want to position the shoulder strap on the PVC frame. I recommend placing it on opposite sides for balanced weight distribution.
* Using a drill, create two small holes on each side of the PVC frame where you want to attach the strap.
* Insert metal eyelets into the holes to reinforce them and prevent the strap from tearing through the PVC. Use eyelet pliers to securely crimp the eyelets in place.
* Attach the shoulder strap to the eyelets using buckles, clips, or by simply threading it through and tying it securely.
5. Final Touches:
* Inspect the entire sack for any loose staples, rivets, or weak spots. Reinforce them as needed.
* Trim any excess fabric around the top of the sack for a cleaner look.
* Give your new peanut harvesting sack a test run to make sure it’s comfortable and functional.
Harvesting Peanuts with Your New Sack: A Step-by-Step Guide
Now that you’ve built your amazing peanut harvesting sack, let’s put it to good use! Here’s how I use mine for a more efficient and back-friendly harvest.
1. Prepare the Peanut Plants:
* Before you start digging, it’s a good idea to loosen the soil around the peanut plants. This makes it easier to pull them up and reduces the risk of damaging the peanuts.
* You can use a garden fork or a shovel to gently loosen the soil. Be careful not to dig too deep or you might accidentally cut the peanut pods.
2. Dig and Lift the Plants:
* Using your garden fork or shovel, carefully dig around the base of the peanut plant.
* Gently lift the plant from the ground, trying to keep as much of the root system intact as possible. The peanuts are attached to the roots, so you want to avoid breaking them off.
3. Shake Off Excess Soil:
* Hold the peanut plant upside down and gently shake off as much excess soil as possible. This will make the peanuts easier to clean later.
* You can also use a hose to lightly rinse off the soil, but be careful not to damage the peanuts.
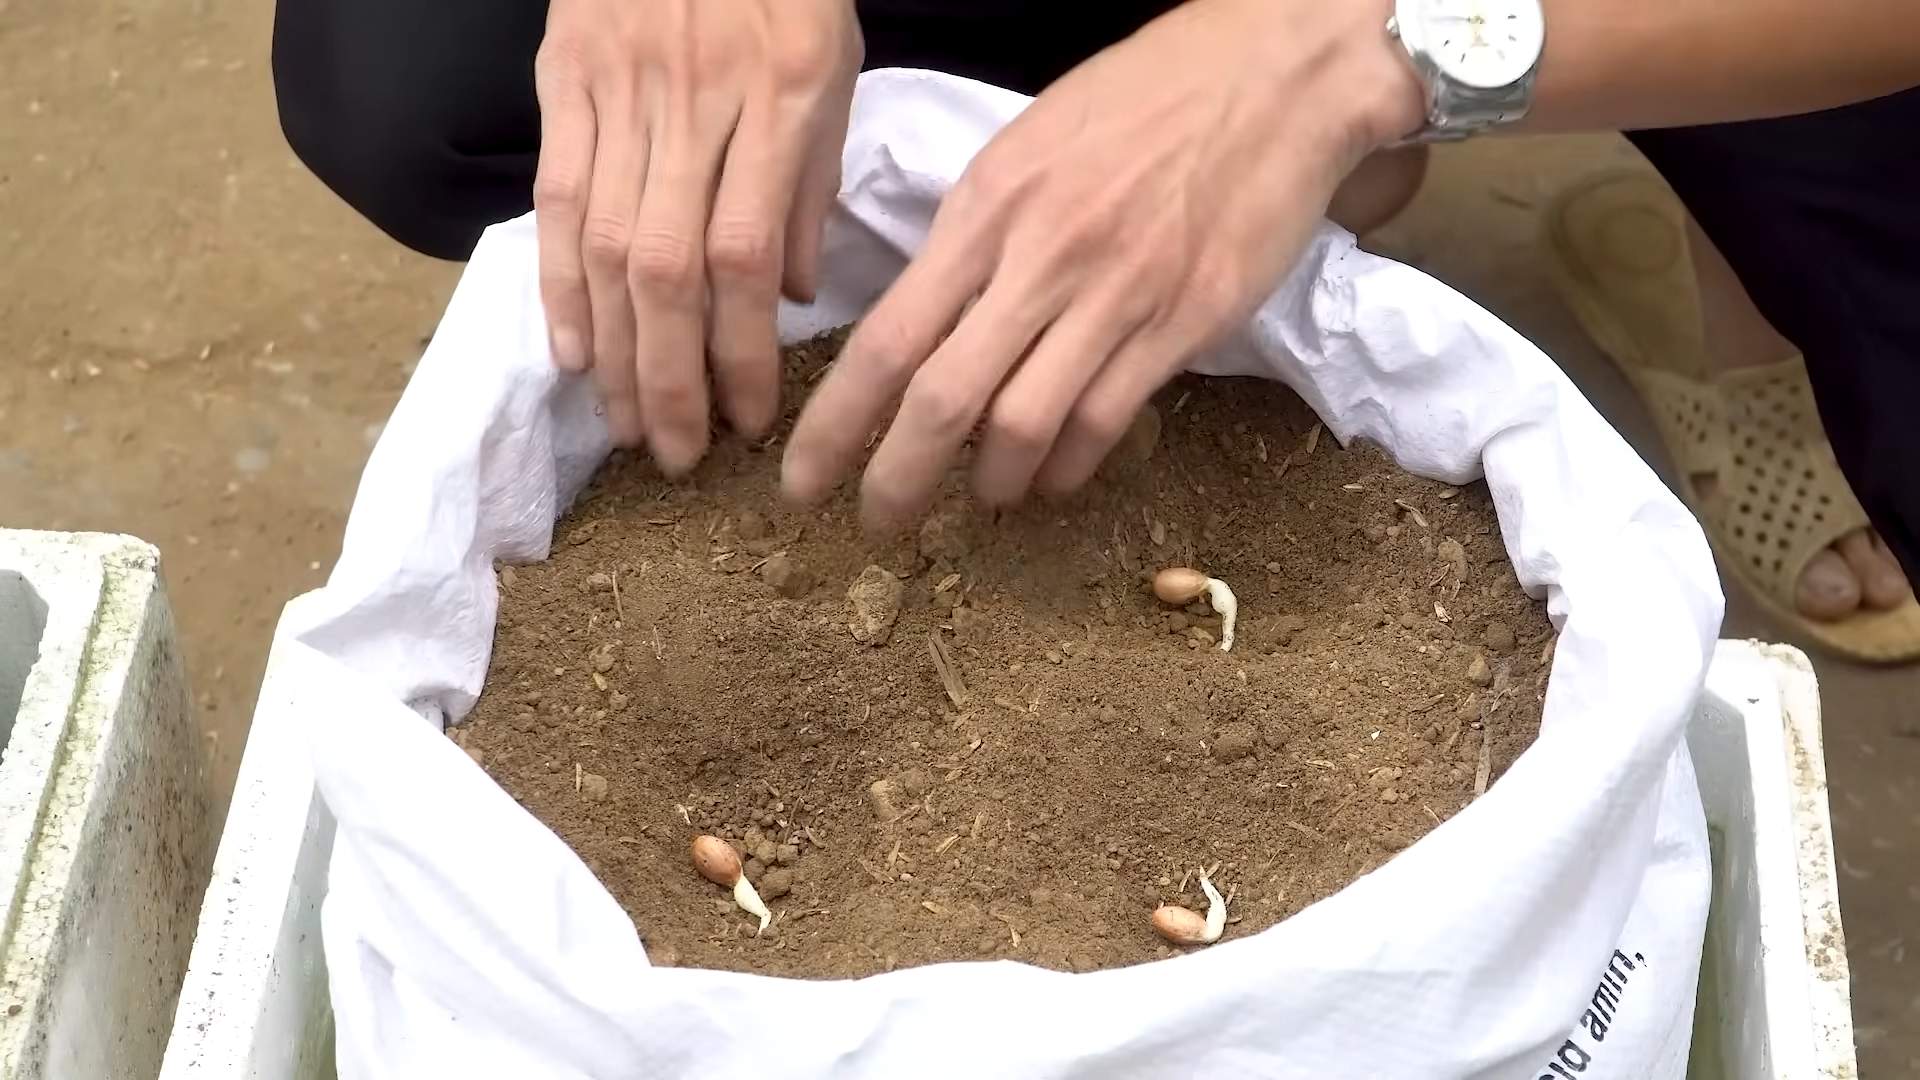
4. Place the Plants in the Harvesting Sack:
* Now, here’s where your DIY sack comes in handy! Place the entire peanut plant, roots and all, into the harvesting sack.
* The wide opening of the sack makes it easy to deposit the plants without having to bend over excessively.
5. Repeat and Carry:
* Repeat steps 2-4 for each peanut plant until your sack is full or you’ve harvested all your peanuts.
* If you added a shoulder strap, sling the sack over your shoulder for easier carrying. This will distribute the weight more evenly and prevent back strain.
6. Curing and Cleaning:
* Once you’ve harvested all your peanuts, it’s time to cure them. Curing helps to dry the peanuts and improve their flavor.
* Spread the peanut plants out in a well-ventilated area, such as a garage or shed. Make sure the peanuts are not exposed to direct sunlight, as this can cause them to dry out too quickly.
* Allow the peanuts to cure for several weeks, or until the shells are dry and brittle.
* After curing, you can clean the peanuts by removing them from the plants and washing them in a bucket of water.
* Spread the cleaned peanuts out on a screen or tray to dry completely before storing them.
Tips and Tricks for a Successful Peanut Harvest
Here are a few extra tips I’ve learned over the years that can help you have an even more successful peanut harvest:
* Harvest at the Right Time: Peanuts are typically ready to harvest in the fall, after the plants have flowered and the leaves have started to turn yellow. Check your specific peanut variety for the recommended harvest time.
* Don’t Overfill the Sack: While it’s tempting to fill the sack to the brim, it’s best to avoid overfilling it. An overly heavy sack can be difficult to carry and can put unnecessary strain on your back.
* Work in Sections: If you have a large peanut patch, consider working in sections. Harvest a small area at a time and then move on to the next. This will make the task less overwhelming.
* Take Breaks: Harvesting peanuts can be hard work, so be sure to take frequent breaks. Stretch your muscles, drink plenty of water, and rest your back.
* Enlist Help: If possible, enlist the help of friends or family members. Harvesting peanuts is much more fun (and easier) when you have a team.
* Consider
Conclusion
So, there you have it! The peanut harvesting DIY sack method is more than just a clever trick; it’s a game-changer for home gardeners and small-scale peanut enthusiasts. Forget wrestling with tangled vines and painstakingly digging up each individual peanut. This method streamlines the entire process, saving you time, energy, and a whole lot of backache.
Why is this a must-try? Because it’s efficient, cost-effective, and incredibly rewarding. Imagine the satisfaction of pulling up a sack overflowing with freshly harvested peanuts, knowing you nurtured them from seed to snack with your own two hands. The DIY sack method minimizes peanut loss during harvesting, ensuring you get the most out of your hard work. Plus, it’s a fantastic way to involve kids in the gardening process, teaching them about where their food comes from and fostering a love for the natural world.
But the fun doesn’t stop there! Feel free to experiment with variations on this method. For example, if you’re growing a particularly large variety of peanuts, you might consider using larger, more durable sacks. You could also try adding drainage holes to the bottom of the sacks to prevent waterlogging in particularly wet climates. Another variation is to use different types of breathable material for the sacks. Burlap is a classic choice, but you could also experiment with other natural fibers like jute or even repurposed cloth bags. Just ensure the material is strong enough to hold the weight of the soil and peanuts.
Consider adding a layer of mulch around the base of the sacks to help retain moisture and suppress weeds. This can be especially beneficial in hotter climates. You can also adjust the planting density within the sacks to optimize peanut production. Experiment with different spacing to see what works best for your particular variety and growing conditions.
The key to success with this method is observation and adaptation. Pay close attention to your peanut plants throughout the growing season, and adjust your techniques as needed. Don’t be afraid to experiment and find what works best for you.
We are confident that once you try this **peanut harvesting** DIY sack method, you’ll never go back to the old way. It’s a simple, effective, and enjoyable way to harvest your own homegrown peanuts. So, grab your sacks, get planting, and prepare to be amazed by the bounty you can reap.
Now, we want to hear from you! Have you tried this method before? What tips and tricks have you discovered? Share your experiences in the comments below. Your insights could help other gardeners achieve even greater success with their peanut harvests. Let’s build a community of peanut-growing enthusiasts and learn from each other. We can’t wait to see your pictures and hear your stories! Happy harvesting!
Frequently Asked Questions (FAQ)
What type of sack is best for this method?
The best type of sack for the peanut harvesting DIY sack method is one that is durable, breathable, and large enough to accommodate the peanut plants and their root systems. Burlap sacks are a popular choice because they are strong, relatively inexpensive, and allow for good air circulation. However, you can also use other types of sacks made from natural fibers like jute or even repurposed cloth bags. The key is to ensure that the material is strong enough to hold the weight of the soil and peanuts without tearing or breaking. Avoid using plastic bags, as they can trap moisture and lead to root rot. Consider the size of your peanut plants when choosing the sack size. A good rule of thumb is to select a sack that is at least 12 inches in diameter and 18 inches deep.
How often should I water the peanut plants in the sacks?
Watering frequency will depend on several factors, including the climate, the type of soil you’re using, and the size of the sacks. In general, you should water your peanut plants whenever the top inch of soil feels dry to the touch. During hot, dry weather, you may need to water them daily. Be careful not to overwater, as this can lead to root rot. Ensure that the sacks have adequate drainage to prevent water from pooling at the bottom. A good way to check if your plants need water is to stick your finger into the soil. If the soil feels dry an inch or two below the surface, it’s time to water. When watering, water deeply and slowly, allowing the water to soak into the soil and reach the roots. Avoid watering the foliage, as this can encourage fungal diseases.
What kind of soil should I use in the sacks?
Peanuts thrive in well-draining, sandy loam soil. Avoid using heavy clay soils, as they can become waterlogged and inhibit root growth. You can create your own potting mix by combining equal parts of garden soil, compost, and sand. The compost will provide essential nutrients, while the sand will improve drainage. You can also purchase pre-made potting mixes specifically designed for vegetables. Ensure that the soil is loose and friable, allowing the peanut roots to easily penetrate and expand. Before filling the sacks, amend the soil with a slow-release fertilizer to provide a steady supply of nutrients throughout the growing season.
How do I know when the peanuts are ready to harvest?
Determining the optimal time to harvest peanuts is crucial for maximizing yield and flavor. The most reliable indicator is the maturity of the peanut pods themselves. Approximately 120-150 days after planting, start checking the pods regularly. Dig up a few sample plants and examine the pods. The shells should be hard and the veins on the shells should be prominent. The inside of the shell should be dark in color. The kernels should be plump and well-formed. Another indicator is the yellowing of the foliage. As the plants mature, the leaves will begin to turn yellow and brown. However, don’t rely solely on the foliage color, as this can also be caused by disease or nutrient deficiencies. The most accurate way to determine maturity is to examine the pods. If the majority of the pods are mature, it’s time to harvest.
Can I reuse the sacks for future peanut crops?
Yes, you can reuse the sacks for future peanut crops, but it’s important to properly clean and sanitize them first. After harvesting, remove all of the soil and plant debris from the sacks. Wash the sacks thoroughly with soap and water to remove any dirt or residue. You can also soak the sacks in a solution of bleach and water (1 part bleach to 10 parts water) to kill any remaining pathogens. Rinse the sacks thoroughly with clean water and allow them to dry completely in the sun before storing them. Inspect the sacks for any tears or damage and repair them as needed. Store the sacks in a dry, well-ventilated area to prevent mold and mildew growth. By properly cleaning and storing the sacks, you can extend their lifespan and reuse them for many years to come.
What if I live in a colder climate? Can I still use this method?
Yes, you can still use the peanut harvesting DIY sack method in colder climates, but you may need to take some extra precautions to ensure a successful harvest. Peanuts require a long growing season (120-150 days) and warm temperatures (70-80°F) to thrive. If you live in a colder climate with a shorter growing season, you can start your peanut plants indoors 4-6 weeks before the last expected frost. Transplant the seedlings into the sacks after the danger of frost has passed. You can also use row covers or cold frames to protect the plants from frost and extend the growing season. Choose a peanut variety that is known to mature quickly in cooler climates. Ensure that the sacks are placed in a sunny location that receives at least 6-8 hours of direct sunlight per day. You may also need to provide supplemental heat to the plants during colder periods. By taking these extra steps, you can successfully grow peanuts in colder climates using the sack method.
Leave a Comment