
Grow Okra on Rooftop: Imagine stepping onto your rooftop and harvesting fresh, vibrant okra, ready to be transformed into a delicious gumbo or a crispy, fried delight. Sounds like a dream? It doesn’t have to be! For centuries, okra has been a staple in cuisines around the world, particularly in African, Indian, and Southern American cooking. Its unique flavor and nutritional benefits have made it a beloved vegetable, and now, you can cultivate this garden gem right in your own urban oasis.
But why should you bother learning how to grow okra on rooftop? Well, for starters, it’s incredibly rewarding to nurture your own food source. Plus, with rising grocery costs and concerns about food miles, growing your own produce is a sustainable and cost-effective solution. Many people think they need a sprawling backyard to enjoy fresh vegetables, but that’s simply not true! Rooftop gardening is becoming increasingly popular, especially for city dwellers who crave a connection to nature and a taste of homegrown goodness.
This DIY guide is your key to unlocking the secrets of successful rooftop okra cultivation. I’ll walk you through everything from choosing the right containers and soil to providing optimal sunlight and watering techniques. Get ready to transform your rooftop into a thriving edible landscape and enjoy the satisfaction of harvesting your very own okra bounty!
Growing Okra on Your Rooftop: A Beginner’s Guide
Hey there, fellow gardening enthusiasts! Ever thought about transforming your rooftop into a vibrant, edible oasis? Well, I’m here to tell you it’s totally doable, and growing okra is a fantastic place to start. Okra, also known as “lady’s fingers,” is a heat-loving vegetable that thrives in sunny conditions, making it perfect for rooftop gardens. Plus, it’s packed with nutrients and adds a unique flavor to your dishes. Let’s dive into how you can successfully grow okra on your rooftop!
Choosing the Right Container and Soil
Before we get our hands dirty, let’s talk about the foundation of our rooftop okra garden: the container and the soil.
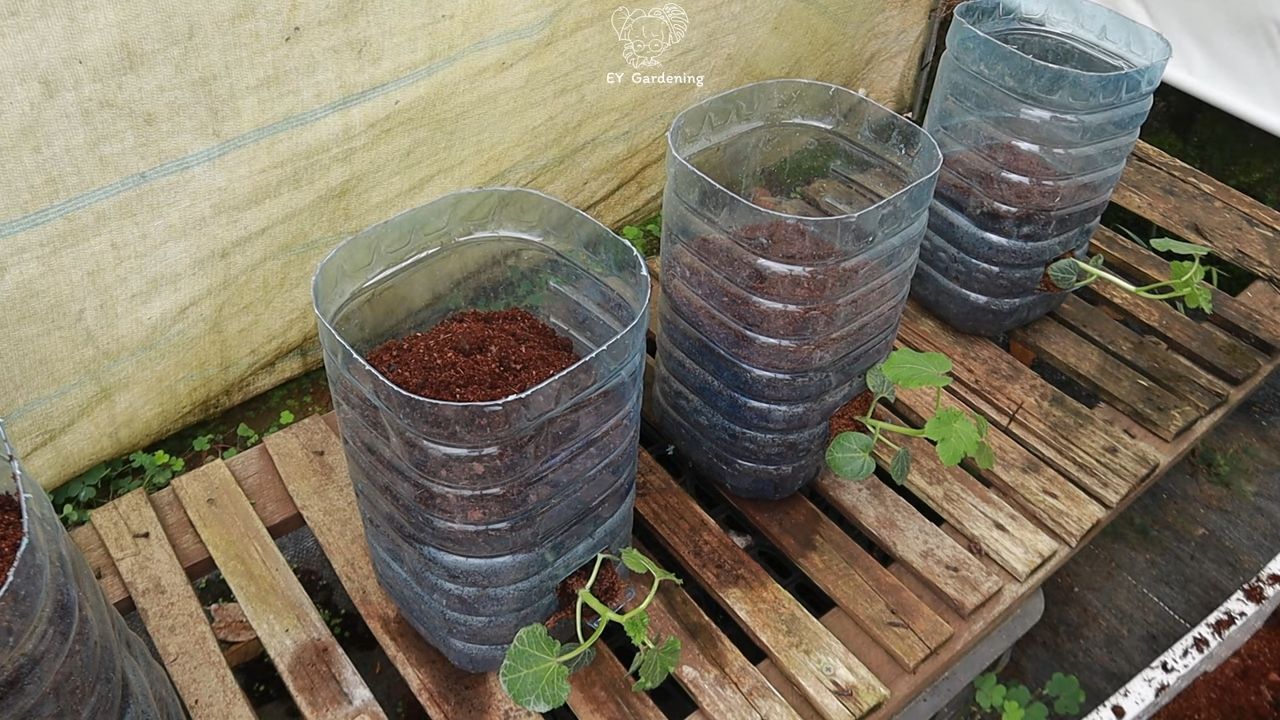
* Container Size: Okra plants need room to grow, both above and below the soil. I recommend using containers that are at least 12-18 inches in diameter and depth. This will give the roots enough space to spread out and support the plant’s growth.
* Container Material: You can use various materials for your containers, such as plastic, terracotta, or even repurposed containers like large buckets or barrels. Just make sure the container has drainage holes at the bottom to prevent waterlogging.
* Drainage is Key: Proper drainage is crucial for okra plants. If your container doesn’t have enough drainage holes, you can drill a few more. You can also add a layer of gravel or pebbles at the bottom of the container to improve drainage.
* Potting Mix Matters: Don’t use garden soil in your containers! It’s too heavy and doesn’t drain well. Instead, opt for a high-quality potting mix that’s specifically designed for container gardening. Look for a mix that contains ingredients like peat moss, perlite, and vermiculite. These ingredients help retain moisture while providing good drainage.
* Soil pH: Okra prefers a slightly acidic to neutral soil pH, ideally between 6.0 and 7.0. You can test your soil pH using a soil testing kit, which you can find at most garden centers. If your soil is too alkaline, you can amend it with sulfur or peat moss to lower the pH.
Planting Your Okra Seeds
Now that we have our containers and soil ready, it’s time to plant our okra seeds!
1. Timing is Everything: Okra is a warm-season crop, so it’s essential to wait until the soil has warmed up before planting. I usually wait until after the last frost and when the soil temperature is consistently above 65°F (18°C).
2. Soaking the Seeds: To speed up germination, I like to soak the okra seeds in warm water for 12-24 hours before planting. This helps soften the seed coat and allows the seeds to absorb moisture more easily.
3. Planting Depth: Plant the okra seeds about ½ inch deep in the potting mix. Space the seeds about 2-3 inches apart. If you’re planting multiple seeds in the same container, make sure to thin them out later, leaving only the strongest seedling.
4. Watering After Planting: After planting, gently water the soil until it’s evenly moist. Avoid overwatering, as this can cause the seeds to rot.
5. Location, Location, Location: Place the containers in a location that receives at least 6-8 hours of direct sunlight per day. Okra plants need plenty of sunlight to thrive.
6. Patience is a Virtue: Okra seeds typically germinate in 7-14 days, depending on the soil temperature and moisture levels. Be patient and keep the soil consistently moist, but not waterlogged.
Caring for Your Okra Plants
Once your okra seedlings emerge, it’s time to provide them with the care they need to grow into healthy, productive plants.
* Watering: Okra plants need consistent watering, especially during hot, dry weather. Water deeply whenever the top inch of soil feels dry to the touch. Avoid overhead watering, as this can increase the risk of fungal diseases. Drip irrigation or soaker hoses are excellent options for watering okra plants.
* Fertilizing: Okra plants are heavy feeders, so it’s essential to fertilize them regularly. I like to use a balanced fertilizer, such as a 10-10-10 or 14-14-14, every 2-3 weeks. You can also use organic fertilizers, such as compost tea or fish emulsion.
* Mulching: Mulching around your okra plants helps retain moisture in the soil, suppress weeds, and regulate soil temperature. You can use organic mulches, such as straw, wood chips, or shredded leaves.
* Pruning: Okra plants don’t require much pruning, but you can remove any yellowing or dead leaves to improve air circulation and prevent disease.
* Pest Control: Keep an eye out for common okra pests, such as aphids, spider mites, and flea beetles. You can control these pests with insecticidal soap, neem oil, or by handpicking them off the plants.
* Supporting the Plants: As okra plants grow taller, they may need support to prevent them from falling over. You can use stakes, trellises, or cages to support the plants.
Harvesting Your Okra
The best part of growing okra is, of course, harvesting your own fresh, homegrown pods!
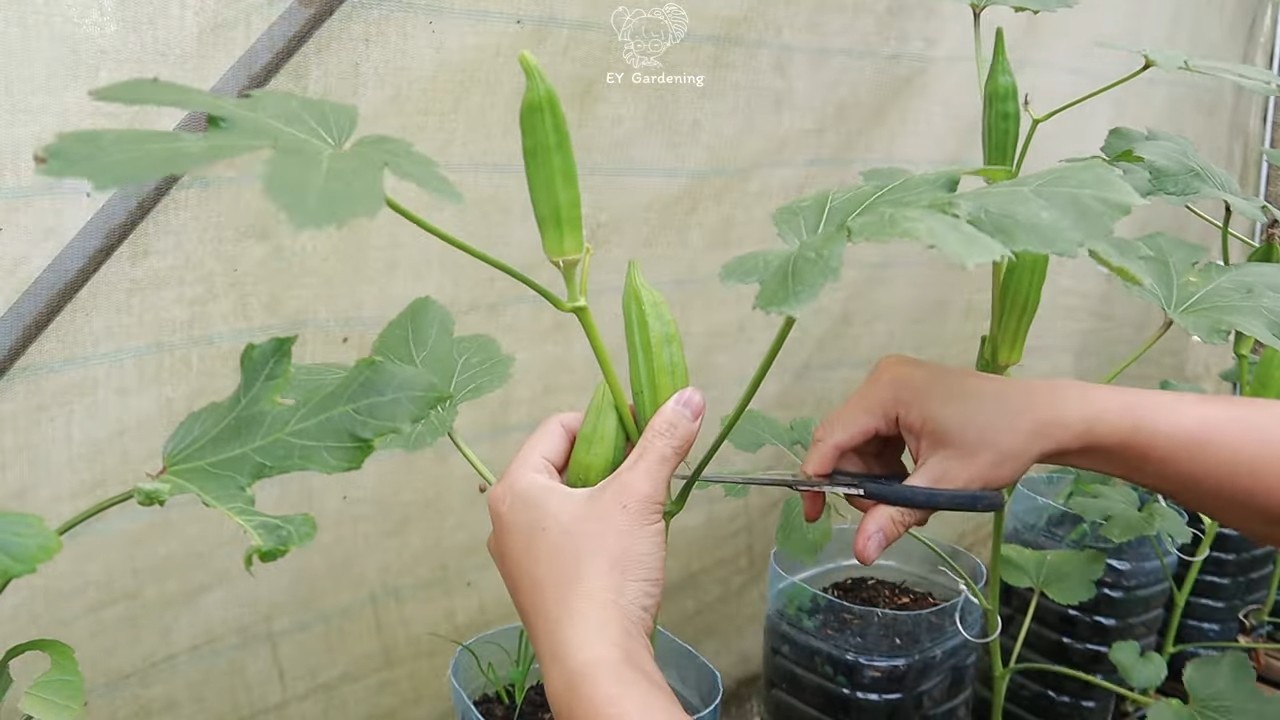
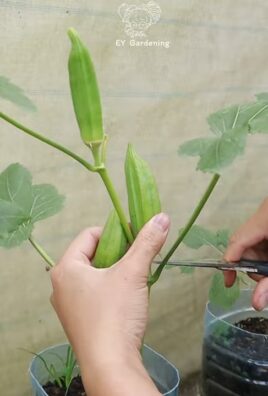
1. Timing is Key: Okra pods are best harvested when they are young and tender, typically 2-4 inches long. Overripe pods become tough and fibrous.
2. Harvesting Frequency: Okra plants produce pods quickly, so you’ll need to harvest them every 1-2 days.
3. Using the Right Tools: Use a sharp knife or pruning shears to cut the pods from the plant. Be careful not to damage the plant.
4. Wear Gloves: Okra plants have tiny hairs that can irritate the skin, so it’s a good idea to wear gloves when harvesting.
5. Storage: Freshly harvested okra pods can be stored in the refrigerator for up to a week.
Dealing with Common Problems
Even with the best care, you may encounter some problems when growing okra. Here are a few common issues and how to address them:
* Yellowing Leaves: Yellowing leaves can be caused by a variety of factors, such as nutrient deficiencies, overwatering, or pest infestations. Check the soil pH and nutrient levels, and adjust your watering and fertilizing practices accordingly.
* Stunted Growth: Stunted growth can be caused by poor soil, lack of sunlight, or pest infestations. Make sure your okra plants are getting enough sunlight and nutrients, and address any pest problems promptly.
* Blossom End Rot: Blossom end rot is a condition that causes the ends of the okra pods to rot. It’s typically caused by calcium deficiency or inconsistent watering. Amend the soil with calcium and water regularly to prevent blossom end rot.
* Fungal Diseases: Okra plants are susceptible to fungal diseases, such as powdery mildew and leaf spot. Improve air circulation around the plants and avoid overhead watering to prevent fungal diseases. You can also use fungicides if necessary.
Choosing the Right Okra Variety
There are many different varieties of okra to choose from, each with its own unique characteristics. Here are a few popular varieties that are well-suited for container gardening:
* Clemson Spineless: This is a classic okra variety that produces dark green, spineless pods. It’s known for its high yields and excellent flavor.
* Emerald: This variety produces long, slender, emerald-green pods. It’s known for its tender texture and mild flavor.
* Burgundy: This variety produces beautiful, burgundy-colored pods. It’s known for its ornamental value as well as its delicious flavor.
* Dwarf Green Long Pod: As the name suggests, this is a compact okra variety that’s perfect for small containers. It produces long, green pods.
Extending the Harvest
To extend your okra harvest, you can try succession planting. This involves planting new okra seeds every 2-3 weeks. This will ensure that you have a continuous supply of fresh okra pods throughout the growing season. You can also try growing okra in a greenhouse or cold frame to extend the growing season in cooler climates.
Rooftop Considerations
Before you start your rooftop okra garden, there are a few things to consider:
* Weight: Make sure your rooftop can support the weight of the containers, soil, and plants. Wet soil can be surprisingly heavy.
* Waterproofing: Protect your rooftop from water damage by using waterproof containers and liners.
* Sun Exposure: Ensure your rooftop receives enough sunlight for okra plants to thrive.
* Wind: Rooftops can be windy, so protect your okra plants from strong winds by using windbreaks or placing them in sheltered locations.
* Accessibility: Make sure you have easy access to your rooftop garden for watering,
Conclusion
So, there you have it! Growing okra on your rooftop isn’t just a whimsical gardening dream; it’s a surprisingly achievable reality. We’ve walked through the essential steps, from selecting the right container and soil to nurturing your okra plants through their growth cycle. But why should you dedicate your precious rooftop space to this endeavor?
The answer lies in the unparalleled freshness and flavor you’ll experience. Store-bought okra simply can’t compare to the vibrant, slightly sweet taste of okra harvested moments before cooking. Imagine the satisfaction of plucking plump, green pods directly from your rooftop garden and transforming them into a delicious gumbo, a crispy fried side dish, or a flavorful addition to your favorite stew.
Beyond the taste, growing your own okra offers a host of other benefits. You’ll have complete control over the growing process, ensuring that your okra is free from harmful pesticides and herbicides. You’ll also reduce your carbon footprint by shortening the distance your food travels from farm to table. And let’s not forget the sheer joy and therapeutic value of gardening – a chance to connect with nature, de-stress, and cultivate something beautiful and nourishing.
But the possibilities don’t end there! Feel free to experiment with different okra varieties. Clemson Spineless is a classic choice, known for its smooth pods and high yields. For a more unique flavor, try Burgundy okra, which boasts stunning red pods that add a pop of color to your garden. You can also explore different companion planting options. Basil, marigolds, and peppers are all excellent companions for okra, helping to deter pests and attract beneficial insects.
Consider adding a trellis or support system for your okra plants, especially if you’re growing taller varieties. This will help to keep the plants upright and prevent the pods from touching the ground, which can lead to rot. You can also experiment with different watering techniques, such as drip irrigation, to conserve water and ensure that your okra plants receive consistent moisture.
Don’t be afraid to get creative with your rooftop okra garden! You can incorporate other vegetables and herbs to create a thriving ecosystem. Imagine a rooftop oasis filled with okra, tomatoes, peppers, basil, and rosemary – a true feast for the senses.
Ultimately, growing okra on your rooftop is an adventure. It’s a chance to learn, experiment, and connect with nature in a meaningful way. It’s also a chance to enjoy the freshest, most flavorful okra you’ve ever tasted.
So, what are you waiting for? Grab your gardening gloves, gather your supplies, and embark on your rooftop okra journey today! We’re confident that you’ll be amazed by the results. And once you’ve harvested your first crop, we encourage you to share your experience with us. Tell us about your successes, your challenges, and your favorite ways to prepare your homegrown okra. We can’t wait to hear your stories! Share your photos and tips on social media using #RooftopOkra and let’s build a community of urban gardeners together. Remember, mastering the art of **growing okra** is easier than you think, and the rewards are well worth the effort.
Frequently Asked Questions (FAQ)
1. What is the best variety of okra to grow on a rooftop?
The best okra variety for your rooftop garden depends on your personal preferences and growing conditions. However, some popular and reliable choices include:
* **Clemson Spineless:** This is a classic variety known for its smooth, spineless pods and high yields. It’s a great choice for beginners and is widely available.
* **Burgundy:** This variety boasts stunning red pods that add a pop of color to your garden. It has a slightly different flavor than Clemson Spineless and is also relatively easy to grow.
* **Emerald:** This variety produces long, slender, dark green pods that are known for their excellent flavor and tenderness.
* **Dwarf Green Long Pod:** If you have limited space, this compact variety is a great option. It produces shorter pods but still offers a good yield.
Consider your climate and the amount of sunlight your rooftop receives when choosing a variety. Some varieties are more heat-tolerant than others.
2. How much sunlight does okra need to grow well on a rooftop?
Okra thrives in full sun, requiring at least 6-8 hours of direct sunlight per day. If your rooftop doesn’t receive enough sunlight, your okra plants may become leggy and produce fewer pods. Consider using grow lights to supplement natural sunlight if necessary.
3. What type of soil is best for growing okra in containers?
Okra prefers well-draining, fertile soil with a slightly acidic to neutral pH (6.0-7.0). A good potting mix for okra should contain a blend of:
* **Compost:** Provides essential nutrients and improves soil structure.
* **Peat moss or coco coir:** Helps retain moisture and improve drainage.
* **Perlite or vermiculite:** Improves drainage and aeration.
Avoid using heavy garden soil, as it can become compacted in containers and restrict root growth.
4. How often should I water my okra plants on a rooftop?
Water your okra plants regularly, especially during hot, dry weather. The soil should be kept consistently moist but not waterlogged. Check the soil moisture level by sticking your finger about an inch deep into the soil. If it feels dry, it’s time to water. Water deeply, allowing the water to drain out of the bottom of the container. Avoid overhead watering, as this can promote fungal diseases.
5. How do I fertilize my okra plants on a rooftop?
Okra plants are heavy feeders and benefit from regular fertilization. Start by incorporating a slow-release fertilizer into the potting mix at planting time. Then, supplement with a liquid fertilizer every 2-3 weeks during the growing season. Choose a fertilizer that is high in phosphorus and potassium, which are essential for pod development.
6. How do I protect my okra plants from pests and diseases on a rooftop?
Okra can be susceptible to pests such as aphids, flea beetles, and okra stink bugs. Regularly inspect your plants for signs of infestation and take action promptly. You can use insecticidal soap or neem oil to control these pests.
Common diseases that can affect okra include powdery mildew and root rot. To prevent these diseases, ensure good air circulation around your plants, avoid overhead watering, and use well-draining soil.
7. When is the best time to harvest okra pods?
Okra pods are typically ready to harvest 50-65 days after planting. Harvest the pods when they are young and tender, typically 2-4 inches long. Use a sharp knife or pruners to cut the pods from the plant. Harvest regularly, every 1-2 days, to encourage continued production. Overripe pods become tough and fibrous.
8. Can I grow okra in a small container on my rooftop?
While okra plants can grow quite large, you can successfully grow them in containers as small as 5 gallons. However, larger containers (10 gallons or more) are recommended for optimal growth and yield. Choose a container that is sturdy and has good drainage holes.
9. What are some companion plants for okra on a rooftop?
Companion planting can help to improve the health and productivity of your okra plants. Some good companion plants for okra include:
* **Basil:** Repels aphids and other pests.
* **Marigolds:** Repel nematodes and other soil pests.
* **Peppers:** Attract beneficial insects.
* **Tomatoes:** Provide shade and support.
* **Lettuce:** Can be grown in the shade of okra plants.
10. How do I save okra seeds for next year?
To save okra seeds, allow some of the pods to mature fully on the plant. The pods will become dry and brown. Once the pods are completely dry, harvest them and remove the seeds. Store the seeds in a cool, dry place in an airtight container. Okra seeds can remain viable for several years.

Leave a Comment