
Grow Peppers at Home – and unlock a world of flavor and vibrant color right outside your door! Have you ever dreamed of plucking a perfectly ripe, sun-kissed pepper straight from the vine and adding it to your dinner? It’s easier than you think, and this DIY guide is your secret weapon to making that dream a reality.
For centuries, peppers have been cherished across cultures, from the fiery chilies of South America, where they originated, to the sweet bell peppers gracing tables worldwide. Their journey is a testament to their versatility and the joy they bring to our palates. But beyond their culinary appeal, growing your own peppers connects you to this rich history and offers a deeply satisfying experience.
Let’s face it, store-bought peppers can sometimes be bland and expensive. But when you grow peppers at home, you control everything – from the soil they grow in to the amount of sunshine they soak up. This means you can cultivate peppers bursting with flavor, tailored to your exact preferences. Plus, it’s a fantastic way to reduce your carbon footprint and enjoy fresh, organic produce. I’m excited to share some simple yet effective DIY tricks and hacks that will transform your garden into a pepper paradise, even if you’re a complete beginner. Get ready to spice up your life – literally!
Growing Peppers at Home: A Beginner’s Guide to a Bountiful Harvest
Hey there, fellow gardening enthusiasts! I’m so excited to share my tried-and-true method for growing peppers right in your own backyard (or even on your balcony!). Peppers are such a versatile and rewarding crop, adding a spicy kick to your meals and a vibrant splash of color to your garden. This guide will walk you through every step, from choosing the right seeds to harvesting your delicious peppers. Let’s get started!
Choosing Your Pepper Varieties
Before we dive into the nitty-gritty, let’s talk about pepper varieties. The world of peppers is vast and exciting, ranging from sweet bell peppers to fiery habaneros. Consider your taste preferences and growing conditions when making your selection.
* Sweet Peppers: Bell peppers (red, yellow, orange, green), banana peppers, and pimento peppers are great choices for salads, stuffing, and roasting.
* Mildly Spicy Peppers: Poblano peppers, Anaheim peppers, and jalapeños offer a gentle heat that’s perfect for adding a little zing to your dishes.
* Hot Peppers: Serrano peppers, cayenne peppers, and Thai peppers pack a significant punch and are ideal for making hot sauces and spicy salsas.
* Extremely Hot Peppers: Habanero peppers, Scotch bonnet peppers, and ghost peppers are for the truly adventurous! Handle these with care and always wear gloves when working with them.
I personally love growing a mix of bell peppers, jalapeños, and cayenne peppers. It gives me a good range of flavors and heat levels to play with in the kitchen.
Starting Your Pepper Seeds Indoors
Peppers need a long growing season, so starting them indoors is crucial, especially if you live in a cooler climate. I usually start my seeds about 8-10 weeks before the last expected frost.
1. Gather Your Supplies:
* Pepper seeds (choose your favorite varieties!)
* Seed starting trays or small pots
* Seed starting mix (a light, well-draining mix is essential)
* Spray bottle filled with water
* Heat mat (optional, but highly recommended)
* Grow lights (also optional, but they make a big difference)
* Clear plastic dome or plastic wrap (to create a humid environment)
2. Prepare Your Seed Starting Trays: Fill your seed starting trays or pots with seed starting mix. Gently tap the trays to settle the mix.
3. Sow Your Seeds: Make a small indentation (about ¼ inch deep) in the center of each cell or pot. Place 2-3 pepper seeds in each indentation. This increases the chances of at least one seed germinating.
4. Cover the Seeds: Gently cover the seeds with seed starting mix. Lightly pat the surface to ensure good contact between the seeds and the mix.
5. Water the Seeds: Use a spray bottle to thoroughly moisten the seed starting mix. Avoid overwatering, as this can lead to damping-off disease.
6. Create a Humid Environment: Cover the seed starting trays with a clear plastic dome or plastic wrap. This will help to retain moisture and create a warm, humid environment that’s ideal for germination.
7. Provide Warmth: Place the seed starting trays on a heat mat. Peppers germinate best at temperatures between 75-85°F (24-29°C). If you don’t have a heat mat, you can place the trays in a warm location, such as near a radiator or on top of your refrigerator.
8. Provide Light: Place the seed starting trays under grow lights. If you don’t have grow lights, you can place the trays in a sunny window, but be sure to rotate them regularly to prevent the seedlings from becoming leggy. I find that grow lights provide more consistent and reliable results.
9. Monitor and Water: Check the seed starting trays daily and water as needed to keep the seed starting mix moist but not soggy. Remove the plastic dome or plastic wrap for a few hours each day to allow for air circulation.
10. Wait for Germination: Pepper seeds can take anywhere from 7-21 days to germinate, depending on the variety and growing conditions. Be patient and keep the seed starting mix moist and warm.
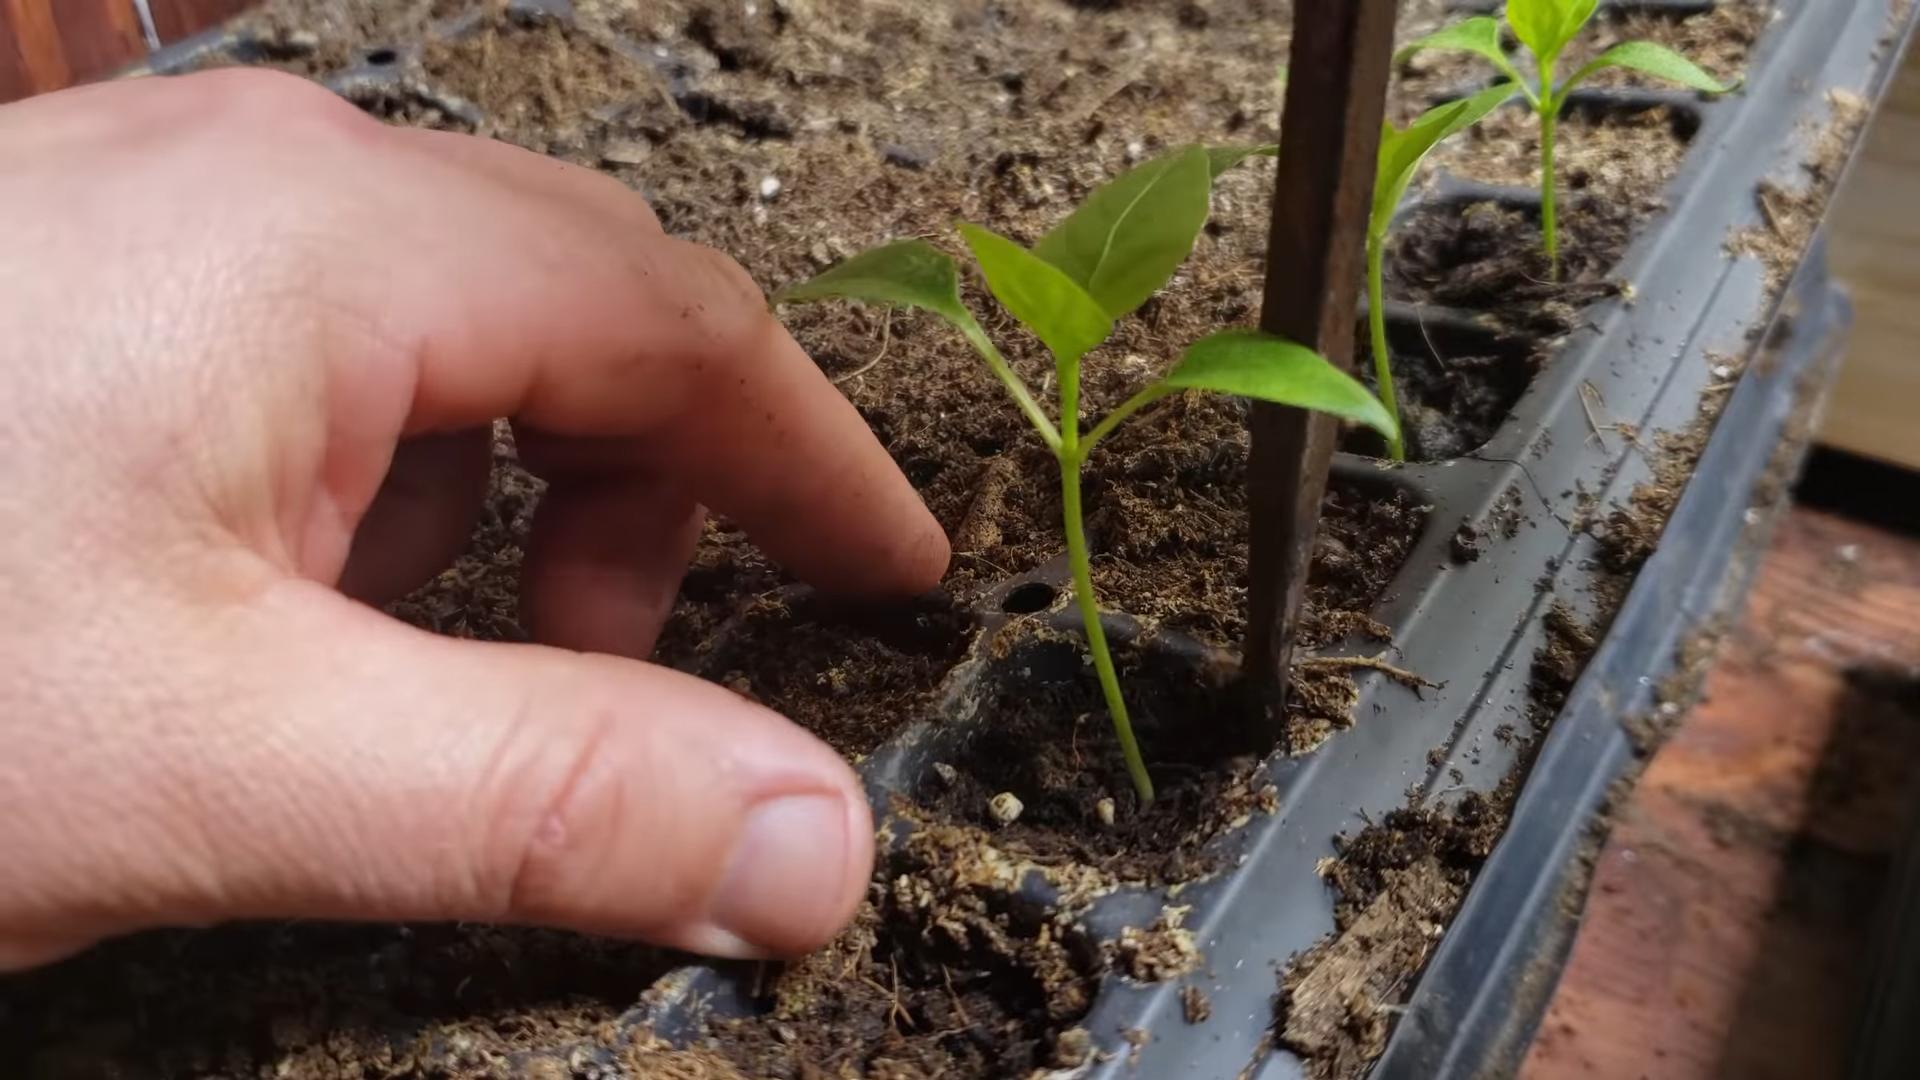
Transplanting Your Pepper Seedlings
Once your pepper seedlings have developed their first set of true leaves (the leaves that look like miniature pepper leaves, not the initial seed leaves), it’s time to transplant them into larger pots.
1. Gather Your Supplies:
* 4-inch pots
* Potting mix (a good quality potting mix is essential)
* Small trowel or spoon
2. Prepare Your Pots: Fill the 4-inch pots with potting mix. Gently tap the pots to settle the mix.
3. Carefully Remove the Seedlings: Gently loosen the soil around the seedlings in the seed starting trays. Use a small trowel or spoon to carefully lift the seedlings out of the trays, being careful not to damage the roots.
4. Transplant the Seedlings: Make a small hole in the center of each pot. Place the seedling in the hole and gently backfill with potting mix. Gently pat the soil around the seedling to secure it in place.
5. Water the Seedlings: Water the seedlings thoroughly after transplanting.
6. Provide Light and Warmth: Place the transplanted seedlings under grow lights or in a sunny window. Continue to provide warmth and monitor the moisture levels in the soil.
Hardening Off Your Pepper Seedlings
Before you can transplant your pepper seedlings into the garden, you need to “harden them off.” This process gradually acclimates the seedlings to outdoor conditions, such as sunlight, wind, and temperature fluctuations.
1. Start Slowly: Begin by placing the seedlings outdoors in a sheltered location for just a few hours each day. Gradually increase the amount of time they spend outdoors each day.
2. Protect from Harsh Conditions: Protect the seedlings from direct sunlight, strong winds, and frost.
3. Monitor the Seedlings: Watch the seedlings closely for signs of stress, such as wilting or sunburn. If they show signs of stress, bring them back indoors and gradually reintroduce them to outdoor conditions.
4. Harden Off for a Week: Harden off the seedlings for at least a week before transplanting them into the garden.
Transplanting Your Pepper Plants into the Garden
Once your pepper plants are hardened off and the danger of frost has passed, it’s time to transplant them into the garden.
1. Choose a Sunny Location: Peppers need at least 6-8 hours of sunlight per day. Choose a location in your garden that receives plenty of sunlight.
2. Prepare the Soil: Peppers prefer well-drained soil that is rich in organic matter. Amend the soil with compost or well-rotted manure before planting.
3. Space the Plants Properly: Space pepper plants 18-24 inches apart, depending on the variety. Taller varieties may need more space.
4. Dig the Holes: Dig holes that are slightly larger than the root balls of the pepper plants.
5. Transplant the Plants: Carefully remove the pepper plants from their pots. Gently loosen the roots and place the plants in the holes. Backfill with soil and gently pat the soil around the plants.
6. Water the Plants: Water the plants thoroughly after transplanting.
7. Mulch the Plants: Apply a layer of mulch around the pepper plants to help retain moisture, suppress weeds, and regulate soil temperature. I like to use straw or wood chips.
Caring for Your Pepper Plants
Once your pepper plants are in the garden, they’ll need regular care to thrive.
* Watering: Water pepper plants regularly, especially during hot, dry weather. Aim to keep the soil consistently moist but not soggy.
* Fertilizing: Fertilize pepper plants every 2-3 weeks with a balanced fertilizer. You can also use a fertilizer specifically formulated for peppers and tomatoes.
* Pruning: Pruning pepper plants can help to improve air circulation and encourage fruit production. Remove any suckers (small shoots that grow from the base of the plant) and any yellowing or diseased leaves.
* Supporting: Taller pepper varieties may need to be supported with stakes or cages to prevent them from falling over.
* Pest and Disease Control: Monitor your pepper plants regularly for signs of pests and diseases. Common pepper pests include aphids, flea beetles, and spider mites. Common pepper diseases include blossom end rot, fungal leaf spot, and viral diseases. Treat any problems promptly with appropriate organic or chemical controls. I prefer using organic methods whenever possible.
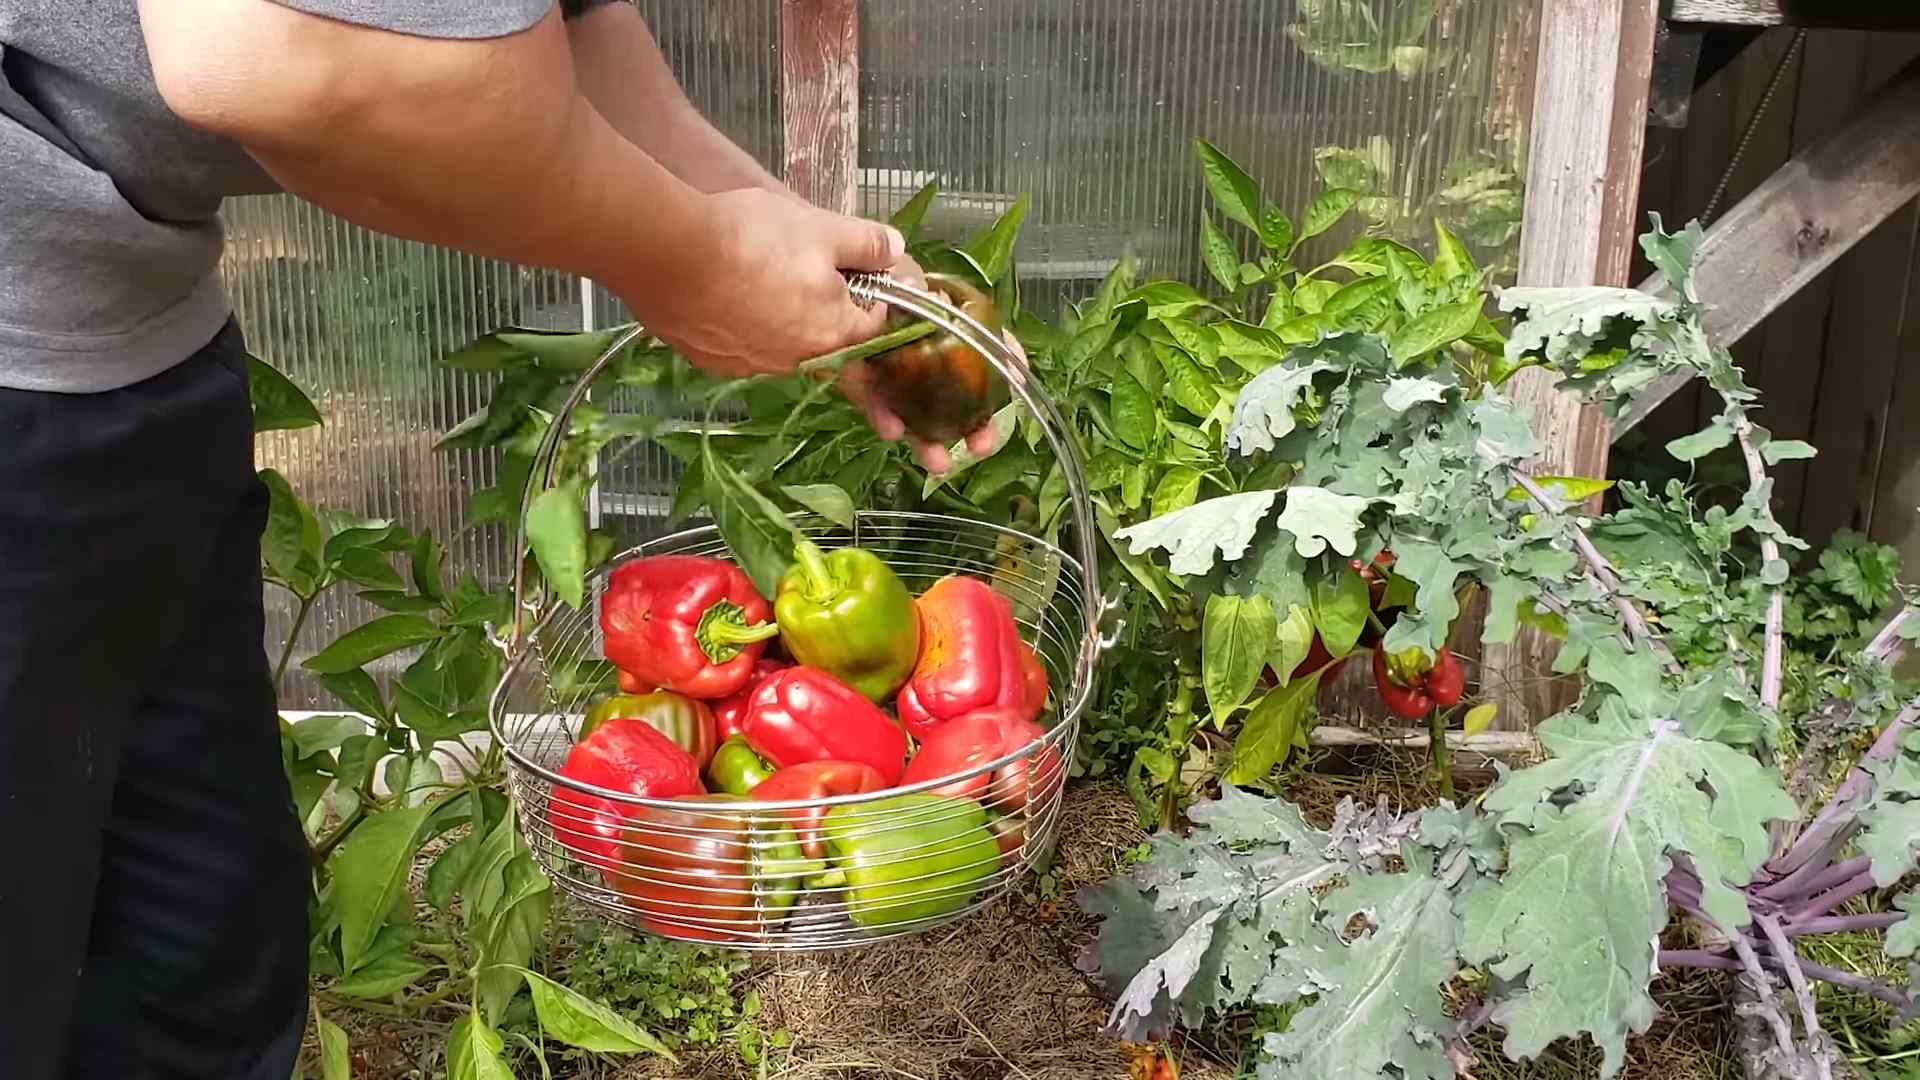
Harvesting Your Peppers
The moment you’ve been waiting for! Harvesting your peppers is the most rewarding part of the process.
* Harvest Time: Peppers are typically ready to harvest when they have reached their mature size and color. The
Conclusion
So, there you have it! Growing peppers at home, especially with this simple DIY trick, is not just a gardening endeavor; it’s an investment in flavor, freshness, and a deeper connection to your food. We’ve walked you through a method that’s accessible, cost-effective, and yields impressive results, even for those with limited space or gardening experience.
Why is this DIY approach a must-try? Because it empowers you to control the entire growing process, from seed to table. You know exactly what goes into your peppers – no mystery chemicals or questionable practices. You get to enjoy the unparalleled taste of freshly picked peppers, bursting with vibrant flavor that store-bought varieties simply can’t match. Plus, there’s an undeniable satisfaction in nurturing a plant from a tiny seed into a bountiful producer.
But the beauty of this DIY pepper-growing journey lies in its adaptability. Feel free to experiment with different pepper varieties. Perhaps you’re a fan of the fiery heat of habaneros or the sweet crunch of bell peppers. Maybe you want to try growing some exotic varieties like shishito or poblano peppers. The possibilities are endless!
Consider also experimenting with different growing mediums. While we’ve focused on a soil-based approach, you could explore hydroponics or aquaponics for a more advanced setup. You can also adjust the nutrient solutions to tailor them to the specific needs of your chosen pepper variety.
Another exciting variation is to explore companion planting. Certain herbs and flowers, like basil, marigolds, and nasturtiums, can deter pests and attract beneficial insects, creating a healthier and more productive environment for your pepper plants.
Don’t be afraid to get creative with your containers. While standard pots work perfectly well, you can also repurpose old buckets, tires, or even fabric grow bags. Just ensure that your chosen container has adequate drainage to prevent waterlogging.
Ultimately, the goal is to find what works best for you and your growing environment. This DIY trick is a starting point, a foundation upon which you can build your own unique pepper-growing experience.
We wholeheartedly encourage you to give this DIY trick a try. It’s a rewarding and fulfilling experience that will transform the way you think about peppers. And most importantly, don’t forget to share your experiences with us! We’d love to hear about your successes, your challenges, and any variations you’ve tried. Share your photos, your tips, and your stories in the comments section below. Let’s create a community of passionate pepper growers, all learning and growing together. Happy growing!
Frequently Asked Questions (FAQ)
What kind of soil is best for growing peppers at home?
Peppers thrive in well-draining, fertile soil that is rich in organic matter. A good starting point is a mix of equal parts potting soil, compost, and perlite or vermiculite. The potting soil provides a base, the compost adds nutrients and improves drainage, and the perlite or vermiculite enhances aeration and prevents compaction. You can also amend your soil with aged manure or other organic fertilizers to further boost its nutrient content. Avoid using heavy clay soils, as they tend to retain too much water and can lead to root rot. The ideal pH for pepper plants is between 6.0 and 7.0. You can test your soil’s pH using a soil testing kit and adjust it accordingly with lime (to raise the pH) or sulfur (to lower the pH).
How often should I water my pepper plants?
Watering frequency depends on several factors, including the size of your container, the type of soil, the weather conditions, and the stage of growth of your pepper plants. As a general rule, water your pepper plants deeply whenever the top inch of soil feels dry to the touch. Avoid overwatering, as this can lead to root rot. During hot, dry weather, you may need to water your plants daily. During cooler, wetter weather, you may only need to water them every few days. When watering, aim to saturate the soil evenly, allowing excess water to drain out of the bottom of the container. Mulching around your pepper plants can help to retain moisture and reduce the need for frequent watering.
What kind of fertilizer should I use for my pepper plants?
Pepper plants are heavy feeders and require regular fertilization to produce abundant yields. A balanced fertilizer with an NPK ratio (nitrogen, phosphorus, potassium) of 5-10-10 or 10-10-10 is a good starting point. Nitrogen promotes leafy growth, phosphorus supports root development and flowering, and potassium enhances fruit production and overall plant health. You can also use organic fertilizers such as compost tea, fish emulsion, or bone meal. Apply fertilizer according to the manufacturer’s instructions, typically every 2-3 weeks during the growing season. Avoid over-fertilizing, as this can burn the roots and damage your plants. As your pepper plants begin to flower and set fruit, you may want to switch to a fertilizer with a higher phosphorus content to encourage fruit development.
How much sunlight do pepper plants need?
Pepper plants require at least 6-8 hours of direct sunlight per day to thrive. Choose a location that receives plenty of sunlight throughout the day. If you are growing your pepper plants indoors, you may need to supplement with artificial lighting, such as grow lights. Position the grow lights about 6-12 inches above the plants and keep them on for 14-16 hours per day. Insufficient sunlight can lead to leggy growth, reduced flowering, and poor fruit production.
How do I protect my pepper plants from pests and diseases?
Regularly inspect your pepper plants for signs of pests and diseases. Common pests include aphids, spider mites, whiteflies, and pepper hornworms. You can control these pests with insecticidal soap, neem oil, or by hand-picking them off the plants. Common diseases include blossom end rot, fungal leaf spots, and viral diseases. Blossom end rot is caused by a calcium deficiency and can be prevented by ensuring that your soil is well-drained and that your plants receive adequate calcium. Fungal leaf spots can be treated with fungicides. Viral diseases are often spread by insects, so controlling pests is crucial for preventing their spread. Good sanitation practices, such as removing diseased leaves and debris, can also help to prevent the spread of diseases. Companion planting with herbs and flowers that repel pests can also be beneficial.
When is the best time to harvest my peppers?
The best time to harvest your peppers depends on the variety and your personal preference. Bell peppers are typically harvested when they are fully colored and firm to the touch. Hot peppers can be harvested at any stage of maturity, depending on your desired level of heat. Green peppers are generally less spicy than red peppers. Use pruning shears or a sharp knife to cut the peppers from the plant, leaving a small stem attached. Harvesting peppers regularly encourages the plant to produce more fruit.
Can I grow peppers in containers?
Yes, peppers are well-suited for container gardening. Choose a container that is at least 12 inches in diameter and has drainage holes. Use a well-draining potting mix and provide your plants with plenty of sunlight and water. Container-grown peppers may require more frequent watering and fertilization than those grown in the ground. Consider using a self-watering container to help maintain consistent moisture levels.
How do I overwinter my pepper plants?
In colder climates, you can overwinter your pepper plants indoors to extend their lifespan. Before the first frost, prune your plants back to about 6-8 inches tall and transplant them into smaller pots. Bring the pots indoors and place them in a sunny location. Water sparingly and avoid fertilizing during the winter months. In the spring, gradually acclimate your plants to outdoor conditions before transplanting them back into the garden.

Leave a Comment