
Grow Pink Radishes at Home, and unlock a vibrant splash of color and peppery zest right from your own backyard (or balcony!). Have you ever dreamt of pulling up a perfectly formed, rosy radish, bursting with flavor, that you nurtured from a tiny seed? Well, stop dreaming and start doing! This DIY guide is your passport to radish-growing success, even if you’ve never touched a trowel before.
Radishes, surprisingly, have a rich history, dating back to ancient Egypt where they were a staple food. They were even depicted in hieroglyphics! Over centuries, they’ve spread across the globe, becoming a beloved addition to salads, snacks, and even cooked dishes. But why settle for store-bought radishes when you can experience the unparalleled satisfaction of growing your own, especially when they’re as beautiful and unique as pink radishes?
Let’s face it, we’re all looking for ways to eat healthier, save money, and connect with nature. Growing your own food ticks all those boxes! Plus, grow pink radishes at home is incredibly rewarding. This DIY trick is perfect for beginners because radishes are fast-growing and relatively low-maintenance. Imagine adding a pop of color to your salads or enjoying a crisp, peppery snack knowing you grew it yourself. This guide will provide you with simple, step-by-step instructions and helpful tips to ensure you have a bountiful harvest of delicious pink radishes in no time. So, grab your gardening gloves, and let’s get started!
Grow Your Own Pretty Pink Radishes: A DIY Guide
Hey there, fellow gardening enthusiasts! I’m so excited to share my secrets for growing vibrant, pink radishes right in your own backyard (or even on your balcony!). Radishes are super easy to grow, even for beginners, and the satisfaction of pulling up those crunchy, peppery gems is just unbeatable. Plus, the pink ones? They’re just so darn cute!
What You’ll Need
Before we dive in, let’s gather our supplies. This is a pretty low-key project, so you probably have most of this stuff already.
* Radish Seeds (Pink Varieties): Obviously! Look for varieties like ‘Pink Beauty’, ‘French Breakfast’ (often has a pink tip), or ‘Cherry Belle’ (though these are more red, they can have a pinkish hue).
* Potting Soil (or Garden Soil): If you’re using containers, a good quality potting mix is essential. If you’re planting directly in the ground, make sure your garden soil is loose and well-draining.
* Container (Optional): If you’re container gardening, choose a pot that’s at least 6 inches deep. Radishes don’t need a ton of space, but they do need room for their roots to grow.
* Watering Can or Hose: For keeping your little radish sprouts happy and hydrated.
* Fertilizer (Optional): A balanced, water-soluble fertilizer can give your radishes a boost, but it’s not strictly necessary.
* Trowel or Small Shovel: For preparing the soil and planting the seeds.
* Sunlight: Radishes need at least 6 hours of sunlight per day.
* Gardening Gloves (Optional): To keep your hands clean.
Getting Started: Preparing the Soil
The key to happy radishes is well-prepared soil. They don’t like compacted soil, as it can hinder their root development.
1. Choose Your Location: Select a spot in your garden or on your balcony that gets at least 6 hours of sunlight each day. Radishes are cool-season crops, so they thrive in cooler temperatures.
2. Prepare the Soil (In-Ground): If you’re planting directly in the ground, loosen the soil with a trowel or shovel to a depth of about 6 inches. Remove any rocks, weeds, or debris. Amend the soil with compost or well-rotted manure to improve drainage and fertility.
3. Prepare the Soil (Containers): If you’re using containers, fill them with a good quality potting mix. Make sure the container has drainage holes to prevent waterlogging.
4. Level the Surface: Gently level the surface of the soil with your hand or a trowel. This will ensure even watering and germination.
Planting the Seeds: The Fun Part!
Now for the exciting part – planting those tiny seeds that will soon become delicious pink radishes!
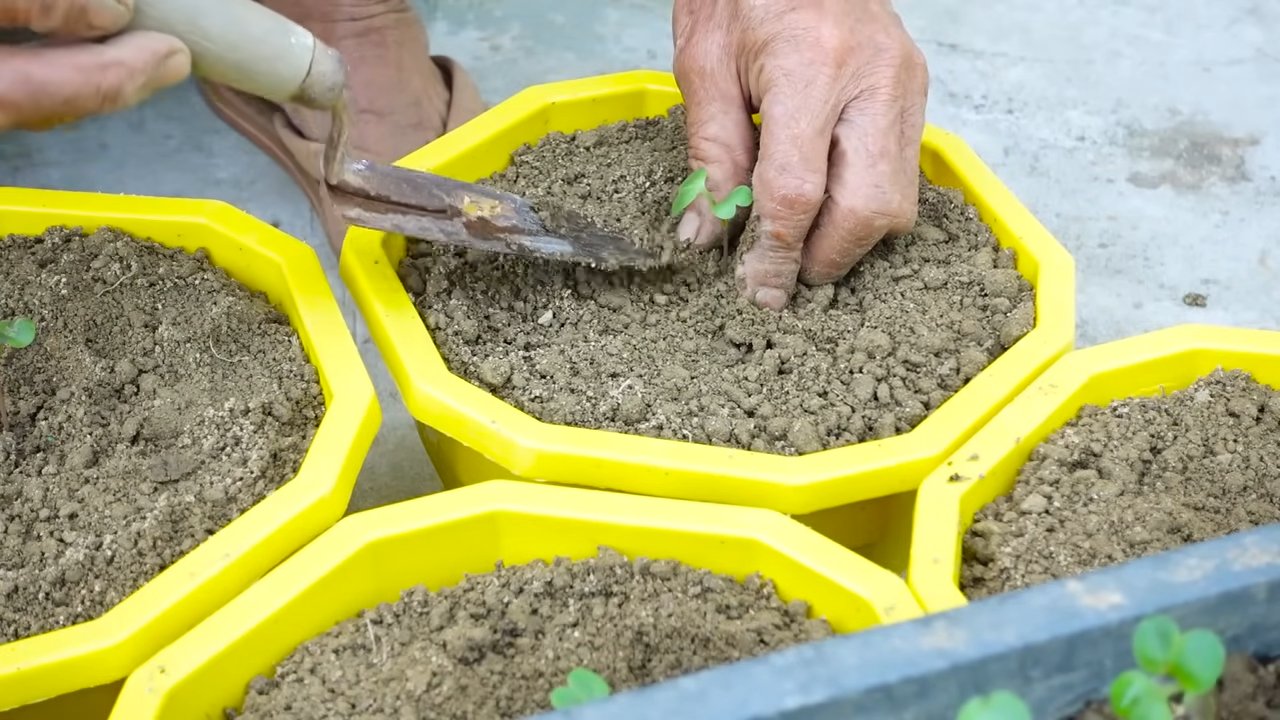
1. Create Furrows: Using your finger or a trowel, create shallow furrows in the soil about ½ inch deep and 1 inch apart.
2. Sow the Seeds: Sprinkle the radish seeds evenly along the furrows. Don’t overcrowd them! Aim for about ½ inch spacing between seeds.
3. Cover the Seeds: Gently cover the seeds with a thin layer of soil.
4. Water Gently: Water the soil gently with a watering can or hose, being careful not to wash away the seeds. The soil should be moist but not soggy.
5. Label Your Planting: It’s always a good idea to label your planting with the date and the type of radish you’re growing. This will help you keep track of your progress.
Caring for Your Radishes: Keeping Them Happy
Radishes are relatively low-maintenance, but they do need a little TLC to thrive.
1. Water Regularly: Keep the soil consistently moist, but not waterlogged. Water deeply whenever the top inch of soil feels dry to the touch. Radishes need consistent moisture to develop properly. Inconsistent watering can lead to cracked or woody radishes.
2. Thin Seedlings (If Necessary): Once the seedlings emerge (usually within 4-7 days), thin them out if they are too crowded. Aim for about 1 inch spacing between plants. This will give them enough room to grow. Gently pull out the extra seedlings, being careful not to disturb the roots of the remaining plants.
3. Weed Regularly: Keep the area around your radishes free of weeds. Weeds compete with radishes for nutrients and water. Hand-pull weeds carefully to avoid damaging the radish roots.
4. Fertilize (Optional): If you want to give your radishes a boost, you can fertilize them with a balanced, water-soluble fertilizer every 2-3 weeks. Follow the instructions on the fertilizer package.
5. Protect from Pests: Radishes are generally pest-resistant, but they can sometimes be bothered by flea beetles or root maggots. Cover your plants with row covers to protect them from pests. If you notice any pests, you can try spraying them with insecticidal soap.
Harvesting Your Radishes: The Best Part!
The best part of growing radishes is, of course, harvesting them! Radishes are fast growers, so you’ll be enjoying your homegrown goodies in no time.
1. Check for Maturity: Radishes are typically ready to harvest in 3-4 weeks, depending on the variety. Check the seed packet for specific maturity dates.
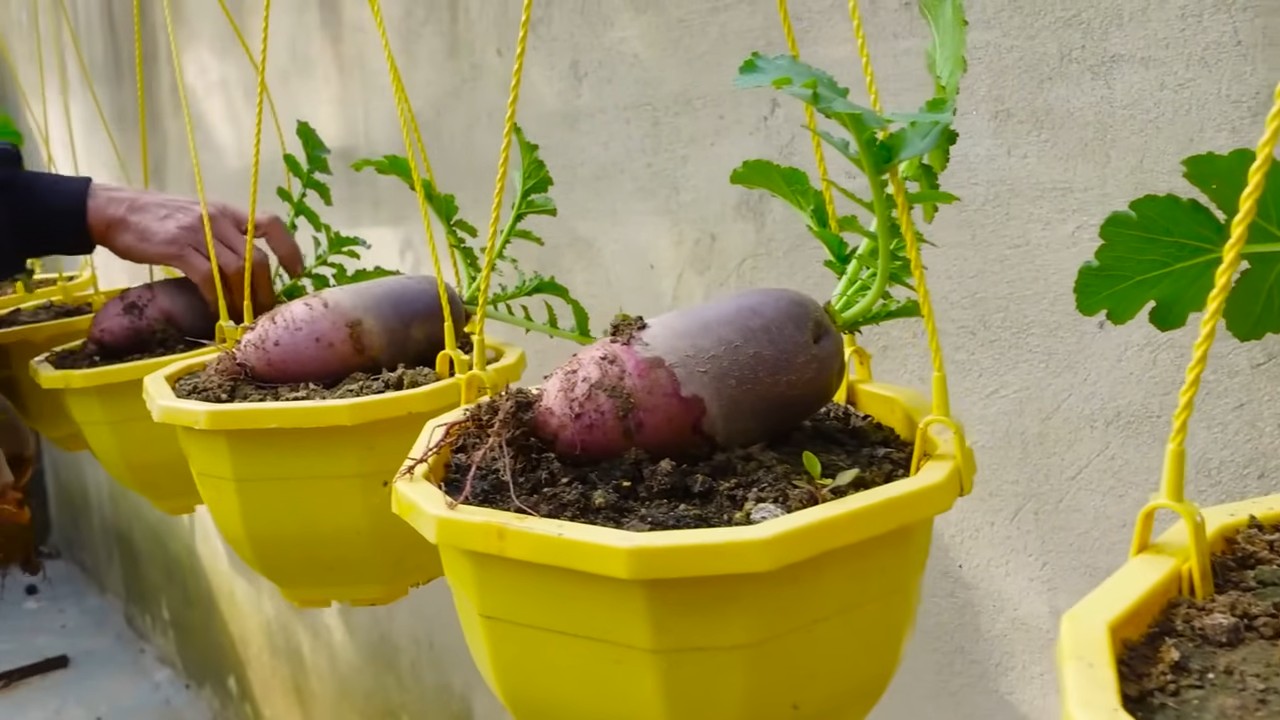
2. Harvest When Ready: Gently pull up a radish to check its size. It should be about 1 inch in diameter. If it’s too small, leave the others to grow for a few more days.
3. Harvest Carefully: Grasp the radish greens near the base and gently pull the radish out of the soil. If it’s difficult to pull, loosen the soil around the radish with a trowel.
4. Wash and Enjoy: Wash the radishes thoroughly to remove any dirt. You can eat them raw in salads, slice them on sandwiches, or roast them for a sweeter flavor.
5. Succession Planting: To enjoy a continuous harvest of radishes, sow a new batch of seeds every 2-3 weeks.
Troubleshooting: Common Radish Problems
Even with the best care, you might encounter a few problems along the way. Here are some common issues and how to fix them:
* Cracked Radishes: This is usually caused by inconsistent watering. Make sure to water your radishes regularly and deeply, especially during hot, dry weather.
* Woody Radishes: This can be caused by overcrowding, poor soil, or letting the radishes grow too large. Thin your seedlings properly, amend the soil with compost, and harvest your radishes when they are the right size.
* Bolting (Going to Seed): This happens when radishes are exposed to hot weather. Radishes are cool-season crops, so they are more likely to bolt in the summer. Plant your radishes in the spring or fall to avoid bolting.
* Pests: Flea beetles and root maggots can sometimes attack radishes. Cover your plants with row covers to protect them from pests. If you notice any pests, you can try spraying them with insecticidal soap.
Extra Tips for Radish Success
Here are a few extra tips to help you grow the best pink radishes ever:
* Choose the Right Variety: Some radish varieties are better suited for certain climates and growing conditions. Do some research to find the best varieties for your area.
* Plant in the Right Season: Radishes are cool-season crops, so they are best planted in the spring or fall.
* Don’t Overcrowd: Overcrowding can lead to small, woody radishes. Thin your seedlings properly to give them enough room to grow.
* Water Consistently: Inconsistent watering can lead to cracked or woody radishes. Water your radishes regularly and deeply, especially during hot, dry weather.
* Harvest Promptly: Radishes are best eaten when they are young and tender. Harvest them as soon as they are ready to avoid them becoming woody or bitter.
Enjoying Your Harvest
Now that you’ve grown your own beautiful pink radishes, it’s time to enjoy them! Here are a few ideas:
* Raw: Slice them thinly and add them to salads, sandwiches, or tacos.
* Roasted: Toss them with olive oil, salt, and pepper and roast them in the oven until tender.
* Pickled: Pickle them for a tangy and crunchy snack.
* Radish Greens: Don’t throw away the radish greens! They are edible and can be used in salads, soups, or stir-fries.
Growing your own pink radishes is a fun and rewarding experience. With a little bit of care and attention, you can enjoy a bountiful harvest of these
Conclusion
So, there you have it! Growing pink radishes at home is not only achievable but also incredibly rewarding. Forget those bland, store-bought radishes that lack the vibrant color and peppery punch you crave. With a little effort and these simple techniques, you can cultivate a garden brimming with crisp, beautiful, and intensely flavorful pink radishes.
Why is this DIY trick a must-try? Because it puts you in control. You dictate the quality of the soil, the amount of sunlight, and the watering schedule, ensuring your radishes are grown organically and to your exact liking. Imagine the satisfaction of harvesting your own vibrant pink radishes, knowing you nurtured them from seed to table. Think of the compliments you’ll receive when you present a colorful radish salad, showcasing your homegrown gems.
Beyond the sheer enjoyment of gardening, growing your own pink radishes offers a significant cost saving compared to purchasing them regularly. Plus, you’ll reduce your carbon footprint by eliminating the transportation and packaging associated with store-bought produce. It’s a win-win for your wallet and the planet!
But the benefits don’t stop there. Freshly harvested radishes are packed with vitamins and minerals, making them a healthy and delicious addition to your diet. They’re low in calories and high in fiber, contributing to a feeling of fullness and aiding digestion.
Ready to take your radish game to the next level? Consider these variations and suggestions:
* Succession Planting: Plant a new batch of seeds every two weeks to ensure a continuous harvest throughout the growing season. This prevents you from being overwhelmed with radishes all at once and guarantees a steady supply for your culinary creations.
* Companion Planting: Radishes are excellent companion plants for carrots, lettuce, and spinach. They help deter pests and improve soil health, creating a thriving garden ecosystem.
* Radish Greens: Don’t discard the radish greens! They’re edible and nutritious, adding a peppery flavor to salads, soups, and stir-fries. Treat them like spinach or arugula.
* Experiment with Varieties: While we’ve focused on pink radishes, there are many other varieties to explore, including red, white, purple, and even black radishes. Each offers a unique flavor and texture, adding diversity to your garden and your plate.
* Pickling Radishes: Preserve your radish harvest by pickling them. Pickled radishes are a tangy and crunchy condiment that adds a delightful zing to sandwiches, tacos, and salads.
So, what are you waiting for? Grab some radish seeds, prepare your soil, and embark on this exciting gardening adventure. We’re confident that you’ll be amazed by the results.
We encourage you to try this DIY trick and share your experience with us! Post photos of your homegrown pink radishes on social media using #HomegrownRadishes and tag us [Your Social Media Handle]. We can’t wait to see your vibrant creations and hear about your gardening journey. Happy growing!
Frequently Asked Questions (FAQ)
What is the best time of year to plant pink radishes?
Radishes are cool-season crops, meaning they thrive in cooler temperatures. The best time to plant them is in early spring or late summer/early fall. Avoid planting during the hottest months of summer, as the heat can cause the radishes to become tough and bitter. In spring, plant as soon as the soil can be worked. For a fall harvest, plant about four to six weeks before the first expected frost. Check your local climate data for specific planting dates.
How much sunlight do pink radishes need?
Radishes need at least six hours of sunlight per day to grow properly. Choose a location in your garden that receives full sun. If you live in a particularly hot climate, some afternoon shade can be beneficial to prevent the radishes from bolting (going to seed prematurely).
What kind of soil is best for growing pink radishes?
Radishes prefer loose, well-drained soil that is rich in organic matter. Amend your soil with compost or well-rotted manure before planting to improve its fertility and drainage. Avoid heavy clay soils, as they can hinder root development. A slightly acidic to neutral soil pH (around 6.0 to 7.0) is ideal.
How often should I water my pink radishes?
Radishes need consistent moisture to grow quickly and develop a crisp texture. Water regularly, especially during dry periods. Aim to keep the soil consistently moist but not waterlogged. Overwatering can lead to root rot. A good rule of thumb is to water deeply once or twice a week, depending on the weather conditions.
How long does it take for pink radishes to mature?
One of the great things about radishes is that they mature very quickly. Most varieties are ready to harvest in just 20 to 30 days. Check the seed packet for the specific maturity time of the variety you are growing.
How do I know when my pink radishes are ready to harvest?
Radishes are ready to harvest when they reach the desired size, typically about 1 inch in diameter. Gently loosen the soil around the radish and pull it out of the ground. If the radish is too small, leave it in the ground for a few more days. If it’s too large, it may become tough and bitter.
Why are my pink radishes cracking?
Cracking can be caused by inconsistent watering. If the soil dries out and then is suddenly flooded with water, the radishes can absorb too much water too quickly, causing them to crack. Maintain consistent moisture levels to prevent cracking.
Why are my pink radishes not forming bulbs?
Several factors can contribute to radishes not forming bulbs. These include:
* Overcrowding: Thin your radish seedlings to ensure they have enough space to develop properly.
* Poor Soil: Radishes need loose, well-drained soil to form bulbs. Amend your soil with compost or other organic matter.
* Lack of Sunlight: Radishes need at least six hours of sunlight per day.
* Hot Weather: High temperatures can cause radishes to bolt and not form bulbs. Plant in early spring or late summer/early fall to avoid the heat.
Can I grow pink radishes in containers?
Yes, radishes are well-suited to container gardening. Choose a container that is at least 6 inches deep and has drainage holes. Use a good-quality potting mix and follow the same planting and care instructions as for growing radishes in the ground.
Are there any pests or diseases that affect pink radishes?
Radishes are generally pest-resistant, but they can be susceptible to flea beetles, root maggots, and aphids. Use row covers to protect your plants from pests. If you encounter any diseases, such as powdery mildew or downy mildew, treat them with an appropriate fungicide. Crop rotation can also help prevent disease problems.
Can I eat the radish leaves?
Yes, radish leaves are edible and nutritious. They have a peppery flavor similar to the radishes themselves. Use them in salads, soups, or stir-fries. Make sure to wash them thoroughly before eating.
How do I store pink radishes after harvesting?
To store radishes, remove the greens and wash the radishes thoroughly. Place them in a plastic bag or container with a damp paper towel and store them in the refrigerator. They should last for about a week.

Leave a Comment