
Grow Red Radish Winter? Absolutely! Imagine biting into a crisp, peppery red radish you nurtured yourself, even when the snow is falling outside. Sounds pretty amazing, right? Well, it’s more achievable than you might think! For centuries, cultures around the globe have relied on clever gardening techniques to extend their growing seasons, ensuring access to fresh produce year-round. From ancient Roman greenhouses to modern-day cold frames, the desire to cultivate our own food, regardless of the weather, is deeply ingrained in our history.
But let’s be honest, not everyone has a sprawling greenhouse or the time for complicated setups. That’s where these simple, effective DIY tricks come in. Growing your own food, especially something as quick and rewarding as a red radish, can be incredibly empowering. It connects you to nature, reduces your reliance on grocery stores, and provides you with fresh, healthy ingredients. Plus, there’s nothing quite like the satisfaction of harvesting something you’ve grown with your own two hands!
In this article, I’m going to share some of my favorite, easy-to-implement DIY hacks that will help you grow red radish winter, even if you’re a complete beginner. We’ll cover everything from choosing the right varieties to creating a mini-greenhouse on a budget. So, get ready to ditch those winter blues and embrace the joy of homegrown goodness!
Winterrettich selbst anbauen: Eine Schritt-für-Schritt-Anleitung
Hallo Gartenfreunde! Winterrettich anzubauen ist gar nicht so schwer, wie man vielleicht denkt. Mit der richtigen Vorbereitung und Pflege könnt ihr auch in den kälteren Monaten knackige, würzige Rettiche ernten. Ich zeige euch, wie es geht!
Die richtige Sorte wählen
Bevor wir loslegen, ist es wichtig, die richtige Sorte Winterrettich auszuwählen. Es gibt verschiedene Sorten, die sich in Größe, Farbe und Geschmack unterscheiden. Einige beliebte Sorten sind:
* Schwarzer Rettich (z.B. ‘Noir Gros Long d’Hiver’): Dieser Rettich hat eine schwarze Schale und ein weißes, scharfes Fruchtfleisch. Er ist besonders gut lagerfähig.
* Weißer Rettich (z.B. ‘Münchner Bier’): Dieser Rettich ist milder im Geschmack als der schwarze Rettich und eignet sich gut für Salate.
* Roter Rettich (z.B. ‘Runder Roter’): Dieser Rettich ist etwas kleiner und hat eine rote Schale. Er ist ebenfalls milder im Geschmack.
Ich persönlich mag den schwarzen Rettich am liebsten, weil er so schön würzig ist. Aber probiert einfach aus, welche Sorte euch am besten schmeckt!
Vorbereitung ist alles: Der richtige Standort und Boden
Winterrettich braucht einen sonnigen bis halbschattigen Standort. Der Boden sollte locker, humos und gut durchlässig sein. Staunässe verträgt der Rettich gar nicht.
Boden vorbereiten:
1. Boden lockern: Lockert den Boden gründlich auf, am besten mit einer Grabegabel oder einem Spaten. Entfernt dabei Steine und Unkraut.
2. Kompost einarbeiten: Arbeitet reichlich Kompost in den Boden ein. Kompost versorgt den Rettich mit wichtigen Nährstoffen und verbessert die Bodenstruktur. Ich nehme immer so etwa 3-5 Liter Kompost pro Quadratmeter.
3. Boden glätten: Glättet den Boden mit einem Rechen, damit er eben ist.
Aussaat: Wann und wie?
Der ideale Zeitpunkt für die Aussaat von Winterrettich ist Ende Juli bis Mitte August. Wenn ihr zu früh aussät, kann es passieren, dass der Rettich zu groß wird und platzt. Wenn ihr zu spät aussät, hat er nicht mehr genug Zeit, um vor dem Winter richtig zu wachsen.
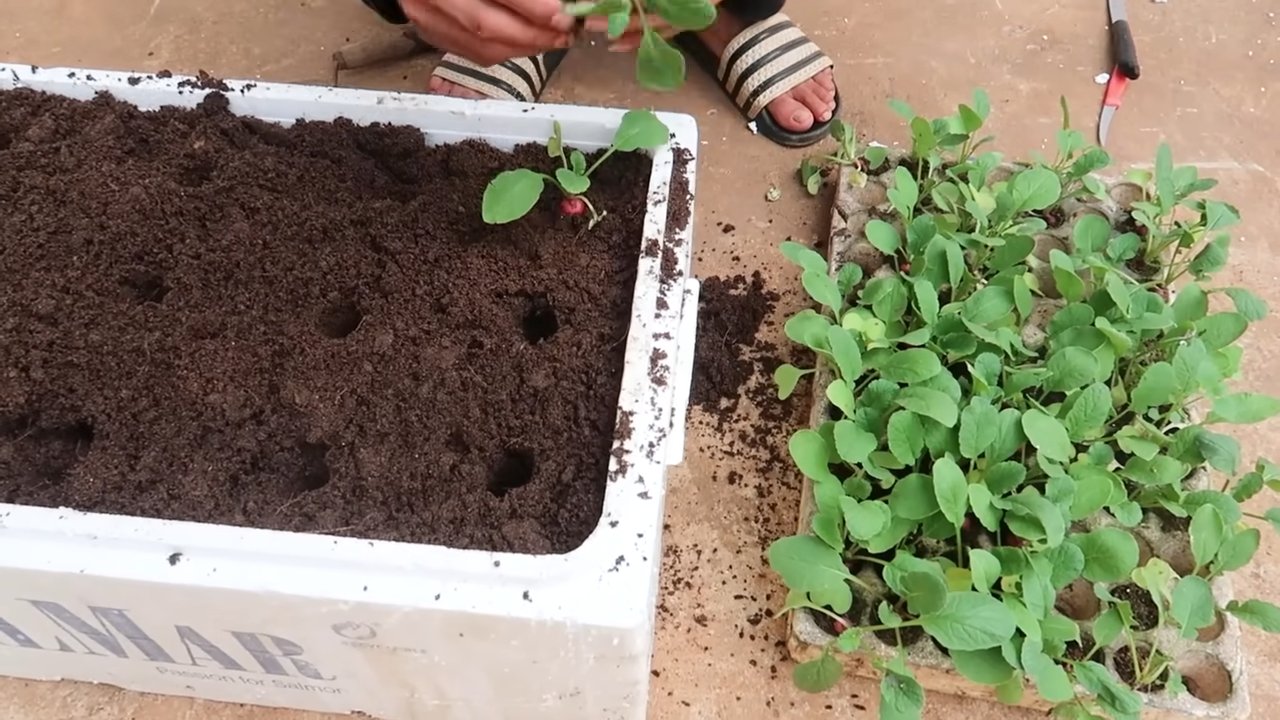
Aussaat Schritt für Schritt:
1. Saatrillen ziehen: Zieht mit einem Rechen oder einem Stock Saatrillen in den Boden. Die Rillen sollten etwa 2-3 cm tief sein und einen Abstand von 25-30 cm zueinander haben.
2. Samen aussäen: Säet die Samen in die Rillen. Achtet darauf, dass die Samen nicht zu dicht liegen. Ein Abstand von 5-8 cm zwischen den Samen ist ideal.
3. Samen bedecken: Bedeckt die Samen mit Erde und drückt die Erde leicht an.
4. Gießen: Gießt die Erde vorsichtig an, damit die Samen nicht weggespült werden.
Pflege: Gießen, Düngen, Hacken
Winterrettich ist relativ pflegeleicht, aber ein paar Dinge solltet ihr beachten:
* Gießen: Gießt den Rettich regelmäßig, besonders in trockenen Perioden. Der Boden sollte immer leicht feucht sein, aber nicht nass.
* Düngen: Düngt den Rettich etwa 2-3 Wochen nach der Aussaat mit einem organischen Dünger. Ich verwende gerne Hornspäne oder Gemüsedünger.
* Hacken: Hackt den Boden regelmäßig, um Unkraut zu entfernen und den Boden zu lockern.
* Ausdünnen: Wenn die Pflanzen zu dicht stehen, solltet ihr sie ausdünnen. Entfernt die schwächsten Pflanzen, so dass die übrigen Pflanzen genügend Platz zum Wachsen haben.
Schutz vor Schädlingen und Krankheiten
Winterrettich ist relativ robust, aber er kann von einigen Schädlingen und Krankheiten befallen werden:
* Erdflöhe: Erdflöhe sind kleine, springende Käfer, die Löcher in die Blätter fressen. Ihr könnt sie mit einem Gemüseschutznetz oder mit natürlichen Mitteln wie Neemöl bekämpfen.
* Kohlfliege: Die Kohlfliege legt ihre Eier an den Wurzeln des Rettichs ab. Die Larven fressen dann an den Wurzeln und können die Pflanzen zum Absterben bringen. Ihr könnt die Kohlfliege mit einem Gemüseschutznetz oder mit Nematoden bekämpfen.
* Falscher Mehltau: Falscher Mehltau ist eine Pilzkrankheit, die sich durch gelbliche Flecken auf den Blättern äußert. Ihr könnt den Falschen Mehltau mit einem Fungizid bekämpfen.
Ich persönlich versuche immer, Schädlinge und Krankheiten mit natürlichen Mitteln zu bekämpfen. Ein Gemüseschutznetz ist oft schon sehr hilfreich.
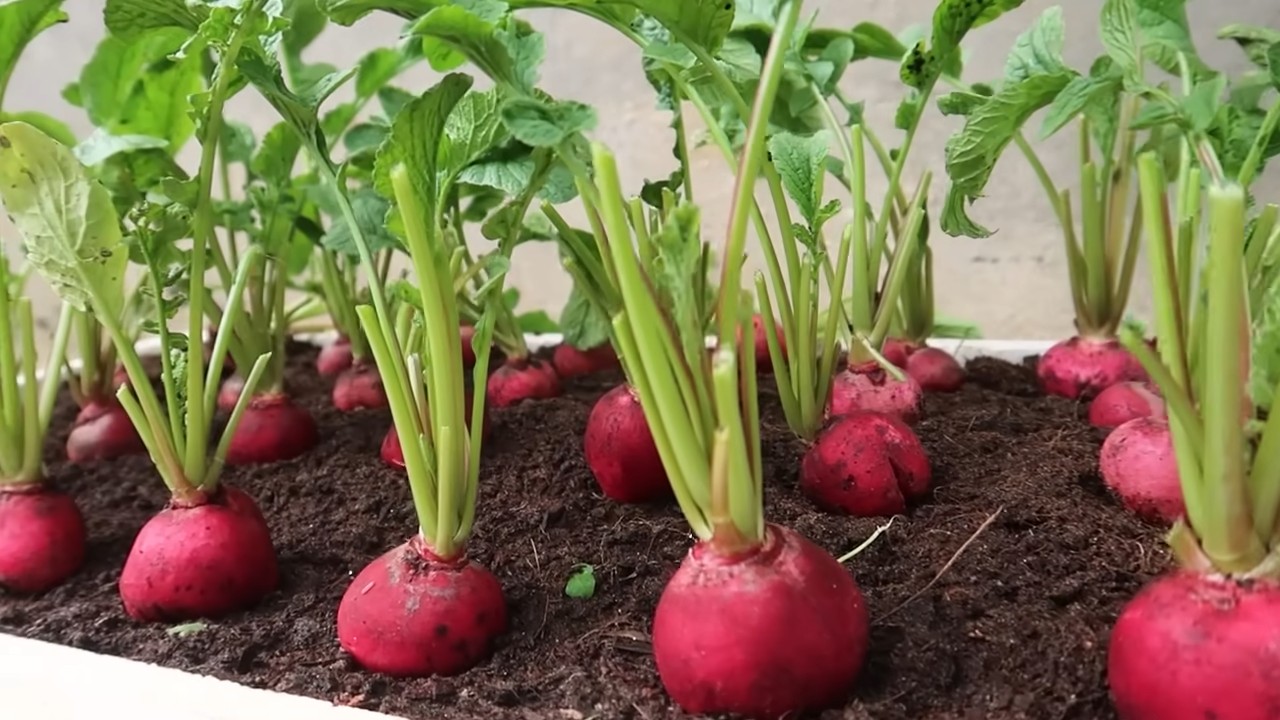
Ernte: Wann ist der Rettich reif?
Die Erntezeit für Winterrettich ist von Oktober bis November. Der Rettich ist reif, wenn er eine bestimmte Größe erreicht hat. Die Größe hängt von der Sorte ab. Schwarzer Rettich kann bis zu 20 cm lang werden, während roter Rettich meist kleiner bleibt.
Ernte Schritt für Schritt:
1. Rettich aus der Erde ziehen: Lockert die Erde um den Rettich herum mit einer Grabegabel oder einem Spaten. Zieht den Rettich dann vorsichtig aus der Erde.
2. Blätter abschneiden: Schneidet die Blätter des Rettichs ab, lasst aber etwa 2-3 cm stehen.
3. Erde entfernen: Entfernt die Erde vom Rettich.
4. Rettich lagern: Lagert den Rettich an einem kühlen, dunklen und trockenen Ort. Im Keller oder im Kühlschrank hält er sich mehrere Monate.
Lagerung: So bleibt der Rettich lange frisch
Winterrettich ist gut lagerfähig. Am besten lagert ihr ihn im Keller oder im Kühlschrank.
Lagerung im Keller:
* Sandkiste: Legt den Rettich in eine Kiste mit feuchtem Sand. Der Sand sollte nicht zu nass sein, damit der Rettich nicht fault.
* Einschlagen: Schlagt den Rettich in Zeitungspapier ein und lagert ihn an einem kühlen, dunklen Ort.
Lagerung im Kühlschrank:
* Gemüsefach: Lagert den Rettich im Gemüsefach des Kühlschranks.
* Plastikbeutel: Legt den Rettich in einen Plastikbeutel und verschließt ihn.
Verwendung: Vielseitig in der Küche
Winterrettich ist vielseitig in der Küche verwendbar. Er kann roh, gekocht oder eingelegt gegessen werden.
* Roh: Roh schmeckt Winterrettich besonders gut in Salaten oder als Rohkost. Er ist knackig und würzig.
* Gekocht: Gekocht kann Winterrettich als Beilage zu Fleisch oder Fisch serviert werden. Er kann auch in Suppen oder Eintöpfen verwendet werden.
* Eingelegt: Eingelegt ist Winterrettich eine leckere Beilage zu Brot oder Käse.
Ich liebe es, Winterrettich in dünne Scheiben zu schneiden und mit Salz und Pfeffer zu bestreuen. Einfach, aber lecker!
Rezepte mit Winterrettich
Hier sind ein paar meiner Lieblingsrezepte mit Winterrettich:
* Rettichsalat: Rettich raspeln, mit Apfel, Karotte und Nüssen mischen. Mit Joghurt-Dressing anmachen.
* Rettichsuppe: Rettich, Kartoffeln und Zwiebeln in Brühe kochen. Mit Sahne und Kräutern verfeinern.
* Eingelegter Rettich: Rettich in Scheiben schneiden und in Essig, Zucker und Gewürzen einlegen.
Zusätzliche Tipps und Tricks
* Bodenprobe: Wenn ihr unsicher seid, ob euer Boden für Winterrettich geeignet ist, könnt ihr eine Bodenprobe machen lassen.
* Fruchtfolge: Achtet auf eine gute Fruchtfolge. Baut Winterrettich nicht jedes Jahr am selben Standort an.
* Mischkultur: Winterrettich verträgt sich gut mit anderen Gemüsesorten wie Karotten, Salat oder Spinat.
*
Conclusion
So, there you have it! Growing red radishes in winter might seem like a gardening challenge reserved for seasoned professionals, but with a few simple adjustments and this straightforward DIY trick, you can enjoy the crisp, peppery flavor of homegrown radishes even when the snow is falling. This isn’t just about having fresh vegetables; it’s about connecting with the earth, understanding the rhythms of nature, and experiencing the satisfaction of nurturing life, even in the seemingly barren months.
Why is this DIY trick a must-try? Because it empowers you to extend your growing season, providing access to fresh, healthy produce when supermarket options might be limited in variety and freshness. Imagine adding vibrant, crunchy radishes to your winter salads, using them as a colorful garnish for soups, or simply enjoying them as a healthy snack. The taste of a radish you’ve grown yourself is undeniably superior, bursting with flavor that store-bought varieties often lack.
Beyond the taste, this method promotes sustainability. By growing your own food, you reduce your reliance on commercially produced vegetables, which often travel long distances, contributing to carbon emissions. You also have complete control over the growing process, ensuring that your radishes are free from harmful pesticides and herbicides.
But the benefits don’t stop there. Gardening is a fantastic stress reliever. The simple act of tending to plants, feeling the soil in your hands, and watching your radishes sprout and grow can be incredibly therapeutic, providing a welcome respite from the demands of daily life.
Ready to take your winter radish growing to the next level? Consider these variations:
* Succession Planting: Plant a new batch of radish seeds every two weeks to ensure a continuous harvest throughout the winter.
* Companion Planting: Plant radishes alongside other winter vegetables like spinach, lettuce, or carrots. They can even help deter pests from other plants.
* Container Gardening: If you don’t have a garden bed, you can easily grow radishes in containers on a sunny windowsill or balcony. Just make sure the containers are deep enough to accommodate the radish roots.
* Experiment with Varieties: Don’t limit yourself to just red radishes. Try growing other varieties like white icicle radishes, black Spanish radishes, or even watermelon radishes for a colorful and flavorful winter harvest.
* Utilize Grow Lights: If you live in an area with very short days and limited sunlight, consider using grow lights to supplement natural light and promote healthy growth.
We are confident that with a little effort and this DIY trick, you’ll be enjoying fresh, homegrown red radishes all winter long. Don’t be afraid to experiment, adapt the method to your specific climate and growing conditions, and most importantly, have fun!
We encourage you to try this DIY trick for growing red radishes in winter and share your experience with us. Post photos of your radish harvest on social media using #WinterRadishDIY and let us know what worked best for you. We can’t wait to see your success! Happy gardening!
Frequently Asked Questions (FAQ)
What is the best time to start planting red radishes for a winter harvest?
The ideal time to start planting red radishes for a winter harvest depends on your local climate and the expected first frost date. Generally, you should aim to sow your seeds about 4-6 weeks before the first expected frost. This will give the radishes enough time to mature before the coldest temperatures arrive. In milder climates, you may be able to plant later in the fall. Check your local weather forecasts and gardening resources for specific recommendations for your area.
What kind of soil is best for growing red radishes in winter?
Red radishes thrive in well-drained, loose soil that is rich in organic matter. Amend your soil with compost or well-rotted manure before planting to improve drainage and fertility. Avoid heavy clay soils, as they can become waterlogged and inhibit root growth. A slightly acidic to neutral soil pH (around 6.0 to 7.0) is ideal. If you are growing in containers, use a high-quality potting mix specifically formulated for vegetables.
How much sunlight do red radishes need in winter?
While radishes can tolerate some shade, they perform best with at least 6 hours of direct sunlight per day. In winter, sunlight hours are often shorter and less intense. Choose a location that receives the most sunlight possible. If you are growing indoors, consider using grow lights to supplement natural light and ensure healthy growth. Rotate your plants regularly to ensure even light exposure.
How often should I water red radishes in winter?
Water radishes regularly to keep the soil consistently moist, but not waterlogged. The frequency of watering will depend on the weather conditions and the type of soil you are using. Check the soil moisture regularly by sticking your finger into the soil about an inch deep. If the soil feels dry, it’s time to water. Avoid overwatering, as this can lead to root rot.
What are some common pests and diseases that affect red radishes in winter, and how can I prevent them?
Common pests that can affect red radishes include flea beetles, aphids, and root maggots. To prevent flea beetles, use row covers to protect your plants. Aphids can be controlled with insecticidal soap or neem oil. Root maggots can be prevented by practicing crop rotation and avoiding planting radishes in the same location year after year. Diseases that can affect radishes include damping-off and white rust. Damping-off can be prevented by using well-drained soil and avoiding overwatering. White rust can be controlled with fungicides.
Can I grow red radishes indoors during the winter?
Yes, you can absolutely grow red radishes indoors during the winter. Choose a sunny windowsill or use grow lights to provide adequate light. Use containers that are at least 6 inches deep and fill them with a high-quality potting mix. Water regularly and fertilize with a balanced fertilizer every few weeks.
How long does it take for red radishes to mature in winter?
Red radishes are known for their quick growth, and they typically mature in about 3-4 weeks from planting. However, in winter, the cooler temperatures and shorter days may slow down the growth rate slightly. Be patient and monitor your plants regularly. You can harvest radishes when they reach the desired size, typically about 1 inch in diameter.
How do I know when my red radishes are ready to harvest?
You can tell when red radishes are ready to harvest by their size and color. They should be about 1 inch in diameter and have a vibrant red color. You can also gently loosen the soil around the radish and pull one up to check its size. If it’s the right size, you can harvest the rest. Don’t let the radishes get too large, as they can become woody and bitter.
Can I eat the radish greens?
Yes, radish greens are edible and nutritious. They have a peppery flavor similar to the radish root. You can add them to salads, soups, or stir-fries. Harvest the greens when they are young and tender.
How do I store red radishes after harvesting them?
To store red radishes, remove the greens and wash the radishes thoroughly. Place them in a plastic bag or container with a damp paper towel and store them in the refrigerator. They should last for about 1-2 weeks.

Leave a Comment