
Grow Snake Gourd Easily, even if you think you don’t have a green thumb! Have you ever looked at those long, winding snake gourds at the market and thought, “Wow, I wish I could grow those!”? Well, guess what? You absolutely can! This often-overlooked vegetable, with its fascinating shape and mild flavor, is surprisingly easy to cultivate at home with a few simple tricks and DIY hacks.
The snake gourd, also known as Chichinda in some parts of the world, has a rich history, particularly in Asian cuisine. For centuries, it’s been a staple ingredient in curries, stews, and even medicinal remedies. Beyond its culinary uses, growing your own snake gourd connects you to a tradition of sustainable gardening and self-sufficiency.
But why should you bother learning how to grow snake gourd easily? In today’s world, knowing how to grow your own food, even just a little bit, is incredibly empowering. Not only will you have access to fresh, organic produce right in your backyard, but you’ll also save money and reduce your environmental footprint. Plus, let’s be honest, there’s something incredibly satisfying about nurturing a plant from seed to harvest. I’m going to share some simple, effective DIY tricks that will help you successfully cultivate these unique vegetables, even if you’re a complete beginner. Get ready to impress your friends and family with your homegrown snake gourds!
Schlangenkuerbis Anbauen: Mein DIY-Guide fuer eine reiche Ernte
Hallo Gartenfreunde! Ich liebe es, exotische Gemüsesorten anzubauen, und der Schlangenkuerbis (Trichosanthes cucumerina) ist einer meiner Favoriten. Er ist nicht nur unglaublich lecker, sondern auch ein echter Hingucker im Garten. In diesem Artikel zeige ich euch, wie ihr Schlangenkuerbis ganz einfach selbst anbauen könnt – von der Aussaat bis zur Ernte. Keine Angst, es ist einfacher als ihr denkt!
Was du brauchst:
* Schlangenkuerbis-Samen (am besten von einer vertrauenswürdigen Quelle)
* Anzuchttöpfe oder -schalen
* Anzuchterde
* Gartenerde (gut durchlässig und nährstoffreich)
* Kompost oder organischer Dünger
* Eine Rankhilfe (z.B. ein Spalier, ein Zaun oder ein stabiles Gerüst)
* Gießkanne oder Gartenschlauch
* Gartenschere
* Geduld und Liebe zum Gärtnern!
Vorbereitung ist alles: Die Aussaat
Der Schlangenkuerbis ist ein tropisches Gewächs und braucht Wärme, um zu keimen. Deshalb ist es wichtig, ihn vorzuziehen.
1. Samen vorbereiten: Schlangenkuerbis-Samen haben eine harte Schale. Um die Keimung zu beschleunigen, könnt ihr die Samen leicht anrauen. Ich mache das, indem ich sie vorsichtig zwischen zwei Blättern Schleifpapier reibe. Aber Vorsicht, nicht zu stark, ihr wollt die Samen nicht beschädigen! Alternativ könnt ihr die Samen auch für 24 Stunden in lauwarmem Wasser einweichen. Das hilft, die Schale aufzuweichen.
2. Aussaat in Anzuchttöpfen: Füllt eure Anzuchttöpfe oder -schalen mit Anzuchterde. Drückt die Erde leicht an und macht dann mit dem Finger ein kleines Loch (ca. 1-2 cm tief). Legt in jedes Loch einen Samen und bedeckt ihn vorsichtig mit Erde. Gießt die Erde sanft an, sodass sie feucht, aber nicht nass ist.
3. Warm und hell stellen: Stellt die Anzuchttöpfe an einen warmen und hellen Ort. Ideal ist eine Fensterbank mit Südausrichtung oder ein beheiztes Gewächshaus. Die Keimtemperatur sollte zwischen 25 und 30 Grad Celsius liegen. Ihr könnt die Töpfe auch mit Frischhaltefolie abdecken, um die Luftfeuchtigkeit zu erhöhen. Vergesst aber nicht, die Folie regelmäßig zu lüften, um Schimmelbildung zu vermeiden.
4. Geduld haben: Die Keimung kann je nach Temperatur und Samenqualität 1-3 Wochen dauern. Haltet die Erde feucht, aber vermeidet Staunässe. Sobald die ersten Keimlinge erscheinen, könnt ihr die Folie entfernen.
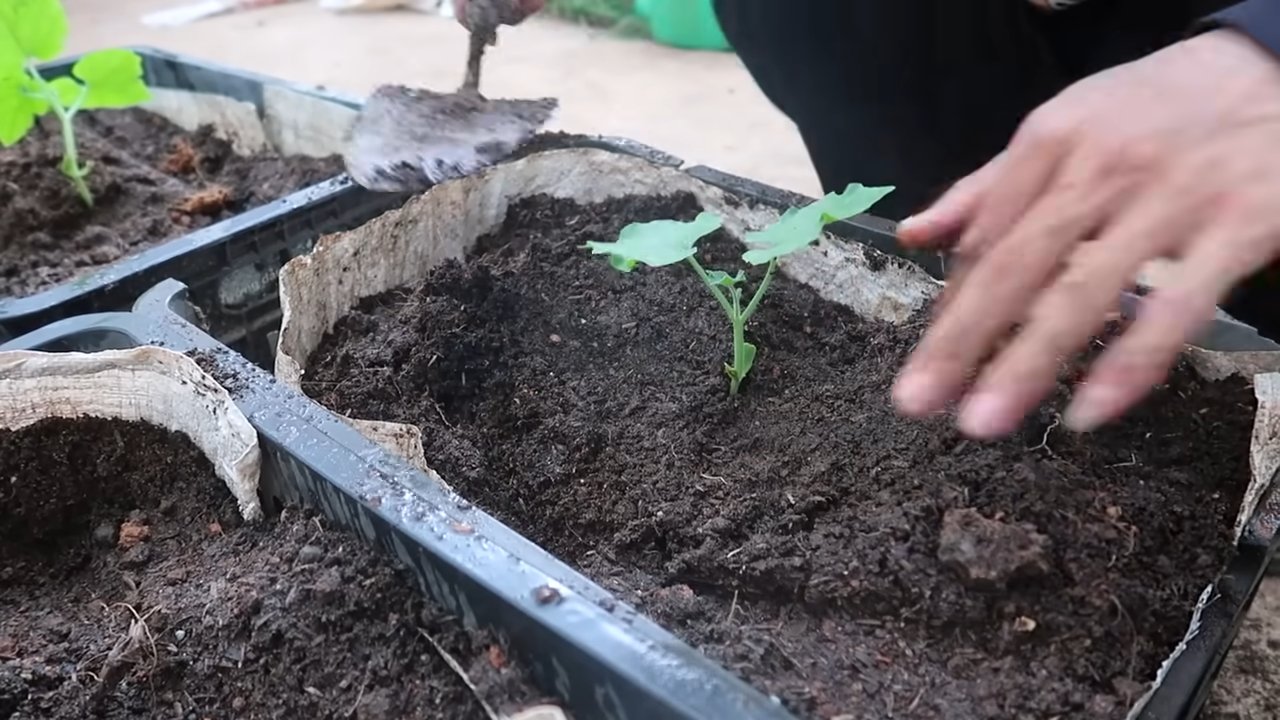
Umzug ins Freie: Die Pflanzung
Sobald die Jungpflanzen kräftig genug sind (ca. 15-20 cm hoch und mit mehreren Blättern), können sie ins Freie umziehen. Das ist normalerweise nach den Eisheiligen (Mitte Mai) der Fall, wenn keine Frostgefahr mehr besteht.
1. Standort vorbereiten: Wählt einen sonnigen und windgeschützten Standort für eure Schlangenkuerbis-Pflanzen. Der Boden sollte gut durchlässig und nährstoffreich sein. Ich bereite den Boden vor, indem ich ihn mit Kompost oder organischem Dünger anreichere.
2. Pflanzlöcher ausheben: Grabt Pflanzlöcher, die etwas größer sind als die Wurzelballen der Jungpflanzen. Der Abstand zwischen den Pflanzen sollte mindestens 1 Meter betragen, da der Schlangenkuerbis viel Platz zum Ranken benötigt.
3. Pflanzen einsetzen: Nehmt die Jungpflanzen vorsichtig aus den Anzuchttöpfen und setzt sie in die Pflanzlöcher. Achtet darauf, die Wurzeln nicht zu beschädigen. Füllt die Löcher mit Erde auf und drückt sie leicht an. Gießt die Pflanzen gründlich an.
4. Rankhilfe installieren: Der Schlangenkuerbis ist ein Kletterer und benötigt eine Rankhilfe. Ich verwende gerne ein Spalier oder einen stabilen Zaun. Ihr könnt aber auch ein Gerüst aus Bambusstäben oder Draht bauen. Achtet darauf, dass die Rankhilfe stabil genug ist, um das Gewicht der wachsenden Pflanzen und Früchte zu tragen.
Pflegeleicht und ertragreich: Die Pflege
Der Schlangenkuerbis ist relativ pflegeleicht, aber ein paar Dinge solltet ihr beachten, um eine reiche Ernte zu erzielen.
1. Regelmäßig gießen: Der Schlangenkuerbis benötigt viel Wasser, besonders während der Blütezeit und Fruchtbildung. Gießt die Pflanzen regelmäßig, besonders bei trockenem Wetter. Vermeidet aber Staunässe, da dies zu Wurzelfäule führen kann. Ich gieße am liebsten morgens, damit die Blätter über den Tag abtrocknen können.
2. Düngen nicht vergessen: Der Schlangenkuerbis ist ein Starkzehrer und benötigt regelmäßig Dünger. Ich dünge meine Pflanzen alle 2-3 Wochen mit einem organischen Gemüsedünger oder Komposttee.
3. Ausgeizen: Um die Fruchtbildung zu fördern, könnt ihr die Seitentriebe des Schlangenkuerbisses ausbrechen. Das nennt man Ausgeizen. Entfernt die Seitentriebe, die aus den Blattachseln wachsen. So konzentriert sich die Pflanze auf die Entwicklung der Haupttriebe und Früchte.
4. Sonnenschutz: In sehr heißen Regionen kann es sinnvoll sein, die Früchte vor direkter Sonneneinstrahlung zu schützen. Ihr könnt die Früchte mit einem Tuch oder einem Blatt bedecken, um Sonnenbrand zu vermeiden.
5. Schädlinge und Krankheiten: Der Schlangenkuerbis ist relativ resistent gegen Schädlinge und Krankheiten. Gelegentlich können Blattläuse oder Spinnmilben auftreten. Diese könnt ihr mit einem natürlichen Insektizid oder einer Seifenlauge bekämpfen. Achtet auch auf Anzeichen von Pilzkrankheiten wie Mehltau. Bei Befall solltet ihr die betroffenen Blätter entfernen und die Pflanzen mit einem Fungizid behandeln.
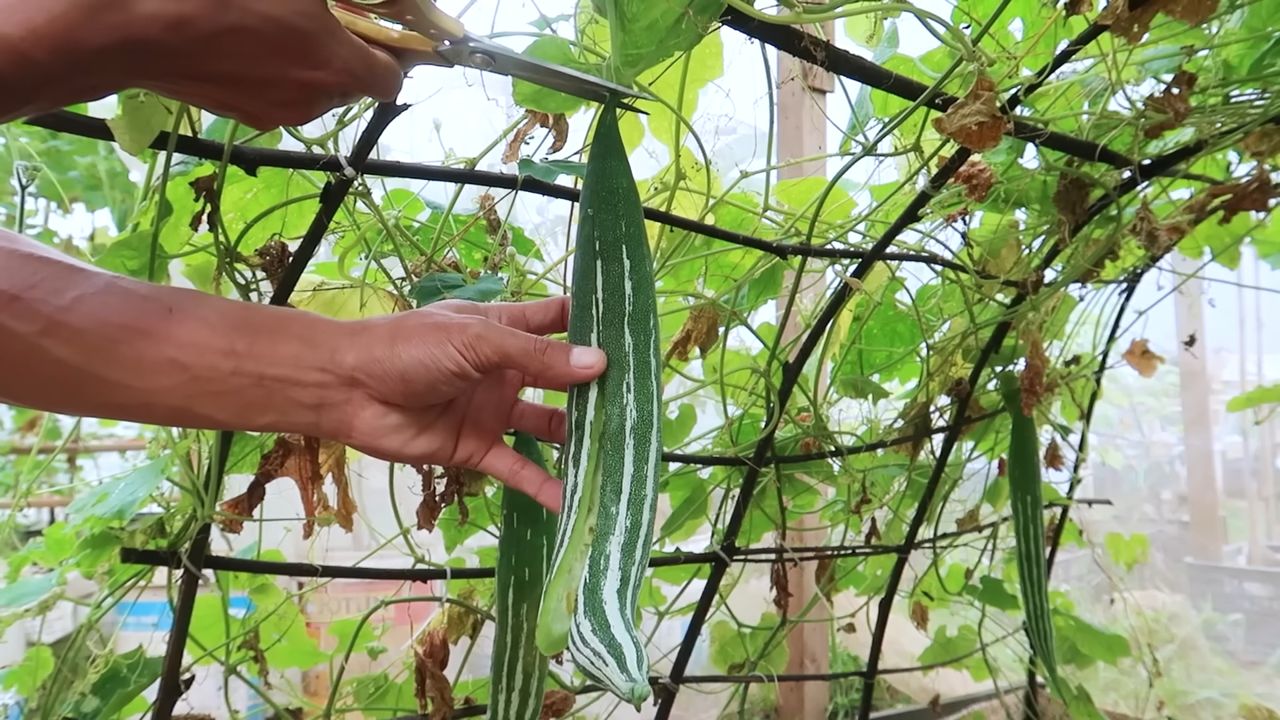
Die Belohnung: Die Ernte
Die Erntezeit des Schlangenkuerbisses beginnt in der Regel im Spätsommer oder Frühherbst, etwa 2-3 Monate nach der Pflanzung.
1. Reife erkennen: Die Früchte sind reif, wenn sie eine grüne Farbe haben und sich leicht biegen lassen. Die Größe der Früchte variiert je nach Sorte.
2. Ernten: Schneidet die Früchte mit einer Gartenschere ab. Lasst dabei einen kleinen Stiel an der Frucht, um die Haltbarkeit zu verlängern.
3. Lagerung: Schlangenkuerbis kann im Kühlschrank für einige Tage gelagert werden. Am besten wickelt ihr die Früchte in ein feuchtes Tuch, um sie vor dem Austrocknen zu schützen.
Verwendung in der Küche:
Der Schlangenkuerbis ist vielseitig in der Küche einsetzbar. Er kann roh in Salaten gegessen, gebraten, gedünstet, gegrillt oder in Currys verwendet werden. Ich liebe es, ihn in asiatischen Gerichten zu verwenden. Er hat einen milden, leicht süßlichen Geschmack und eine knackige Textur.
Hier sind ein paar Ideen:
* Schlangenkuerbis-Salat: Schneidet den Schlangenkuerbis in dünne Scheiben und mischt ihn mit anderen Gemüsesorten wie Tomaten, Gurken und Paprika. Gebt ein Dressing eurer Wahl darüber.
* Gebratener Schlangenkuerbis: Schneidet den Schlangenkuerbis in Scheiben und bratet ihn in der Pfanne mit etwas Öl und Gewürzen an.
* Schlangenkuerbis-Curry: Fügt den Schlangenkuerbis zu eurem Lieblingscurry hinzu. Er passt gut zu Kokosmilch, Currypaste und anderen Gemüsesorten.
* Gegrillter Schlangenkuerbis: Schneidet den Schlangenkuerbis in Scheiben und grillt ihn auf dem Grill. Beträufelt ihn mit etwas Olivenöl und Gewürzen.
Extra-Tipps fuer eine reiche Ernte:
* Bienenfreundliche Pflanzen: Pflanzt in der Nähe des Schlangenkuerbisses bienenfreundliche Pflanzen wie Lavend
Conclusion
So, there you have it! Growing snake gourd doesn’t have to be a daunting task. By implementing this simple, yet effective DIY trick, you’re setting yourself up for a bountiful harvest of these fascinating and nutritious vegetables. We’ve walked you through the process, highlighting the key steps to ensure success, from seed preparation to providing the ideal support structure. This method isn’t just about growing snake gourd; it’s about cultivating a deeper connection with nature and experiencing the satisfaction of nurturing your own food source.
Why is this DIY trick a must-try? Because it addresses the most common challenges faced by gardeners attempting to grow snake gourd. It optimizes germination rates, promotes vigorous vine growth, and ultimately maximizes your yield. Forget struggling with inconsistent results and disappointing harvests. This approach empowers you to take control and achieve impressive results, even if you’re a beginner gardener.
But don’t just take our word for it! The beauty of gardening lies in experimentation and adaptation. Feel free to explore variations on this technique to suit your specific climate and growing conditions. For instance, if you live in an area with particularly hot summers, consider providing some afternoon shade to protect the developing gourds from sunburn. You could also experiment with different types of organic fertilizers to boost growth and fruit production. Another variation could involve companion planting. Marigolds, for example, are known to deter pests and can be planted near your snake gourd vines.
Consider using a trellis system that allows for ample airflow around the vines. This will help prevent fungal diseases, which can be a common problem in humid environments. You can also prune the vines regularly to encourage branching and fruit production. Remember to always use clean, sharp pruning shears to avoid spreading diseases.
The key takeaway is that growing snake gourd successfully hinges on providing the right conditions and support. This DIY trick provides a solid foundation for success, but don’t be afraid to personalize it to fit your unique gardening needs.
We are confident that this method will significantly improve your chances of a successful snake gourd harvest. Now, it’s your turn to put this knowledge into practice. Get your hands dirty, embrace the learning process, and enjoy the fruits (or rather, gourds!) of your labor.
We’re eager to hear about your experiences! Share your successes, challenges, and any variations you’ve tried in the comments section below. Your insights will not only help other gardeners but also contribute to a collective understanding of how to best grow snake gourd in different environments. Let’s create a community of passionate gardeners, all learning and growing together! So, go ahead, give this DIY trick a try and let us know how it works for you. Happy gardening!
Frequently Asked Questions (FAQ)
What is the best time of year to plant snake gourd seeds?
The ideal time to plant snake gourd seeds is during the late spring or early summer, after the last frost has passed and the soil has warmed up to at least 70°F (21°C). Snake gourd requires warm temperatures to germinate and thrive. In warmer climates, you may be able to plant earlier in the spring. Check your local weather forecast and planting guides for specific recommendations for your region. Starting seeds indoors 4-6 weeks before the last expected frost can also give you a head start.
How much sunlight does snake gourd need?
Snake gourd requires at least 6-8 hours of direct sunlight per day to grow and produce fruit. Choose a planting location that receives full sun throughout the day. If you live in a particularly hot climate, some afternoon shade may be beneficial to prevent sunburn on the developing gourds. Insufficient sunlight can lead to stunted growth, reduced fruit production, and increased susceptibility to diseases.
What type of soil is best for growing snake gourd?
Snake gourd prefers well-drained, fertile soil that is rich in organic matter. The ideal soil pH is between 6.0 and 7.0. Before planting, amend the soil with compost, well-rotted manure, or other organic materials to improve drainage, fertility, and water retention. Avoid heavy clay soils, as they can become waterlogged and inhibit root growth. If you have clay soil, consider adding sand or perlite to improve drainage.
How often should I water snake gourd plants?
Snake gourd plants need consistent moisture, especially during hot, dry weather. Water deeply and regularly, ensuring that the soil remains consistently moist but not waterlogged. Avoid overhead watering, as this can promote fungal diseases. Instead, water at the base of the plant or use a soaker hose. The frequency of watering will depend on your climate, soil type, and the age of the plant. Check the soil moisture regularly and water when the top inch of soil feels dry to the touch.
What kind of support structure is best for snake gourd vines?
Snake gourd vines are vigorous climbers and require a strong support structure to grow properly. A sturdy trellis, fence, or arbor are all suitable options. The support structure should be at least 6-8 feet tall to accommodate the growing vines. Ensure that the support structure is strong enough to support the weight of the mature vines and developing gourds. You can also train the vines to grow along a pergola or even a sturdy tree branch.
How do I prevent pests and diseases from affecting my snake gourd plants?
To prevent pests and diseases, practice good gardening hygiene. Remove any dead or diseased leaves and debris from around the plants. Ensure good air circulation to prevent fungal diseases. Regularly inspect your plants for signs of pests, such as aphids, spider mites, or squash bugs. If you find pests, treat them with insecticidal soap or neem oil. To prevent fungal diseases, avoid overhead watering and apply a fungicide if necessary. Companion planting with marigolds can also help deter pests.
When is the snake gourd ready to harvest?
Snake gourds are typically ready to harvest about 2-3 months after planting. The gourds should be long and slender, with a smooth, green skin. The exact size and shape will vary depending on the variety. To harvest, use a sharp knife or pruning shears to cut the gourd from the vine. Handle the gourds carefully to avoid bruising or damaging the skin. The younger gourds are more tender and have a milder flavor. Older gourds can become tough and bitter.
Can I eat snake gourd? How do I prepare it?
Yes, snake gourd is edible and can be used in a variety of culinary dishes. The young, tender gourds are the most flavorful and can be used in stir-fries, curries, soups, and stews. To prepare snake gourd, wash it thoroughly and peel off the outer skin. Cut the gourd lengthwise and remove the seeds and pith. Slice or dice the gourd according to your recipe. Snake gourd has a mild, slightly sweet flavor that pairs well with a variety of spices and vegetables. It is a popular ingredient in Indian, Asian, and Caribbean cuisine.
How can I save snake gourd seeds for next year?
To save snake gourd seeds, allow a few gourds to mature fully on the vine. The gourds will turn yellow or orange and become very hard. Once the gourds are fully mature, cut them open and scoop out the seeds. Wash the seeds thoroughly and spread them out on a clean surface to dry completely. Store the dried seeds in an airtight container in a cool, dry place. The seeds should remain viable for several years. Remember to label the container with the variety and date of collection.


Leave a Comment