
Grow Taro Indoors Organically? Absolutely! Imagine harvesting your own vibrant, edible taro leaves right from your living room. It’s easier than you think, and I’m here to guide you through every step of the process. For centuries, taro has been a staple crop in many cultures, particularly in Polynesia and Asia, where it holds deep cultural significance, often symbolizing prosperity and sustenance.
But you don’t need a tropical island to enjoy this amazing plant. In fact, with a few simple tricks and a little DIY ingenuity, you can successfully grow taro indoors organically, regardless of your climate.
Why bother, you ask? Well, beyond the sheer satisfaction of nurturing your own food, growing taro indoors organically allows you to control the growing environment, ensuring your taro is free from harmful pesticides and herbicides. Plus, it’s a fantastic way to add a touch of the exotic to your home décor and impress your friends with your green thumb. So, let’s dive in and unlock the secrets to cultivating your own indoor taro paradise!
Growing Taro Indoors Organically: A Step-by-Step Guide
Hey there, fellow plant enthusiasts! Ever thought about growing your own taro indoors? It’s totally doable, and trust me, the satisfaction of harvesting your own organically grown taro is amazing. I’ve been doing it for a while now, and I’m excited to share my secrets with you. This guide will walk you through everything you need to know, from choosing the right corm to harvesting your delicious, homegrown taro.
What You’ll Need
Before we dive in, let’s gather our supplies. Here’s a list of everything you’ll need to successfully grow taro indoors:
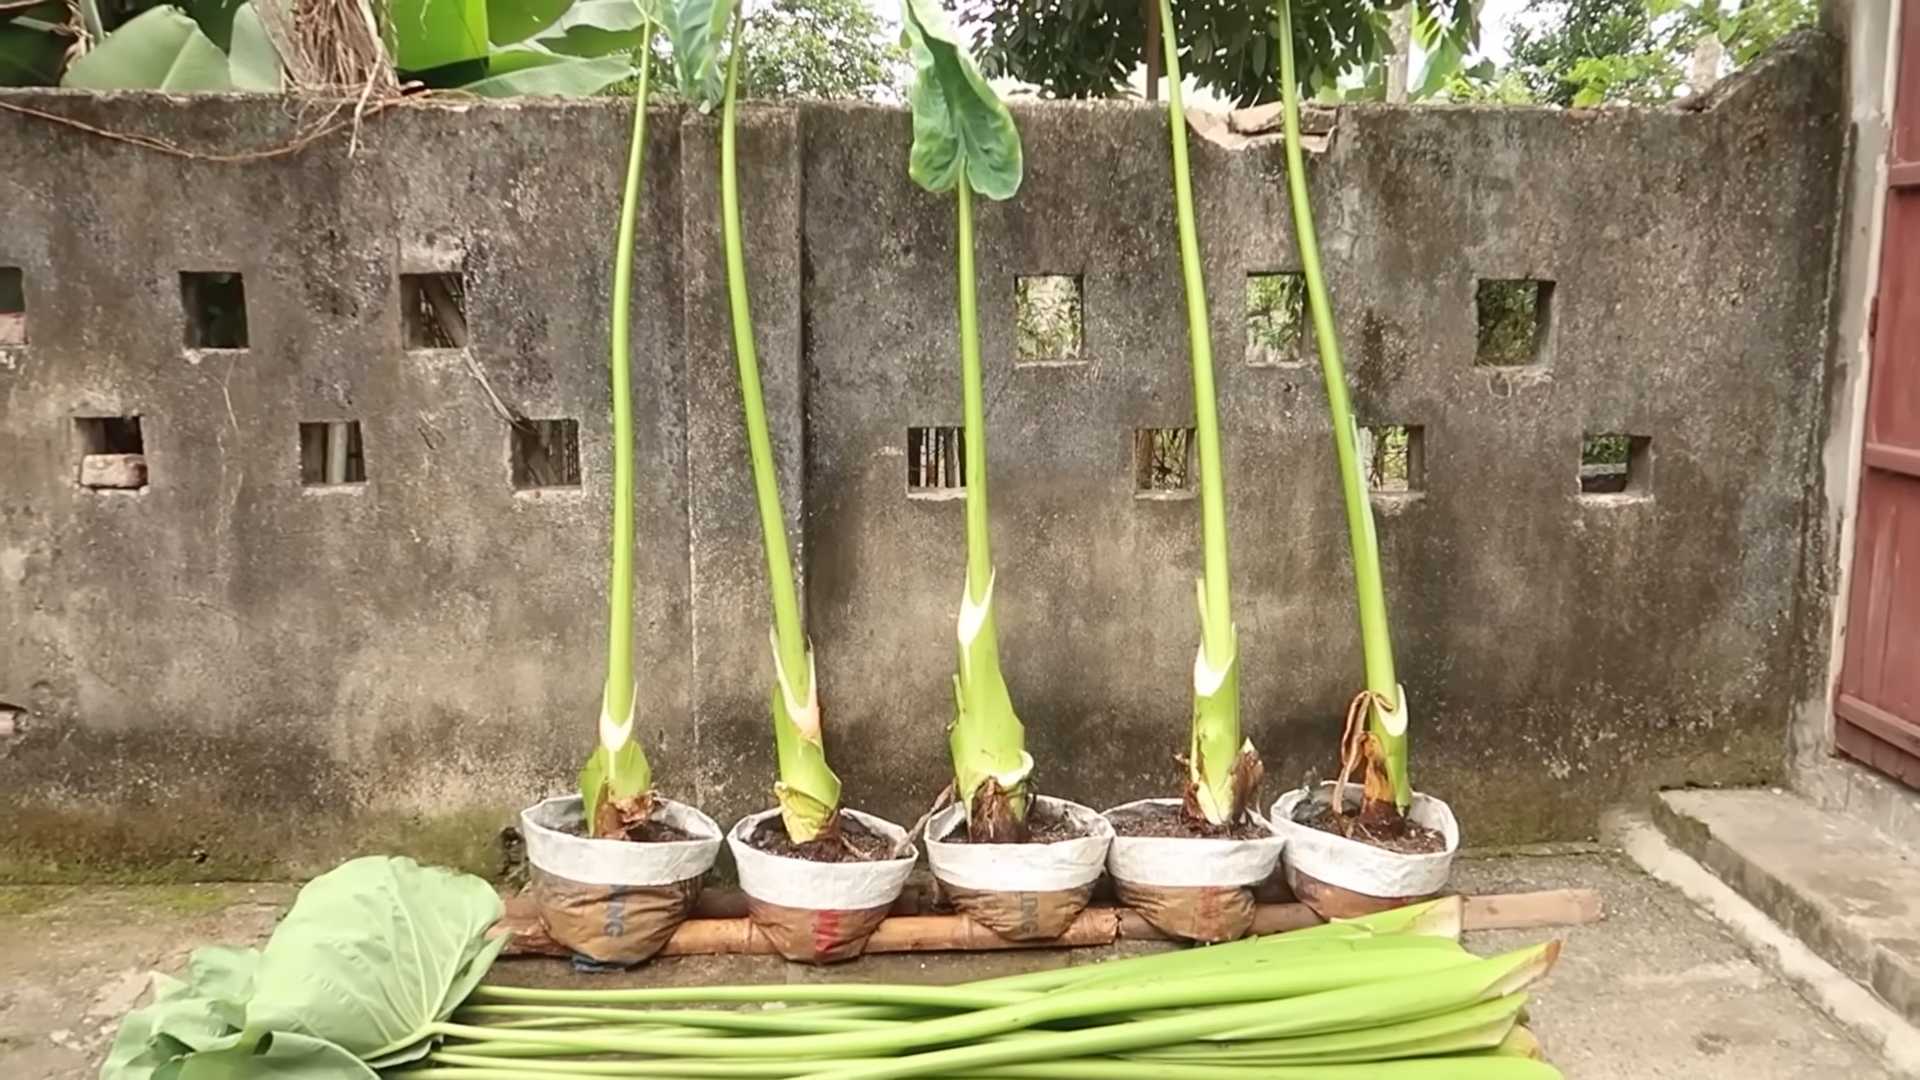
* Taro Corms: Look for healthy, firm corms at your local nursery or online. Opt for organic ones if possible!
* Large Container: Taro needs space! Choose a container that’s at least 12 inches in diameter and 12 inches deep. Bigger is better, really.
* Organic Potting Mix: A well-draining, nutrient-rich organic potting mix is crucial. I like to use a mix of compost, peat moss, and perlite.
* Water: Taro loves water, so have a good supply ready.
* Grow Lights (Optional but Recommended): Especially if you don’t have a super sunny spot, grow lights will help your taro thrive.
* Organic Fertilizer: A slow-release organic fertilizer will provide your taro with the nutrients it needs.
* Spray Bottle: For misting the leaves to maintain humidity.
* Pebbles or Gravel: To improve drainage at the bottom of the container.
* Watering Can or Hose: For watering your taro plants.
Preparing Your Taro Corms
Okay, let’s get those corms ready for planting! This is a crucial step, so pay close attention.
1. Inspect the Corms: Carefully examine your taro corms. Look for any signs of damage, rot, or pests. Discard any corms that look unhealthy. We want to start with the best possible material.
2. Clean the Corms: Gently wash the corms with water to remove any dirt or debris. You can use a soft brush if needed.
3. Sprouting (Optional but Recommended): While you can plant the corms directly, sprouting them first gives them a head start. To sprout, place the corms in a shallow dish of water, ensuring the top part (where the eyes are) is exposed to air. Keep the dish in a warm, bright location. Change the water every day or two. You should see sprouts emerging within a week or two.
Planting Your Taro
Now for the fun part – planting!
1. Prepare the Container: Place a layer of pebbles or gravel at the bottom of your container to improve drainage. This is super important to prevent root rot.
2. Fill with Potting Mix: Fill the container with your organic potting mix, leaving a few inches of space at the top.
3. Plant the Corm: Make a hole in the center of the potting mix that’s deep enough to accommodate the corm. If you sprouted your corm, be extra careful not to damage the sprouts. Place the corm in the hole with the sprouts facing upwards (if sprouted). If you didn’t sprout, orient the corm so the “eyes” (small bumps where new growth will emerge) are facing upwards.
4. Cover the Corm: Gently cover the corm with potting mix, leaving the top of the corm (or the sprouts) exposed.
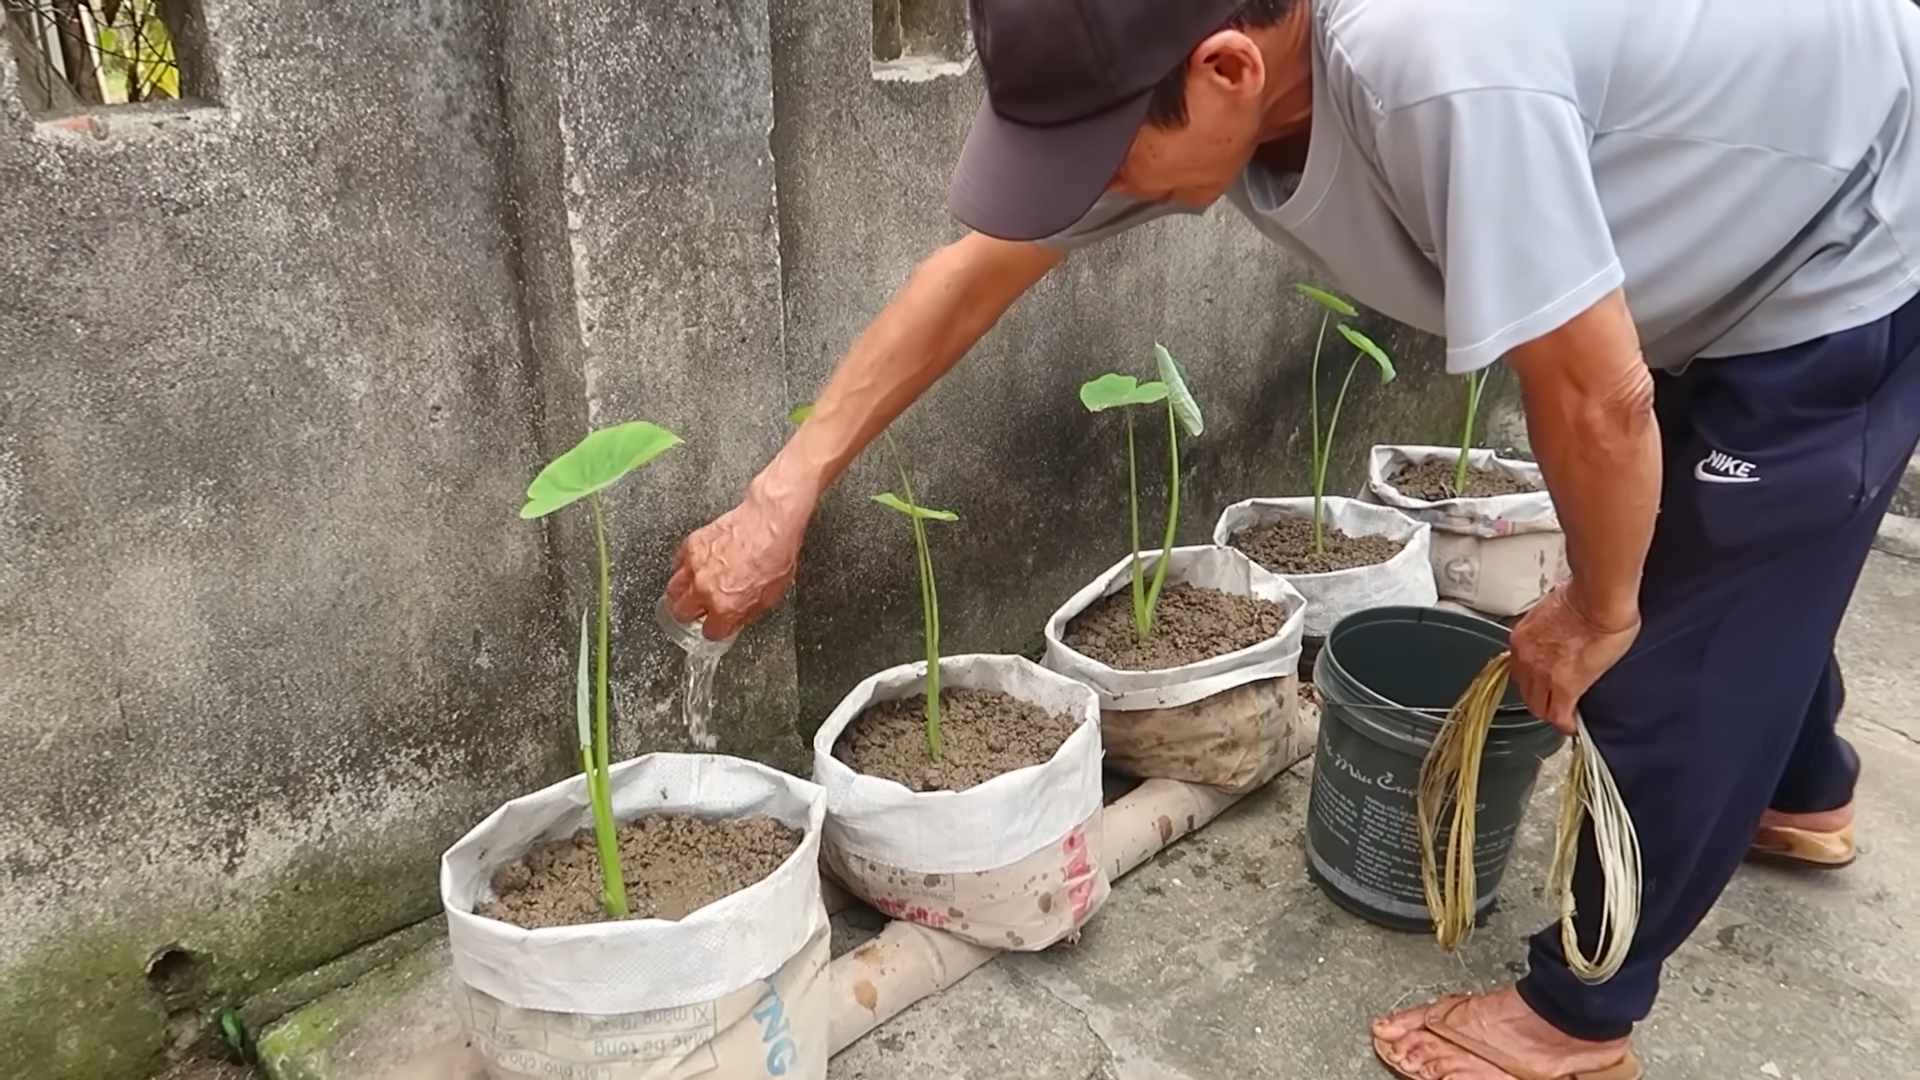
5. Water Thoroughly: Water the potting mix thoroughly until water drains out of the bottom of the container. This helps settle the soil and ensures the corm has enough moisture to start growing.
Caring for Your Indoor Taro
Alright, you’ve planted your taro! Now, let’s talk about how to keep it happy and healthy.
1. Light: Taro needs bright, indirect light. A spot near a sunny window is ideal. If you don’t have enough natural light, use grow lights. I usually keep my grow lights on for about 12-14 hours a day.
2. Watering: Taro loves water! Keep the potting mix consistently moist, but not soggy. Water when the top inch of soil feels dry to the touch. Don’t let the plant sit in standing water, as this can lead to root rot.
3. Humidity: Taro thrives in high humidity. Mist the leaves regularly with a spray bottle, especially during dry winter months. You can also place the container on a tray filled with pebbles and water. As the water evaporates, it will increase the humidity around the plant. A humidifier nearby can also work wonders.
4. Temperature: Taro prefers warm temperatures, ideally between 65°F and 85°F (18°C and 29°C). Avoid placing your taro near drafts or cold windows.
5. Fertilizing: Feed your taro with a slow-release organic fertilizer every few months. Follow the instructions on the fertilizer packaging. You can also use a liquid organic fertilizer diluted to half strength every few weeks during the growing season (spring and summer).
6. Pest Control: Keep an eye out for pests like aphids, spider mites, and mealybugs. If you spot any pests, treat them with an organic insecticide like neem oil or insecticidal soap. Prevention is key! Regularly inspect your plant and wipe down the leaves with a damp cloth.
7. Pruning: Remove any yellowing or dead leaves to encourage new growth. You can also prune the plant to maintain its shape.
Troubleshooting
Even with the best care, you might encounter some issues. Here are a few common problems and how to fix them:
* Yellowing Leaves: This could be a sign of overwatering, underwatering, or nutrient deficiency. Check the soil moisture and adjust your watering accordingly. If the soil is consistently moist, you’re likely overwatering. If the soil is dry, you’re underwatering. If you’re fertilizing regularly, the yellowing could be due to a different issue.
* Brown Leaf Tips: This is often caused by low humidity or dry air. Increase the humidity around your plant by misting the leaves or using a humidifier.
* Stunted Growth: This could be due to insufficient light, nutrient deficiency, or rootbound. Make sure your taro is getting enough light and fertilize regularly. If the plant is rootbound (the roots are circling around the inside of the container), you’ll need to repot it into a larger container.
* Root Rot: This is caused by overwatering and poor drainage. Make sure your container has drainage holes and that you’re not letting the plant sit in standing water. If you suspect root rot, carefully remove the plant from the container and inspect the roots. Trim away any rotten, mushy roots. Repot the plant in fresh potting mix.
Harvesting Your Taro
After several months of care, your taro will be ready to harvest! This is the most rewarding part of the whole process.
1. When to Harvest: You can harvest taro corms when the plant is about 6-9 months old. The leaves will start to turn yellow and die back, indicating that the corm is mature.
2. Harvesting the Corms: Gently loosen the soil around the plant. Carefully lift the plant out of the container. The corms will be attached to the roots.
3. Cleaning the Corms: Wash the corms with water to remove any dirt or debris.
4. Curing the Corms: Cure the corms for a few days in a cool, dry place. This will help them develop a thicker skin and improve their flavor.
5. Enjoying Your Harvest: Taro corms must be cooked before eating, as they contain calcium oxalate crystals that can cause irritation. You can boil, bake, or fry them. Taro is a versatile ingredient that can be used in a variety of dishes.
Propagating Taro
Want more taro plants? You can easily propagate taro from corms or cormels (smaller corms that grow around the main corm).
1. Separating Cormels: When you harvest your taro, you’ll likely find several cormels attached to the main corm. Carefully separate the cormels from the main corm.
2. Planting Cormels: Plant the cormels in individual containers filled with organic potting mix. Follow the same planting instructions as for the main corms.
3. Caring for New Plants: Care for the new plants as you would for your mature taro plant.
Choosing the Right Taro Variety
While most taro varieties can be grown indoors, some are better suited than others. Look for varieties that are compact and don’t require a lot of space. Here are a few good options:
* Bun Long:
Conclusion
So, there you have it! Growing taro indoors organically might seem like a tropical dream, but with a little know-how and dedication, it’s entirely achievable. We’ve walked you through the essential steps, from selecting the right corm to providing the ideal environment for your taro to thrive. But why should you embark on this indoor gardening adventure?
Firstly, cultivating your own taro offers unparalleled freshness. Imagine harvesting leaves and corms directly from your indoor garden, knowing exactly where they came from and what went into their growth. This is especially important for those concerned about pesticides and herbicides often used in commercial farming. You have complete control over the growing process, ensuring a truly organic and healthy harvest.
Secondly, growing taro indoors organically is a rewarding experience. Watching your plant flourish under your care, witnessing the unfurling of new leaves, and eventually harvesting your own corms provides a deep sense of satisfaction. It’s a connection to nature that can be particularly valuable in urban environments.
Thirdly, let’s talk about the versatility of taro. The leaves can be used in various culinary creations, from stews and soups to wraps and chips. The corms, of course, are a staple in many cuisines, offering a unique flavor and texture that’s both comforting and delicious. Having a readily available supply of organically grown taro opens up a world of culinary possibilities.
But the benefits don’t stop there. Growing plants indoors, in general, can improve air quality, reduce stress levels, and add a touch of natural beauty to your home. Taro, with its lush foliage and tropical vibe, is no exception. It can transform any room into a mini-oasis, creating a calming and inviting atmosphere.
Now, let’s consider some variations and suggestions to personalize your taro-growing experience. Experiment with different pot sizes and soil mixes to find what works best for your specific environment. Try using a self-watering pot to simplify the watering process. Consider adding a layer of mulch to the soil surface to help retain moisture and suppress weeds.
For those seeking a more decorative touch, explore different taro varieties with varying leaf colors and patterns. Some varieties boast striking purple or variegated foliage, adding visual interest to your indoor garden. You can also train your taro plant to climb a trellis or moss pole, creating a stunning vertical display.
Remember, growing taro indoors organically is a journey of learning and experimentation. Don’t be afraid to try new things, adapt your approach as needed, and most importantly, have fun! We encourage you to give this DIY trick a try and experience the joy of growing your own taro.
We are confident that with the information provided, you can successfully cultivate your own thriving taro plant indoors. So, grab a corm, prepare your pot, and get ready to embark on this exciting gardening adventure.
Finally, we want to hear from you! Share your experiences, tips, and photos of your indoor taro gardens with us. Let’s create a community of taro enthusiasts and inspire others to embrace the joys of organic indoor gardening. Your insights and feedback are invaluable, and we can’t wait to see what you create. So, go ahead, give it a try, and let us know how it goes! We are eager to hear about your success in growing taro indoors organically.
FAQ
Frequently Asked Questions About Growing Taro Indoors Organically
1. What is the best type of taro to grow indoors?
While many taro varieties can be grown indoors, some are better suited than others. Look for varieties that are naturally smaller and more compact, such as ‘Bun Long’ or ‘Illustris’. These varieties tend to adapt better to indoor conditions and are less likely to outgrow their pots quickly. Consider the available space and lighting when selecting a variety. Also, ensure the variety you choose is edible if you plan to harvest the corms or leaves. Researching the specific needs of each variety will help you make the best choice for your indoor garden.
2. What kind of soil is best for growing taro indoors organically?
Taro thrives in rich, well-draining soil that retains moisture. A good mix would be equal parts of potting soil, compost, and perlite or vermiculite. The potting soil provides a base, the compost adds nutrients and improves water retention, and the perlite or vermiculite enhances drainage and aeration. Avoid using heavy clay soils, as they can become waterlogged and lead to root rot. You can also add a small amount of organic fertilizer to the soil mix to provide a boost of nutrients. Regularly amending the soil with compost will help maintain its fertility and structure.
3. How much sunlight does taro need when grown indoors?
Taro needs bright, indirect sunlight to thrive. Direct sunlight can scorch the leaves, so it’s best to place your plant near a window that receives filtered light. An east-facing window is often ideal, as it provides morning sun without the harsh afternoon rays. If you don’t have access to a bright window, you can supplement with artificial grow lights. LED grow lights are energy-efficient and can provide the necessary light spectrum for healthy growth. Monitor your plant for signs of insufficient light, such as leggy growth or pale leaves, and adjust its position or lighting accordingly.
4. How often should I water my indoor taro plant?
Taro loves moisture, so it’s important to keep the soil consistently damp but not waterlogged. Water thoroughly when the top inch of soil feels dry to the touch. Ensure that the pot has drainage holes to prevent water from accumulating at the bottom. During the growing season (spring and summer), you may need to water more frequently than during the dormant season (fall and winter). Check the soil moisture regularly and adjust your watering schedule as needed. Overwatering can lead to root rot, so it’s crucial to strike a balance between providing enough moisture and avoiding waterlogged conditions.
5. How do I fertilize my taro plant organically?
Feed your taro plant with an organic fertilizer every 2-4 weeks during the growing season. You can use a liquid seaweed fertilizer, compost tea, or a slow-release organic fertilizer. Follow the instructions on the fertilizer packaging for proper application rates. Avoid over-fertilizing, as this can damage the plant. Regularly amending the soil with compost will also provide a steady supply of nutrients. Look for signs of nutrient deficiencies, such as yellowing leaves, and adjust your fertilization schedule accordingly. Organic fertilizers are a safe and sustainable way to provide your taro plant with the nutrients it needs to thrive.
6. How do I harvest taro leaves and corms?
You can harvest taro leaves when they are large enough to use, typically when they are at least 8-10 inches long. Cut the leaves near the base of the plant, leaving a few inches of stem attached. The corms can be harvested when the plant is mature, usually after 6-8 months. To harvest the corms, carefully dig up the entire plant and separate the corms from the roots. Choose corms that are firm and free from blemishes. After harvesting, you can replant some of the smaller corms to start new plants. Remember to cook taro leaves and corms thoroughly before eating, as they contain calcium oxalate crystals that can cause irritation if consumed raw.
7. What are some common pests and diseases that affect taro, and how can I control them organically?
Common pests that can affect taro include aphids, spider mites, and mealybugs. You can control these pests by spraying the plant with insecticidal soap or neem oil. Regularly inspect your plant for signs of infestation and take action promptly. Diseases that can affect taro include root rot and fungal leaf spots. To prevent root rot, ensure that the soil is well-draining and avoid overwatering. To control fungal leaf spots, improve air circulation around the plant and remove any affected leaves. You can also spray the plant with a copper-based fungicide. Organic pest and disease control methods are a safe and effective way to protect your taro plant.
8. Can I grow taro in water only?
While taro can be started in water, it will eventually need to be transplanted into soil to thrive long-term. You can place a taro corm in a jar of water, ensuring that the bottom of the corm is submerged. Change the water every few days to prevent algae growth. Once the corm has sprouted roots and leaves, you can transplant it into a pot filled with well-draining soil. Growing taro in water initially can help stimulate root growth and make the transplanting process easier. However, soil provides the necessary nutrients and support for the plant to grow to its full potential.
9. How do I overwinter my taro plant indoors?
During the winter months, taro plants typically go dormant. Reduce watering and fertilization during this time. You can also cut back the foliage to encourage new growth in the spring. Place the plant in a cool, dark location, such as a basement or garage. Check the soil moisture occasionally and water lightly if it becomes completely dry. In the spring, gradually increase watering and fertilization as new growth emerges. Overwintering your taro plant indoors will allow it to rest and prepare for another season of growth.
10. Is growing taro indoors organically difficult?
Growing taro indoors organically requires some attention and care, but it is not overly difficult. The key is to provide the plant with the right conditions

Leave a Comment