
Grow wheatgrass with water – sounds too good to be true, right? I thought so too, until I discovered this incredibly simple and rewarding DIY project! Forget complicated setups and expensive equipment; you can cultivate your own vibrant, nutrient-packed wheatgrass using just water.
Wheatgrass has a rich history, dating back to ancient Egypt and Mesopotamia, where it was revered for its health benefits. Today, it’s a popular addition to smoothies and juices, celebrated for its detoxifying properties and high concentration of vitamins and minerals. But buying it pre-grown can be costly and often lacks that fresh, homegrown goodness.
That’s where this DIY trick comes in! Imagine having a constant supply of fresh wheatgrass right on your kitchen counter. No more trips to the health food store, no more worrying about pesticides or questionable growing practices. This method is not only cost-effective but also incredibly satisfying. You’ll be amazed at how easy it is to grow wheatgrass with water and enjoy its numerous health benefits. Ready to ditch the store-bought stuff and embrace the joy of homegrown goodness? Let’s get started!
Weizengras Anbauen Nur Mit Wasser: Ein Einfacher DIY-Leitfaden
Hallo liebe Pflanzenfreunde! Habt ihr schon mal Weizengras probiert? Es ist ein echter Superfood-Booster, vollgepackt mit Vitaminen und Mineralien. Und das Beste daran? Ihr könnt es ganz einfach zu Hause anbauen, sogar ohne Erde! Ich zeige euch, wie es geht. Es ist wirklich kinderleicht und macht Spaß.
Was du brauchst:
* Weizensamen (am besten für den Anbau geeignet, z.B. Dinkelweizen)
* Ein flaches Gefäß (z.B. eine Auflaufform, ein Tablett oder spezielle Weizengras-Anzuchtschalen)
* Ein Sieb oder ein feinmaschiges Tuch
* Wasser (gefiltert ist ideal, aber Leitungswasser geht auch)
* Eine Sprühflasche
* Ein dunkler Ort (z.B. ein Schrank oder eine Schublade) für die ersten Tage
* Ein heller Ort (aber nicht in direkter Sonneneinstrahlung) für die restliche Zeit
Vorbereitung der Samen: Der Schlüssel zum Erfolg
Die Vorbereitung der Samen ist super wichtig, damit sie gut keimen. Hier ist, was ihr tun müsst:
1. Einweichen: Gebt die Weizensamen in ein Sieb und spült sie gründlich unter kaltem Wasser ab. Das entfernt Staub und Schmutz. Dann gebt die Samen in ein Glas oder eine Schüssel und bedeckt sie mit reichlich Wasser. Lasst sie 8-12 Stunden einweichen. Ich mache das meistens über Nacht, dann kann ich am nächsten Morgen direkt loslegen.
2. Abspülen: Nach dem Einweichen gießt das Wasser ab und spült die Samen noch einmal gründlich durch. Das ist wichtig, um Schimmelbildung vorzubeugen.
3. Wiederholen: Spült die Samen die nächsten 1-2 Tage 2-3 Mal täglich durch. Achtet darauf, dass sie immer feucht bleiben, aber nicht im Wasser stehen. Ihr werdet sehen, wie die ersten kleinen Keime sprießen. Das ist ein gutes Zeichen!
Die Anzucht: Schritt für Schritt zum grünen Glück
Jetzt geht es ans Eingemachte! Wir bringen die gekeimten Samen in unser Gefäß.
1. Gefäß vorbereiten: Reinigt euer Gefäß gründlich. Es sollte sauber sein, damit sich keine Bakterien oder Schimmel bilden können.
2. Samen verteilen: Verteilt die gekeimten Weizensamen gleichmäßig auf dem Boden des Gefäßes. Sie sollten dicht an dicht liegen, aber nicht übereinander. Eine einzelne Schicht ist ideal.
3. Befeuchten: Besprüht die Samen mit der Sprühflasche, sodass sie gut befeuchtet sind. Sie sollten nicht trocken sein, aber auch nicht im Wasser schwimmen.
4. Abdunkeln: Stellt das Gefäß an einen dunklen Ort. Das ist wichtig, damit die Samen in Ruhe keimen können. Ich stelle es meistens in einen Schrank oder eine Schublade.
5. Befeuchten (wichtig!): Besprüht die Samen 2-3 Mal täglich mit Wasser. Sie dürfen auf keinen Fall austrocknen! Das ist der wichtigste Schritt in dieser Phase.
6. Beobachten: Nach 2-3 Tagen sollten die ersten kleinen grünen Sprossen zu sehen sein. Das ist der Moment, auf den ihr gewartet habt!
Die Wachstumsphase: Licht und Liebe für dein Weizengras
Jetzt, wo die ersten Sprossen da sind, brauchen wir Licht!
1. Licht: Stellt das Gefäß an einen hellen Ort, aber nicht in direkte Sonneneinstrahlung. Ein Fensterbrett, das nicht direkt der Sonne zugewandt ist, ist ideal.
2. Befeuchten: Besprüht das Weizengras weiterhin 2-3 Mal täglich mit Wasser. Achtet darauf, dass der Boden immer feucht ist.
3. Gießen (optional): Wenn ihr möchtet, könnt ihr das Weizengras auch vorsichtig gießen. Gießt aber nicht zu viel, sonst können die Wurzeln faulen. Ich bevorzuge das Besprühen, weil es einfacher ist.
4. Drehen: Dreht das Gefäß regelmäßig, damit das Weizengras gleichmäßig wächst. Sonst neigt es dazu, sich zum Licht zu neigen.
5. Geduld: Jetzt heißt es warten und beobachten. Das Weizengras wird jeden Tag ein Stückchen größer.
Die Ernte: Dein grüner Smoothie-Booster
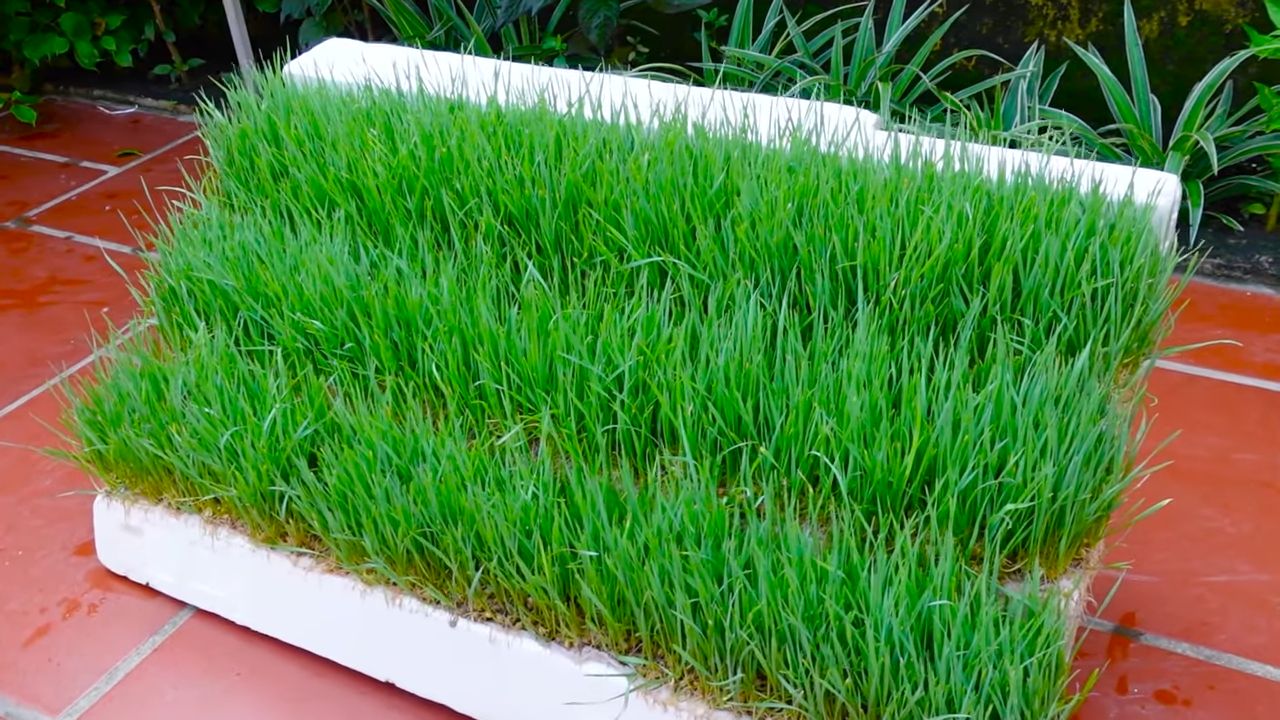
Nach etwa 7-10 Tagen ist euer Weizengras erntereif. Es sollte etwa 10-15 cm hoch sein.
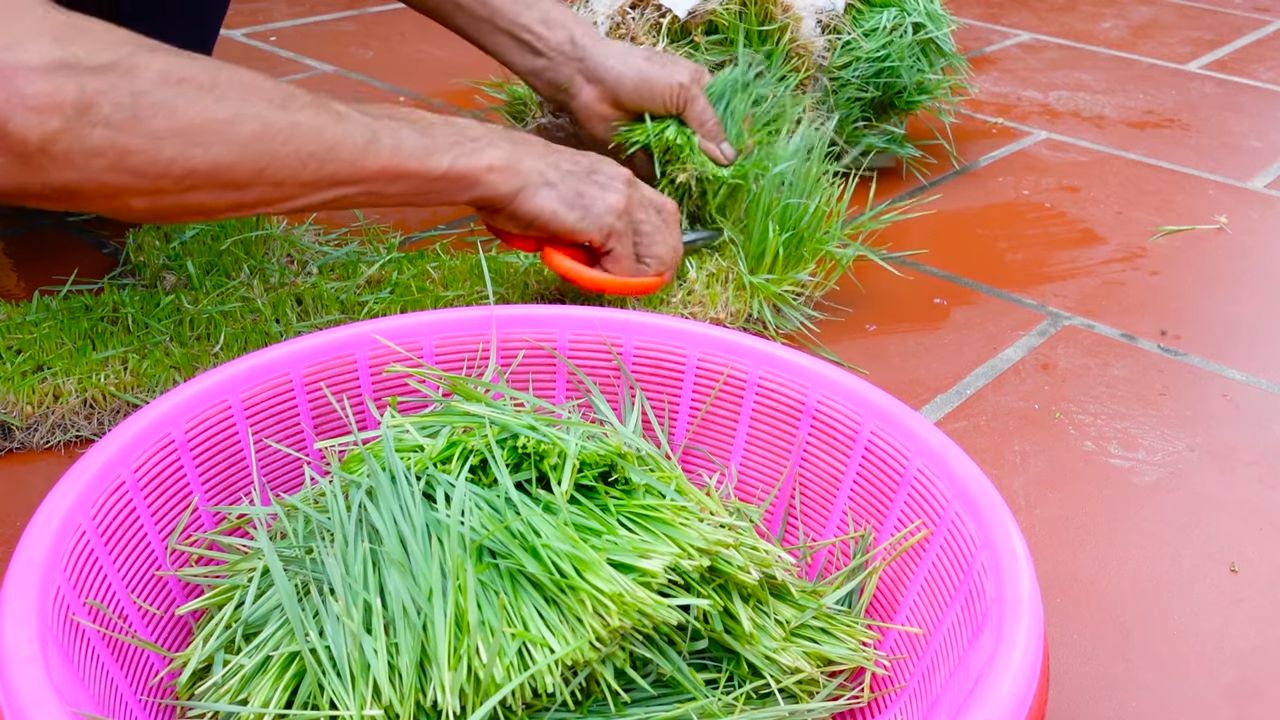
1. Ernten: Schneidet das Weizengras mit einer Schere kurz über dem Boden ab.
2. Verarbeiten: Verwendet das Weizengras sofort für Smoothies, Säfte oder Salate. Ihr könnt es auch einfrieren, um es später zu verwenden.
3. Genießen: Genießt die gesundheitlichen Vorteile eures selbst angebauten Weizengrases!
Tipps und Tricks für den Weizengras-Anbau
* Schimmel vermeiden: Achtet darauf, dass die Samen und das Weizengras nicht zu feucht sind. Eine gute Belüftung hilft, Schimmelbildung vorzubeugen. Wenn ihr Schimmel entdeckt, entfernt die betroffenen Stellen sofort.
* Samenqualität: Verwendet nur hochwertige Weizensamen, die speziell für den Anbau geeignet sind. Billige Samen keimen oft nicht so gut.
* Wasserqualität: Gefiltertes Wasser ist ideal, aber Leitungswasser geht auch. Vermeidet chlorhaltiges Wasser.
* Mehrere Gefäße: Startet mehrere Gefäße gleichzeitig, damit ihr immer frisches Weizengras zur Verfügung habt.
* Nach der Ernte: Nach der Ernte könnt ihr das Gefäß reinigen und mit neuen Samen wieder bepflanzen.
Häufige Probleme und Lösungen
* Schimmel: Wie bereits erwähnt, ist Schimmel ein häufiges Problem. Sorgt für gute Belüftung und vermeidet zu viel Feuchtigkeit.
* Schlechte Keimung: Wenn die Samen nicht gut keimen, kann das an der Qualität der Samen oder an zu wenig Feuchtigkeit liegen. Probiert es mit anderen Samen oder befeuchtet sie häufiger.
* Gelbes Weizengras: Gelbes Weizengras kann ein Zeichen für zu wenig Licht oder Nährstoffe sein. Stellt das Gefäß an einen helleren Ort und überlegt, ob ihr etwas Dünger hinzufügen möchtet (obwohl das bei der Anzucht mit Wasser normalerweise nicht nötig ist).
Warum Weizengras so gesund ist
Weizengras ist ein echtes Superfood! Es ist reich an:
* Vitaminen: A, C, E, K und B-Vitamine
* Mineralien: Eisen, Kalzium, Magnesium und Kalium
* Antioxidantien: Schützen die Zellen vor Schäden
* Chlorophyll: Wirkt entgiftend und blutreinigend
Weizengras kann helfen, das Immunsystem zu stärken, die Verdauung zu verbessern und den Körper zu entgiften. Es ist ein toller Zusatz für jeden Smoothie oder Saft!
Ich hoffe, dieser Leitfaden hilft euch dabei, euer eigenes Weizengras anzubauen. Es ist wirklich einfach und macht Spaß! Probiert es aus und lasst mich wissen, wie es euch gefällt! Viel Erfolg!
Conclusion
So, there you have it! Growing your own wheatgrass with just water is not only incredibly simple, but it’s also a rewarding experience that brings a touch of vibrant green into your home and a boost of fresh nutrients into your diet. Forget expensive store-bought wheatgrass shots – with this easy DIY method, you can have a constant supply of this superfood right at your fingertips.
Why is this DIY trick a must-try? Because it’s economical, sustainable, and empowering. You’re in control of the entire process, ensuring your wheatgrass is free from pesticides and grown with love. Plus, it’s a fantastic way to connect with nature, even if you live in an urban environment. The satisfaction of watching those tiny seeds sprout and transform into lush, green blades is truly unparalleled.
But the benefits don’t stop there. Freshly grown wheatgrass is packed with vitamins, minerals, and antioxidants, making it a powerful addition to smoothies, juices, or even as a garnish for your favorite dishes. It’s a natural energy booster, a detoxifier, and a delicious way to support your overall well-being.
Looking for variations? Experiment with different types of wheatgrass seeds to find your favorite flavor profile. You can also try growing your wheatgrass in different containers, such as terracotta pots or even repurposed plastic containers. Just make sure they have adequate drainage. For a fun twist, try adding a thin layer of organic soil on top of the seeds after soaking them. This can provide extra nutrients and support healthy growth. You can also experiment with different light levels. While wheatgrass thrives in bright, indirect sunlight, you can also grow it under fluorescent lights if you don’t have access to a sunny spot.
Don’t be intimidated by the idea of growing your own wheatgrass. This method is foolproof, even for beginners. All you need is a little patience and a willingness to experiment. And remember, even if your first attempt isn’t perfect, don’t give up! Every batch of wheatgrass you grow will be a learning experience, and you’ll quickly become a pro.
We wholeheartedly encourage you to try this DIY trick and experience the joy of growing your own wheatgrass. It’s a simple, sustainable, and incredibly rewarding way to boost your health and connect with nature. Once you’ve tried it, we’d love to hear about your experience! Share your photos, tips, and tricks in the comments below. Let’s create a community of wheatgrass enthusiasts and inspire others to embrace the power of homegrown goodness. So go ahead, give it a try, and discover the amazing benefits of growing your own **wheatgrass with water**!
Frequently Asked Questions (FAQ)
What exactly is wheatgrass and why is it good for me?
Wheatgrass is the young grass of the common wheat plant, *Triticum aestivum*. It’s considered a superfood because it’s incredibly nutrient-dense. It’s packed with vitamins A, C, and E, as well as iron, calcium, magnesium, and amino acids. Wheatgrass is also a good source of chlorophyll, which is believed to have detoxifying and antioxidant properties. Many people consume wheatgrass juice or add it to smoothies for a boost of energy and overall well-being.
How long does it take to grow wheatgrass using this method?
Generally, it takes about 7-10 days to grow wheatgrass to a harvestable height using the water-only method. The exact time will depend on factors such as temperature, humidity, and the quality of your seeds. You’ll know it’s ready to harvest when the blades are about 4-6 inches tall and have a vibrant green color.
What kind of seeds should I use for growing wheatgrass?
You should use hard red winter wheat seeds specifically sold for sprouting or growing wheatgrass. Avoid using wheat seeds that are treated with fungicides or other chemicals, as these are not safe for consumption. You can find wheatgrass seeds at most health food stores, garden centers, or online retailers. Make sure to choose organic seeds whenever possible to avoid exposure to pesticides.
How often should I water the wheatgrass?
With the water-only method, you don’t actually “water” the wheatgrass in the traditional sense. You’re essentially keeping the seeds and roots consistently moist. After the initial soaking and rinsing, you’ll want to rinse the seeds and tray with fresh water 1-2 times per day. This helps prevent mold growth and keeps the seeds hydrated. Ensure that excess water drains away after each rinse.
How do I prevent mold from growing on my wheatgrass?
Mold growth is a common concern when growing wheatgrass. To prevent it, ensure good air circulation around your growing tray. Avoid overcrowding the seeds, as this can trap moisture and create a breeding ground for mold. Rinse the seeds thoroughly with fresh water 1-2 times per day to remove any potential mold spores. If you do notice mold, remove the affected areas immediately. A diluted hydrogen peroxide solution (1 part hydrogen peroxide to 10 parts water) can be sprayed on the affected areas to kill the mold.
What is the best way to harvest wheatgrass?
The best time to harvest wheatgrass is when it’s about 4-6 inches tall. Use clean scissors or a sharp knife to cut the blades close to the base, just above the roots. You can harvest the wheatgrass in sections as needed, or harvest the entire tray at once.
How long does harvested wheatgrass last?
Harvested wheatgrass is best used immediately for optimal flavor and nutrient content. However, you can store it in the refrigerator for up to a week. Wrap the wheatgrass in a damp paper towel and place it in a sealed plastic bag or container.
Can I regrow wheatgrass after harvesting it?
Wheatgrass can be regrown once after the initial harvest, but the second growth will be less vigorous and nutrient-rich. After harvesting, continue to rinse the roots and tray as usual. You should see new growth within a few days. However, for the best results, it’s recommended to start a new batch of wheatgrass seeds after each harvest.
What can I do with the wheatgrass roots after harvesting?
The wheatgrass roots can be composted or added to your garden as a natural fertilizer. They are rich in nutrients and will help improve soil health. You can also blend them into smoothies, although they may have a slightly bitter taste.
Is it safe to consume wheatgrass if I have a gluten intolerance or celiac disease?
Wheatgrass is generally considered safe for people with gluten intolerance or celiac disease because it’s harvested before the wheat plant produces grains, which contain gluten. However, it’s always best to consult with your doctor or a registered dietitian before consuming wheatgrass if you have any concerns. Be sure to purchase wheatgrass seeds from a reputable source to ensure they are free from cross-contamination.

Leave a Comment