
Growing Garlic in Plastic Bottles: Sounds a little unconventional, right? But trust me, this simple DIY trick can revolutionize your home garden! For centuries, garlic has been a culinary staple and a medicinal powerhouse, revered across cultures from ancient Egypt to modern-day Italy. But let’s be honest, not everyone has a sprawling garden to dedicate to this pungent bulb. That’s where this ingenious hack comes in!
I’m going to show you how to maximize your yield and minimize your space by growing garlic in plastic bottles. Imagine fresh, flavorful garlic readily available right outside your kitchen door, even if you only have a small balcony or patio. No more trips to the store for subpar garlic – you’ll have your own homegrown supply!
This method is not only incredibly space-saving, but it’s also a fantastic way to recycle those plastic bottles that might otherwise end up in a landfill. Plus, it offers better control over the soil and growing conditions, leading to healthier, more robust garlic cloves. So, are you ready to ditch the traditional garden bed and embrace this innovative approach to growing garlic in plastic bottles? Let’s get started!
Growing Garlic in Plastic Bottles: A Beginner’s Guide
Hey there, fellow gardening enthusiasts! Ever thought about growing your own garlic but felt intimidated by the space requirements? Well, I’m here to tell you that you can absolutely grow delicious, pungent garlic right in your home, using nothing more than plastic bottles! This method is perfect for apartment dwellers, balcony gardeners, or anyone who wants to maximize their yield in a small space. Let’s dive into this super easy and rewarding DIY project!
What You’ll Need
Before we get started, let’s gather our supplies. This is a pretty low-cost project, which is always a win in my book!
* Plastic Bottles: I recommend using 2-liter soda bottles or larger water bottles. The bigger the bottle, the more garlic you can grow in it. Make sure they are clean and clear (or translucent) to allow sunlight to reach the soil.
* Garlic Cloves: Choose organic garlic from your local farmers market or grocery store. Avoid using garlic from the supermarket that may have been treated to prevent sprouting. Look for plump, healthy cloves.
* Potting Soil: Use a good quality potting mix that drains well. You can also amend it with compost for added nutrients.
* Gravel or Pebbles: This is for drainage at the bottom of the bottles.
* Water: For watering your garlic, of course!
* Scissors or a Utility Knife: For cutting the plastic bottles. Be careful!
* Spray Bottle (Optional): For misting the soil.
* Gloves (Optional): To keep your hands clean.
Preparing the Plastic Bottles
This is where we transform those discarded bottles into mini garlic farms!
1. Clean the Bottles: Thoroughly wash the plastic bottles with soap and water to remove any residue. Rinse them well and let them dry completely. This helps prevent mold and other issues.
2. Cut the Bottles: There are a couple of ways you can cut the bottles, depending on how many plants you want to grow in each bottle and how you want to arrange them.
* Option 1: Horizontal Cut (Multiple Plants): Cut the bottle horizontally about 2/3 of the way up from the bottom. This creates a larger planting area. You’ll essentially be using the bottom portion as a pot.
* Option 2: Vertical Cut (Single Plant): Cut a rectangular opening on the side of the bottle, large enough to plant a single garlic clove. This is a good option if you want to grow individual plants in each bottle. You can make multiple openings on one bottle, spaced evenly apart.
* Option 3: Top Removal (Multiple Plants): Cut off the top of the bottle completely, creating a large opening. This is similar to Option 1 but allows for easier access and more sunlight.
3. Drill Drainage Holes: This is crucial! Drill or poke several drainage holes in the bottom of the bottle. This prevents waterlogging, which can rot the garlic cloves. If you’re using the horizontal cut method, make sure the holes are in the bottom of the “pot” you’ve created.
4. Add Drainage Layer: Place a layer of gravel or pebbles at the bottom of the bottle. This further improves drainage and prevents the soil from clogging the drainage holes. About an inch or two should be sufficient.
Planting the Garlic Cloves
Now for the fun part – planting the garlic!
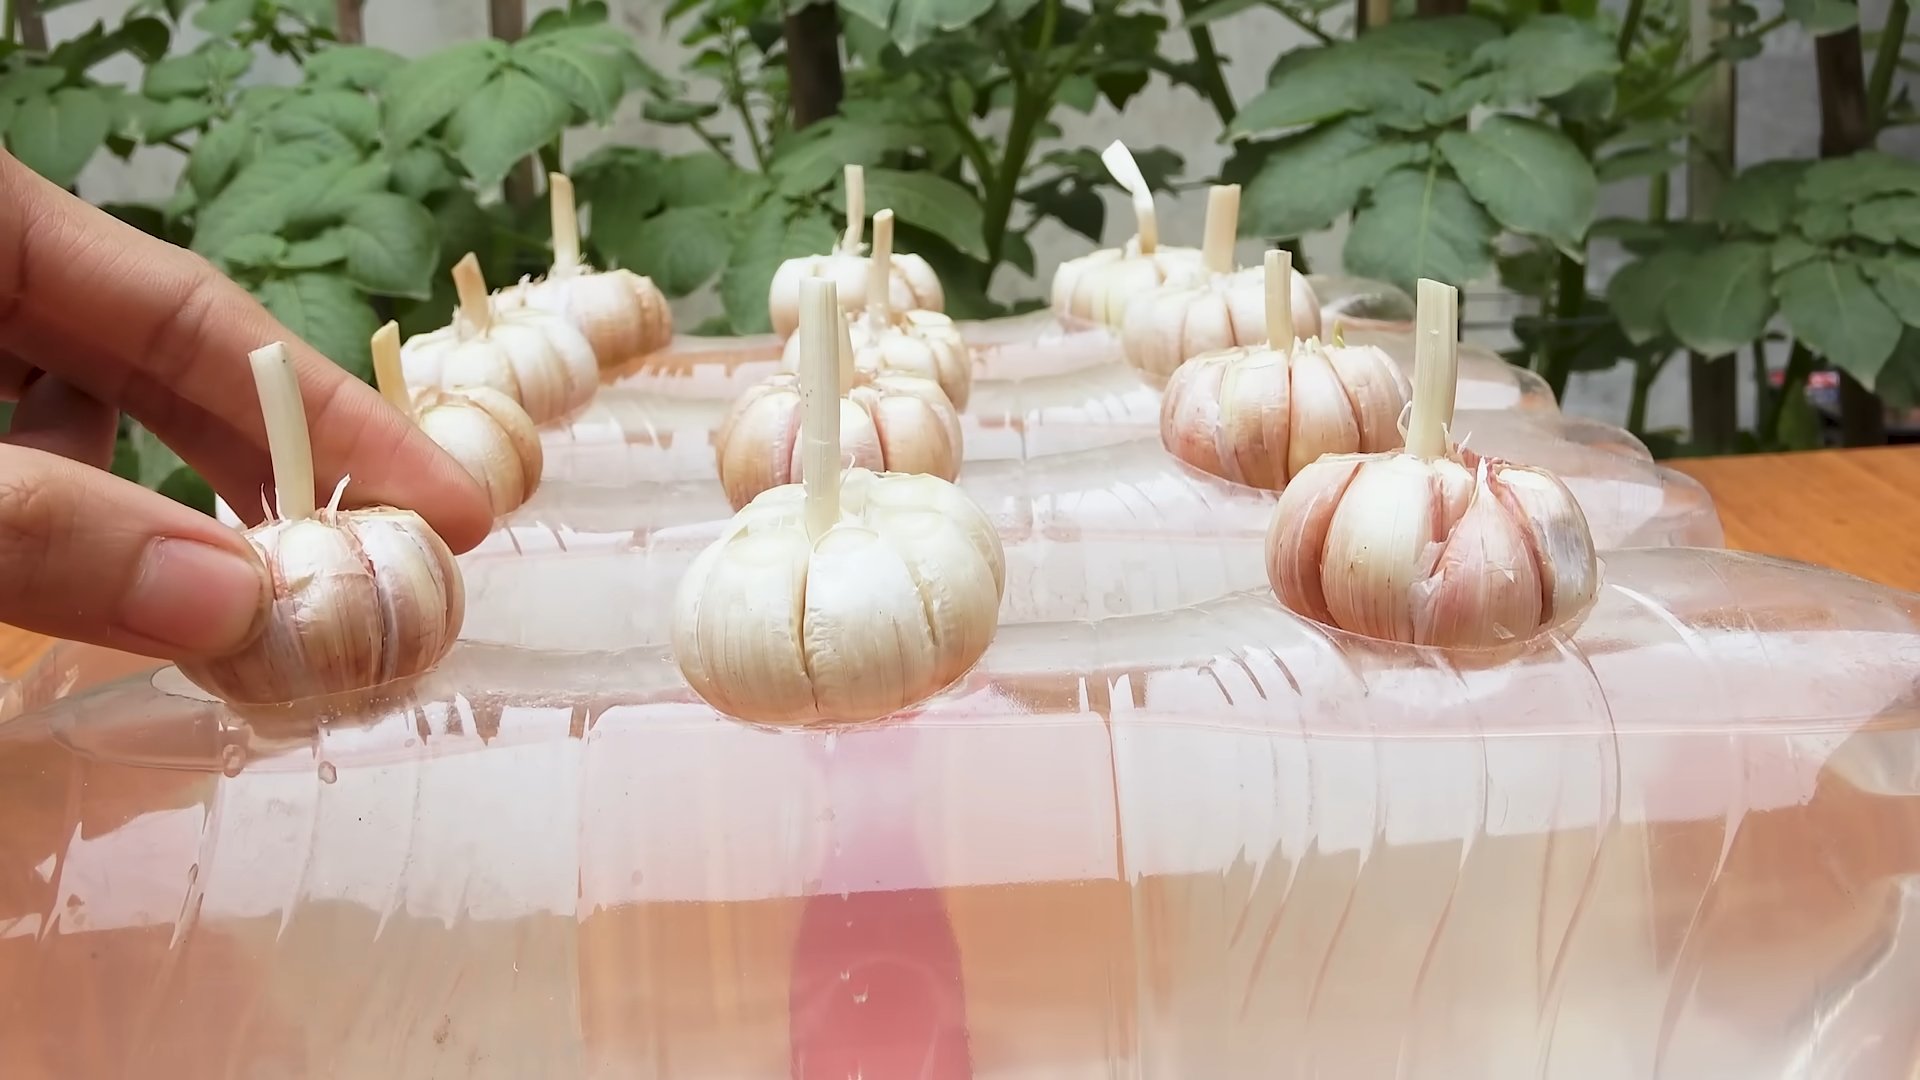
1. Prepare the Garlic Cloves: Gently separate the cloves from the garlic bulb. Leave the papery skin on each clove intact. Select the largest, healthiest cloves for planting. These will produce the strongest plants.
2. Fill with Potting Soil: Fill the prepared plastic bottle with potting soil, leaving about an inch of space at the top. Gently pat down the soil to remove any air pockets.
3. Plant the Cloves: Plant the garlic cloves pointy-side up, about 2-3 inches deep in the soil. Space the cloves about 3-4 inches apart if you’re planting multiple cloves in one bottle.
4. Water Thoroughly: Water the soil thoroughly until water drains out of the drainage holes. This helps settle the soil and encourages root growth.
Caring for Your Garlic Plants
Now that your garlic is planted, it’s time to provide the right care to ensure a bountiful harvest.
1. Sunlight: Garlic needs at least 6-8 hours of sunlight per day. Place your plastic bottle planters in a sunny location, such as a windowsill, balcony, or patio. If you don’t have enough natural light, you can supplement with grow lights.
2. Watering: Water your garlic plants regularly, but avoid overwatering. The soil should be moist but not soggy. Check the soil moisture by sticking your finger about an inch into the soil. If it feels dry, it’s time to water. In general, water deeply once or twice a week, depending on the weather and humidity.
3. Fertilizing: Garlic is a heavy feeder, so it benefits from regular fertilization. Use a balanced liquid fertilizer diluted to half strength every 2-3 weeks. You can also amend the soil with compost or aged manure.
4. Mulching (Optional): Adding a layer of mulch, such as straw or wood chips, can help retain moisture, suppress weeds, and regulate soil temperature.
5. Pest and Disease Control: Keep an eye out for pests and diseases. Common garlic pests include aphids, thrips, and onion maggots. Diseases include white rot and downy mildew. If you notice any problems, treat them promptly with appropriate organic pesticides or fungicides. Good air circulation can help prevent fungal diseases.
6. Rotating the Bottles: If your garlic is growing on a windowsill, rotate the bottles regularly to ensure even sunlight exposure. This will prevent the plants from leaning towards the light.
Harvesting Your Garlic
The moment we’ve all been waiting for! Harvesting your homegrown garlic is incredibly satisfying.
1. When to Harvest: Garlic is typically ready to harvest in late spring or early summer, about 8-9 months after planting. Look for these signs:
* The lower leaves of the plant will start to turn yellow or brown.
* The flower stalk (if present) will start to curl and straighten.
* The bulb will be plump and well-formed.
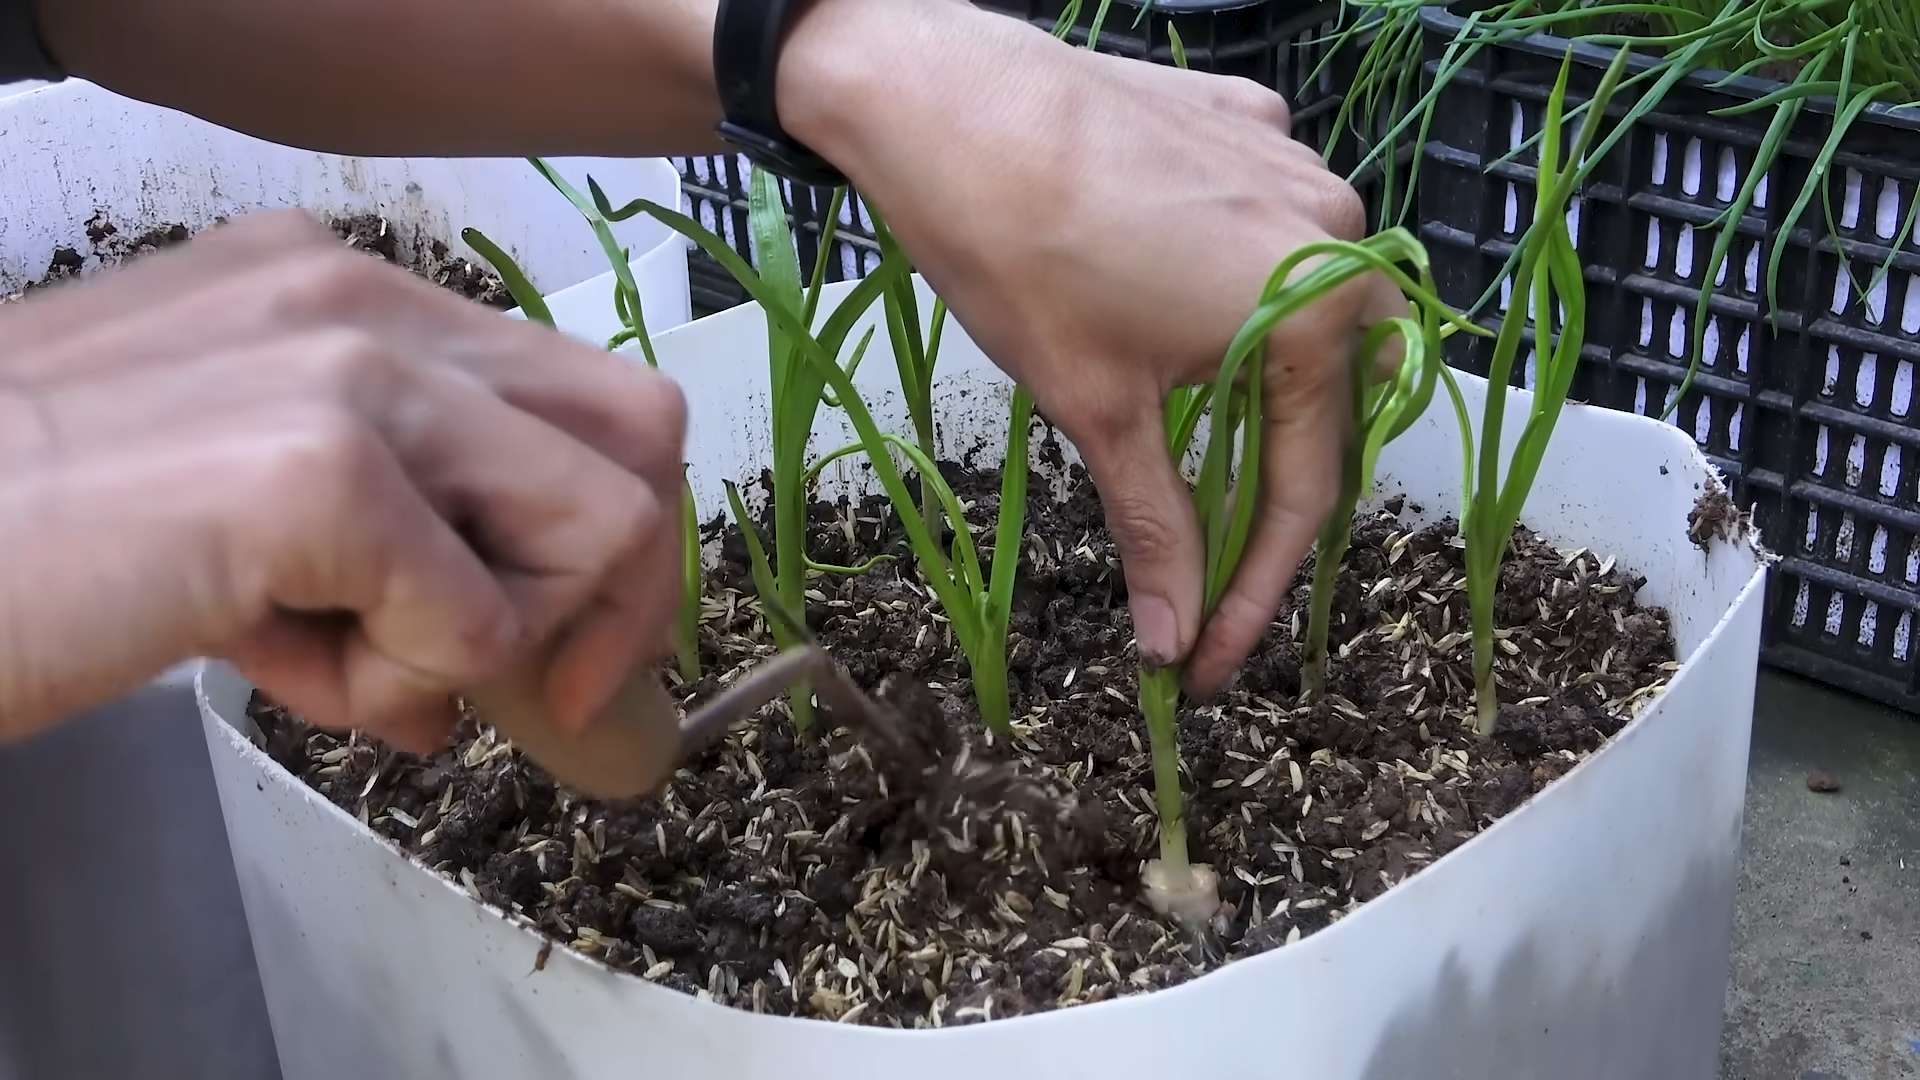
2. How to Harvest: Gently loosen the soil around the garlic bulb with a trowel or fork. Carefully pull the bulb out of the soil, being careful not to damage it.
3. Curing the Garlic: Curing is essential for long-term storage.
* Gently brush off any excess soil from the bulbs.
* Tie the garlic plants together in bundles of 4-6 bulbs.
* Hang the bundles in a cool, dry, well-ventilated place for 2-4 weeks.
* The garlic is cured when the necks are dry and the outer skins are papery.
4. Storing the Garlic: Once the garlic is cured, cut off the roots and stems, leaving about an inch of stem attached to the bulb. Store the garlic in a cool, dry, dark place, such as a pantry or basement. Properly cured and stored garlic can last for several months.
Troubleshooting
Even with the best planning, sometimes things don’t go exactly as expected. Here are a few common issues you might encounter and how to address them:
* Yellowing Leaves: This could be a sign of overwatering, underwatering, nutrient deficiency, or disease. Check the soil moisture, fertilize if necessary, and inspect for pests or diseases.
* Slow Growth: This could be due to insufficient sunlight, poor soil, or lack of nutrients. Move the plants to a sunnier location, amend the soil with compost, and fertilize regularly.
* Rotting Cloves: This is usually caused by overwatering or poor drainage. Make sure the drainage holes are clear and avoid overwatering.
* Pests: Treat pests with appropriate organic pesticides, such as neem oil or insecticidal soap.
Tips and Tricks for Success
Here are a few extra tips to help you grow the best garlic possible in plastic bottles:
* Choose the Right Garlic Variety: Some garlic varieties are better suited for container growing than others. Softneck garlic varieties tend to be more adaptable to container growing than hardneck varieties.
* Use a Larger Bottle: The larger the bottle, the more room the garlic roots have to grow. This can result in larger, healthier bulbs.
* Amend the Soil: Adding compost or other organic matter to the potting soil can improve drainage, aeration, and nutrient content.
* Water Wisely: Avoid overwatering, which can lead to root rot. Water deeply but infrequently, allowing the soil to dry out slightly between waterings.
* Fertilize Regularly: Garlic is a heavy feeder, so it benefits from regular fertilization. Use a balanced liquid fertilizer diluted to half strength every
Conclusion
So, there you have it! Growing garlic in plastic bottles isn’t just a quirky gardening experiment; it’s a genuinely effective and space-saving method for cultivating your own fresh, flavorful garlic. We’ve walked you through the simple steps, highlighting the benefits of this unique approach. From reclaiming otherwise discarded plastic to enjoying a bountiful harvest of pungent cloves, this DIY project offers a rewarding experience for gardeners of all levels.
Why is this a must-try? Because it’s accessible, sustainable, and surprisingly productive. Even if you lack a traditional garden plot, you can still enjoy the satisfaction of growing your own food. The controlled environment of the plastic bottle allows for better drainage and temperature regulation, leading to healthier and more robust garlic plants. Plus, the vertical nature of the setup maximizes space, making it ideal for balconies, patios, or even sunny windowsills.
But don’t stop there! Feel free to experiment with different varieties of garlic to discover your favorites. Try using different types of soil mixes to see which yields the best results in your specific climate. You can also explore companion planting by adding herbs like rosemary or thyme to the bottle alongside your garlic, creating a miniature ecosystem. Consider painting the bottles to add a touch of personality to your mini-garden, or even grouping several bottles together to create a visually appealing display.
The possibilities are endless! The key is to embrace the process, learn from your experiences, and adapt the technique to suit your individual needs and preferences.
We are confident that once you try growing garlic in plastic bottles, you’ll be amazed by the results. It’s a fun, educational, and ultimately delicious way to connect with nature and enjoy the fruits (or rather, cloves) of your labor.
So, grab some plastic bottles, gather your garlic cloves, and get ready to embark on this exciting gardening adventure. We encourage you to share your experiences with us! Post photos of your bottle gardens, share your tips and tricks, and let us know what you’ve learned along the way. Together, we can create a community of bottle-gardening enthusiasts and inspire others to embrace this innovative and sustainable approach to growing their own food. Happy gardening!
Frequently Asked Questions (FAQ)
What kind of plastic bottles are best for growing garlic?
The ideal plastic bottles are those that are sturdy and opaque or semi-opaque. Avoid using thin, flimsy bottles that might collapse under the weight of the soil. Two-liter soda bottles or larger water bottles work well. Opaque or semi-opaque bottles are preferable because they help to protect the roots from direct sunlight, which can be harmful. Clear bottles can still be used, but you might want to consider wrapping them in dark-colored paper or fabric to block out some of the light. Make sure the bottles are clean and free of any residue before you start planting.
How many garlic cloves can I plant in one plastic bottle?
The number of garlic cloves you can plant in a single bottle depends on the size of the bottle. For a standard two-liter bottle, you can typically plant 3-4 cloves, spaced evenly around the bottle. Ensure that each clove has enough room to develop without overcrowding. Overcrowding can lead to stunted growth and increased risk of disease. If you’re using a larger bottle, you can plant more cloves, but always prioritize adequate spacing.
What type of soil should I use for growing garlic in plastic bottles?
A well-draining potting mix is essential for growing garlic in plastic bottles. Avoid using garden soil, as it can be too heavy and compact, leading to poor drainage and root rot. A good potting mix should be light, airy, and rich in organic matter. You can also amend your potting mix with perlite or vermiculite to improve drainage and aeration. Consider adding compost or aged manure to provide essential nutrients for healthy garlic growth.
How often should I water my garlic plants in plastic bottles?
Water your garlic plants regularly, but avoid overwatering. The soil should be consistently moist, but not soggy. Check the moisture level of the soil by sticking your finger about an inch deep. If the soil feels dry, it’s time to water. Water deeply, allowing the excess water to drain out of the drainage holes in the bottom of the bottle. Reduce watering during periods of heavy rain or when the plants are dormant.
How much sunlight do garlic plants need when grown in plastic bottles?
Garlic plants need at least 6-8 hours of direct sunlight per day to thrive. Place your plastic bottle garden in a sunny location, such as a south-facing balcony or patio. If you don’t have access to enough natural sunlight, you can supplement with grow lights. Rotate the bottles regularly to ensure that all sides of the plants receive adequate sunlight.
When is the best time to plant garlic in plastic bottles?
The best time to plant garlic in plastic bottles is in the fall, about 4-6 weeks before the first expected frost. This allows the garlic cloves to establish roots before winter sets in. In warmer climates, you can plant garlic in late winter or early spring. The key is to provide a period of cold stratification, which helps to break dormancy and promote bulb formation.
How long does it take for garlic to grow in plastic bottles?
Garlic typically takes about 8-9 months to mature, from planting to harvest. The exact time will depend on the variety of garlic, the climate, and the growing conditions. You’ll know your garlic is ready to harvest when the leaves start to turn yellow and brown and begin to fall over.
Can I grow garlic indoors in plastic bottles?
Yes, you can grow garlic indoors in plastic bottles, but it’s important to provide adequate light and ventilation. Place the bottles near a sunny window or use grow lights to supplement natural light. Ensure that the plants have good air circulation to prevent fungal diseases. Indoor-grown garlic may not produce bulbs as large as those grown outdoors, but you can still harvest the green shoots for use in cooking.
How do I harvest garlic grown in plastic bottles?
When the leaves of your garlic plants start to turn yellow and brown and begin to fall over, it’s time to harvest. Gently loosen the soil around the base of the plant and carefully pull the garlic bulb out of the bottle. Brush off any excess soil and allow the bulbs to cure in a cool, dry place for a few weeks before storing.
What are some common problems when growing garlic in plastic bottles and how can I prevent them?
Some common problems when growing garlic in plastic bottles include root rot, fungal diseases, and pest infestations. To prevent these problems, use a well-draining potting mix, avoid overwatering, provide good air circulation, and inspect your plants regularly for signs of pests or diseases. If you notice any problems, address them promptly with appropriate treatments.
Can I reuse the plastic bottles for growing garlic again?
Yes, you can reuse the plastic bottles for growing garlic again, but it’s important to clean them thoroughly before replanting. Wash the bottles with soap and water to remove any soil or debris. Disinfect the bottles with a solution of bleach and water to kill any pathogens. Rinse the bottles thoroughly before using them again.
What are some variations I can try when growing garlic in plastic bottles?
There are many variations you can try when growing garlic in plastic bottles. You can experiment with different varieties of garlic, different types of soil mixes, and different companion plants. You can also try growing garlic upside down by cutting a hole in the bottom of the bottle and planting the clove with the root end facing out. Get creative and have fun experimenting with different techniques!
Leave a Comment