
Growing Beetroot in a Terrace Garden might seem daunting, but trust me, it’s easier than you think! Imagine plucking vibrant, earthy beetroots straight from your own rooftop oasis – the taste of homegrown goodness is simply unmatched. For centuries, beetroot has been cultivated for its nutritional value and striking color, dating back to ancient Roman times where it was prized for its medicinal properties. Now, you can bring this historical superfood right to your doorstep, or rather, your terrace!
But why bother with the effort? Well, store-bought beetroots often lack the freshness and flavor of homegrown varieties. Plus, with rising concerns about pesticides and food miles, cultivating your own produce is a fantastic way to ensure a healthy and sustainable lifestyle. This DIY guide will provide you with simple, step-by-step instructions and clever hacks to successfully grow beetroot in your terrace garden, even if you’re a complete beginner. I’ll share my personal tips and tricks for maximizing your yield and avoiding common pitfalls. Get ready to transform your terrace into a thriving beetroot haven and enjoy the delicious rewards of your labor!
Dein eigener Rote Bete Terrassengarten: Eine DIY-Anleitung
Hallo Gartenfreunde! Ich zeige euch heute, wie ihr einen wunderschönen und produktiven Rote Bete Terrassengarten anlegen könnt. Das ist nicht nur eine tolle Möglichkeit, frisches Gemüse anzubauen, sondern auch ein echter Hingucker in eurem Garten oder auf eurem Balkon. Keine Angst, es ist einfacher als es aussieht!
Was du für deinen Rote Bete Terrassengarten brauchst:
* Terracotta-Töpfe in verschiedenen Größen: Ich empfehle mindestens drei Töpfe, die in der Größe abgestuft sind. So entsteht der Terrasseneffekt.
* Hochwertige Pflanzerde: Rote Bete mag lockere, nährstoffreiche Erde.
* Rote Bete Samen: Wähle am besten eine Sorte, die dir schmeckt und für den Anbau im Topf geeignet ist.
* Drainagematerial: Blähton, Kies oder Tonscherben, um Staunässe zu vermeiden.
* Gießkanne oder Schlauch: Für die Bewässerung.
* Gartenschere oder Messer: Zum Ausdünnen der Keimlinge.
* Optional: Organischer Dünger, um das Wachstum zu fördern.
* Optional: Handschuhe, um deine Hände sauber zu halten.
Schritt-für-Schritt-Anleitung: So baust du deinen Rote Bete Terrassengarten
1. Vorbereitung der Töpfe
1. Reinigung der Töpfe: Bevor du loslegst, solltest du die Töpfe gründlich reinigen. Entferne Erde und Ablagerungen mit Wasser und einer Bürste.
2. Drainage einfüllen: Bedecke den Boden jedes Topfes mit einer Schicht Drainagematerial (Blähton, Kies oder Tonscherben). Das sorgt dafür, dass überschüssiges Wasser abfließen kann und die Wurzeln nicht faulen. Ich nehme immer eine Schicht von etwa 3-5 cm.
3. Erde einfüllen: Fülle die Töpfe mit Pflanzerde. Lass oben etwa 2-3 cm Platz, damit du beim Gießen nicht alles überschwemmst.
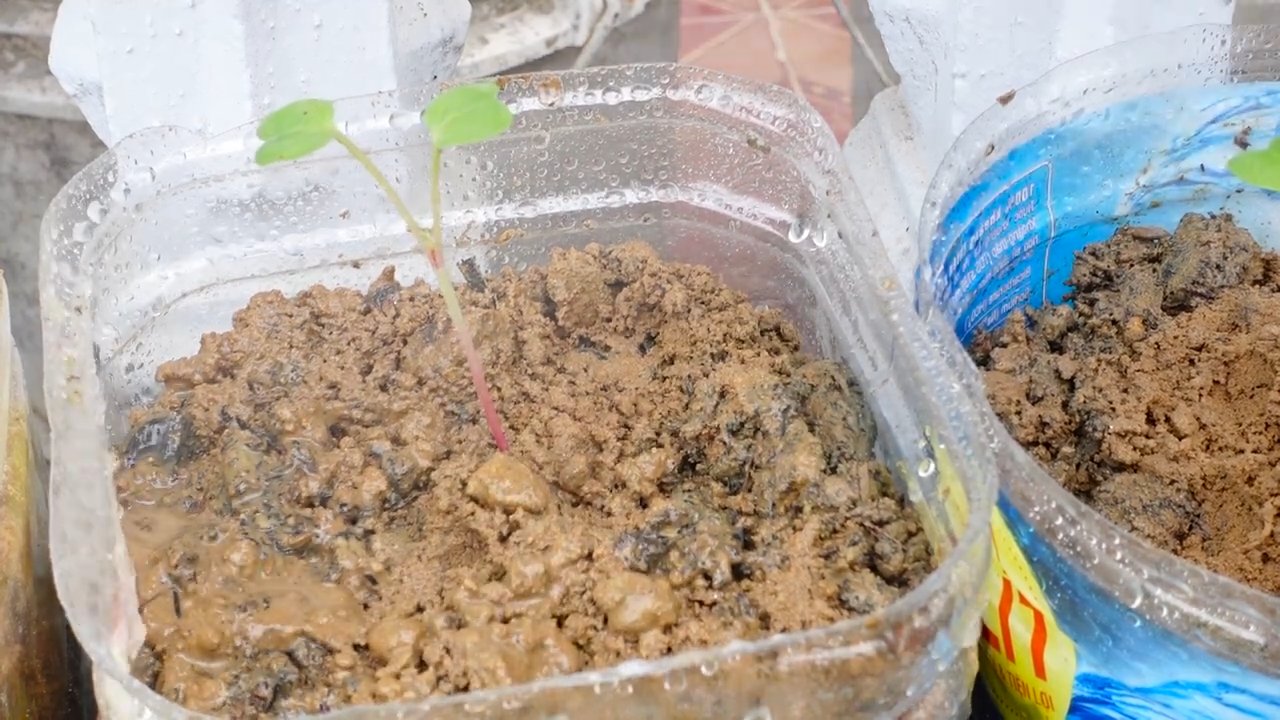
2. Aussaat der Rote Bete Samen
1. Samen vorbereiten: Rote Bete Samen sind eigentlich kleine Fruchtknäuel, die mehrere Samen enthalten können. Um die Keimung zu verbessern, kannst du die Samen vor der Aussaat für einige Stunden in lauwarmes Wasser legen. Das weicht die harte Schale auf.
2. Aussaat: Verteile die Samen gleichmäßig auf der Erde in den Töpfen. Ich säe meistens 3-4 Samen pro Topf, um sicherzustellen, dass mindestens einer keimt.
3. Mit Erde bedecken: Bedecke die Samen mit einer dünnen Schicht Erde (etwa 1-2 cm).
4. Angießen: Gieße die Erde vorsichtig an, damit die Samen nicht weggeschwemmt werden. Verwende am besten eine Gießkanne mit Brauseaufsatz.
3. Pflege der Rote Bete Pflanzen
1. Standort: Stelle die Töpfe an einen sonnigen Standort. Rote Bete braucht mindestens 6 Stunden Sonne pro Tag, um gut zu wachsen.
2. Bewässerung: Halte die Erde feucht, aber nicht nass. Gieße regelmäßig, besonders an heißen Tagen. Vermeide Staunässe, da dies zu Wurzelfäule führen kann. Ich prüfe immer mit dem Finger, ob die Erde trocken ist, bevor ich gieße.
3. Ausdünnen: Sobald die Keimlinge etwa 5-7 cm groß sind, solltest du sie ausdünnen. Entferne die schwächsten Pflanzen, sodass nur noch die kräftigsten übrig bleiben. Das gibt den verbleibenden Pflanzen mehr Platz und Nährstoffe.
4. Düngung (optional): Wenn du möchtest, kannst du die Rote Bete Pflanzen während der Wachstumsphase mit einem organischen Dünger düngen. Das fördert das Wachstum und die Entwicklung der Knollen. Ich verwende gerne Komposttee oder verdünnte Brennnesseljauche.
5. Schutz vor Schädlingen: Rote Bete kann von verschiedenen Schädlingen befallen werden, wie z.B. Blattläusen oder Erdflöhen. Kontrolliere die Pflanzen regelmäßig und bekämpfe Schädlinge bei Bedarf mit natürlichen Mitteln. Ich sprühe meine Pflanzen manchmal mit einer Mischung aus Wasser und Neemöl ein.
4. Der Terrasseneffekt
1. Anordnung der Töpfe: Sobald die Pflanzen etwas größer sind, kannst du die Töpfe terrassenförmig anordnen. Stelle den größten Topf nach hinten, den mittleren in die Mitte und den kleinsten nach vorne. So entsteht ein schöner Terrasseneffekt und alle Pflanzen bekommen ausreichend Licht.
2. Stabilität: Achte darauf, dass die Töpfe stabil stehen und nicht umfallen können. Du kannst sie z.B. mit Steinen oder Holzkeilen fixieren.
5. Ernte der Rote Bete
1. Erntezeitpunkt: Rote Bete kann geerntet werden, sobald die Knollen die gewünschte Größe erreicht haben. Das ist in der Regel etwa 8-10 Wochen nach der Aussaat der Fall.
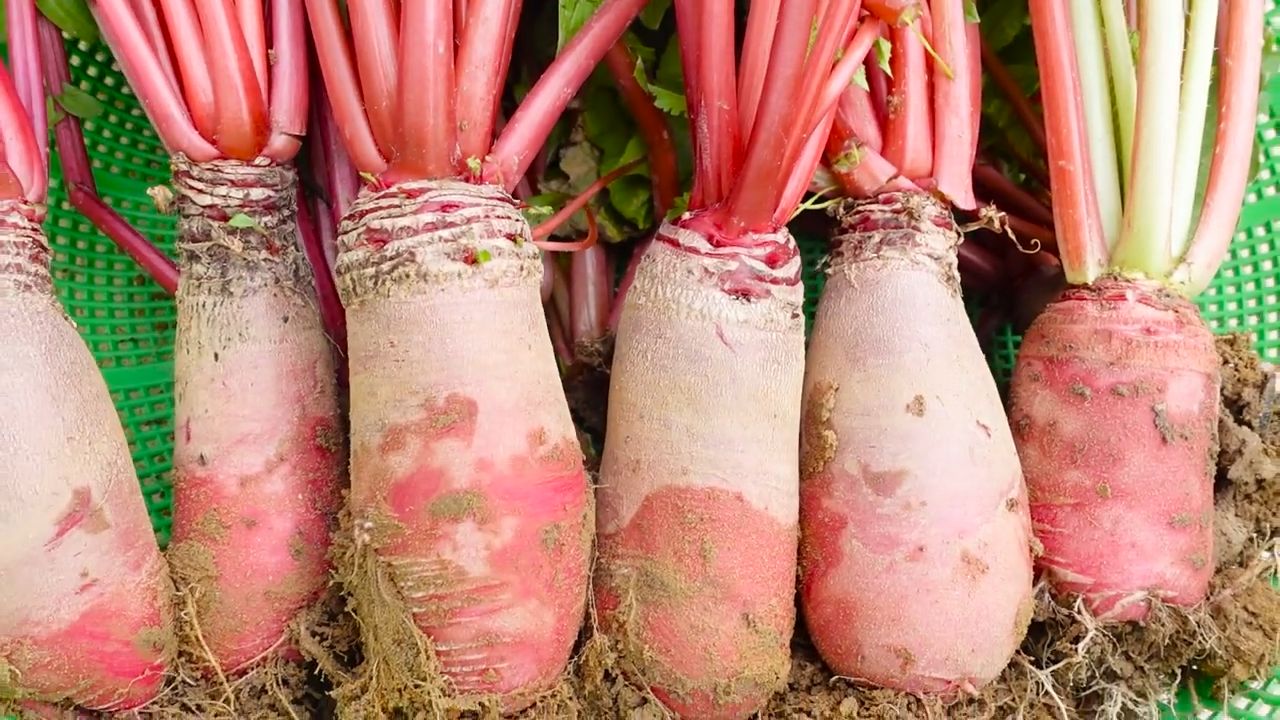
2. Ernte: Ziehe die Rote Bete vorsichtig aus der Erde. Wenn die Erde zu fest ist, kannst du sie mit einer Grabegabel lockern.
3. Reinigung: Entferne die Erde von den Knollen und schneide das Grün ab. Lass dabei etwa 2-3 cm Stiel stehen, damit die Knollen nicht ausbluten.
4. Verwendung: Rote Bete kann roh, gekocht, gebraten oder eingelegt werden. Sie ist sehr vielseitig und gesund. Ich liebe es, sie in Salaten, Suppen oder als Beilage zu verwenden. Auch das Grün kann man essen, z.B. wie Spinat zubereitet.
Zusätzliche Tipps für deinen Rote Bete Terrassengarten
* Sortenwahl: Es gibt viele verschiedene Rote Bete Sorten. Wähle eine Sorte, die für den Anbau im Topf geeignet ist und die dir schmeckt. Beliebte Sorten sind z.B. ‘Detroit Dark Red’, ‘Boltardy’ oder ‘Chioggia’.
* Fruchtfolge: Baue Rote Bete nicht jedes Jahr am selben Standort an. Wechsle die Kulturen, um Krankheiten und Schädlingen vorzubeugen.
* Mulchen: Bedecke die Erde um die Pflanzen mit einer Schicht Mulch (z.B. Stroh oder Rasenschnitt). Das hält die Feuchtigkeit im Boden und unterdrückt Unkraut.
* Beipflanzung: Pflanze Rote Bete zusammen mit anderen Pflanzen, die sich gegenseitig fördern. Gute Nachbarn sind z.B. Salat, Zwiebeln oder Knoblauch.
* Kreativität: Sei kreativ bei der Gestaltung deines Terrassengartens. Verwende verschiedene Töpfe, Farben und Dekorationen, um einen individuellen Look zu schaffen.
Häufige Probleme und Lösungen
* Gelbe Blätter: Gelbe Blätter können ein Zeichen für Nährstoffmangel sein. Dünge die Pflanzen mit einem organischen Dünger.
* Wurzelfäule: Wurzelfäule wird durch Staunässe verursacht. Achte auf eine gute Drainage und gieße nicht zu viel.
* Schädlinge: Kontrolliere die Pflanzen regelmäßig auf Schädlinge und bekämpfe sie bei Bedarf mit natürlichen Mitteln.
* Kleine Knollen: Kleine Knollen können ein Zeichen für zu wenig Sonne oder Nährstoffe sein. Stelle die Töpfe an einen sonnigeren Standort und dünge die Pflanzen.
Ich hoffe, diese Anleitung hilft dir dabei, deinen eigenen Rote Bete Terrassengarten anzulegen. Es ist ein tolles Projekt, das nicht nur Spaß macht, sondern auch frisches und gesundes Gemüse liefert. Viel Erfolg und viel Freude beim Gärtnern!
Conclusion
So, there you have it! Transforming your terrace into a vibrant, beetroot-producing haven is not only achievable but incredibly rewarding. We’ve walked you through the steps, from selecting the right varieties to nurturing your plants and harvesting your crimson treasures. But why is this DIY beetroot terrace garden a must-try? It’s about more than just fresh vegetables; it’s about connecting with nature, embracing sustainable practices, and enjoying the unparalleled flavor of homegrown produce.
Imagine stepping onto your terrace, the sun warming your face, and plucking a perfectly ripe beetroot, still earthy and sweet. That’s an experience you simply can’t replicate with store-bought vegetables. Plus, you have complete control over the growing process, ensuring your beetroots are free from harmful pesticides and chemicals.
But the beauty of this project lies in its adaptability. Feel free to experiment with different beetroot varieties. Golden beets offer a milder, sweeter flavor, while Chioggia beets boast beautiful concentric rings. You can also incorporate companion planting to enhance growth and deter pests. Marigolds, for example, are excellent at repelling nematodes, while garlic can help deter aphids.
Don’t be afraid to get creative with your container choices, either. While we’ve suggested specific sizes, you can repurpose old buckets, troughs, or even wooden crates. Just ensure they have adequate drainage. And if you’re short on space, consider vertical gardening techniques to maximize your growing area.
Beyond the beets themselves, remember to utilize the entire plant. Beet greens are incredibly nutritious and can be used in salads, stir-fries, or even as a substitute for spinach. Roasting the beets brings out their natural sweetness, while pickling them preserves their vibrant color and flavor for months to come.
This DIY beetroot terrace garden is more than just a gardening project; it’s an investment in your health, your well-being, and the environment. It’s a chance to learn new skills, connect with nature, and enjoy the satisfaction of growing your own food.
We wholeheartedly encourage you to give this a try. Start small, learn as you go, and don’t be discouraged by initial setbacks. Gardening is a journey, and every mistake is an opportunity to learn and grow.
And most importantly, we want to hear about your experiences! Share your photos, tips, and challenges in the comments below. Let’s create a community of beetroot enthusiasts and inspire others to embrace the joy of terrace gardening. What are you waiting for? Get your hands dirty and start growing your own delicious, homegrown beetroots today! Let us know what kind of soil you used and how often you watered your plants. We are excited to see your progress!
Frequently Asked Questions (FAQ)
1. What is the best time of year to start a beetroot terrace garden?
The ideal time to start your beetroot terrace garden depends on your local climate. Beetroots thrive in cooler temperatures, so the best time to plant is typically in early spring or late summer/early fall. Avoid planting during the hottest months of summer, as high temperatures can cause the roots to become tough and bitter. If you live in a region with mild winters, you may even be able to grow beetroots year-round. Check your local planting calendar for specific recommendations based on your area’s climate.
2. How much sunlight do beetroots need when grown on a terrace?
Beetroots need at least 6 hours of direct sunlight per day to thrive. Choose a location on your terrace that receives ample sunlight throughout the day. If your terrace is partially shaded, try to position your containers so that they receive morning sun, which is less intense than afternoon sun. If you’re struggling to provide enough natural light, you can supplement with grow lights.
3. What kind of soil is best for growing beetroots in containers?
Beetroots prefer well-draining, fertile soil with a slightly acidic to neutral pH (around 6.0 to 7.0). A good potting mix for beetroots should be loose and airy, allowing for good root development. Avoid heavy clay soils, as they can become waterlogged and hinder growth. You can amend your potting mix with compost or other organic matter to improve drainage and fertility. Consider using a mix of equal parts potting soil, compost, and perlite or vermiculite.
4. How often should I water my beetroot plants on the terrace?
Water your beetroot plants regularly, especially during dry periods. The soil should be kept consistently moist but not waterlogged. Check the soil moisture by sticking your finger about an inch deep into the soil. If it feels dry, it’s time to water. Water deeply, allowing the water to drain out of the bottom of the container. Avoid overhead watering, as this can promote fungal diseases. During hot weather, you may need to water your plants more frequently.
5. What are some common pests and diseases that affect beetroots, and how can I prevent them?
Beetroots can be susceptible to various pests and diseases, including aphids, flea beetles, leaf miners, and fungal diseases like powdery mildew. To prevent these problems, practice good garden hygiene. Remove any dead or diseased leaves promptly. Ensure good air circulation around your plants. You can also use organic pest control methods, such as insecticidal soap or neem oil, to control aphids and other pests. For fungal diseases, consider using a copper-based fungicide. Companion planting with marigolds or garlic can also help deter pests.
6. How do I know when my beetroots are ready to harvest?
Beetroots are typically ready to harvest when the roots are about 2-3 inches in diameter. You can gently brush away some of the soil around the base of the plant to check the size of the roots. The greens can also be harvested at any time, but be careful not to remove too many leaves at once, as this can weaken the plant. To harvest the roots, gently loosen the soil around the plant and pull it up by the leaves.
7. Can I grow other vegetables alongside my beetroots on the terrace?
Yes, companion planting can be beneficial for beetroots. Good companion plants for beetroots include onions, garlic, lettuce, radishes, and beans. These plants can help deter pests, improve soil health, or provide shade. Avoid planting beetroots near plants in the same family, such as spinach or chard, as they can attract similar pests and diseases.
8. How can I store my harvested beetroots?
To store your harvested beetroots, remove the greens, leaving about an inch of stem attached. Gently brush off any excess soil. Store the beetroots in a cool, dark, and humid place, such as a refrigerator or root cellar. They can be stored for several weeks or even months under the right conditions. You can also pickle or can your beetroots to preserve them for longer periods.
9. What are some creative ways to use my homegrown beetroots?
The possibilities are endless! You can roast them, boil them, grill them, or even eat them raw in salads. Beetroot juice is a healthy and refreshing drink. Beet greens can be used in salads, stir-fries, or soups. You can also pickle beetroots for a tangy and flavorful condiment. Get creative and experiment with different recipes to discover your favorite ways to enjoy your homegrown beetroots.
10. Can I grow beetroots in containers indoors if I don’t have a terrace?
Yes, you can grow beetroots indoors, but it may be more challenging. You’ll need to provide them with plenty of light, either through a sunny window or with grow lights. Choose a container that is at least 8-10 inches deep and wide. Use a well-draining potting mix and water regularly. Be sure to monitor for pests and diseases. While indoor-grown beetroots may not be as large as those grown outdoors, you can still enjoy the satisfaction of growing your own vegetables.

Leave a Comment