
Growing Bell Peppers Indoors might seem like a challenge reserved for seasoned gardeners, but trust me, with a few clever tricks and a dash of DIY spirit, you can be harvesting your own colorful peppers right from your windowsill! For centuries, humans have cultivated plants indoors, from the elaborate orangeries of European royalty to the humble herb gardens gracing kitchen counters. This connection to nature, brought inside, offers not just fresh produce but also a sense of calm and accomplishment.
But why bother with the effort of growing bell peppers indoors? Well, imagine the satisfaction of plucking a ripe, juicy bell pepper in the dead of winter, adding a burst of sunshine to your meals when the outside world is gray and cold. Or perhaps you live in an apartment with limited outdoor space, yet crave the taste of homegrown goodness. Maybe you simply want to extend your growing season and enjoy fresh peppers for longer. Whatever your reason, this DIY guide is here to empower you with the knowledge and simple techniques you need to succeed. We’ll explore everything from choosing the right varieties to creating the perfect indoor environment, ensuring you’ll be enjoying delicious, homegrown bell peppers in no time!
Growing Bell Peppers Indoors: A Comprehensive DIY Guide
Hey there, fellow gardening enthusiasts! Ever dreamt of having fresh, vibrant bell peppers right at your fingertips, even when the weather outside is frightful? Well, you’re in luck! I’m going to walk you through the process of growing bell peppers indoors, step-by-step. It’s easier than you might think, and the reward of harvesting your own peppers is incredibly satisfying. Let’s get started!
Choosing the Right Bell Pepper Variety
Not all bell pepper varieties are created equal, especially when it comes to indoor growing. You’ll want to pick varieties that are compact and well-suited for container gardening. Here are a few of my favorites:
* ‘Mini Bell’: These are adorable and produce small, sweet peppers perfect for snacking. They also tend to mature faster than larger varieties.
* ‘Sweet Palermo’: While technically not a bell pepper, these elongated, sweet peppers are easy to grow indoors and produce abundantly.
* ‘Yolo Wonder’: A classic bell pepper that performs reliably well in containers.
* ‘Lunchbox Peppers’: These come in a variety of colors and are perfect for, well, lunchboxes! They’re compact and productive.
Gathering Your Supplies
Before we dive into the planting process, let’s make sure you have everything you need. Trust me, having all your supplies ready beforehand will make the whole experience much smoother.
* Bell Pepper Seeds: Choose your desired variety from the list above or experiment with others!
* Seed Starting Tray or Small Pots: These will be used to germinate your seeds.
* Seed Starting Mix: This is a light, sterile soil mix specifically designed for seedlings.
* Larger Pots (5-gallon or larger): These will be the permanent homes for your pepper plants.
* Potting Mix: A well-draining potting mix is crucial for healthy pepper growth. Avoid using garden soil, as it can compact and hinder drainage.
* Grow Lights: Bell peppers need a lot of light, so a good set of grow lights is essential for indoor growing. LED grow lights are energy-efficient and work great.
* Watering Can or Spray Bottle: For gentle watering.
* Fertilizer: A balanced fertilizer specifically formulated for vegetables.
* Small Fan: To provide air circulation and prevent fungal diseases.
* Optional: Plant labels, heat mat, humidity dome.
Starting Your Seeds
This is where the magic begins! Starting your seeds indoors gives you a head start on the growing season and allows you to control the environment.
1. Prepare Your Seed Starting Tray: Fill your seed starting tray or small pots with seed starting mix. Moisten the mix thoroughly, but don’t let it become waterlogged.
2. Sow Your Seeds: Make a small indentation (about ¼ inch deep) in the soil of each cell or pot. Place 2-3 seeds in each indentation. This increases the chances of at least one seed germinating.
3. Cover the Seeds: Gently cover the seeds with a thin layer of seed starting mix.
4. Water Gently: Use a spray bottle to mist the surface of the soil. You want to keep the soil moist but not soggy.
5. Provide Warmth and Light: Place your seed starting tray on a heat mat (optional) to maintain a soil temperature of around 75-80°F (24-27°C). Cover the tray with a humidity dome (optional) to help retain moisture. Place the tray under your grow lights, positioning the lights a few inches above the surface of the soil.
6. Monitor and Water: Check the soil moisture daily and water as needed to keep it consistently moist.
7. Thin Seedlings: Once the seedlings emerge (usually within 7-14 days) and have developed their first true leaves (the leaves that appear after the initial seed leaves), thin them out by snipping off the weaker seedlings at the soil line, leaving only one strong seedling per cell or pot.
Transplanting Your Seedlings
Once your seedlings have grown a bit larger and have developed a few sets of true leaves, it’s time to transplant them into their permanent pots.
1. Prepare Your Larger Pots: Fill your 5-gallon (or larger) pots with a well-draining potting mix. Leave a few inches of space at the top of the pot.
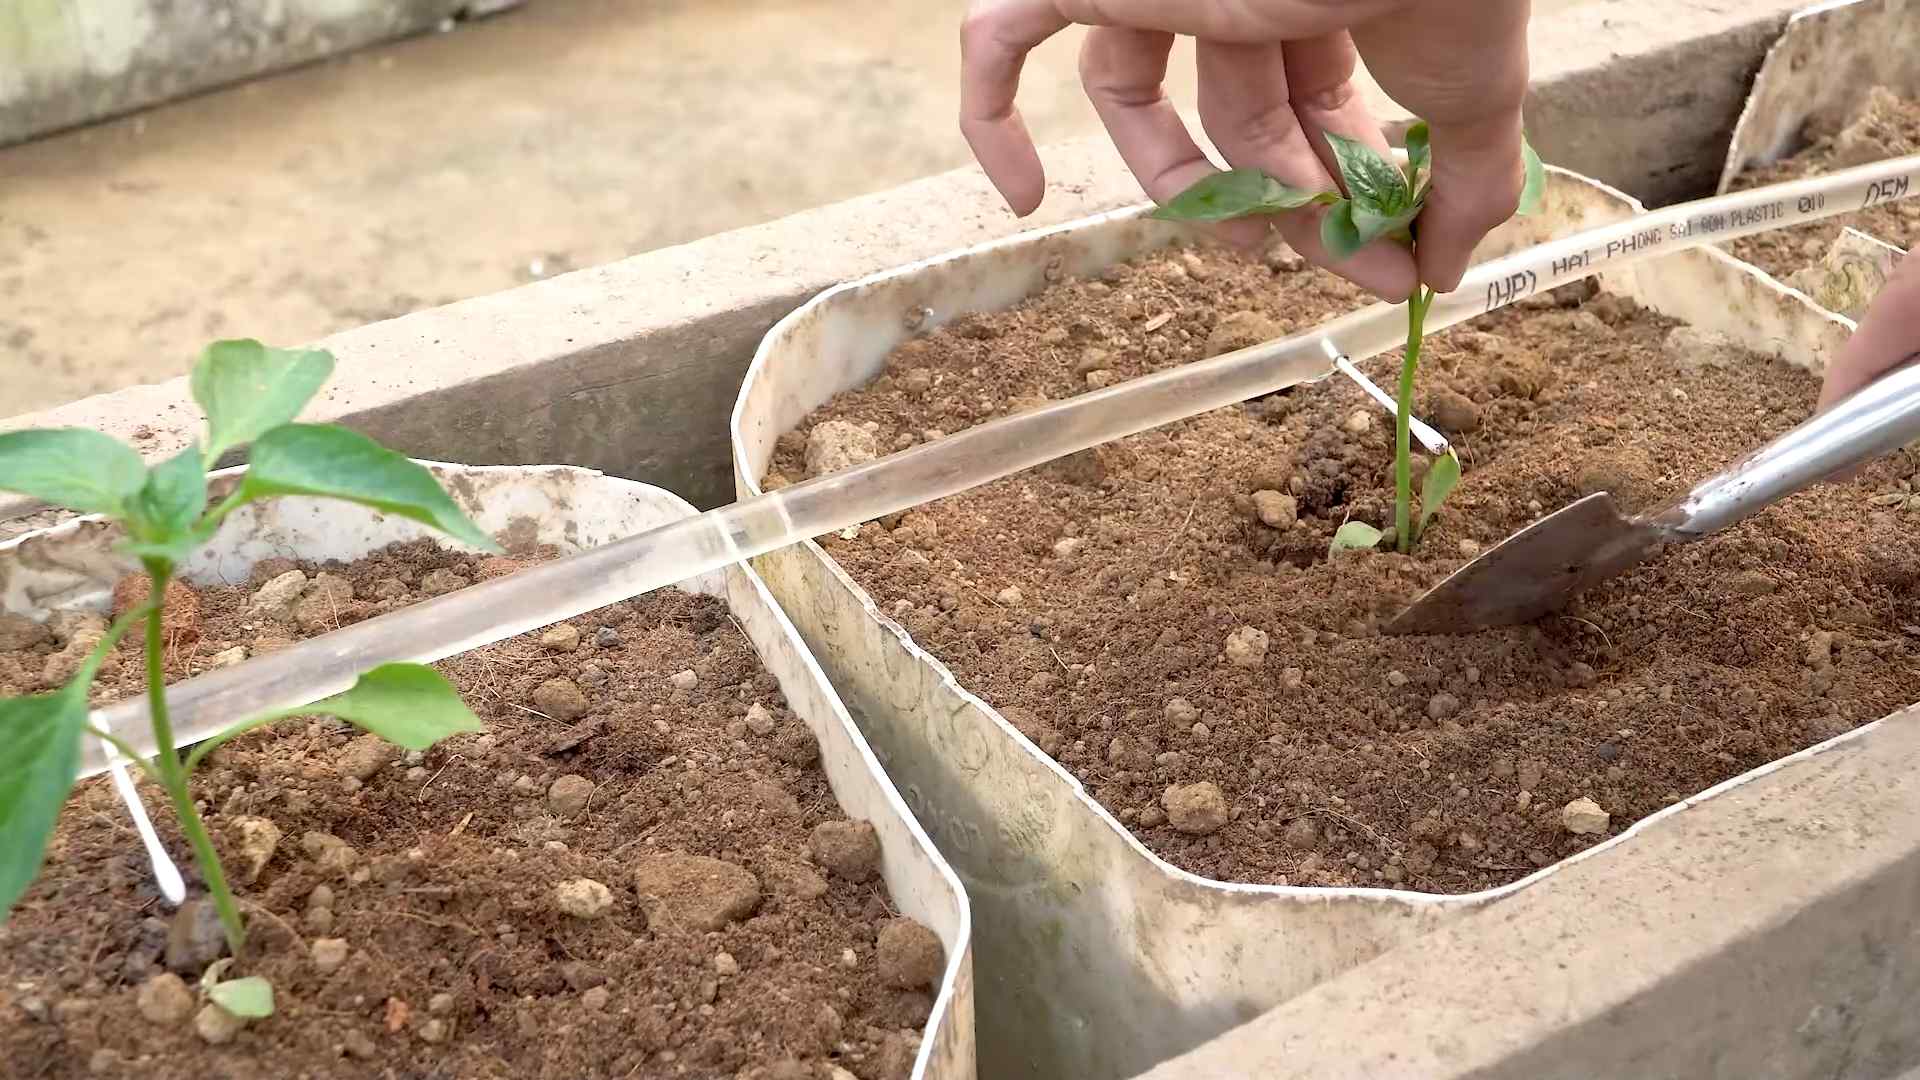
2. Carefully Remove Seedlings: Gently remove the seedlings from their seed starting tray or small pots. Be careful not to damage the roots. You can use a small trowel or spoon to help loosen the soil around the roots.
3. Plant the Seedlings: Make a hole in the center of the potting mix in each pot, large enough to accommodate the root ball of the seedling. Place the seedling in the hole and gently backfill with potting mix.
4. Water Thoroughly: Water the newly transplanted seedlings thoroughly to help settle the soil around the roots.
5. Provide Support (Optional): As your pepper plants grow, they may need some support to prevent them from toppling over, especially when they start producing peppers. You can use stakes or tomato cages to provide support.
Caring for Your Indoor Bell Pepper Plants
Now that your bell pepper plants are happily settled in their pots, it’s time to provide them with the care they need to thrive.
* Light: Bell peppers need at least 8-10 hours of light per day. If you’re using grow lights, keep them on for this amount of time. Adjust the height of the lights as the plants grow to keep them a few inches above the foliage.
* Watering: Water your pepper plants regularly, allowing the top inch of soil to dry out between waterings. Avoid overwatering, as this can lead to root rot.
* Fertilizing: Feed your pepper plants with a balanced fertilizer every 2-3 weeks. Follow the instructions on the fertilizer label.
* Temperature: Bell peppers prefer temperatures between 70-80°F (21-27°C) during the day and 60-70°F (15-21°C) at night.
* Humidity: Bell peppers prefer moderate humidity levels. You can increase humidity by placing a tray of water near your plants or using a humidifier.
* Air Circulation: Good air circulation is essential for preventing fungal diseases. Use a small fan to provide gentle air movement around your plants.
* Pollination: Bell peppers are self-pollinating, but they may need a little help indoors. You can hand-pollinate your plants by gently shaking the flowers or using a small paintbrush to transfer pollen from one flower to another.
* Pruning: Pruning can help improve air circulation and encourage fruit production. Remove any yellowing or dead leaves. You can also pinch off the tips of the branches to encourage bushier growth.
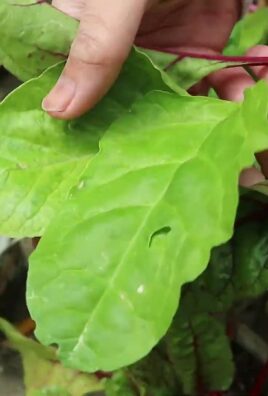
Dealing with Pests and Diseases
Even indoors, your bell pepper plants can be susceptible to pests and diseases. Here are a few common problems and how to deal with them:
* Aphids: These tiny insects can suck the sap from your plants. You can control aphids by spraying them with a strong stream of water or using insecticidal soap.
* Spider Mites: These tiny pests can cause yellowing and stippling on the leaves. You can control spider mites by increasing humidity and spraying them with insecticidal soap.
* Whiteflies: These small, white insects can fly up when you disturb the plants. You can control whiteflies by using yellow sticky traps or spraying them with insecticidal soap.
* Fungal Diseases: Fungal diseases can cause spots on the leaves or rot on the fruit. You can prevent fungal diseases by providing good air circulation and avoiding overwatering. If you see signs of fungal disease, remove the affected leaves or fruit and treat the plant with a fungicide.
Harvesting Your Bell Peppers
The moment you’ve been waiting for! Your bell peppers are ready to harvest when they have reached their mature size and color.
1. Check for Ripeness: Bell peppers will change color as they ripen, from green to yellow, orange, red, or purple, depending on the variety. The peppers should also feel firm to the touch.
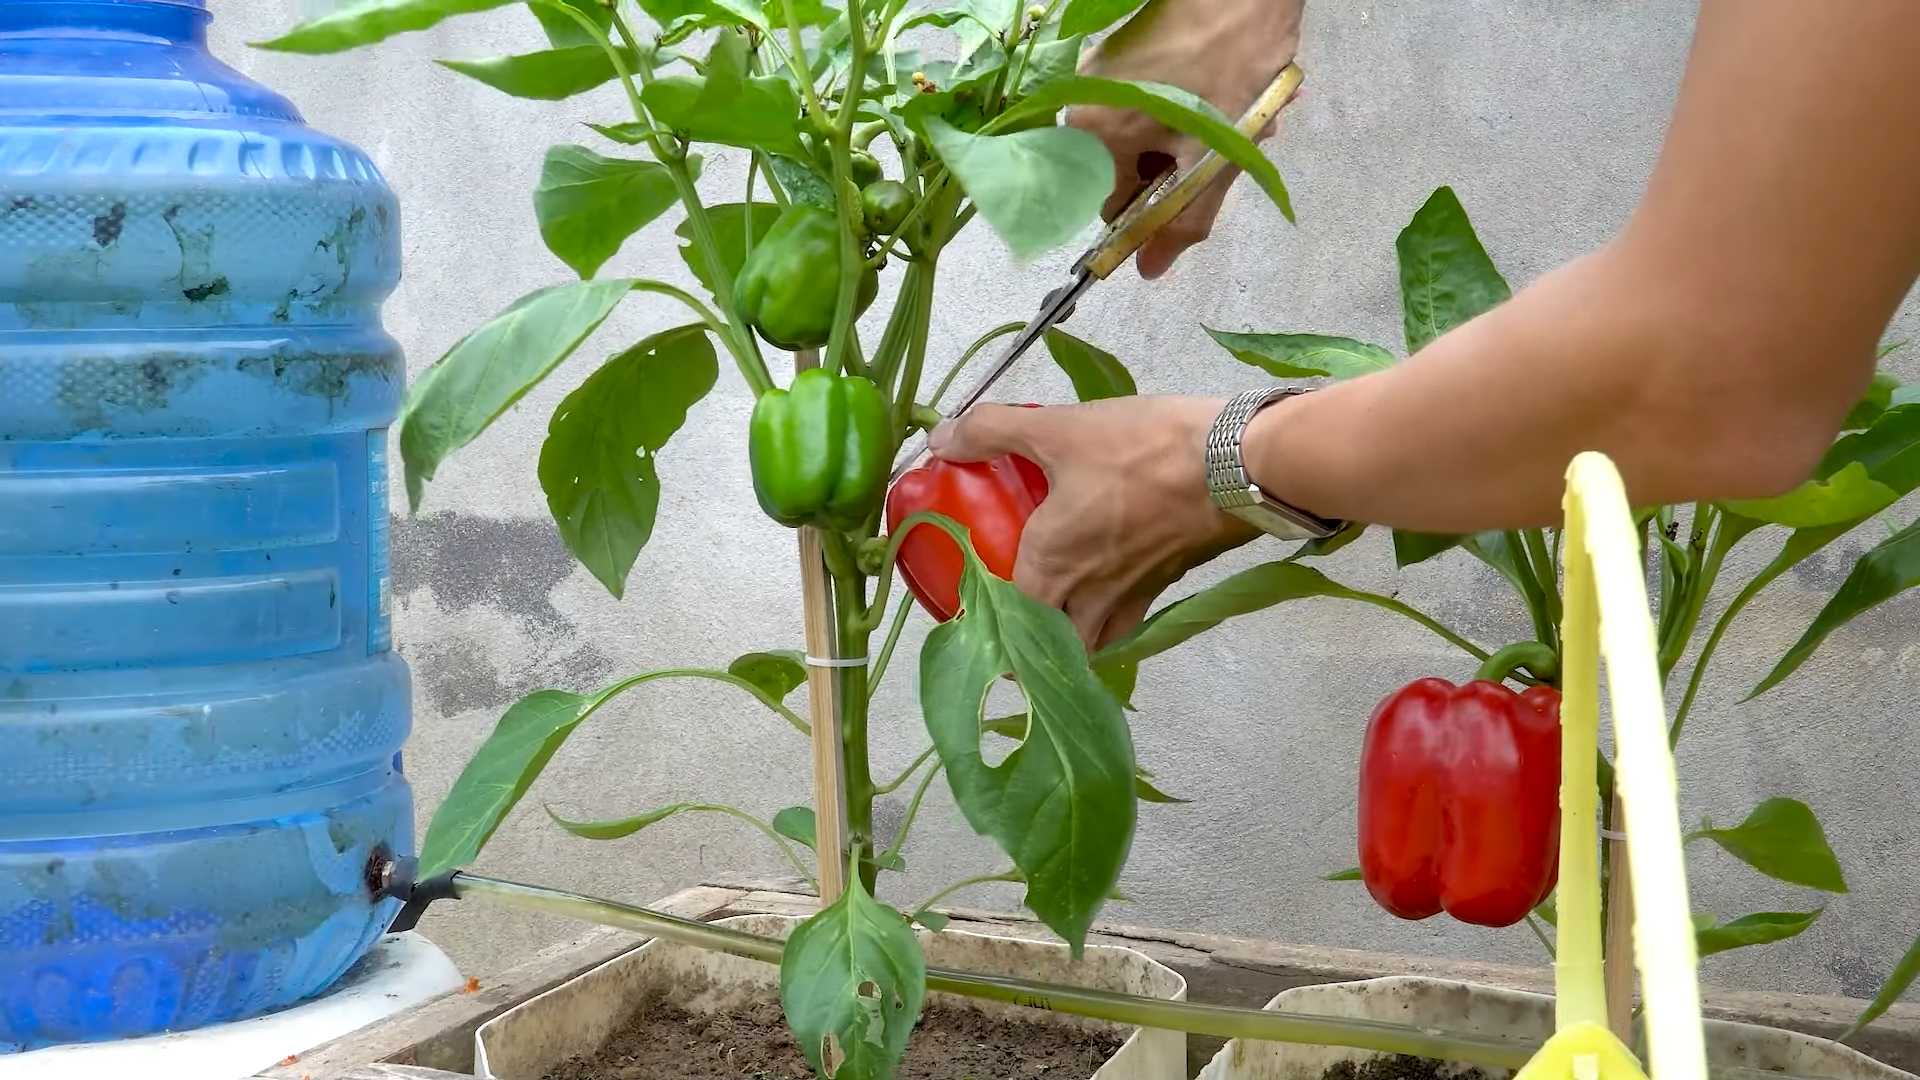
2. Harvest Carefully: Use a sharp knife or scissors to cut the peppers from the plant, leaving a small stem attached.
3. Enjoy Your Harvest: Enjoy your fresh, homegrown bell peppers in salads, stir-fries, or any of your favorite recipes!
Troubleshooting Tips
* My pepper plants are not producing fruit: This could be due to a lack of light, improper pollination, or nutrient deficiencies. Make sure your plants are getting enough light, hand-pollinate the flowers, and fertilize regularly.
* My pepper plants are dropping their flowers: This could be due to temperature fluctuations, overwatering, or underwatering. Maintain consistent temperatures, water properly, and avoid letting
Conclusion
So, there you have it! Growing bell peppers indoors might seem like a daunting task, but with a little patience, the right setup, and these simple DIY tricks, you can enjoy fresh, vibrant bell peppers right from your own home, regardless of the season. We’ve covered everything from selecting the right seeds and providing adequate light to hand-pollinating and managing pests. This isn’t just about saving money; it’s about experiencing the joy of nurturing life and reaping the rewards of your labor.
Why is this DIY approach a must-try? Because it empowers you to take control of your food source, reduces your reliance on commercially grown produce (often shipped long distances), and offers a deeply satisfying connection to the natural world. Imagine the pride you’ll feel serving a salad featuring bell peppers you nurtured from seed to fruit! Plus, it’s a fantastic learning experience for the whole family, teaching valuable lessons about botany, responsibility, and the importance of sustainable living.
But don’t stop there! Experiment with different varieties of bell peppers. Try growing miniature bell peppers in smaller containers for a decorative and edible addition to your kitchen. Or, if you’re feeling adventurous, explore growing other pepper varieties alongside your bell peppers, such as jalapeños or banana peppers, to create a diverse indoor pepper garden. You can also experiment with different soil mixes to see what works best for your specific environment. Consider adding organic fertilizers or compost tea to boost growth and fruit production.
The key to successful indoor bell pepper growing is observation and adaptation. Pay close attention to your plants’ needs and adjust your care routine accordingly. Are the leaves turning yellow? They might need more nutrients. Are the peppers slow to ripen? They might need more light. Don’t be afraid to experiment and learn from your mistakes.
We are confident that with these tips, you’ll be well on your way to harvesting a bountiful crop of delicious bell peppers. Now, it’s your turn! We encourage you to give this DIY trick a try and share your experiences with us. Post photos of your indoor bell pepper garden on social media using #IndoorBellPeppers and #DIYGardening. Let us know what challenges you faced, what successes you celebrated, and any additional tips you discovered along the way. Your insights could help other aspiring indoor gardeners achieve their goals. Happy growing!
Frequently Asked Questions (FAQ)
What is the best time of year to start growing bell peppers indoors?
Ideally, you should start your bell pepper seeds indoors 6-8 weeks before the last expected frost. This typically falls in late winter or early spring. Starting early gives the seedlings ample time to develop before transplanting them into larger containers or, if you choose, moving them outdoors once the weather warms up. However, because you’re growing indoors, you have more flexibility. You can technically start growing bell peppers indoors at any time of year, as long as you can provide the necessary light and temperature conditions. Just be mindful that the plants will need a consistent environment to thrive.
How much light do bell peppers need when grown indoors?
Bell peppers are sun-loving plants and require a significant amount of light to thrive and produce fruit. When growing indoors, you’ll need to supplement natural light with artificial lighting. Aim for at least 14-16 hours of light per day. Full-spectrum LED grow lights are an excellent choice as they provide the necessary wavelengths for photosynthesis and are energy-efficient. Position the lights a few inches above the plants and adjust as they grow. Insufficient light can lead to leggy growth, weak stems, and poor fruit production. If you notice your plants stretching towards the light source, it’s a clear sign that they need more light.
How often should I water my indoor bell pepper plants?
Watering frequency depends on several factors, including the size of the container, the type of soil, the temperature, and the humidity levels. As a general rule, water your bell pepper plants when the top inch of soil feels dry to the touch. Avoid overwatering, as this can lead to root rot. Ensure that your containers have drainage holes to allow excess water to escape. When watering, water deeply until water drains out of the bottom of the pot. This ensures that the roots are thoroughly hydrated. During warmer months or when the plants are actively fruiting, you may need to water more frequently.
How do I hand-pollinate my bell pepper plants indoors?
Bell peppers are self-pollinating, meaning they have both male and female parts in the same flower. However, indoor plants often lack the wind or insect activity needed for natural pollination. Hand-pollination is a simple process that can significantly increase fruit production. Use a small, soft brush or a cotton swab to gently collect pollen from the stamen (the male part of the flower) and transfer it to the pistil (the female part of the flower). You can also gently shake the plant to release pollen. Repeat this process every few days, especially when the plants are flowering.
What kind of fertilizer should I use for indoor bell pepper plants?
Bell peppers are heavy feeders and require regular fertilization to support healthy growth and fruit production. Use a balanced fertilizer with an NPK ratio (nitrogen, phosphorus, potassium) of around 5-10-10 or 10-10-10. Start fertilizing when the plants are a few weeks old and continue throughout the growing season. Follow the instructions on the fertilizer packaging for application rates. You can also supplement with organic fertilizers like compost tea or fish emulsion. Avoid over-fertilizing, as this can burn the roots and damage the plants.
How do I deal with pests on my indoor bell pepper plants?
Even indoors, bell pepper plants can be susceptible to pests like aphids, spider mites, and whiteflies. Regularly inspect your plants for signs of infestation, such as small insects, webbing, or sticky residue on the leaves. If you spot pests, take action immediately. You can try washing the plants with a strong stream of water or using insecticidal soap or neem oil. These are natural and effective options for controlling pests without harming the plants. You can also introduce beneficial insects like ladybugs to help control pest populations.
Why are my bell pepper flowers falling off without producing fruit?
Flower drop can be frustrating, but it’s a common issue with bell pepper plants. Several factors can contribute to flower drop, including temperature fluctuations, insufficient light, overwatering or underwatering, and lack of pollination. Ensure that your plants are receiving adequate light and water, and that the temperature is consistently warm. Hand-pollinate the flowers to increase the chances of fruit set. You can also try spraying the plants with a blossom set spray, which contains plant hormones that promote fruit development.
How long does it take for bell peppers to ripen indoors?
The time it takes for bell peppers to ripen depends on the variety and the growing conditions. Generally, it takes about 60-90 days from transplanting to harvest. Green bell peppers are technically unripe, but they are still edible. If you want to harvest red, yellow, or orange bell peppers, you’ll need to wait longer for them to fully ripen. The peppers will change color and become sweeter as they ripen. Be patient and allow the peppers to mature fully on the plant for the best flavor.
Can I grow bell peppers in a hydroponic system indoors?
Yes, growing bell peppers in a hydroponic system is a viable option for indoor gardening. Hydroponics allows you to provide the plants with a precise nutrient solution and optimal growing conditions. Bell peppers thrive in hydroponic systems and can produce abundant yields. You’ll need to choose a suitable hydroponic system, such as a deep water culture (DWC) or a nutrient film technique (NFT) system. Use a hydroponic nutrient solution specifically formulated for fruiting vegetables. Monitor the pH and nutrient levels regularly to ensure that the plants are receiving the proper nutrition.
What size pot should I use for growing bell peppers indoors?
For growing bell peppers indoors, it’s best to use a pot that is at least 5 gallons in size. This will provide enough room for the roots to grow and develop properly. The larger the pot, the more stable the plant will be and the less frequently you’ll need to water it. Make sure the pot has drainage holes to prevent waterlogging. You can use plastic, ceramic, or fabric pots. Fabric pots are a good option because they allow for better aeration of the roots.

Leave a Comment