
Balcony Chili Plant Growing doesn’t have to be a daunting task! Imagine stepping onto your balcony and plucking fresh, fiery chilies to spice up your dinner. Sounds amazing, right? For centuries, growing chilies has been a part of various cultures, adding zest to cuisines and even holding symbolic significance in some traditions. From the ancient Aztecs using them in rituals to the vibrant street food of Southeast Asia, chilies have always been a beloved ingredient.
But let’s be honest, not everyone has a sprawling garden to cultivate these spicy gems. That’s where this DIY guide comes in! I’m going to share some simple yet effective tricks to help you succeed in Balcony Chili Plant Growing, even if you’re a complete beginner. We’ll cover everything from choosing the right pot size and soil mix to providing adequate sunlight and tackling common pests.
Why do you need these hacks? Because store-bought chilies can be expensive and often lack the freshness and flavor of homegrown ones. Plus, there’s something incredibly satisfying about nurturing a plant from seed to harvest. So, get ready to transform your balcony into a mini chili farm and enjoy a constant supply of fresh, spicy goodness!
Growing Chili Peppers on Your Balcony: A Spicy DIY Adventure!
Hey there, fellow balcony gardeners! I’m so excited to share my experience growing chili peppers right here on my tiny balcony. It’s surprisingly easy and incredibly rewarding to have fresh, spicy peppers just steps away from your kitchen. Get ready to add some zest to your life (and your meals!) with this comprehensive guide.
Choosing the Right Chili Pepper Variety
Before we dive into the nitty-gritty, let’s talk about chili pepper varieties. Not all peppers are created equal, and some are definitely better suited for balcony life than others.
* Consider size: Compact varieties are your best friend. Look for peppers like Thai chilies, habaneros (if you’re brave!), jalapenos, or even ornamental peppers. These tend to stay smaller and bushier, making them perfect for containers.
* Think about your climate: Research which peppers thrive in your region. Some peppers prefer hotter climates, while others are more tolerant of cooler temperatures.
* Spice level matters: Choose peppers that match your heat tolerance. Don’t go overboard if you’re not a fan of super-spicy food!
* Read the seed packet: Pay close attention to the plant’s mature size, sunlight requirements, and watering needs. This information is crucial for success.
Gathering Your Supplies
Okay, now that you’ve chosen your chili pepper variety, let’s gather the necessary supplies. Here’s what you’ll need:
* Chili pepper seeds or seedlings: You can start from seeds or buy seedlings from a local nursery. Seedlings will give you a head start.
* Containers: Choose pots that are at least 12 inches in diameter. Good drainage is essential, so make sure your pots have drainage holes. Terracotta or plastic pots work well.
* Potting mix: Use a high-quality potting mix specifically formulated for containers. Avoid using garden soil, as it can compact and drain poorly.
* Fertilizer: A balanced fertilizer (e.g., 10-10-10) or a fertilizer specifically formulated for tomatoes and peppers will provide the necessary nutrients.
* Watering can or hose: For regular watering.
* Gardening gloves: To protect your hands.
* Small trowel or shovel: For planting.
* Optional: Plant labels, stakes or cages (for support), insecticidal soap (for pest control).
Planting Your Chili Peppers
Alright, let’s get our hands dirty! Here’s how to plant your chili peppers:
1. Starting from Seeds (Optional): If you’re starting from seeds, sow them indoors 6-8 weeks before the last expected frost. Plant the seeds about 1/4 inch deep in seed-starting mix. Keep the soil moist and warm (around 70-80°F). Once the seedlings have a few sets of true leaves, you can transplant them into larger pots.
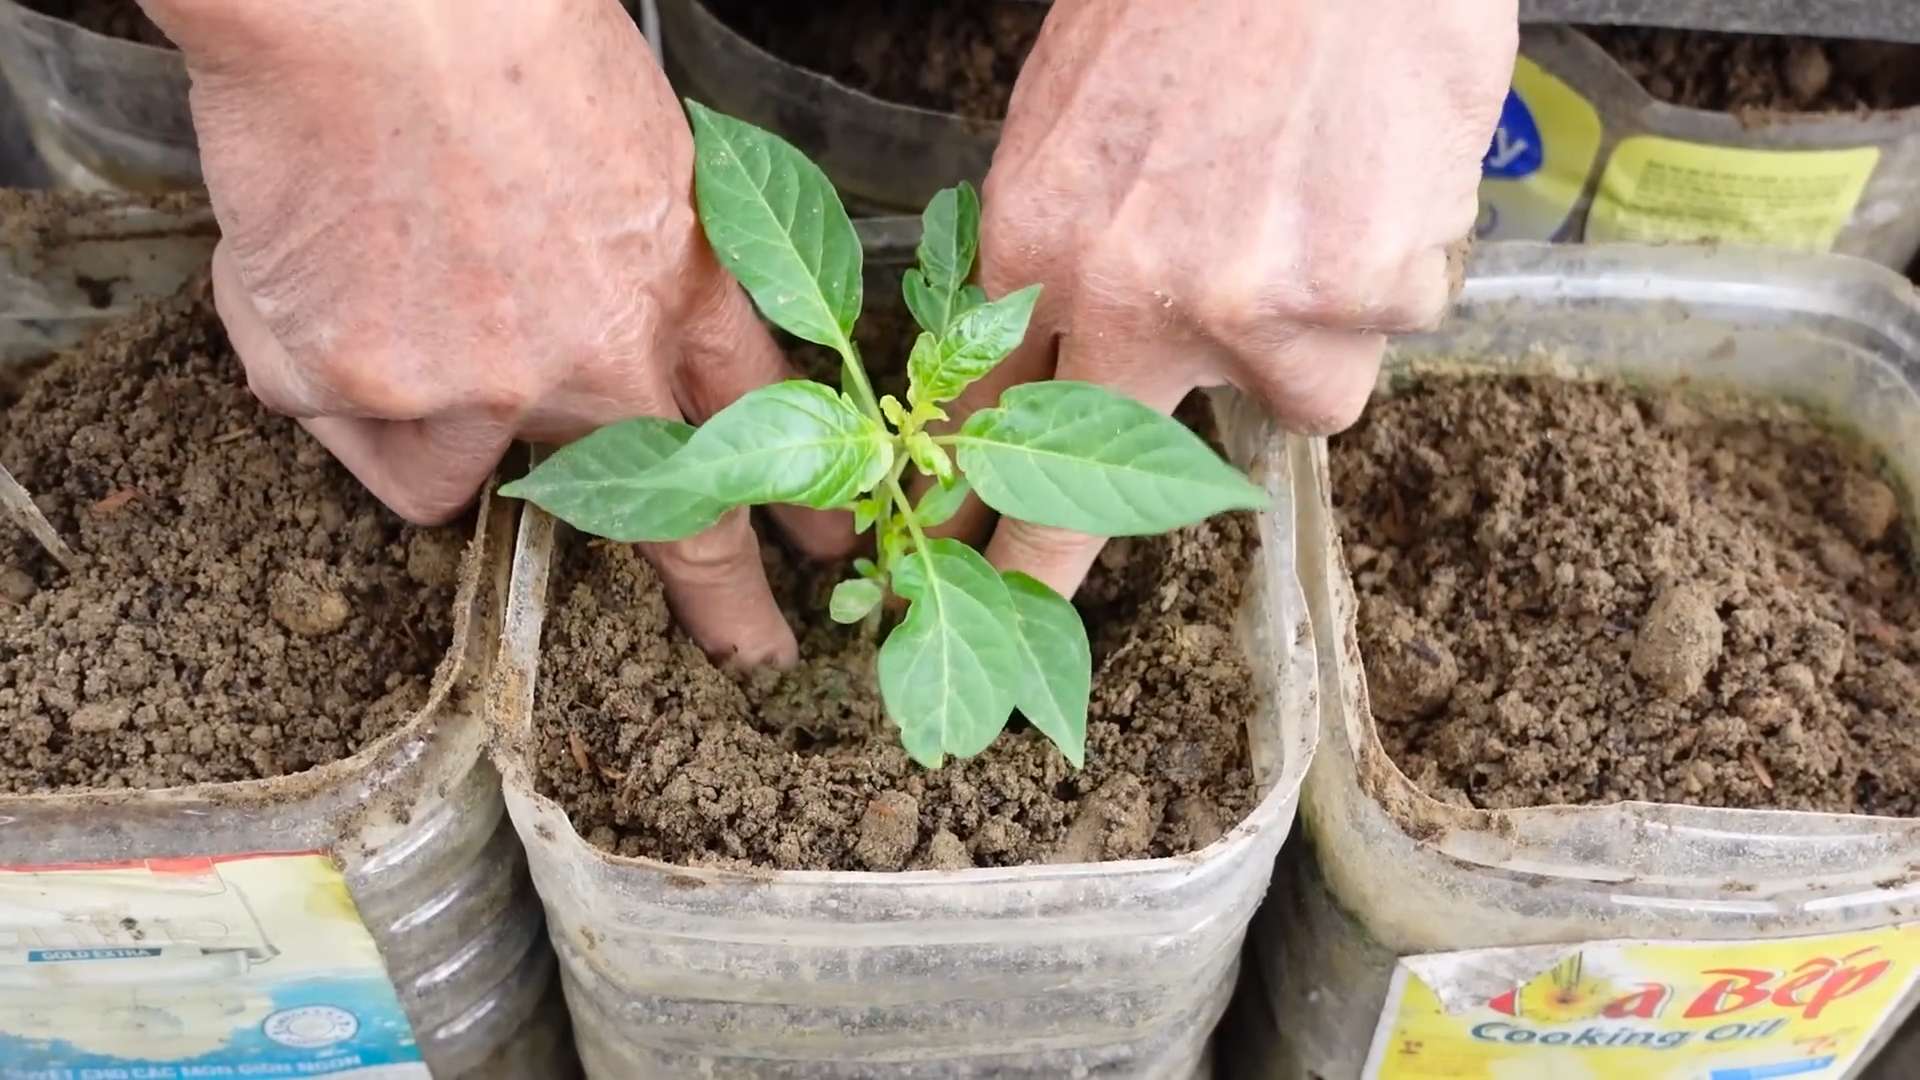
2. Preparing the Container: Fill your chosen container with potting mix, leaving about an inch or two of space at the top.
3. Planting the Seedling: Gently remove the seedling from its nursery pot. Loosen the roots slightly with your fingers. Dig a hole in the potting mix that’s large enough to accommodate the root ball. Place the seedling in the hole and backfill with potting mix. Gently firm the soil around the base of the plant.
4. Watering: Water thoroughly after planting, until water drains out of the drainage holes. This helps settle the soil and ensures the roots are well-hydrated.
5. Labeling: Label your plant with the chili pepper variety and the date of planting. This will help you keep track of your plants and their progress.
Caring for Your Chili Pepper Plants
Now that your chili peppers are planted, it’s time to provide them with the care they need to thrive.
1. Sunlight: Chili peppers need at least 6-8 hours of direct sunlight per day. Place your containers in the sunniest spot on your balcony. If your balcony doesn’t get enough sunlight, you may need to supplement with grow lights.
2. Watering: Water your chili pepper plants regularly, especially during hot, dry weather. The soil should be consistently moist, but not waterlogged. Check the soil moisture by sticking your finger into the soil. If the top inch of soil feels dry, it’s time to water. Water deeply, until water drains out of the drainage holes. Avoid overhead watering, as this can lead to fungal diseases.
3. Fertilizing: Feed your chili pepper plants every 2-3 weeks with a balanced fertilizer or a fertilizer specifically formulated for tomatoes and peppers. Follow the instructions on the fertilizer package.
4. Pruning: Pruning can help promote bushier growth and increase fruit production. Pinch off any suckers (small shoots that grow between the main stem and the branches) that appear. You can also prune back the tips of the branches to encourage branching.
5. Supporting: As your chili pepper plants grow, they may need support to prevent them from falling over. Use stakes or cages to support the plants.
6. Pest Control: Keep an eye out for pests like aphids, spider mites, and whiteflies. If you notice any pests, treat them with insecticidal soap or neem oil. Follow the instructions on the product label.
7. Pollination: Chili peppers are self-pollinating, but sometimes they need a little help. You can hand-pollinate your plants by gently shaking the flowers or using a small paintbrush to transfer pollen from one flower to another. This is especially important if you’re growing your plants indoors or in a sheltered location where there are few pollinators.
Harvesting Your Chili Peppers
The most exciting part! Harvesting your chili peppers is the culmination of all your hard work.
1. Timing: The time it takes for chili peppers to mature depends on the variety. Generally, it takes about 60-90 days from transplanting for the peppers to be ready for harvest.
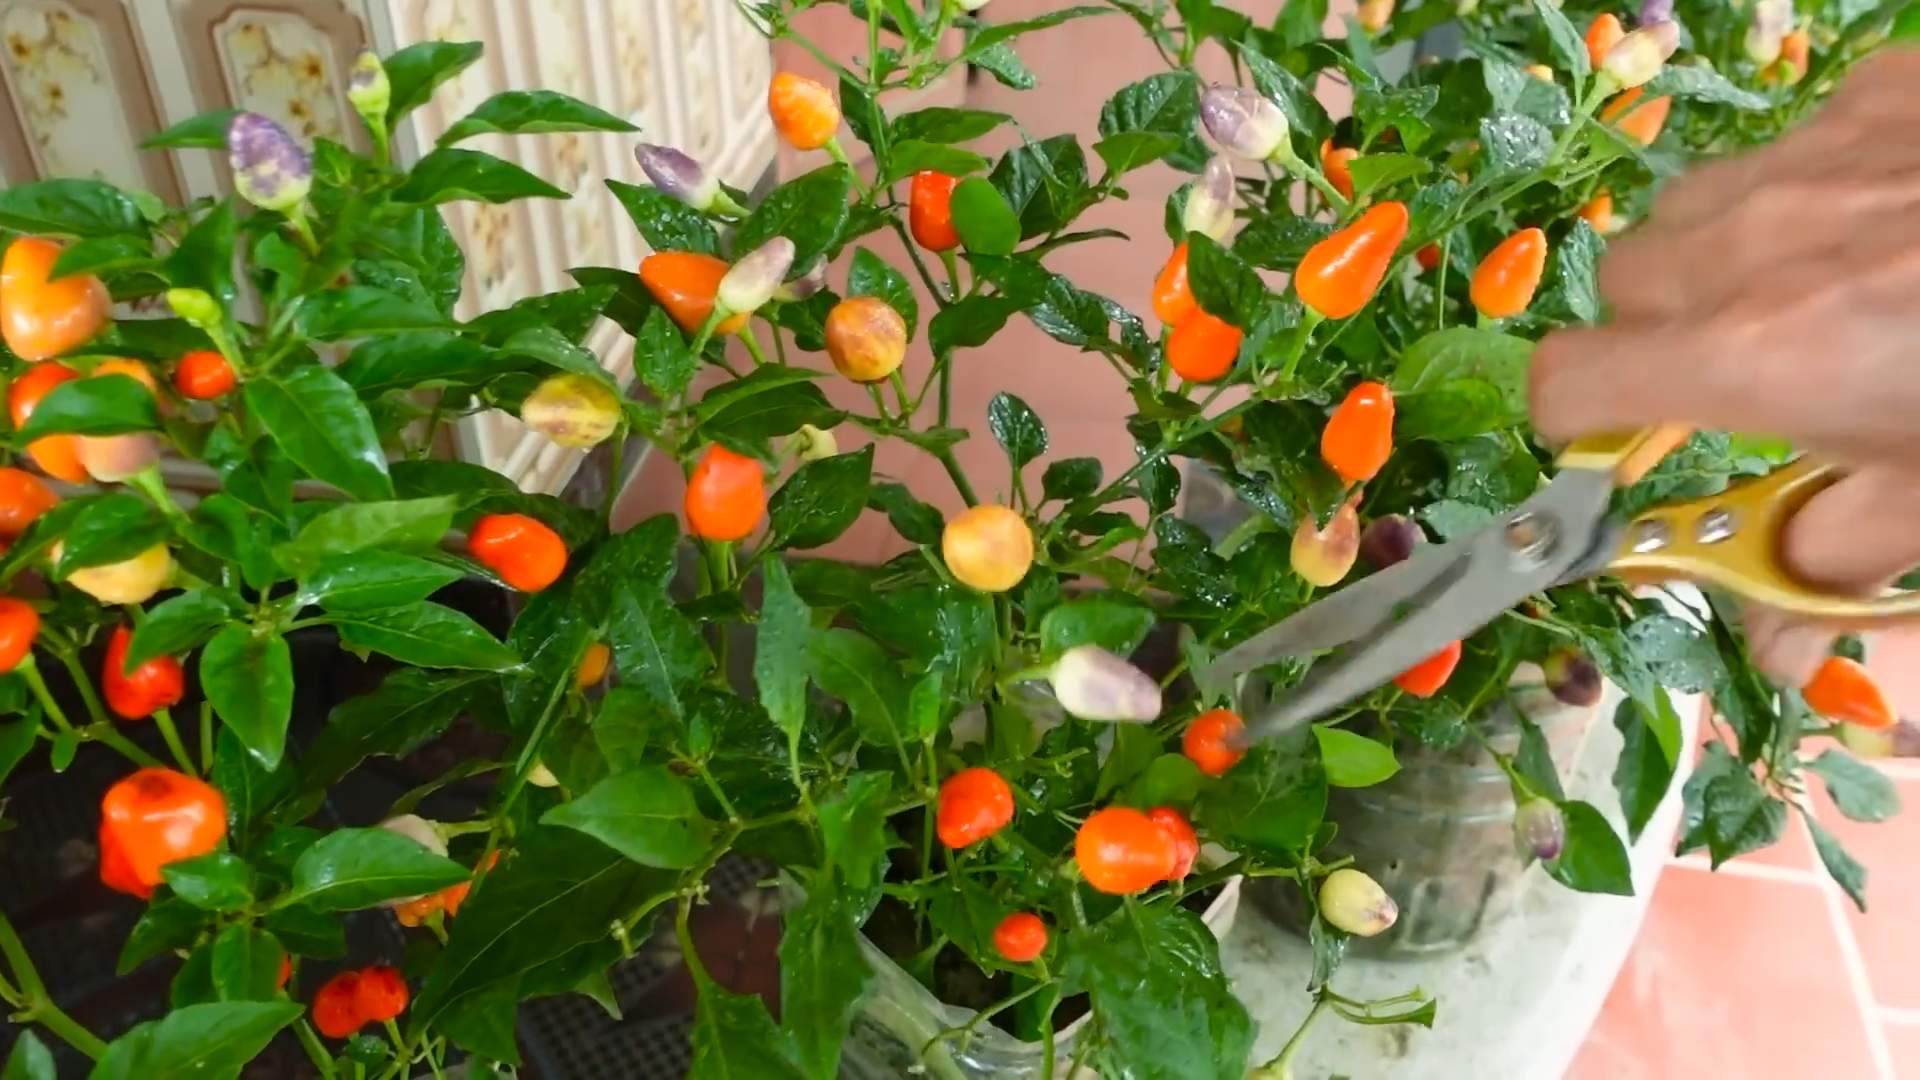
2. Ripeness: The color of the chili peppers will change as they ripen. Most peppers start out green and then turn red, yellow, orange, or brown, depending on the variety. The peppers are usually ready to harvest when they have reached their mature color and are firm to the touch.
3. Harvesting Technique: Use pruning shears or scissors to cut the peppers from the plant. Leave a small stem attached to the pepper.
4. Storage: Fresh chili peppers can be stored in the refrigerator for up to a week. You can also dry, freeze, or pickle your chili peppers for longer storage.
Troubleshooting Common Problems
Even with the best care, you may encounter some problems while growing chili peppers on your balcony. Here are some common issues and how to address them:
* Yellowing leaves: This can be caused by overwatering, underwatering, nutrient deficiencies, or pests. Check the soil moisture and adjust your watering accordingly. Fertilize your plants regularly. Inspect the leaves for pests.
* Blossom drop: This is when the flowers fall off the plant without producing fruit. It can be caused by temperature stress (too hot or too cold), lack of pollination, or nutrient deficiencies. Ensure your plants are getting enough sunlight and water. Hand-pollinate the flowers if necessary. Fertilize your plants regularly.
* Stunted growth: This can be caused by poor soil, lack of sunlight, or pests. Repot your plants in fresh potting mix. Move your plants to a sunnier location. Inspect the plants for pests.
* Pest infestations: Aphids, spider mites, and whiteflies are common pests that can attack chili pepper plants. Treat them with insecticidal soap or neem oil.
Extra Tips for Balcony Chili Pepper Success
* Choose the right container size: Bigger is generally better when it comes to container size. A larger container will provide more room for the roots to grow and will hold more moisture.
* Use a well-draining potting mix: Good drainage is essential for preventing root rot.
* Water deeply and regularly: Water your plants until water drains out of the drainage holes.
* Fertilize regularly: Chili peppers are heavy feeders and need regular fertilization to produce a good crop.
* Provide support: Use stakes or cages to support the plants as they grow.
* Protect your plants from extreme weather: If you live in an area with extreme weather, protect your plants from frost, heat, and strong winds.
* Harvest regularly: Harvesting the peppers regularly will encourage the plant to produce more fruit.
* Enjoy your harvest! Use your fresh chili peppers to add some spice to your favorite dishes.
Growing chili peppers on your balcony is a fun and rewarding experience. With a little care and attention, you can enjoy a bountiful harvest of fresh, spicy peppers all season long. Happy gardening!
Conclusion
So, there you have it! Transforming your balcony into a vibrant, chili-producing haven is not only achievable but surprisingly rewarding. We’ve walked through the simple steps to cultivate your own thriving chili plants, and hopefully, you’re feeling inspired to give it a go. This isn’t just about growing food; it’s about connecting with nature, adding a splash of color to your urban space, and enjoying the unparalleled satisfaction of harvesting your own fiery peppers.
Why is this DIY balcony chili plant growing trick a must-try? Because it offers a trifecta of benefits: fresh, organic chilies readily available for your culinary creations, a beautiful and engaging hobby that reduces stress, and a sustainable way to contribute to a greener environment, even in the heart of the city. Imagine the pride you’ll feel when you sprinkle your homegrown chilies onto your favorite dish, knowing you nurtured them from seedling to spicy perfection.
But the journey doesn’t end here! Feel free to experiment with different varieties of chilies. From the mild jalapeños to the scorching habaneros, the possibilities are endless. Consider companion planting with herbs like basil or oregano, which can help deter pests and enhance the flavor of your chilies. You can also explore different container sizes and materials to find what works best for your balcony’s specific conditions. For example, terracotta pots are great for drainage, while plastic pots retain moisture better.
Don’t be afraid to get creative with your setup. Vertical gardening systems are perfect for maximizing space on smaller balconies. You can also add decorative elements like trellises or colorful plant markers to personalize your chili garden. Remember, the most important thing is to have fun and enjoy the process.
We wholeheartedly encourage you to embark on this exciting adventure of balcony chili plant growing. It’s a simple yet profound way to bring a touch of nature into your life and add a little spice to your meals.
Once you’ve harvested your first batch of chilies, we’d love to hear about your experience! Share your photos, tips, and stories in the comments below. Let’s create a community of balcony chili growers and inspire others to embrace the joy of homegrown goodness. What varieties did you choose? What challenges did you face, and how did you overcome them? Your insights can be invaluable to fellow gardeners.
So, grab your seeds, pots, and soil, and get ready to transform your balcony into a chili paradise. Happy growing!
Frequently Asked Questions (FAQ)
What is the best time of year to start growing chili plants on my balcony?
The ideal time to start growing chili plants depends on your local climate. Generally, it’s best to start seeds indoors 6-8 weeks before the last expected frost. This allows the seedlings to develop a strong root system before being transplanted outdoors. If you live in a warmer climate with mild winters, you can start seeds directly outdoors in early spring. However, be sure to protect young plants from any unexpected cold snaps. A good rule of thumb is to wait until the soil temperature consistently reaches at least 65°F (18°C) before planting. You can use a soil thermometer to monitor the temperature.
What kind of soil is best for growing chili plants in containers?
Chili plants thrive in well-draining, nutrient-rich soil. A good potting mix for containers should consist of a blend of peat moss, perlite, and vermiculite. This combination provides excellent drainage, aeration, and water retention. You can also amend the potting mix with compost or aged manure to provide additional nutrients. Avoid using garden soil in containers, as it can become compacted and poorly drained, which can lead to root rot. Look for potting mixes specifically formulated for vegetables or herbs, as these often contain the right balance of nutrients for optimal growth.
How much sunlight do chili plants need on a balcony?
Chili plants require at least 6-8 hours of direct sunlight per day to thrive. Choose a location on your balcony that receives ample sunlight throughout the day. If your balcony is partially shaded, you can supplement with grow lights to ensure your plants receive enough light. Rotate your plants regularly to ensure even exposure to sunlight. Insufficient sunlight can result in leggy growth, reduced flowering, and smaller, less flavorful chilies. Observe your plants closely and adjust their position as needed to maximize sunlight exposure.
How often should I water my chili plants on the balcony?
Watering frequency depends on several factors, including the size of the container, the type of soil, the weather conditions, and the stage of plant growth. Generally, you should water your chili plants when the top inch of soil feels dry to the touch. Avoid overwatering, as this can lead to root rot. During hot, dry weather, you may need to water your plants daily. In cooler, more humid weather, you may only need to water them every few days. Use a watering can or hose with a gentle spray nozzle to avoid damaging the plants. Water deeply, allowing the water to drain out of the bottom of the container.
What are some common pests and diseases that affect chili plants, and how can I prevent them?
Common pests that can affect chili plants include aphids, spider mites, whiteflies, and thrips. These pests can suck the sap from the leaves, causing them to become yellowed and distorted. To prevent pest infestations, inspect your plants regularly for signs of pests. You can also use insecticidal soap or neem oil to control pests. Diseases that can affect chili plants include fungal diseases such as powdery mildew and blossom end rot. To prevent fungal diseases, ensure good air circulation around your plants and avoid overwatering. Blossom end rot is caused by a calcium deficiency, so you can add calcium to the soil or use a calcium-rich fertilizer.
How do I fertilize my chili plants on the balcony?
Chili plants are heavy feeders and require regular fertilization to produce abundant yields. Start fertilizing your plants a few weeks after transplanting them into their final containers. Use a balanced fertilizer with a ratio of 10-10-10 or 14-14-14. You can also use a fertilizer specifically formulated for vegetables or tomatoes. Fertilize your plants every 2-3 weeks during the growing season. Follow the instructions on the fertilizer label for proper application rates. Avoid over-fertilizing, as this can burn the roots of the plants. You can also supplement with organic fertilizers such as compost tea or fish emulsion.
When and how do I harvest my chili peppers?
The time to harvest your chili peppers depends on the variety and your personal preference. Most chili peppers will change color as they ripen, from green to red, yellow, or orange. You can harvest your peppers when they have reached their mature color and size. Use a sharp knife or scissors to cut the peppers from the plant, leaving a small stem attached. Handle the peppers carefully to avoid bruising them. You can use gloves when harvesting hot peppers to protect your skin from the capsaicin. Store your harvested peppers in a cool, dry place.
Can I grow chili plants indoors if my balcony doesn’t get enough sunlight?
Yes, you can grow chili plants indoors if your balcony doesn’t get enough sunlight. You will need to provide supplemental lighting using grow lights. LED grow lights are a good option, as they are energy-efficient and produce a full spectrum of light that is beneficial for plant growth. Place the grow lights about 6-12 inches above the plants and keep them on for 12-16 hours per day. You will also need to ensure that your plants receive adequate ventilation and humidity.
What are some good chili pepper varieties to grow on a balcony?
There are many different chili pepper varieties that are well-suited for growing on a balcony. Some popular choices include jalapeños, habaneros, serranos, Thai chilies, and bell peppers. Choose varieties that are compact and bushy, as these will be easier to manage in containers. You can also consider growing dwarf or miniature varieties, which are specifically bred for container gardening. Research the specific needs of each variety to ensure that you can provide the right growing conditions.
How do I overwinter my chili plants on the balcony?
If you live in a climate with cold winters, you can overwinter your chili plants indoors to protect them from frost. Before the first frost, prune your plants back to about 6-8 inches tall. Dig up the plants and pot them in fresh potting mix. Bring the plants indoors and place them in a sunny location. Water the plants sparingly during the winter months, allowing the soil to dry out slightly between waterings. You may need to provide supplemental lighting if your plants are not receiving enough sunlight. In the spring, gradually acclimate the plants to outdoor conditions before transplanting them back into their containers on the balcony.

Leave a Comment