
Growing Collard Greens Hack: Unlock the secrets to a bountiful harvest right in your backyard! Have you ever dreamed of enjoying fresh, flavorful collard greens straight from your garden, but felt intimidated by the process? You’re not alone! Many gardeners, both beginners and seasoned pros, sometimes struggle with these leafy greens. But what if I told you there’s a simple, effective hack that can dramatically improve your collard green yield and quality?
Collard greens have a rich history, deeply rooted in Southern American cuisine and culture. They’re more than just a vegetable; they’re a symbol of resilience, tradition, and good fortune. For generations, families have passed down recipes and techniques for cultivating these nutritious greens, often believing that eating them on New Year’s Day brings prosperity.
But let’s face it, growing collard greens can be tricky. Pests, diseases, and nutrient deficiencies can all wreak havoc on your crop. That’s where this DIY trick comes in! I’m going to share a simple, yet powerful method that addresses common collard green growing challenges, helping you achieve lush, healthy plants and a delicious harvest. This growing collard greens hack will save you time, money, and frustration, allowing you to enjoy the satisfaction of growing your own food and connecting with a time-honored tradition. Get ready to transform your garden and your plate!
Unlock a Bountiful Harvest: My Foolproof Collard Greens Growing Hack
Hey there, fellow gardening enthusiasts! I’m so excited to share my secret weapon for growing the most amazing, lush, and delicious collard greens you’ve ever seen. I’ve been tinkering with my gardening techniques for years, and I’ve finally cracked the code for maximizing my collard green yield. Get ready to ditch those sad, sparse leaves and embrace a harvest that will have you sharing with the whole neighborhood!
Understanding the Collard Green’s Needs
Before we dive into the hack itself, let’s quickly cover the basics. Collard greens are relatively easy to grow, but understanding their preferences will make a HUGE difference.
* Sunlight: Collards love sunshine! Aim for at least 6 hours of direct sunlight per day. The more, the merrier.
* Soil: Well-draining soil is key. Collards aren’t fans of soggy feet. A slightly acidic to neutral pH (around 6.0-7.0) is ideal.
* Water: Consistent moisture is crucial, especially during hot weather.
* Nutrients: Collards are heavy feeders, meaning they need plenty of nutrients to thrive.
The Secret Weapon: Companion Planting and Strategic Fertilizing
Okay, here’s the heart of my collard green growing hack. It’s a two-pronged approach that combines the power of companion planting with a strategic fertilizing schedule.
* Companion Planting Powerhouse:
* Aromatic Herbs (Rosemary, Thyme, Sage): These deter cabbage moths, which are notorious collard green pests. Plus, they smell amazing!
* Marigolds: These beauties repel nematodes and other soil pests. They also add a pop of color to your garden.
* Dill: Attracts beneficial insects like ladybugs and lacewings, which feast on aphids and other unwanted critters.
* Garlic and Onions: These pungent plants deter a wide range of pests.
* Legumes (Beans, Peas): These fix nitrogen in the soil, providing a natural fertilizer boost for your collards.
* Strategic Fertilizing Schedule:
* Pre-Planting: Amend your soil with compost and a slow-release organic fertilizer.
* 3 Weeks After Transplanting: Side-dress with a nitrogen-rich fertilizer (like fish emulsion or blood meal) to promote leafy growth.
* Every 4-6 Weeks: Apply a balanced organic fertilizer to keep your collards happy and healthy throughout the growing season.
Step-by-Step Guide: From Seed to Harvest
Alright, let’s get our hands dirty! Here’s a detailed, step-by-step guide to growing amazing collard greens using my hack.
Phase 1: Starting Your Collard Greens
1. Choose Your Variety: There are tons of collard green varieties to choose from, each with its own unique flavor and texture. Some of my favorites include ‘Georgia Southern’, ‘Champion’, and ‘Vates’. Consider your climate and personal preferences when making your selection.
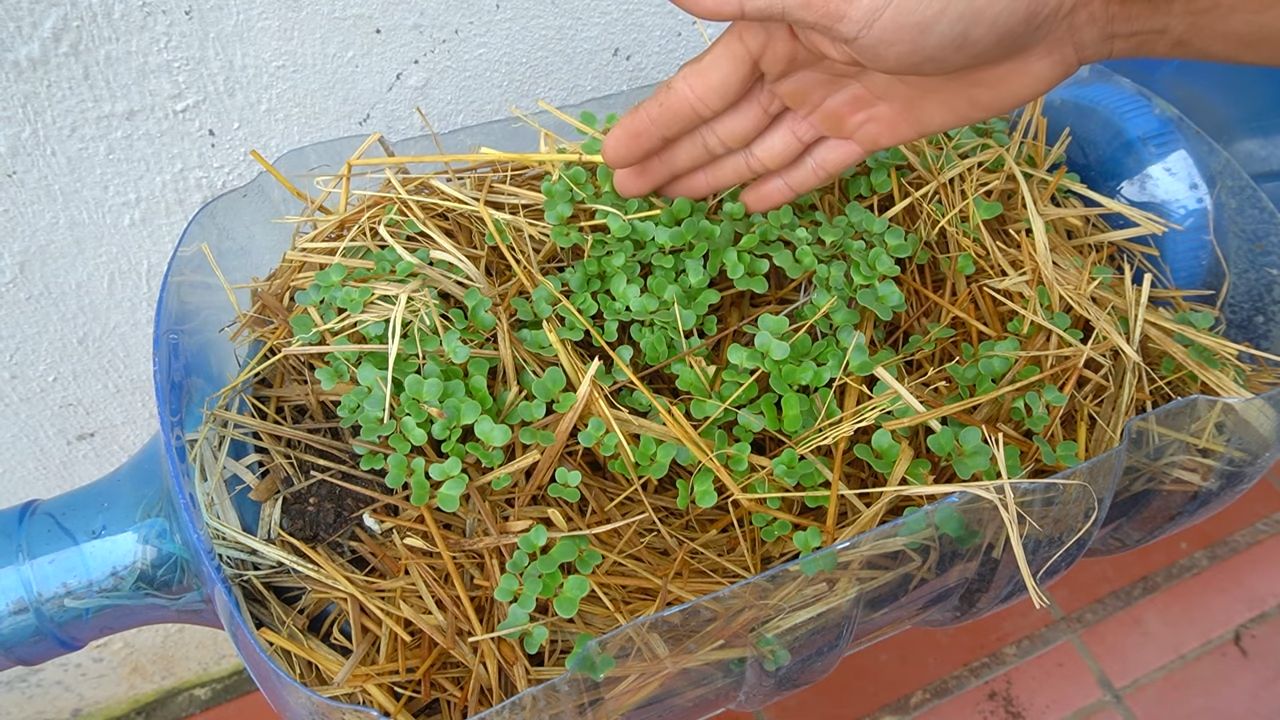
2. Start Seeds Indoors (Optional): If you live in a region with a short growing season, starting your seeds indoors 4-6 weeks before the last expected frost is a great idea. This gives your collards a head start.
* Fill seed trays or small pots with a seed-starting mix.
* Sow seeds about 1/4 inch deep.
* Keep the soil consistently moist but not soggy.
* Provide plenty of light (a grow light works wonders).
* Once the seedlings have a few sets of true leaves, they’re ready to be transplanted.
3. Direct Sow Seeds Outdoors: If you have a longer growing season, you can direct sow your collard green seeds directly into your garden bed.
* Prepare your garden bed by amending the soil with compost and a slow-release organic fertilizer.
* Sow seeds about 1/2 inch deep and 2-3 inches apart.
* Water gently but thoroughly.
* Thin seedlings to 12-18 inches apart once they have a few sets of true leaves.
Phase 2: Transplanting and Companion Planting
1. Prepare Your Garden Bed: Whether you started your seeds indoors or are direct sowing, proper bed preparation is crucial.
* Choose a location that receives at least 6 hours of direct sunlight per day.
* Amend the soil with plenty of compost to improve drainage and fertility.
* Incorporate a slow-release organic fertilizer according to package directions.
2. Transplant Seedlings (If Applicable): Gently remove your seedlings from their trays or pots.
* Dig holes that are slightly larger than the root balls.
* Place the seedlings in the holes and backfill with soil.
* Water thoroughly.
3. Companion Planting Time!: This is where the magic happens! Plant your chosen companion plants around your collard greens.
* Space your companion plants appropriately, considering their mature size.
* For example, plant marigolds every 12-18 inches around the perimeter of your collard green patch.
* Interplant dill and other herbs throughout the bed.
4. Mulch, Mulch, Mulch!: Apply a layer of organic mulch (like straw or shredded leaves) around your collard greens and companion plants.
* Mulch helps retain moisture, suppress weeds, and regulate soil temperature.
Phase 3: Ongoing Care and Fertilizing
1. Watering: Keep your collard greens consistently moist, especially during hot weather. Water deeply and regularly, aiming for about 1 inch of water per week.
2. Fertilizing: Follow my strategic fertilizing schedule (mentioned earlier).
* Side-dress with a ni
Hey there, fellow gardening enthusiasts! I’m so excited to share my secret weapon for growing the most amazing, lush, and delicious collard greens you’ve ever seen. I’ve been tinkering with my gardening techniques for years, and I’ve finally cracked the code for maximizing my collard green yield. Get ready to ditch those sad, sparse leaves and embrace a harvest that will have you sharing with the whole neighborhood!
Understanding the Collard Green’s Needs
Before we dive into the hack itself, let’s quickly cover the basics. Collard greens are relatively easy to grow, but understanding their preferences will make a HUGE difference.
* Sunlight: Collards love sunshine! Aim for at least 6 hours of direct sunlight per day. The more, the merrier.
* Soil: Well-draining soil is key. Collards aren’t fans of soggy feet. A slightly acidic to neutral pH (around 6.0-7.0) is ideal.
* Water: Consistent moisture is crucial, especially during hot weather.
* Nutrients: Collards are heavy feeders, meaning they need plenty of nutrients to thrive.
The Secret Weapon: Companion Planting and Strategic Fertilizing
Okay, here’s the heart of my collard green growing hack. It’s a two-pronged approach that combines the power of companion planting with a strategic fertilizing schedule.
* Companion Planting Powerhouse:
* Aromatic Herbs (Rosemary, Thyme, Sage): These deter cabbage moths, which are notorious collard green pests. Plus, they smell amazing!
* Marigolds: These beauties repel nematodes and other soil pests. They also add a pop of color to your garden.
* Dill: Attracts beneficial insects like ladybugs and lacewings, which feast on aphids and other unwanted critters.
* Garlic and Onions: These pungent plants deter a wide range of pests.
* Legumes (Beans, Peas): These fix nitrogen in the soil, providing a natural fertilizer boost for your collards.
* Strategic Fertilizing Schedule:
* Pre-Planting: Amend your soil with compost and a slow-release organic fertilizer.
* 3 Weeks After Transplanting: Side-dress with a nitrogen-rich fertilizer (like fish emulsion or blood meal) to promote leafy growth.
* Every 4-6 Weeks: Apply a balanced organic fertilizer to keep your collards happy and healthy throughout the growing season.
Step-by-Step Guide: From Seed to Harvest
Alright, let’s get our hands dirty! Here’s a detailed, step-by-step guide to growing amazing collard greens using my hack.
Phase 1: Starting Your Collard Greens
1. Choose Your Variety: There are tons of collard green varieties to choose from, each with its own unique flavor and texture. Some of my favorites include ‘Georgia Southern’, ‘Champion’, and ‘Vates’. Consider your climate and personal preferences when making your selection.
2. Start Seeds Indoors (Optional): If you live in a region with a short growing season, starting your seeds indoors 4-6 weeks before the last expected frost is a great idea. This gives your collards a head start.
* Fill seed trays or small pots with a seed-starting mix.
* Sow seeds about 1/4 inch deep.
* Keep the soil consistently moist but not soggy.
* Provide plenty of light (a grow light works wonders).
* Once the seedlings have a few sets of true leaves, they’re ready to be transplanted.
3. Direct Sow Seeds Outdoors: If you have a longer growing season, you can direct sow your collard green seeds directly into your garden bed.
* Prepare your garden bed by amending the soil with compost and a slow-release organic fertilizer.
* Sow seeds about 1/2 inch deep and 2-3 inches apart.
* Water gently but thoroughly.
* Thin seedlings to 12-18 inches apart once they have a few sets of true leaves.
Phase 2: Transplanting and Companion Planting
1. Prepare Your Garden Bed: Whether you started your seeds indoors or are direct sowing, proper bed preparation is crucial.
* Choose a location that receives at least 6 hours of direct sunlight per day.
* Amend the soil with plenty of compost to improve drainage and fertility.
* Incorporate a slow-release organic fertilizer according to package directions.
2. Transplant Seedlings (If Applicable): Gently remove your seedlings from their trays or pots.
* Dig holes that are slightly larger than the root balls.
* Place the seedlings in the holes and backfill with soil.
* Water thoroughly.
3. Companion Planting Time!: This is where the magic happens! Plant your chosen companion plants around your collard greens.
* Space your companion plants appropriately, considering their mature size.
* For example, plant marigolds every 12-18 inches around the perimeter of your collard green patch.
* Interplant dill and other herbs throughout the bed.
4. Mulch, Mulch, Mulch!: Apply a layer of organic mulch (like straw or shredded leaves) around your collard greens and companion plants.
* Mulch helps retain moisture, suppress weeds, and regulate soil temperature.
Phase 3: Ongoing Care and Fertilizing
1. Watering: Keep your collard greens consistently moist, especially during hot weather. Water deeply and regularly, aiming for about 1 inch of water per week.
2. Fertilizing: Follow my strategic fertilizing schedule (mentioned earlier).
* Side-dress with a nitrogen-rich fertilizer 3 weeks after transplanting.
* Apply a balanced organic fertilizer every 4-6 weeks throughout the growing season.
3. Pest Control: Keep a close eye out for pests.
* Handpick any cabbage worms or other caterpillars you find.
* Use insecticidal soap or neem oil to control aphids and other soft-bodied insects.
* The companion plants should help deter many pests, but vigilance is key.
4. Weed Control: Regularly remove any weeds that pop up in your garden bed. Weeds compete with your collard greens for water and nutrients.
5. Monitor Soil pH: Periodically test your soil pH to ensure it’s within the ideal range (6.0-7.0). Amend the soil with lime to raise the pH or sulfur to lower it, if necessary.
Phase 4: Harvesting Your Bounty
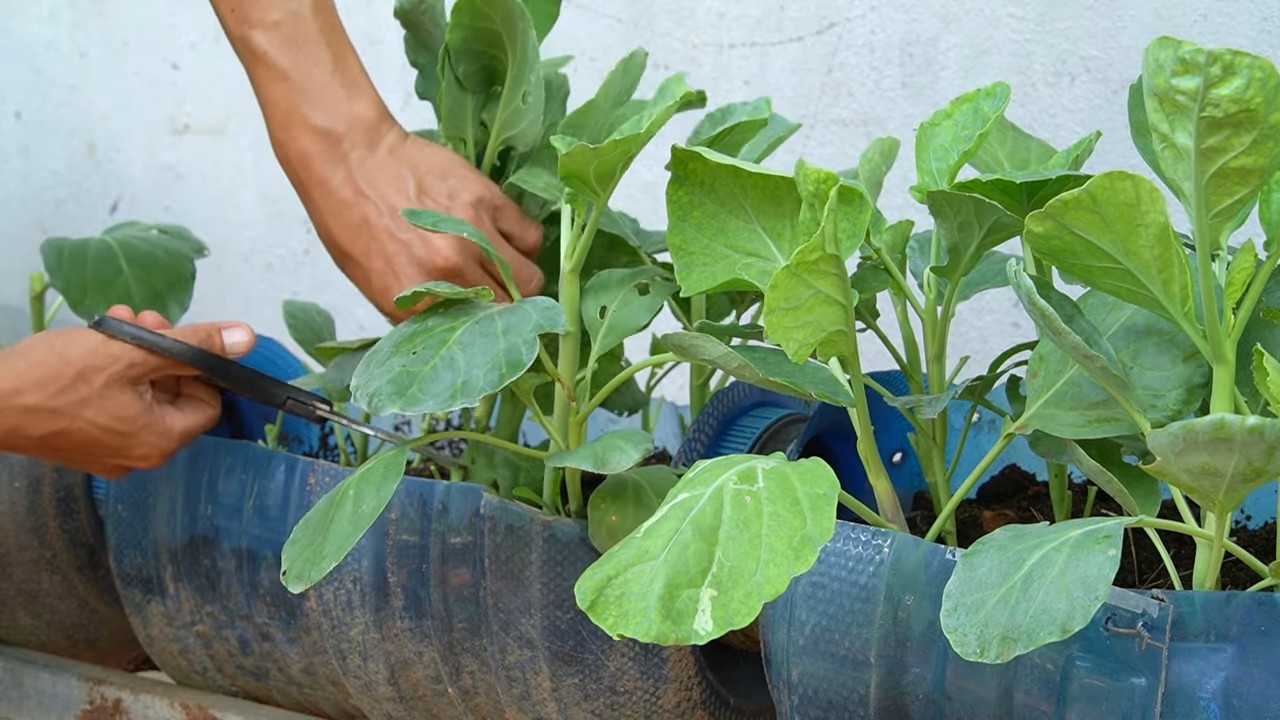
1. Harvesting Leaves: You can start harvesting collard green leaves once they reach a decent size (usually around 8-10 inches long).
* Harvest the outer leaves first, leaving the inner leaves to continue growing.
* Use a sharp knife or scissors to cut the leaves close to the stem.
* Harvesting regularly encourages the plant to produce more leaves.
2. Succession Planting: To ensure a continuous harvest throughout the growing season, consider succession planting.
* Sow new seeds every few weeks to have a steady supply of collard greens.
3. Enjoy Your Harvest!: Collard greens are incredibly versatile. You can steam them, sauté them, add them to soups and stews, or even use them in salads.
Troubleshooting Common Collard Green Problems
Even with the best care, you might encounter a few challenges along the way. Here are some common problems and how to address them:
* Aphids: These tiny pests can suck the sap from your collard green leaves. Spray them with insecticidal soap or neem oil. Ladybugs are also great natural predators.
* Cabbage Worms: These caterpillars can quickly decimate your collard green leaves. Handpick them or use Bacillus thuringiensis (Bt), a natural insecticide.
* Downy Mildew: This fungal disease can cause yellow spots on your collard green leaves. Improve air circulation and avoid overhead watering.
* Clubroot: This soilborne disease can cause stunted growth and swollen roots. Rotate your crops and amend the soil with lime to raise the pH.
Extra Tips for Collard Green Success
* Choose Disease-Resistant Varieties: When selecting your collard green varieties, look for those that are resistant to common diseases like downy mildew and clubroot.
* Water in the Morning: Watering in the morning allows the leaves to dry out during the day, reducing the risk of fungal diseases.
* Fertilize Regularly: Collard greens are heavy feeders, so don’t skimp on the fertilizer.
* Protect from Frost: If you live in a region with frost, protect your collard
Conclusion
So, there you have it! This simple yet incredibly effective DIY trick for growing collard greens is more than just a gardening tip; it’s a game-changer. We’ve explored how this method can significantly boost your yield, protect your precious plants from pests, and ultimately, make your gardening experience more rewarding.
Why is this a must-try? Because it addresses some of the most common challenges faced by collard green growers. Pests like cabbage worms and aphids can decimate a crop in no time, leaving you with nothing but disappointment. This DIY solution provides a physical barrier, minimizing the need for harmful pesticides and ensuring a healthier, more organic harvest. Furthermore, the improved soil conditions and consistent moisture levels fostered by this technique lead to faster growth and more robust plants.
But the benefits don’t stop there. This method is also incredibly adaptable. Feel free to experiment with different materials for your DIY setup. Instead of plastic bottles, you could use repurposed containers, old buckets with the bottoms cut out, or even create a mini-greenhouse structure using PVC pipes and plastic sheeting. The key is to provide protection and create a more controlled environment for your collard greens to thrive.
Consider these variations to tailor the technique to your specific needs and climate:
* For hotter climates: Use shade cloth instead of clear plastic to prevent overheating. You can also add ventilation holes to your DIY structure to improve airflow.
* For colder climates: Use thicker plastic or even bubble wrap to provide extra insulation. You can also add a layer of mulch around the base of the plants to protect the roots from frost.
* For smaller gardens: Adapt the size of your DIY structures to fit your available space. You can even grow collard greens in containers using this method.
Ultimately, the success of this DIY trick hinges on your willingness to experiment and adapt. Don’t be afraid to try different approaches and see what works best for you. The joy of gardening lies in the learning process, and this method offers ample opportunities for discovery.
We are confident that this DIY trick will revolutionize your collard green growing experience. Imagine harvesting basketfuls of lush, healthy greens, knowing that you achieved it with a simple, cost-effective solution. The satisfaction of growing your own food is unparalleled, and this method makes it even more accessible and rewarding.
Now, it’s your turn! We encourage you to try this DIY trick for growing collard greens and share your experience with us. Let us know what variations you tried, what challenges you faced, and what successes you achieved. Your feedback will help us refine this method and make it even more effective for other gardeners. Share your photos and stories on our social media channels using #CollardGreenHack and let’s build a community of thriving collard green growers! Happy gardening!
Frequently Asked Questions (FAQ)
What exactly is the “DIY trick” you’re referring to?
The DIY trick involves creating a protective enclosure around your collard green plants using readily available materials like plastic bottles, buckets, or even homemade PVC pipe structures covered in plastic sheeting. This enclosure helps to protect the plants from pests, retain moisture, and create a more controlled environment for optimal growth. It’s a simple, cost-effective way to significantly improve your collard green harvest.
What are the main benefits of using this DIY trick?
The primary benefits include:
* Pest Protection: The enclosure acts as a physical barrier against common collard green pests like cabbage worms, aphids, and flea beetles, reducing the need for pesticides.
* Improved Moisture Retention: The enclosure helps to trap moisture in the soil, reducing the frequency of watering and preventing the plants from drying out.
* Enhanced Growth: The controlled environment within the enclosure promotes faster growth and more robust plants.
* Extended Growing Season: The enclosure can provide some protection from frost, allowing you to extend your growing season in cooler climates.
* Cost-Effective: The materials used for this DIY trick are typically inexpensive and readily available, making it a budget-friendly solution.
What kind of materials can I use to create the enclosure?
You have several options! Plastic bottles with the bottoms cut off are a popular choice. You can also use old buckets with the bottoms removed, or create a mini-greenhouse structure using PVC pipes and plastic sheeting. The key is to choose materials that are durable, weather-resistant, and allow sunlight to reach the plants.
How do I ensure proper ventilation within the enclosure?
Proper ventilation is crucial to prevent overheating and fungal diseases. If you’re using plastic bottles or buckets, you can create ventilation holes by drilling small holes near the top of the enclosure. For PVC pipe structures, you can leave gaps in the plastic sheeting or install small vents. Monitor the temperature and humidity inside the enclosure regularly and adjust the ventilation as needed.
How often should I water my collard greens when using this DIY trick?
The frequency of watering will depend on your climate and soil conditions. However, the enclosure will help to retain moisture, so you’ll likely need to water less frequently than you would without it. Check the soil moisture regularly and water when the top inch feels dry to the touch. Avoid overwatering, as this can lead to root rot.
Can I use this DIY trick for other plants besides collard greens?
Yes, absolutely! This DIY trick can be adapted for other leafy greens like kale, spinach, and lettuce. It can also be used for other vegetables that are susceptible to pests or require a more controlled environment, such as tomatoes, peppers, and eggplants. Just be sure to adjust the size and design of the enclosure to suit the specific needs of the plant.
What if I live in a very hot climate? Will this DIY trick still work?
Yes, but you’ll need to make some adjustments to prevent overheating. Use shade cloth instead of clear plastic to reduce the amount of sunlight reaching the plants. You can also add more ventilation holes to improve airflow. Consider watering more frequently to keep the soil cool and moist.
How do I prevent pests from getting inside the enclosure?
While the enclosure provides a physical barrier, some pests may still find their way inside. To minimize this risk, make sure the enclosure is sealed tightly to the ground. You can also use insect netting to cover any gaps or openings. Regularly inspect the plants for pests and remove them manually if necessary.
How long should I keep the enclosure on my collard greens?
You can keep the enclosure on your collard greens throughout their entire growing season. However, as the plants mature and become more resistant to pests, you may choose to remove the enclosure. Monitor the plants closely after removing the enclosure and take action if you notice any signs of pest infestation.
What kind of fertilizer should I use for collard greens grown with this DIY trick?
Use a balanced fertilizer that is specifically formulated for leafy greens. Follow the instructions on the fertilizer package carefully and avoid over-fertilizing, as this can damage the plants. You can also amend the soil with compost or other organic matter to improve its fertility and drainage.
How do I know when my collard greens are ready to harvest?
Collard greens are typically ready to harvest when the leaves are about 10-12 inches long. You can harvest individual leaves as needed, starting with the outer leaves. Avoid harvesting more than one-third of the plant at a time, as this can stress the plant and reduce its yield.
What if I don’t have a garden? Can I still use this DIY trick?
Yes! You can easily adapt this DIY trick for container gardening. Simply choose a container that is large enough to accommodate the mature size of the collard green plant and create a smaller version of the enclosure to fit over the container. This is a great way to grow collard greens even if you don’t have a traditional garden.
Where can I find more information about growing collard greens?
There are many resources available online and in libraries that can provide you with more information about growing collard greens. You can also consult with local gardening experts or join a gardening club to learn from experienced growers. Don’t be afraid to experiment and try different techniques to find what works best for you. Remember, **growing collard greens** is a rewarding experience, and with a little effort, you can enjoy a bountiful harvest of fresh, healthy greens.
Leave a Comment