
Growing Edible Hibiscus might sound like something only a seasoned gardener can achieve, but trust me, it’s more accessible than you think! Have you ever imagined stepping into your backyard and plucking a vibrant, tangy flower straight from the plant to add a unique twist to your salad or a refreshing zing to your iced tea? That’s the magic of growing edible hibiscus, and this DIY guide is your key to unlocking that magic.
Hibiscus, with its stunning blooms, has a rich history, gracing gardens and cultures for centuries. From ancient Egypt, where hibiscus tea was a favorite of the pharaohs, to its use in traditional medicine across various cultures, this flower boasts a legacy as vibrant as its petals. But beyond its beauty and historical significance, the edible varieties offer a delicious and nutritious addition to your culinary repertoire.
In today’s world, where we’re all looking for ways to connect with nature, eat healthier, and reduce our environmental footprint, growing edible hibiscus at home is a fantastic solution. Imagine the satisfaction of knowing exactly where your food comes from, free from harmful pesticides and brimming with freshness. Plus, it’s a fantastic conversation starter! This DIY article will provide you with simple, step-by-step instructions, insider tips, and tricks to successfully cultivate these beautiful and beneficial flowers, even if you’re a complete beginner. Let’s get our hands dirty and bring the exotic flavors and vibrant colors of edible hibiscus to your home garden!
Growing Edible Hibiscus: A DIY Guide to a Tropical Treat
Okay, so you want to grow your own edible hibiscus? Awesome! It’s a fantastic project, and trust me, the rewards – beautiful flowers and delicious, tangy treats – are totally worth it. I’ve been growing hibiscus for a few years now, and I’ve learned a thing or two along the way. This guide will walk you through everything you need to know, from choosing the right variety to harvesting your bounty. Let’s get started!
Choosing Your Hibiscus Variety
Not all hibiscus are created equal, especially when it comes to edibility. You’ll want to focus on varieties specifically grown for their calyces (the fleshy part that surrounds the flower bud). Here’s a breakdown:
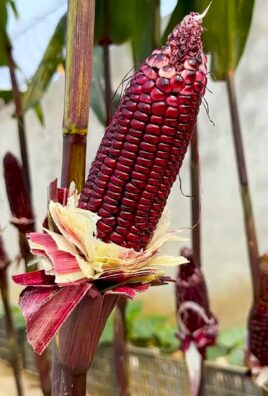
* **Roselle (Hibiscus sabdariffa):** This is the most common edible hibiscus. It’s known for its vibrant red calyces, which are used to make hibiscus tea, jams, and sauces. Roselle is relatively easy to grow and quite productive.
* **False Roselle (Hibiscus acetosella):** Also known as Cranberry Hibiscus or African Rose Mallow, this variety has beautiful dark red foliage and slightly smaller, less fleshy calyces than Roselle. While edible, the calyces are often used more for their ornamental value and add a slightly tart flavor to salads.
* **’Thai Red’ Roselle:** A specific cultivar of Roselle, known for its particularly large and fleshy calyces. If you can find seeds or cuttings of this variety, grab them!
Important Note: Avoid using ornamental hibiscus (the kind you typically see in landscaping) for consumption. They may have been treated with chemicals that aren’t safe to ingest. Always source your seeds or cuttings from a reputable supplier who specializes in edible varieties.
Getting Started: Seeds vs. Cuttings
You have two main options for starting your hibiscus: seeds or cuttings. Each has its pros and cons:
* **Seeds:** Starting from seed is generally more affordable, but it takes longer to get a harvest. You’ll need to start the seeds indoors a few weeks before the last frost.
* **Cuttings:** Cuttings offer a faster route to harvest, as you’re essentially cloning an existing plant. However, you’ll need access to a mature hibiscus plant to take cuttings from.
I’ve had success with both methods, so choose the one that best suits your resources and patience level.
Growing Hibiscus from Seed: A Step-by-Step Guide
Here’s how to start your hibiscus from seed:
1. **Soaking the Seeds:** To improve germination rates, soak the hibiscus seeds in warm water for 24 hours before planting. This helps soften the hard outer shell. I usually put them in a small bowl and cover them with about an inch of water.
2. **Preparing the Seed Starting Mix:** Use a well-draining seed starting mix. You can buy a pre-made mix or make your own by combining equal parts peat moss, perlite, and vermiculite. I prefer to use a mix that’s specifically formulated for seed starting, as it’s usually sterile and free of weed seeds.
3. **Planting the Seeds:** Fill your seed starting trays or pots with the mix. Sow the seeds about ¼ inch deep and gently cover them with soil. I usually plant 2-3 seeds per cell to increase my chances of success.
4. **Watering:** Gently water the soil until it’s moist but not soggy. Avoid overwatering, as this can lead to fungal diseases. I use a spray bottle to mist the soil, which helps prevent the seeds from being disturbed.
5. **Providing Warmth and Light:** Hibiscus seeds need warmth to germinate. Place the seed starting trays on a heat mat or in a warm location. They also need plenty of light. If you don’t have a sunny windowsill, use a grow light. I keep my grow lights on for about 16 hours a day.
6. **Germination:** Germination typically takes 7-21 days. Keep the soil consistently moist during this time. Once the seedlings emerge, remove the heat mat and continue to provide plenty of light.
7. **Thinning:** Once the seedlings have developed a few sets of true leaves, thin them to one plant per cell. Choose the strongest and healthiest seedling and snip off the others at the soil line.
8. **Hardening Off:** Before transplanting the seedlings outdoors, you’ll need to harden them off. This process gradually acclimates the plants to outdoor conditions. Start by placing the seedlings outdoors in a sheltered location for a few hours each day, gradually increasing the amount of time they spend outside over the course of a week or two.
Growing Hibiscus from Cuttings: A Step-by-Step Guide
If you have access to a mature hibiscus plant, taking cuttings is a great way to propagate new plants. Here’s how:
1. **Taking the Cuttings:** In the spring or early summer, take cuttings from healthy, non-flowering stems. The cuttings should be about 4-6 inches long and have several leaves. I usually take cuttings in the morning, when the plant is well-hydrated.
2. **Preparing the Cuttings:** Remove the lower leaves from the cuttings, leaving only a few leaves at the top. This will help prevent the cuttings from rotting.
3. **Applying Rooting Hormone:** Dip the cut end of each cutting in rooting hormone. This will encourage root development. You can find rooting hormone at most garden centers.
4. **Planting the Cuttings:** Plant the cuttings in a well-draining potting mix. You can use the same mix that you used for starting seeds.
5. **Creating a Humid Environment:** Hibiscus cuttings need a humid environment to root successfully. You can create a mini-greenhouse by covering the cuttings with a plastic bag or humidity dome.
6. **Watering:** Keep the soil consistently moist but not soggy.
7. **Rooting:** Rooting typically takes 2-4 weeks. You’ll know the cuttings have rooted when you see new growth.
8. **Transplanting:** Once the cuttings have rooted, you can transplant them into individual pots.
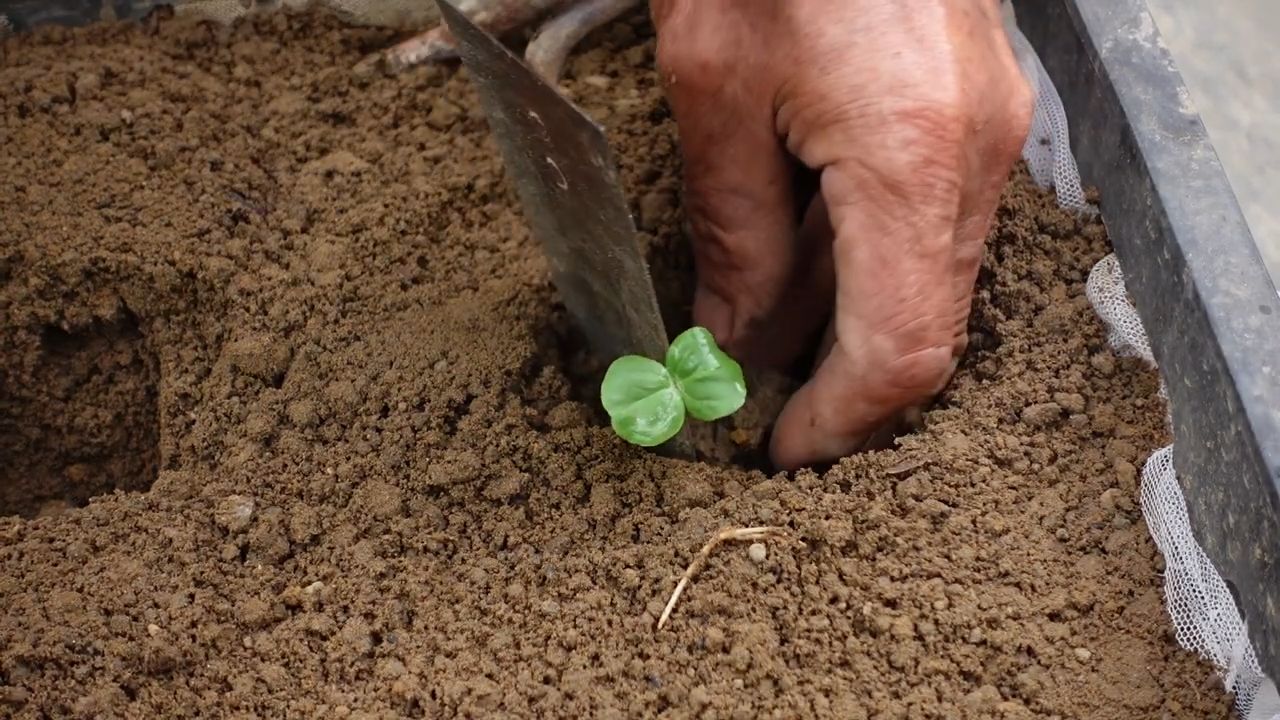
Transplanting Your Hibiscus
Whether you started from seed or cuttings, you’ll eventually need to transplant your hibiscus into larger pots or directly into the garden.
1. **Choosing a Location:** Hibiscus plants need plenty of sunlight – at least 6-8 hours per day. They also need well-draining soil. If you’re planting in the garden, choose a location that’s sheltered from strong winds.
2. **Preparing the Soil:** Amend the soil with compost or other organic matter to improve drainage and fertility. I like to add a generous amount of compost to my hibiscus beds.
3. **Transplanting:** Gently remove the hibiscus plant from its pot and plant it in the prepared soil. Space the plants about 2-3 feet apart.
4. **Watering:** Water the plants thoroughly after transplanting.
Caring for Your Hibiscus Plants
Once your hibiscus plants are established, here’s how to keep them happy and healthy:
* **Watering:** Water regularly, especially during hot, dry weather. Hibiscus plants prefer consistently moist soil, but avoid overwatering, as this can lead to root rot. I usually water deeply once or twice a week, depending on the weather.
* **Fertilizing:** Fertilize your hibiscus plants every 2-3 weeks with a balanced fertilizer. I like to use a fertilizer that’s specifically formulated for hibiscus plants.
* **Pruning:** Prune your hibiscus plants in the spring to encourage bushier growth and more flowers. You can also prune them to remove any dead or damaged branches.
* **Pest Control:** Keep an eye out for pests such as aphids, spider mites, and whiteflies. Treat infestations promptly with insecticidal soap or neem oil. I check my plants regularly for pests and address any problems as soon as I see them.
* **Overwintering:** In colder climates, you’ll need to overwinter your hibiscus plants indoors. Before the first frost, dig up the plants and pot them in containers. Cut them back by about one-third and bring them indoors to a cool, bright location. Water sparingly during the winter months.
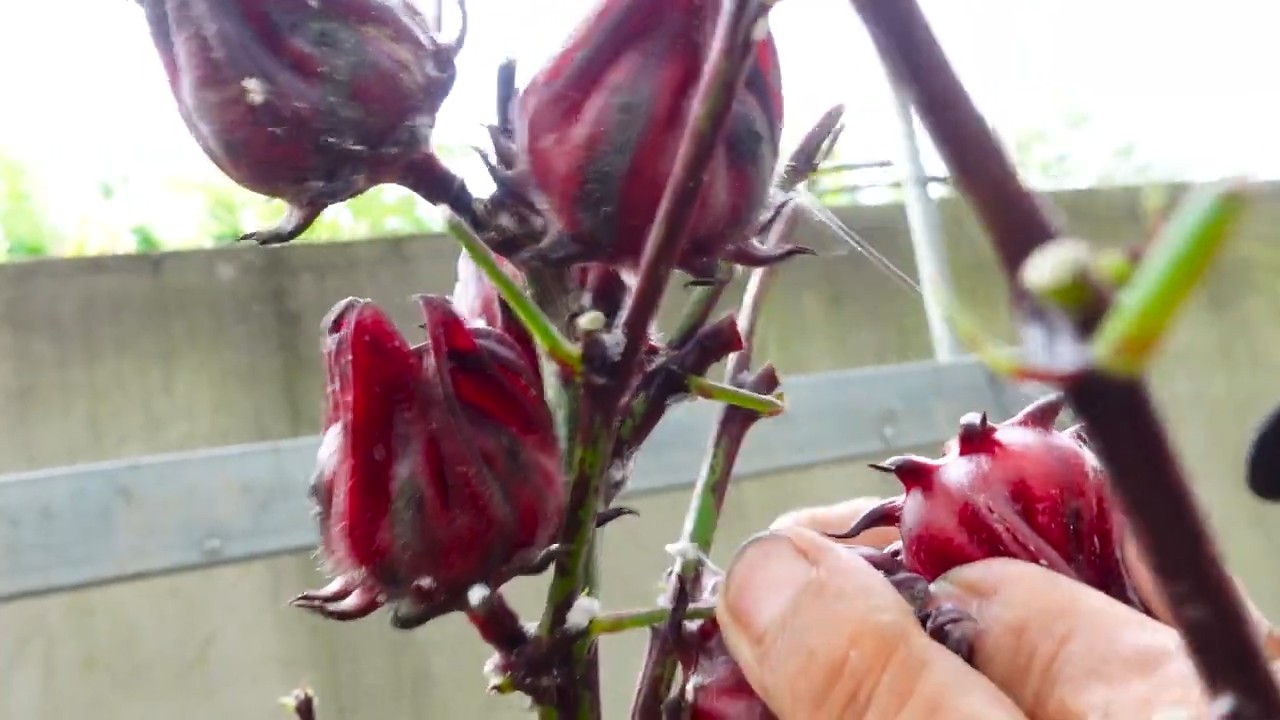
Harvesting Your Hibiscus Calyces
The moment you’ve been waiting for! Harvesting those beautiful, tangy calyces.
1. **Timing:** The calyces are ready to harvest when they are plump and fully colored. This usually occurs about 3-4 weeks after the flowers bloom.
2. **Harvesting:** Use sharp scissors or pruning shears to cut the calyces from the plant. Be careful not to damage the surrounding stems or leaves.
3. **Processing:** Once you’ve harvested the calyces, you can use them fresh or dry them for later use. To dry them, spread them out on a screen or dehydrator and dry them until they are brittle.
4. **Storage:** Store dried hibiscus calyces in an airtight container in a cool, dark place.
Using Your Edible
Conclusion
So, there you have it! Growing edible hibiscus is not only achievable, but it’s also a rewarding experience that brings a touch of the exotic to your garden and your plate. From the vibrant colors of the flowers to the tangy, cranberry-like flavor of the calyces, this plant offers a unique culinary adventure. We’ve walked you through the essential steps, from selecting the right variety and preparing the soil to nurturing your hibiscus and harvesting its bounty.
But why is this DIY trick a must-try? Because it empowers you to take control of your food source, connect with nature, and enjoy a truly unique and delicious ingredient that you won’t easily find in your local grocery store. Imagine the satisfaction of serving a hibiscus-infused tea made with flowers you grew yourself, or adding a vibrant splash of color and flavor to your salads with homegrown calyces. It’s a conversation starter, a culinary experiment, and a beautiful addition to any garden.
Don’t be afraid to experiment with variations! Try different hibiscus varieties to discover your favorite flavor profile. Some varieties are more tart, while others have a slightly sweeter taste. You can also explore different growing methods, such as container gardening or raised beds, to suit your space and climate. Consider companion planting with herbs like basil or mint to enhance the flavor and attract beneficial insects.
And the possibilities don’t stop there. Beyond tea and salads, edible hibiscus can be used in a wide range of culinary creations. Think hibiscus jam, hibiscus syrup for cocktails, hibiscus-infused vinegar, or even dried hibiscus powder for adding a tangy kick to your spice blends. The only limit is your imagination!
We wholeheartedly encourage you to embark on this exciting journey of growing edible hibiscus. It’s a relatively easy and incredibly rewarding project that will bring beauty, flavor, and a sense of accomplishment to your life. Don’t be intimidated by the prospect of growing something new. With a little patience and care, you’ll be harvesting your own delicious hibiscus in no time.
Once you’ve tried it, we’d love to hear about your experience! Share your tips, tricks, and favorite hibiscus recipes in the comments below. Let’s create a community of hibiscus enthusiasts and inspire others to discover the joys of growing their own food. What variety did you choose? What challenges did you face, and how did you overcome them? What are your favorite ways to use your homegrown hibiscus? Your insights and experiences will be invaluable to other aspiring hibiscus growers. So, get your hands dirty, embrace the challenge, and let’s grow some edible hibiscus together!
Frequently Asked Questions (FAQ)
What is the best time of year to plant edible hibiscus?
The best time to plant edible hibiscus depends on your climate. In warmer regions with mild winters, you can plant hibiscus in the spring or early summer after the last frost. This allows the plant to establish itself before the cooler months. In colder regions, it’s best to start hibiscus seeds indoors 6-8 weeks before the last expected frost and transplant them outdoors once the weather warms up and the risk of frost has passed. Aim for soil temperatures consistently above 60°F (15°C) for optimal growth.
How much sunlight does edible hibiscus need?
Edible hibiscus thrives in full sun, requiring at least 6-8 hours of direct sunlight per day. Adequate sunlight is crucial for healthy growth, abundant flowering, and the development of flavorful calyces. If you’re growing hibiscus indoors, place it near a sunny window or supplement with grow lights. Insufficient sunlight can lead to leggy growth, reduced flowering, and less flavorful calyces.
What type of soil is best for growing edible hibiscus?
Edible hibiscus prefers well-draining, slightly acidic soil with a pH between 6.0 and 6.5. Amend your soil with compost or other organic matter to improve drainage and fertility. Avoid heavy clay soils that retain too much water, as this can lead to root rot. If you’re growing hibiscus in containers, use a high-quality potting mix specifically formulated for flowering plants.
How often should I water my edible hibiscus?
Water your edible hibiscus regularly, especially during hot, dry weather. Keep the soil consistently moist but not waterlogged. Allow the top inch of soil to dry out between waterings. Overwatering can lead to root rot, while underwatering can stress the plant and reduce flowering. Adjust your watering schedule based on the weather conditions and the plant’s needs. During the growing season, you may need to water daily, while during cooler periods, you can reduce watering frequency.
How do I fertilize my edible hibiscus?
Fertilize your edible hibiscus regularly during the growing season with a balanced fertilizer formulated for flowering plants. Look for a fertilizer with a higher phosphorus content to promote flowering. Follow the instructions on the fertilizer package for application rates. Avoid over-fertilizing, as this can lead to excessive foliage growth at the expense of flowering. You can also supplement with organic fertilizers like compost tea or fish emulsion.
When and how do I harvest edible hibiscus?
The calyces of edible hibiscus are typically ready for harvest 2-3 weeks after the flowers bloom. The calyces should be plump, firm, and slightly reddish in color. To harvest, simply snip the calyces from the plant using pruning shears or scissors. Be careful not to damage the plant when harvesting. You can harvest the calyces as they ripen, or you can wait until all the flowers have bloomed and harvest them all at once.
Are there any pests or diseases that affect edible hibiscus?
Edible hibiscus can be susceptible to pests such as aphids, spider mites, and whiteflies. Regularly inspect your plants for signs of infestation and take action promptly to prevent the pests from spreading. You can control pests with insecticidal soap, neem oil, or by introducing beneficial insects like ladybugs. Hibiscus can also be affected by diseases such as root rot and fungal leaf spots. Prevent these diseases by providing good drainage, avoiding overwatering, and ensuring good air circulation.
Can I grow edible hibiscus in containers?
Yes, edible hibiscus can be successfully grown in containers. Choose a large container with drainage holes and use a high-quality potting mix. Ensure the container receives plenty of sunlight and water regularly. Container-grown hibiscus may require more frequent fertilization than plants grown in the ground. Consider using a slow-release fertilizer to provide a steady supply of nutrients.
How do I overwinter edible hibiscus?
In colder climates, edible hibiscus is typically grown as an annual. However, you can overwinter your hibiscus indoors by bringing it inside before the first frost. Prune the plant back to about 6-8 inches and place it in a cool, bright location. Water sparingly during the winter months, allowing the soil to dry out between waterings. In the spring, gradually acclimate the plant to outdoor conditions before transplanting it back into the garden.
Are all hibiscus varieties edible?
While many hibiscus varieties are technically edible, some are more palatable and flavorful than others. The *Hibiscus sabdariffa* variety, also known as Roselle, is the most commonly grown and consumed edible hibiscus. It’s important to research the specific variety you’re growing to ensure it’s safe and enjoyable to eat. Avoid consuming hibiscus plants that have been treated with pesticides or herbicides.
Leave a Comment