
Growing Grape Tomatoes can be incredibly rewarding, offering a burst of sweet, tangy flavor straight from your backyard! Imagine popping those little jewels into your mouth, still warm from the sun – pure bliss, right? But let’s be honest, sometimes getting those perfect, plump grape tomatoes feels more like a battle than a breeze. That’s where a few clever DIY tricks come in handy, and I’m here to share my secrets!
The history of tomatoes, including our beloved grape variety, is fascinating. Originating in South America, tomatoes were initially met with suspicion in Europe, even considered poisonous! Thankfully, their deliciousness eventually won out, and now they’re a staple in gardens and kitchens worldwide. The grape tomato, a relatively modern cultivar, offers a convenient and flavorful snacking option that’s become incredibly popular.
Why do you need these DIY hacks for growing grape tomatoes? Well, even though they’re generally considered easier to grow than larger varieties, grape tomatoes can still be susceptible to common gardening woes like pests, diseases, and nutrient deficiencies. Plus, maximizing your yield and ensuring those tomatoes are bursting with flavor requires a little extra know-how. I’ve learned these tricks through trial and error (and a lot of research!), and I’m excited to help you avoid the same pitfalls and enjoy a bountiful harvest of delicious grape tomatoes this season!
DIY: So ziehst du saftige Cherrytomaten selbst!
Ich liebe Cherrytomaten! Diese kleinen, süßen Dinger sind einfach perfekt zum Naschen, für Salate oder als Topping für Pizza. Und das Beste? Du kannst sie ganz einfach selbst anbauen! Ich zeige dir, wie du mit ein paar einfachen Schritten und etwas Geduld eine reiche Ernte an Cherrytomaten erzielen kannst. Keine Angst, es ist einfacher als du denkst!
Was du brauchst:
* Cherrytomaten-Samen (oder Jungpflanzen, wenn du es eilig hast)
* Anzuchterde (oder Blumenerde, wenn du Jungpflanzen verwendest)
* Kleine Anzuchttöpfe oder -schalen
* Größere Töpfe (mindestens 10 Liter Volumen pro Pflanze) oder ein sonniges Beet
* Tomatendünger
* Pflanzstäbe oder Rankgitter
* Gießkanne oder Gartenschlauch
* Geduld und Liebe!
Aussaat und Anzucht (wenn du mit Samen startest):
Wenn du mit Samen beginnst, musst du die kleinen Kerlchen erst einmal vorziehen. Das gibt ihnen einen Vorsprung, bevor sie ins Freie kommen.
1. Vorbereitung der Anzuchttöpfe: Fülle deine Anzuchttöpfe oder -schalen mit Anzuchterde. Drücke die Erde leicht an, aber nicht zu fest. Sie sollte locker und luftig sein.
2. Aussaat der Samen: Verteile die Cherrytomaten-Samen gleichmäßig auf der Erde. Bedecke sie dann mit einer dünnen Schicht Erde (ca. 0,5 cm).
3. Bewässerung: Befeuchte die Erde vorsichtig mit einer Sprühflasche oder einer Gießkanne mit feinem Brausekopf. Die Erde sollte feucht, aber nicht nass sein.
4. Der richtige Standort: Stelle die Anzuchttöpfe an einen warmen und hellen Ort. Ein Fensterbrett mit Südausrichtung ist ideal. Die optimale Keimtemperatur liegt bei 20-25°C.
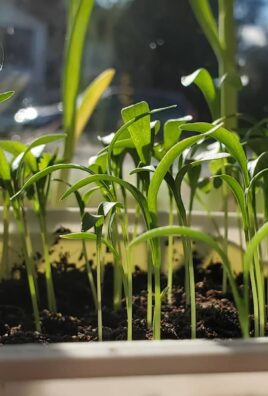
5. Geduld ist gefragt: Halte die Erde feucht und warte, bis die Samen keimen. Das kann je nach Sorte und Temperatur 7-14 Tage dauern.
6. Pikieren: Sobald die Sämlinge ihre ersten richtigen Blätter (neben den Keimblättern) entwickelt haben, ist es Zeit zum Pikieren. Das bedeutet, dass du die kleinen Pflänzchen in größere Töpfe umsetzt, damit sie mehr Platz zum Wachsen haben.
* Fülle größere Töpfe (ca. 8-10 cm Durchmesser) mit Blumenerde.
* Hebe die Sämlinge vorsichtig mit einem Pikierstab oder einem Löffel aus den Anzuchttöpfen. Achte darauf, die Wurzeln nicht zu beschädigen.
* Setze die Sämlinge in die neuen Töpfe und fülle sie mit Erde auf. Drücke die Erde leicht an.
* Gieße die Sämlinge vorsichtig an.
7. Weiterpflege: Stelle die pikierten Sämlinge wieder an einen hellen und warmen Ort. Gieße sie regelmäßig, aber vermeide Staunässe.
Auspflanzen ins Freie oder in größere Töpfe:
Sobald die Temperaturen steigen und keine Frostgefahr mehr besteht (meist Mitte Mai nach den Eisheiligen), kannst du deine Cherrytomaten ins Freie pflanzen.
1. Vorbereitung des Standorts: Wähle einen sonnigen Standort für deine Cherrytomaten. Sie brauchen mindestens 6 Stunden Sonne pro Tag. Der Boden sollte locker, humusreich und gut durchlässig sein. Wenn du sie in Töpfe pflanzt, verwende große Töpfe mit mindestens 10 Litern Volumen pro Pflanze.
2. Vorbereitung der Pflanzen: Bevor du die Pflanzen ins Freie pflanzt, solltest du sie abhärten. Das bedeutet, dass du sie einige Tage lang stundenweise ins Freie stellst, damit sie sich an die Sonne und den Wind gewöhnen können.
3. Pflanzen: Grabe Löcher, die etwas größer sind als die Wurzelballen der Pflanzen. Setze die Pflanzen in die Löcher und fülle sie mit Erde auf. Drücke die Erde leicht an. Achte darauf, dass der Abstand zwischen den Pflanzen ausreichend ist (ca. 50-60 cm), damit sie genügend Platz zum Wachsen haben.
4. Stütze geben: Cherrytomaten können ziemlich hoch werden und brauchen Unterstützung. Setze direkt beim Pflanzen einen Pflanzstab neben jede Pflanze oder verwende ein Rankgitter. Binde die Pflanzen regelmäßig an den Stäben oder dem Gitter fest, damit sie nicht umknicken.
5. Angießen: Gieße die Pflanzen nach dem Pflanzen gründlich an.
Pflege während der Wachstumsphase:
Jetzt beginnt die eigentliche Arbeit, aber keine Sorge, es ist nicht viel!
1. Gießen: Gieße deine Cherrytomaten regelmäßig, besonders bei trockenem Wetter. Vermeide es, die Blätter zu gießen, da dies Pilzkrankheiten fördern kann. Gieße am besten morgens, damit die Pflanzen tagsüber abtrocknen können.
2. Düngen: Cherrytomaten sind Starkzehrer und brauchen regelmäßig Dünger. Beginne etwa 2-3 Wochen nach dem Auspflanzen mit dem Düngen. Verwende einen speziellen Tomatendünger und befolge die Anweisungen auf der Packung. Ich dünge meine Tomaten alle 2 Wochen.
3. Ausgeizen: Cherrytomaten bilden sogenannte Geiztriebe. Das sind Seitentriebe, die in den Blattachseln wachsen. Diese Triebe nehmen der Pflanze unnötig Kraft und sollten regelmäßig ausgegeizt werden. Breche die Geiztriebe einfach mit den Fingern ab, solange sie noch klein sind.
4. Mulchen: Eine Mulchschicht aus Stroh oder Rasenschnitt hilft, die Feuchtigkeit im Boden zu halten und Unkraut zu unterdrücken.
5. Beobachten: Achte auf Schädlinge und Krankheiten. Blattläuse, Weiße Fliege und Krautfäule können Cherrytomaten befallen. Bei Bedarf kannst du biologische Schädlingsbekämpfungsmittel einsetzen.
Erntezeit:
Das ist der schönste Teil!
1. Reife erkennen: Cherrytomaten sind reif, wenn sie eine intensive Farbe haben (rot, gelb, orange, je nach Sorte) und sich leicht vom Stiel lösen lassen.
2. Ernten: Pflücke die reifen Cherrytomaten regelmäßig ab. Das fördert die Bildung neuer Früchte.
3. Genießen: Genieße deine selbstgezogenen Cherrytomaten! Sie schmecken am besten frisch vom Strauch.
Zusätzliche Tipps für eine reiche Ernte:
* Sortenwahl: Wähle Cherrytomaten-Sorten, die für dein Klima geeignet sind. Es gibt viele verschiedene Sorten mit unterschiedlichen Geschmacksrichtungen und Farben.
* Gute Belüftung: Sorge für eine gute Belüftung der Pflanzen, um Pilzkrankheiten vorzubeugen.
* Regelmäßiges Gießen: Achte auf eine gleichmäßige Bewässerung, besonders während der Fruchtbildung.
* Schutz vor Regen: Wenn möglich, schütze deine Cherrytomaten vor Regen, um die Gefahr von Pilzkrankheiten zu verringern. Ein Tomatenhaus oder ein überdachter Standort sind ideal.
* Bodenverbesserung: Verbessere den Boden vor dem Pflanzen mit Kompost oder anderem organischen Material.
* Freunde dich mit Nützlingen an: Marienkäfer und andere Nützlinge helfen, Schädlinge zu bekämpfen.
Ich hoffe, diese Anleitung hilft dir dabei, eine reiche Ernte an saftigen Cherrytomaten zu erzielen! Es ist wirklich ein lohnendes Hobby und es gibt nichts Besseres, als seine eigenen, frischen Tomaten zu genießen. Viel Spaß beim Gärtnern!

Conclusion
So, there you have it! Mastering the art of growing grape tomatoes doesn’t require a green thumb blessed by the gardening gods. It’s about understanding the plant’s needs, providing the right environment, and employing a few clever DIY tricks to maximize your yield. This method, focusing on consistent watering, strategic pruning, and homemade support systems, is a game-changer for anyone looking to enjoy a bountiful harvest of sweet, juicy grape tomatoes right from their own backyard.
Why is this DIY approach a must-try? Because it empowers you to take control of your tomato production. You’re not relying on expensive store-bought solutions or complicated techniques. You’re using readily available materials and simple methods to create a thriving tomato patch. This not only saves you money but also gives you a deeper connection to the food you’re growing. Imagine the satisfaction of serving a salad made entirely from ingredients you nurtured from seed to table!
But the beauty of this DIY journey lies in its adaptability. Feel free to experiment with variations to suit your specific needs and preferences. For instance, if you’re short on space, consider growing your grape tomatoes in containers on a balcony or patio. Just ensure the containers are large enough to accommodate the plant’s root system and provide adequate drainage. You can also explore different types of homemade fertilizers, using compost tea or diluted fish emulsion to boost growth and fruit production.
Another exciting variation is to try different varieties of grape tomatoes. While the classic red grape tomato is a crowd-pleaser, there are also yellow, orange, and even black varieties that offer unique flavors and textures. Experimenting with different varieties can add a splash of color and excitement to your garden and your plate.
Don’t be afraid to get creative with your support systems. While the DIY tomato cage we discussed is a great option, you can also use stakes, trellises, or even repurposed materials like old ladders or branches to provide support for your growing plants. The key is to ensure that the support system is strong enough to hold the weight of the mature plant and its abundant fruit.
Ultimately, the success of your grape tomato growing endeavor depends on your willingness to experiment, learn, and adapt. So, gather your supplies, roll up your sleeves, and get ready to embark on a rewarding gardening adventure. We are confident that with a little effort and these DIY tricks, you’ll be enjoying a delicious harvest of homegrown grape tomatoes in no time.
We wholeheartedly encourage you to try this DIY trick for growing grape tomatoes. It’s a simple, effective, and rewarding way to enjoy fresh, homegrown produce. And most importantly, we want to hear about your experience! Share your successes, your challenges, and your creative variations in the comments below. Let’s build a community of grape tomato enthusiasts and learn from each other’s experiences. Happy gardening!
Frequently Asked Questions (FAQ)
What is the best time to start growing grape tomatoes?
The ideal time to start growing grape tomatoes depends on your local climate. In general, you should start seeds indoors 6-8 weeks before the last expected frost. If you’re buying seedlings from a nursery, wait until after the last frost to transplant them outdoors. Soil temperature should be at least 60°F (15°C) for optimal growth. Starting too early can lead to leggy seedlings that are susceptible to disease, while starting too late may result in a shorter growing season and a smaller harvest. Consider using a soil thermometer to accurately gauge the soil temperature before planting.
How often should I water my grape tomato plants?
Consistent watering is crucial for healthy grape tomato growth. Water deeply and regularly, especially during hot, dry weather. Aim to water at the base of the plant to avoid wetting the foliage, which can increase the risk of fungal diseases. A good rule of thumb is to water when the top inch of soil feels dry to the touch. However, avoid overwatering, as this can lead to root rot. Mulching around the base of the plants can help retain moisture and reduce the need for frequent watering. During periods of heavy rain, you may need to reduce watering frequency to prevent waterlogging.
What kind of soil is best for growing grape tomatoes?
Grape tomatoes thrive in well-drained, fertile soil that is rich in organic matter. A slightly acidic soil pH of 6.0 to 6.8 is ideal. Before planting, amend the soil with compost, aged manure, or other organic materials to improve drainage and fertility. Avoid heavy clay soils, as they can become waterlogged and inhibit root growth. If you have clay soil, consider growing your grape tomatoes in raised beds or containers filled with a well-draining potting mix. A soil test can help you determine the pH and nutrient levels of your soil and guide you in making necessary amendments.
How much sunlight do grape tomato plants need?
Grape tomato plants require at least 6-8 hours of direct sunlight per day to produce a bountiful harvest. Choose a planting location that receives full sun throughout the day. If you live in a particularly hot climate, some afternoon shade may be beneficial to prevent the plants from overheating. Insufficient sunlight can lead to leggy growth, reduced fruit production, and increased susceptibility to diseases. Observe the sunlight patterns in your garden before planting to ensure that your grape tomato plants receive adequate sunlight.
How do I prune grape tomato plants?
Pruning is an important part of growing grape tomatoes, as it helps to improve air circulation, reduce disease risk, and encourage fruit production. Remove suckers, which are the small shoots that grow between the main stem and the branches. These suckers can drain energy from the plant and reduce fruit yield. Also, remove any yellowing or diseased leaves to prevent the spread of disease. Prune regularly throughout the growing season to maintain a healthy and productive plant. Use clean, sharp pruning shears to avoid damaging the plant.
What are some common pests and diseases that affect grape tomatoes?
Grape tomatoes are susceptible to a variety of pests and diseases, including aphids, whiteflies, tomato hornworms, early blight, and blossom end rot. Regularly inspect your plants for signs of pests or diseases. Use organic pest control methods, such as insecticidal soap or neem oil, to control pests. To prevent diseases, ensure good air circulation, avoid overhead watering, and remove any diseased leaves promptly. Blossom end rot is caused by a calcium deficiency and can be prevented by adding calcium to the soil or using a calcium-rich foliar spray.
How do I know when my grape tomatoes are ripe?
Grape tomatoes are typically ready to harvest when they are fully colored and slightly soft to the touch. The color will vary depending on the variety, but most grape tomatoes will turn red, yellow, or orange when ripe. Gently twist the tomato from the vine to harvest. Avoid pulling the tomato, as this can damage the plant. Ripe grape tomatoes can be stored at room temperature for a few days or in the refrigerator for up to a week.
Can I grow grape tomatoes in containers?
Yes, grape tomatoes can be successfully grown in containers, making them a great option for gardeners with limited space. Choose a large container that is at least 12 inches in diameter and has drainage holes. Use a well-draining potting mix and provide adequate support for the plant, such as a stake or trellis. Water regularly and fertilize every 2-3 weeks with a balanced fertilizer. Place the container in a location that receives at least 6-8 hours of direct sunlight per day.
How can I encourage more fruit production on my grape tomato plants?
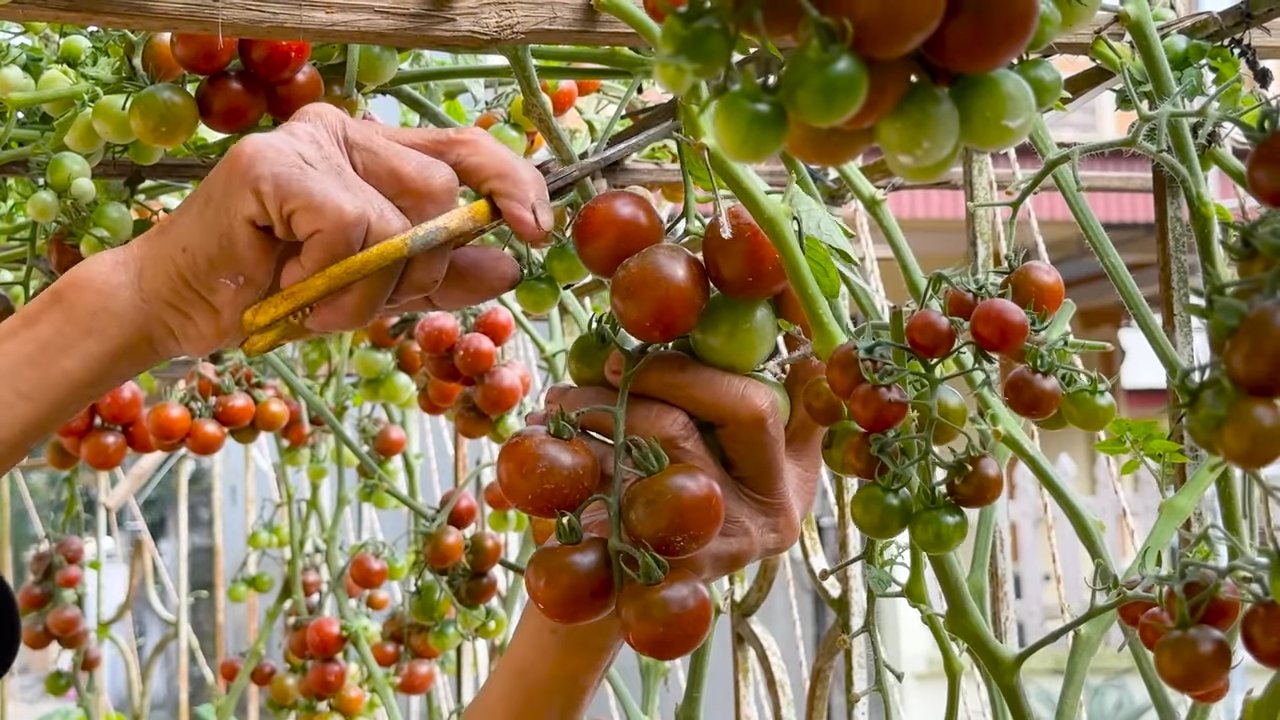
To encourage more fruit production on your grape tomato plants, ensure they are receiving adequate sunlight, water, and nutrients. Prune regularly to improve air circulation and reduce disease risk. Consider using a blossom set spray to improve fruit set, especially during hot weather. You can also try hand-pollinating the flowers by gently shaking the plant or using a small brush to transfer pollen from one flower to another. Avoid over-fertilizing with nitrogen, as this can promote leafy growth at the expense of fruit production.
What are some creative ways to use my homegrown grape tomatoes?
The possibilities are endless! Enjoy them fresh in salads, snacks, or as a topping for pizzas and sandwiches. Roast them with herbs and garlic for a delicious side dish. Make a simple tomato sauce or salsa. Pickle them for a tangy treat. Or, dry them in the sun or in a dehydrator for a concentrated burst of flavor. Get creative and experiment with different recipes to discover your favorite ways to enjoy your homegrown grape tomatoes.
Leave a Comment