
Growing Healthy Bean Plants doesn’t have to be a daunting task! Imagine plucking fresh, crisp beans straight from your own backyard, knowing you nurtured them from tiny seeds to a bountiful harvest. Sounds dreamy, right? Well, it’s totally achievable, even if you don’t have a sprawling garden. For centuries, beans have been a staple crop in cultures worldwide, providing essential nutrients and a delicious addition to countless dishes. From the ancient Incas who revered them to modern-day gardeners, beans have always held a special place in our hearts (and on our plates!).
But let’s be honest, sometimes those little bean sprouts can be a bit finicky. Yellowing leaves, stunted growth, and pesky pests can quickly turn your gardening dreams into a frustrating reality. That’s where these DIY tricks and hacks come in! I’m going to share some simple, yet effective, secrets to ensure you’re growing healthy bean plants that thrive. Whether you’re a seasoned gardener or just starting out, these tips will help you overcome common challenges and enjoy a truly rewarding harvest. Get ready to roll up your sleeves and transform your garden into a bean-growing paradise!
Bohnen selbst anbauen: Eine umfassende DIY-Anleitung für gesunde Pflanzen
Hallo liebe Gartenfreunde! Ich freue mich, euch heute in die Welt des Bohnenanbaus einzuführen. Bohnen sind nicht nur lecker und vielseitig in der Küche, sondern auch relativ einfach anzubauen, selbst wenn ihr noch keine grünen Daumen habt. In diesem Artikel zeige ich euch Schritt für Schritt, wie ihr gesunde und ertragreiche Bohnenpflanzen in eurem eigenen Garten oder sogar auf dem Balkon ziehen könnt. Los geht’s!
Die richtige Bohnensorte wählen
Bevor wir loslegen, ist es wichtig, die richtige Bohnensorte für eure Bedürfnisse und euren Standort auszuwählen. Es gibt zwei Haupttypen: Buschbohnen und Stangenbohnen.
* **Buschbohnen:** Diese wachsen kompakt und benötigen keine Rankhilfe. Sie sind ideal für kleinere Gärten oder den Anbau in Töpfen.
* **Stangenbohnen:** Diese klettern und benötigen eine Rankhilfe wie ein Spalier oder ein Tipi. Sie produzieren in der Regel über einen längeren Zeitraum mehr Ertrag als Buschbohnen.
Überlegt euch, wie viel Platz ihr habt und welche Art von Bohnen ihr am liebsten esst. Es gibt unzählige Sorten, von grünen Bohnen über Wachsbohnen bis hin zu Feuerbohnen. Informiert euch am besten im Gartencenter oder online über die verschiedenen Sorten und wählt die aus, die euch am meisten zusagen.
Vorbereitung des Bodens
Bohnen lieben einen lockeren, gut durchlässigen Boden, der reich an organischen Stoffen ist. Hier sind die Schritte zur Vorbereitung des Bodens:
1. **Boden lockern:** Lockert den Boden mit einer Grabegabel oder einem Spaten auf. Entfernt dabei Steine, Wurzeln und Unkraut.
2. **Kompost einarbeiten:** Mischt reichlich Kompost oder gut verrotteten Mist in den Boden ein. Das verbessert die Bodenstruktur und versorgt die Bohnen mit wichtigen Nährstoffen.
3. **Boden glätten:** Harkt den Boden glatt, um eine ebene Oberfläche für die Aussaat zu schaffen.
4. **pH-Wert prüfen:** Bohnen bevorzugen einen leicht sauren bis neutralen pH-Wert (zwischen 6,0 und 7,0). Testet den pH-Wert eures Bodens mit einem Bodentestkit und passt ihn gegebenenfalls an.
Aussaat der Bohnen
Der richtige Zeitpunkt für die Aussaat ist entscheidend für den Erfolg. Bohnen sind frostempfindlich und sollten erst nach den letzten Frösten ausgesät werden. In den meisten Regionen ist das Mitte Mai bis Anfang Juni.
1. **Aussaatzeitpunkt bestimmen:** Wartet, bis der Boden sich ausreichend erwärmt hat (mindestens 10°C).
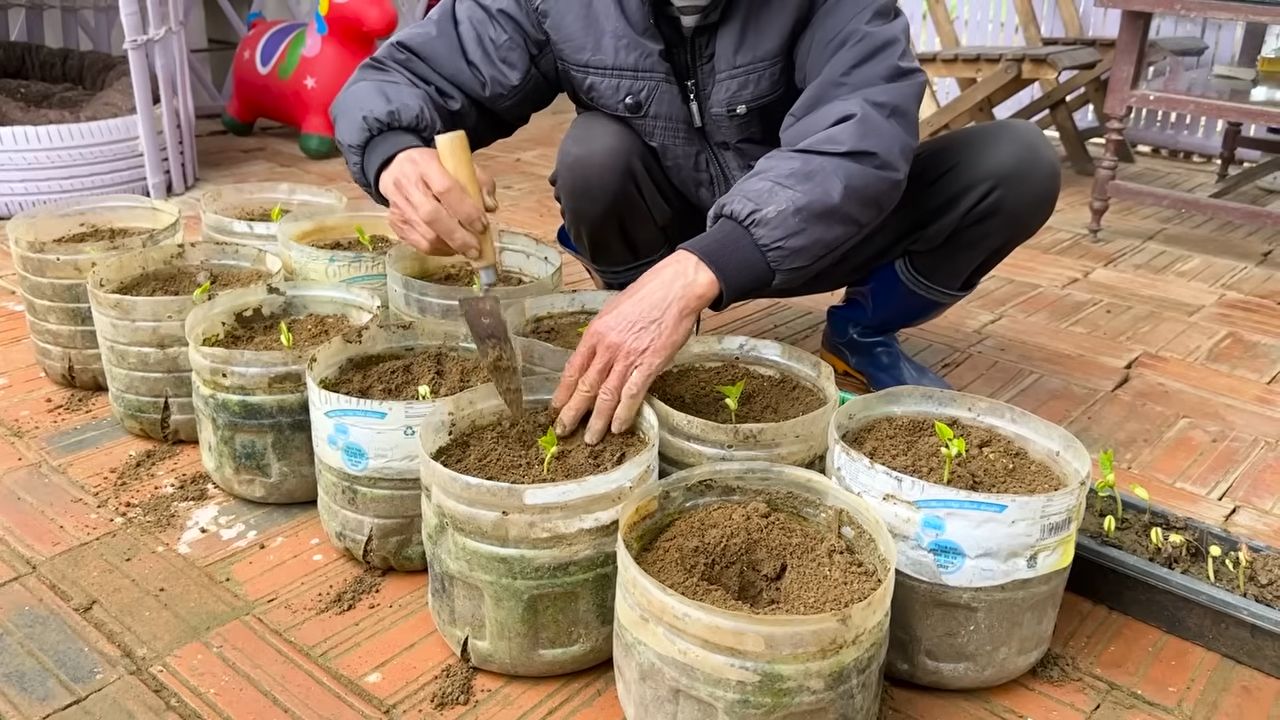
2. **Aussaatmethode wählen:** Ihr könnt Bohnen direkt ins Freiland säen oder sie in Töpfen vorziehen. Die Direktsaat ist einfacher, aber die Voranzucht kann den Erntezeitpunkt etwas vorverlegen.
3. **Direktsaat:**
* Zieht mit einer Hacke oder einem Stock Rillen in den Boden. Für Buschbohnen sollten die Rillen etwa 40 cm auseinander liegen, für Stangenbohnen etwa 60 cm.
* Legt die Bohnenkerne in einem Abstand von etwa 5-10 cm in die Rillen.
* Bedeckt die Kerne mit etwa 2-3 cm Erde und drückt die Erde leicht an.
* Gießt die Rillen vorsichtig an.
4. **Voranzucht:**
* Füllt kleine Töpfe mit Anzuchterde.
* Legt in jeden Topf 2-3 Bohnenkerne.
* Bedeckt die Kerne mit etwa 2 cm Erde und gießt sie an.
* Stellt die Töpfe an einen hellen, warmen Ort.
* Sobald die Keimlinge etwa 10 cm hoch sind, könnt ihr sie ins Freiland pflanzen.
Pflege der Bohnenpflanzen
Nach der Aussaat oder dem Auspflanzen ist die richtige Pflege entscheidend für gesunde und ertragreiche Bohnenpflanzen.
1. **Gießen:** Bohnen benötigen regelmäßig Wasser, besonders während der Blütezeit und der Hülsenbildung. Gießt am besten morgens, damit die Blätter über den Tag abtrocknen können und Pilzkrankheiten vermieden werden. Vermeidet Staunässe.
2. **Unkraut jäten:** Haltet den Boden um die Bohnenpflanzen unkrautfrei. Unkraut konkurriert mit den Bohnen um Nährstoffe und Wasser.
3. **Düngen:** Bohnen sind Stickstofffixierer, das heißt, sie können Stickstoff aus der Luft in den Boden bringen. Eine zusätzliche Düngung ist in der Regel nicht notwendig, wenn der Boden gut vorbereitet wurde. Wenn ihr jedoch feststellt, dass die Pflanzen schlecht wachsen, könnt ihr sie mit einem organischen Dünger wie Komposttee oder Beinwelljauche düngen.
4. **Rankhilfe für Stangenbohnen:** Stellt sicher, dass eure Stangenbohnen eine stabile Rankhilfe haben. Ihr könnt ein Spalier, ein Tipi oder einfach nur lange Stöcke verwenden. Helft den Pflanzen beim Klettern, indem ihr sie an der Rankhilfe befestigt.
5. **Schutz vor Schädlingen und Krankheiten:** Bohnen können von verschiedenen Schädlingen und Krankheiten befallen werden. Achtet auf Anzeichen wie Blattläuse, Bohnenfliegen oder Pilzkrankheiten. Bei Bedarf könnt ihr biologische Schädlingsbekämpfungsmittel oder Fungizide einsetzen.
Ernte der Bohnen
Der Zeitpunkt der Ernte hängt von der Bohnensorte und dem gewünschten Reifegrad ab.
1. **Erntezeitpunkt bestimmen:** Grüne Bohnen und Wachsbohnen werden geerntet, wenn die Hülsen prall und knackig sind, aber die Kerne noch nicht zu groß sind. Feuerbohnen werden geerntet, wenn die Hülsen voll ausgereift sind und die Kerne sich leicht aus den Hülsen lösen lassen.
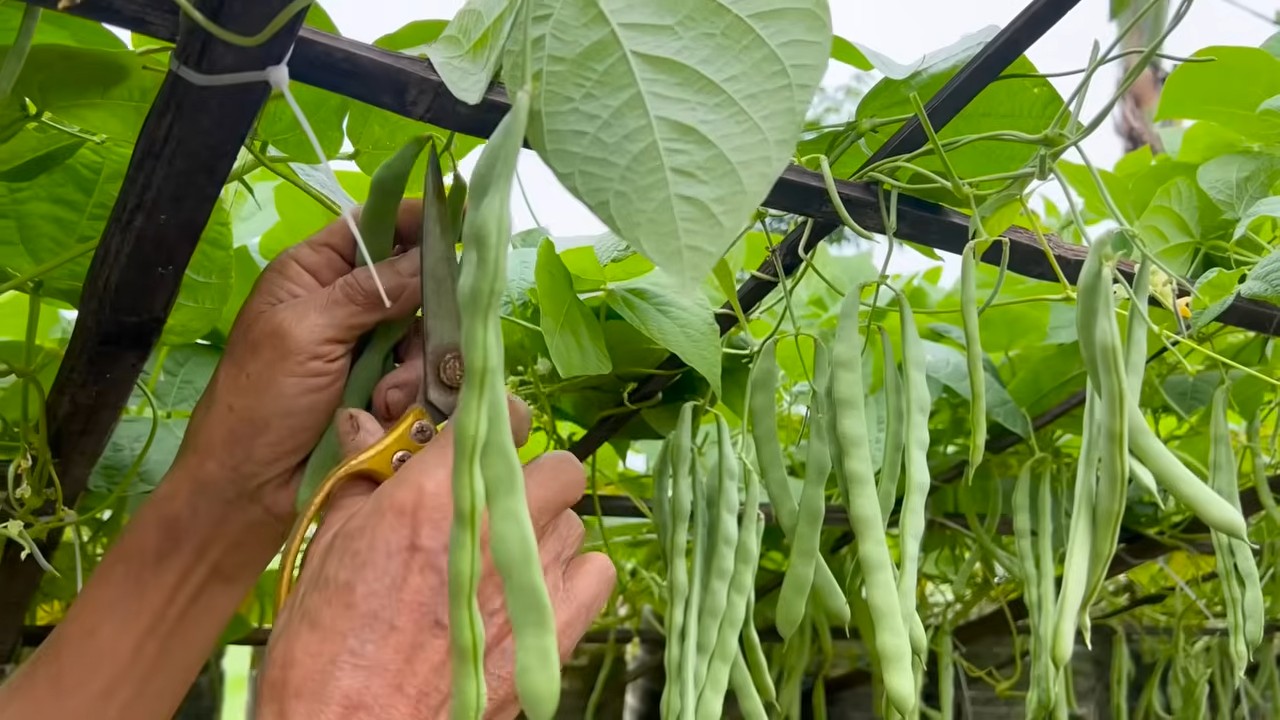
2. **Erntemethode:** Pflückt die Bohnen vorsichtig von den Pflanzen ab. Achtet darauf, die Pflanzen nicht zu beschädigen.
3. **Regelmäßige Ernte:** Erntet die Bohnen regelmäßig, um die Produktion neuer Hülsen anzuregen.
4. **Lagerung:** Frische Bohnen können im Kühlschrank einige Tage aufbewahrt werden. Ihr könnt sie auch einfrieren oder einlegen, um sie länger haltbar zu machen.
Häufige Probleme und Lösungen
Auch beim Bohnenanbau können Probleme auftreten. Hier sind einige häufige Probleme und wie ihr sie lösen könnt:
* **Schlechte Keimung:** Ursachen können zu kalter Boden, zu tiefe Aussaat oder schlechte Saatgutqualität sein. Achtet auf den richtigen Aussaatzeitpunkt, verwendet frisches Saatgut und sät die Bohnen nicht zu tief.
* **Blattläuse:** Blattläuse saugen Pflanzensaft und können die Pflanzen schwächen. Bekämpft sie mit einem Wasserstrahl, Schmierseife oder Nützlingen wie Marienkäfern.
* **Bohnenfliege:** Die Larven der Bohnenfliege fressen an den Wurzeln der Bohnenpflanzen. Schützt die Pflanzen mit einem Vlies oder verwendet Nematoden zur Bekämpfung der Larven.
* **Pilzkrankheiten:** Pilzkrankheiten wie Bohnenbrand oder Grauschimmel können die Blätter und Hülsen befallen. Sorgt für eine gute Belüftung der Pflanzen, vermeidet Staunässe und entfernt befallene Pflanzenteile.
Zusätzliche Tipps für den erfolgreichen Bohnenanbau
* **Fruchtfolge beachten:** Baut Bohnen nicht jedes Jahr am selben Standort an, um Krankheiten und Schädlingen vorzubeugen.
* **Mischkultur:** Bohnen profitieren von der Mischkultur mit anderen Pflanzen wie Karotten, Gurken oder Salat.
* **Bohnen als Gründüngung:** Nach der Ernte könnt ihr die Bohnenpflanzen als Gründüngung in den Boden einarbeiten. Sie reichern den Boden mit Stickstoff an und verbessern die Bodenstruktur.
* Bohnen vorziehen: Ich persönlich ziehe meine Bohnen gerne vor, da ich so einen kleinen Vorsprung habe und die Pflanzen robuster sind, wenn sie ins Freiland kommen.
* Regelmäßig kontrollieren: Nehmt euch regelmäßig Zeit, eure Bohnenpflanzen zu kontrollieren. So könnt ihr Probleme frühzeitig erkennen
Conclusion
So, there you have it! Mastering the art of growing healthy bean plants doesn’t require a green thumb blessed by the gardening gods. It’s about understanding their needs, providing the right environment, and employing a few simple, yet effective, DIY tricks. This method, focusing on [mention specific DIY trick from the article, e.g., “creating a DIY bean trellis from repurposed materials”], is a game-changer for several reasons.
First and foremost, it’s incredibly cost-effective. Instead of shelling out money for expensive store-bought supports or specialized fertilizers, you’re utilizing resources you likely already have on hand or can acquire cheaply. This makes gardening accessible to everyone, regardless of budget.
Secondly, it promotes sustainability. Repurposing materials not only saves you money but also reduces waste and minimizes your environmental impact. It’s a win-win situation for you and the planet.
Thirdly, and perhaps most importantly, this DIY approach fosters a deeper connection with your garden. You’re not just passively planting seeds; you’re actively involved in creating the optimal conditions for your bean plants to thrive. This hands-on experience is incredibly rewarding and allows you to learn more about the intricacies of plant growth.
But the beauty of this method lies in its adaptability. Feel free to experiment with different variations to suit your specific needs and preferences. For instance, if you’re short on space, consider growing bush beans in containers using a smaller, more compact DIY trellis. Or, if you’re looking to add a touch of visual appeal to your garden, try painting your DIY bean trellis with vibrant colors or decorating it with recycled materials.
Consider exploring different companion planting options. Marigolds, for example, are known to deter bean beetles, while nasturtiums can attract aphids away from your bean plants. Experiment with different combinations to see what works best for your garden.
Don’t be afraid to get creative with your DIY bean trellis design. Use bamboo poles, sturdy branches, or even old ladders to create unique and eye-catching structures. The possibilities are endless!
Remember, growing healthy bean plants is a journey, not a destination. There will be challenges along the way, but don’t let them discourage you. Embrace the learning process, and celebrate your successes, no matter how small.
We wholeheartedly encourage you to try this DIY trick for growing healthy bean plants. We are confident that you will be amazed by the results. Not only will you enjoy a bountiful harvest of delicious beans, but you’ll also gain a sense of accomplishment and satisfaction from creating something beautiful and sustainable with your own two hands.
And most importantly, we want to hear about your experience! Share your photos, tips, and stories with us in the comments section below. Let’s create a community of passionate gardeners who are dedicated to growing healthy bean plants using innovative and sustainable methods. Your insights could inspire others to embark on their own gardening adventures. So, get out there, get your hands dirty, and start growing! Happy gardening!
Frequently Asked Questions (FAQ)
What are the most common problems when growing bean plants, and how can this DIY trick help prevent them?
Many common bean plant problems, such as fungal diseases and pest infestations, are exacerbated by poor air circulation and overcrowding. This DIY trick, particularly if it involves creating a trellis or support structure, promotes better airflow around the plants, reducing the risk of fungal diseases like powdery mildew and bean rust. By keeping the foliage off the ground, it also minimizes contact with soil-borne pathogens. Furthermore, a well-supported plant is less susceptible to damage from wind or heavy rain, which can create entry points for pests and diseases. The DIY aspect allows you to customize the support to ensure adequate spacing between plants, further reducing the risk of overcrowding and disease spread.
How often should I water my bean plants, and does this DIY method affect watering frequency?
The watering frequency for bean plants depends on several factors, including the climate, soil type, and stage of growth. Generally, bean plants need consistent moisture, especially during flowering and pod development. Aim to water deeply whenever the top inch of soil feels dry to the touch. This DIY method, especially if it involves mulching around the base of the plants, can help retain moisture in the soil, reducing the need for frequent watering. Mulch acts as a barrier, preventing evaporation and keeping the soil cooler. However, it’s still important to monitor the soil moisture regularly and adjust your watering schedule accordingly. Overwatering can be just as detrimental as underwatering, leading to root rot and other problems.
What type of soil is best for growing bean plants, and can I improve my soil using DIY methods?
Bean plants thrive in well-draining soil that is rich in organic matter. A slightly acidic to neutral pH (around 6.0 to 7.0) is ideal. If your soil is heavy clay or sandy, you can improve its structure and fertility using DIY methods. Adding compost, well-rotted manure, or other organic amendments will improve drainage, aeration, and water retention. You can also create your own compost pile using kitchen scraps, yard waste, and other organic materials. This is a great way to recycle waste and create a nutrient-rich soil amendment for your bean plants. Soil testing kits are readily available and can help you determine the pH of your soil and identify any nutrient deficiencies. Based on the results, you can amend your soil accordingly to create the optimal growing environment for your bean plants.
What are some good companion plants for bean plants, and how can I incorporate them into my DIY garden setup?
Companion planting can be a beneficial strategy for growing healthy bean plants. Some good companion plants for beans include marigolds, nasturtiums, rosemary, and carrots. Marigolds deter bean beetles, while nasturtiums attract aphids away from bean plants. Rosemary repels bean flies, and carrots improve soil aeration. You can incorporate these companion plants into your DIY garden setup by planting them alongside your bean plants. For example, you could plant marigolds at the base of your bean trellis or interplant carrots between rows of bean plants. Consider the growth habits of each plant and ensure that they don’t compete for sunlight or nutrients. Companion planting can help create a more balanced and resilient garden ecosystem.
How do I harvest my bean plants, and what are some tips for maximizing my yield?
The timing of harvest depends on the type of bean you are growing. Snap beans are typically harvested when the pods are tender and plump, but before the beans inside become too large. Dry beans are harvested when the pods are dry and brittle. To maximize your yield, harvest your bean plants regularly. This encourages the plants to produce more pods. Avoid damaging the plants when harvesting by gently snapping or cutting the pods off the vine. Providing adequate support, watering regularly, and fertilizing properly will also help maximize your yield. Consider succession planting, where you plant new bean seeds every few weeks, to extend your harvest season.
Leave a Comment