
Growing healthy vegetables at home doesn’t have to be a daunting task! Imagine stepping into your backyard and harvesting fresh, vibrant tomatoes, crisp lettuce, and flavorful herbs, all nurtured by your own hands. Sounds idyllic, right? Well, it’s more achievable than you think! For centuries, people have cultivated their own food, from ancient Roman kitchen gardens to the victory gardens of wartime eras. This connection to the earth and the satisfaction of providing for oneself is deeply ingrained in our history.
But in today’s fast-paced world, many of us feel disconnected from our food sources. Supermarket produce, while convenient, often lacks the flavor and nutritional value of homegrown vegetables. That’s where this DIY guide comes in! I’m going to share some simple yet effective tricks and hacks that will empower you to start growing healthy vegetables at home, even if you have limited space or experience.
Whether you’re a seasoned gardener or a complete beginner, these tips will help you maximize your yield, minimize pests, and create a thriving vegetable garden that you can be proud of. Get ready to dig in and discover the joy of fresh, homegrown goodness!
DIY Home Vegetable Garden: From Seed to Supper!
Hey there, fellow garden enthusiasts! I’m so excited you’re thinking about growing your own veggies. Trust me, there’s nothing quite like the taste of a tomato you’ve nurtured from a tiny seed. It’s not as daunting as it might seem, and I’m here to guide you through every step. Let’s get our hands dirty!
Choosing Your Space and Veggies
Before we even think about seeds, let’s figure out where your garden will live and what you want to grow.
* Sunlight is Key: Most vegetables need at least 6-8 hours of direct sunlight per day. Observe your yard throughout the day to see where the sun shines the longest.
* Soil Matters: Good drainage is crucial. If your soil is heavy clay, you’ll need to amend it with compost and other organic matter.
* Consider Your Climate: Different vegetables thrive in different climates. Check your local hardiness zone to choose varieties that will flourish in your area.
* Start Small: Don’t overwhelm yourself! Begin with a few easy-to-grow vegetables like lettuce, tomatoes, zucchini, or herbs.
* Think About Space: Some vegetables, like pumpkins and watermelons, need a lot of room to spread out. Others, like carrots and radishes, can be grown in containers.
* Vertical Gardening: If you’re short on space, consider vertical gardening with trellises for climbing plants like cucumbers and beans.
Preparing Your Garden Bed
Okay, you’ve picked your spot and your veggies. Now it’s time to get the garden bed ready. This is a crucial step for healthy plants.
1. Clear the Area: Remove any grass, weeds, rocks, or debris from the area where you’ll be planting. A good, clean slate is essential.
2. Test Your Soil: A soil test will tell you the pH level and nutrient content of your soil. You can purchase a soil test kit at most garden centers or send a sample to your local agricultural extension office.
3. Amend the Soil: Based on your soil test results, amend the soil with compost, aged manure, or other organic matter. This will improve drainage, aeration, and nutrient content. I personally love using composted leaves – they’re a fantastic free resource!
4. Till or Dig: Loosen the soil to a depth of at least 12 inches. You can use a tiller for larger areas or a garden fork for smaller beds. This will make it easier for roots to grow.
5. Rake Smooth: Rake the soil smooth and level. This will create a nice, even surface for planting.
6. Consider Raised Beds: If your soil is particularly poor or you have drainage issues, consider building raised beds. They’re also great for accessibility.
Starting Seeds Indoors (Optional)
Starting seeds indoors gives you a head start on the growing season, especially for vegetables that need a long time to mature, like tomatoes and peppers.
1. Choose Your Seeds: Select high-quality seeds from a reputable source. Look for varieties that are well-suited to your climate.
2. Gather Your Supplies: You’ll need seed starting trays or pots, seed starting mix, a spray bottle, and a heat mat (optional).
3. Plant the Seeds: Follow the instructions on the seed packet for planting depth and spacing. Generally, you’ll want to plant seeds about twice as deep as they are wide.
4. Water Gently: Moisten the seed starting mix with a spray bottle. Avoid overwatering, which can lead to damping off (a fungal disease that kills seedlings).
5. Provide Warmth: Place the seed starting trays on a heat mat or in a warm location. Seeds need warmth to germinate.
6. Provide Light: Once the seeds have germinated, move the seedlings to a sunny window or under grow lights. They need at least 12-16 hours of light per day.
7. Thin the Seedlings: Once the seedlings have a few sets of true leaves, thin them out so that only the strongest seedlings remain.
8. Harden Off the Seedlings: Before transplanting the seedlings outdoors, you’ll need to harden them off. This means gradually exposing them to outdoor conditions over a period of 7-10 days. Start by placing them in a sheltered location for a few hours each day, gradually increasing the amount of time they spend outdoors.
Planting Your Vegetables
Whether you started seeds indoors or purchased seedlings from a nursery, it’s time to get those veggies in the ground!
1. Check the Weather: Make sure the weather is favorable before planting. Avoid planting on days that are too hot, cold, or windy.
2. Prepare the Planting Holes: Dig holes that are slightly larger than the root balls of the seedlings.
3. Remove the Seedlings from Their Containers: Gently remove the seedlings from their containers, being careful not to damage the roots.
4. Plant the Seedlings: Place the seedlings in the holes and backfill with soil. Gently firm the soil around the base of the plants.
5. Water Thoroughly: Water the seedlings thoroughly after planting. This will help them settle in and establish their roots.
6. Mulch: Apply a layer of mulch around the plants. Mulch helps to retain moisture, suppress weeds, and regulate soil temperature. I like using straw or shredded leaves.
7. Space Appropriately: Give each plant enough space to grow. Check the seed packet or plant tag for recommended spacing. Overcrowding can lead to disease and reduced yields.
Watering and Feeding Your Plants
Consistent watering and feeding are essential for healthy, productive plants.
1. Water Deeply and Infrequently: Water deeply and infrequently, rather than shallowly and frequently. This encourages roots to grow deeper into the soil.
2. Water at the Base of the Plants: Avoid watering the foliage, as this can lead to fungal diseases.
3. Use a Soaker Hose or Drip Irrigation: Soaker hoses and drip irrigation systems are a great way to water plants efficiently and effectively.
4. Fertilize Regularly: Fertilize your plants regularly with a balanced fertilizer. Follow the instructions on the fertilizer label. I prefer using organic fertilizers like compost tea or fish emulsion.
5. Side-Dress with Compost: Side-dressing with compost is a great way to provide plants with a slow-release source of nutrients. Simply sprinkle compost around the base of the plants and gently work it into the soil.
Dealing with Pests and Diseases
Unfortunately, pests and diseases are a part of gardening. But don’t worry, there are things you can do to prevent and control them.
1. Inspect Plants Regularly: Regularly inspect your plants for signs of pests or diseases. The sooner you catch a problem, the easier it will be to control.
2. Handpick Pests: Handpick pests like aphids, caterpillars, and slugs from your plants. This is a simple and effective way to control small infestations.
3. Use Insecticidal Soap or Neem Oil: Insecticidal soap and neem oil are effective organic pesticides that can be used to control a wide range of pests.
4. Promote Beneficial Insects: Attract beneficial insects like ladybugs, lacewings, and parasitic wasps to your garden. These insects will prey on pests and help to keep them under control. Plant flowers that attract beneficial insects, such as dill, fennel, and yarrow.
5. Practice Crop Rotation: Crop rotation is a technique that involves planting different crops in the same location each year. This helps to prevent the buildup of pests and diseases in the soil.
6. Choose Disease-Resistant Varieties: When selecting vegetable varieties, choose those that are resistant to common diseases in your area.
7. Ensure Good Air Circulation: Good air circulation helps to prevent fungal diseases. Space plants properly and prune them to improve air flow.
Harvesting Your Vegetables
This is the best part! Harvesting the fruits (and vegetables!) of your labor.
1. Harvest at the Right Time: Harvest your vegetables at the right time for optimal flavor and texture. Check the seed packet or plant tag for information on when to harvest.
2. Harvest Regularly: Harvest vegetables regularly to encourage continued production.
3. Use the Right Tools: Use the right tools for harvesting. For example, use scissors or pruning shears to harvest leafy greens and herbs.
4. Store Vegetables Properly: Store vegetables properly to prolong their shelf life. Some vegetables, like tomatoes and peppers, should be stored at room temperature. Others, like leafy greens and root vegetables, should be stored in the refrigerator.
Specific Vegetable Tips
Here are a few quick tips for some popular vegetables:
* Tomatoes: Provide support with stakes or cages. Pinch off suckers (the shoots that grow between the main stem and the branches)
Conclusion
So, there you have it! Mastering the art of **growing healthy vegetables at home** is not only achievable but also incredibly rewarding. We’ve explored practical tips and techniques that empower you to transform your backyard, balcony, or even a sunny windowsill into a thriving edible garden.
Why is this DIY approach a must-try? Because it puts you in complete control. You dictate the quality of the soil, the type of seeds, and the methods used to nurture your plants. This means you can avoid harmful pesticides and herbicides, ensuring that the vegetables you and your family consume are as pure and nutritious as possible. Beyond the health benefits, there’s an undeniable satisfaction that comes from harvesting your own food, knowing that you played an active role in bringing it from seed to table. It’s a connection to nature that’s often missing in our modern lives.
But the journey doesn’t end here. Consider these variations to further personalize your vegetable gardening experience:
* **Vertical Gardening:** If space is limited, explore vertical gardening techniques using trellises, hanging baskets, or stacked planters. This allows you to maximize your yield in a small area.
* **Companion Planting:** Experiment with companion planting, where you strategically pair different vegetables and herbs to benefit each other. For example, planting basil near tomatoes can deter pests and improve the tomato’s flavor.
* **Succession Planting:** Extend your harvest season by practicing succession planting. This involves planting new crops every few weeks, ensuring a continuous supply of fresh vegetables throughout the growing season.
* **Hydroponics or Aquaponics:** For the more adventurous gardener, consider exploring hydroponics (growing plants without soil) or aquaponics (combining aquaculture and hydroponics). These methods can be highly efficient and require less space than traditional gardening.
* Seed Saving: Save seeds from your best-performing plants to ensure a continuous supply of your favorite varieties and adapt them to your local climate.
Growing your own vegetables is a continuous learning process. Don’t be afraid to experiment, make mistakes, and learn from them. Each season will bring new challenges and opportunities for growth. The key is to start small, be patient, and enjoy the journey.
We wholeheartedly encourage you to embrace this DIY adventure and discover the joys of growing your own food. Imagine the taste of a sun-ripened tomato picked fresh from your garden, or the satisfaction of serving a salad made entirely from ingredients you grew yourself. It’s an experience that’s both fulfilling and empowering.
So, grab your gardening gloves, gather your seeds, and get ready to embark on a journey of growth and discovery. And most importantly, don’t forget to share your experiences with us! We’d love to hear about your successes, your challenges, and any tips or tricks you’ve learned along the way. Share your photos, stories, and questions in the comments below. Let’s create a community of passionate home gardeners who are dedicated to growing healthy vegetables and nourishing our bodies and souls. Happy gardening!
Frequently Asked Questions (FAQ)
What are the easiest vegetables to grow for beginners?
For beginners, some of the easiest vegetables to grow include lettuce, radishes, spinach, bush beans, zucchini, and cherry tomatoes. These vegetables are relatively low-maintenance and can tolerate some beginner mistakes. They also tend to mature quickly, providing a rewarding harvest in a short amount of time. Herbs like basil, mint, and chives are also excellent choices for beginners.
How much sunlight do vegetables need?
Most vegetables need at least 6-8 hours of direct sunlight per day to thrive. Leafy greens like lettuce and spinach can tolerate slightly less sunlight (around 4-6 hours), but fruiting vegetables like tomatoes, peppers, and cucumbers require full sun for optimal growth and fruit production. If you don’t have enough natural sunlight, you can supplement with grow lights.
What kind of soil is best for growing vegetables?
The best soil for growing vegetables is well-draining, nutrient-rich, and slightly acidic (pH between 6.0 and 7.0). You can improve your soil by adding compost, aged manure, or other organic matter. A soil test can help you determine the pH and nutrient levels of your soil and identify any amendments that are needed. Avoid using heavy clay soil, as it can become waterlogged and suffocate plant roots.
How often should I water my vegetables?
The frequency of watering depends on several factors, including the type of vegetable, the weather conditions, and the type of soil. As a general rule, water deeply and less frequently, rather than shallowly and more often. This encourages deep root growth, which makes plants more drought-tolerant. Check the soil moisture regularly by sticking your finger about an inch into the soil. If the soil feels dry, it’s time to water. Avoid overwatering, as this can lead to root rot.
How do I deal with pests and diseases in my vegetable garden?
The best way to deal with pests and diseases is to prevent them in the first place. This includes choosing disease-resistant varieties, practicing crop rotation, providing good air circulation, and keeping your garden clean and free of debris. If pests or diseases do appear, there are several organic control methods you can try, such as hand-picking pests, using insecticidal soap, or applying neem oil. Avoid using harsh chemical pesticides, as they can harm beneficial insects and contaminate your vegetables.
What are some common mistakes to avoid when growing vegetables?
Some common mistakes to avoid include:
* Planting vegetables too close together.
* Not providing enough sunlight.
* Overwatering or underwatering.
* Not amending the soil with organic matter.
* Ignoring pests and diseases.
* Not providing adequate support for vining vegetables.
* Harvesting vegetables too early or too late.
How do I know when my vegetables are ready to harvest?
The best way to know when your vegetables are ready to harvest is to consult a gardening guide or seed packet for specific information on each vegetable. Generally, vegetables are ready to harvest when they have reached their mature size and color. You can also check for signs of ripeness, such as a slight give when gently squeezed or a change in texture.
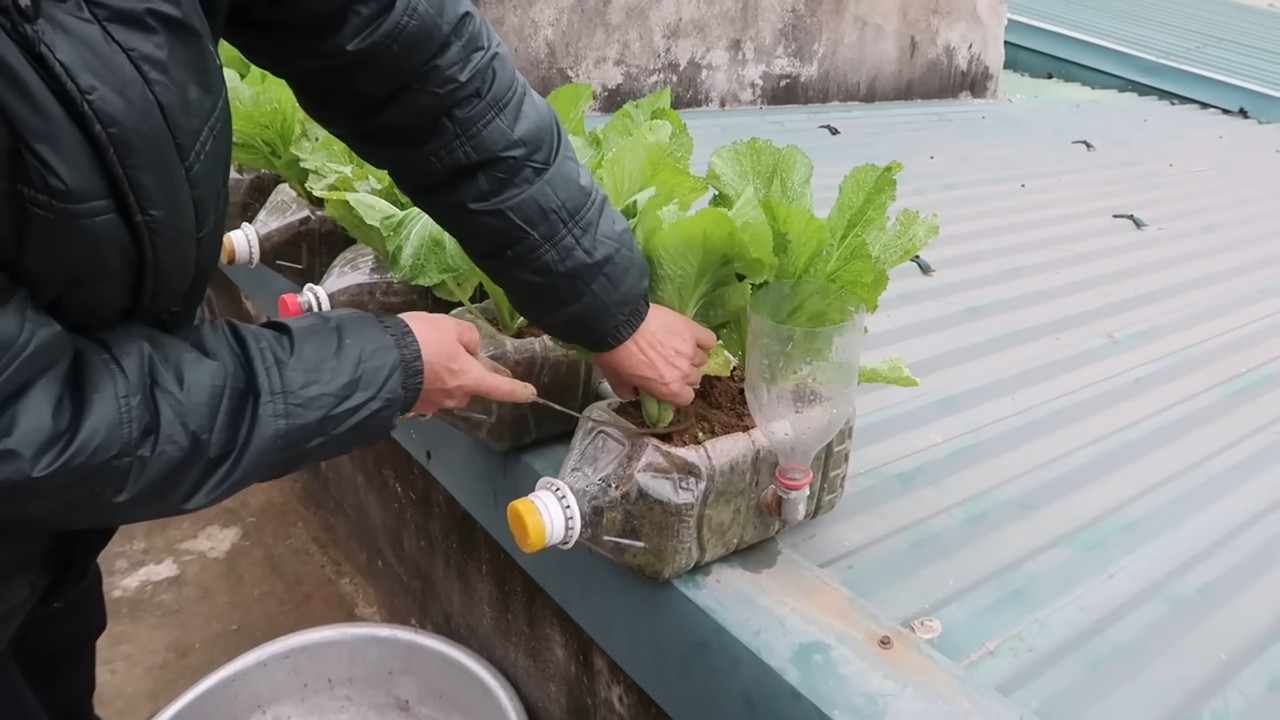
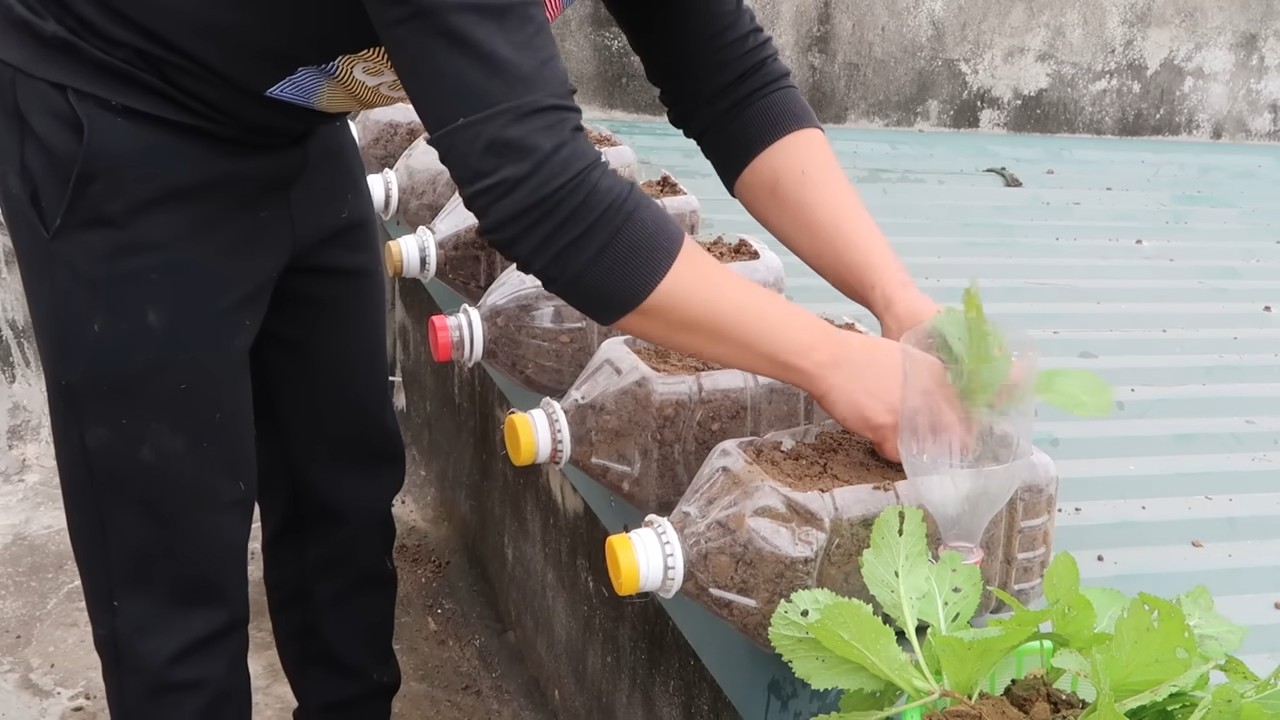
Can I grow vegetables in containers?
Yes, you can definitely grow vegetables in containers! Container gardening is a great option for people with limited space or poor soil. Choose containers that are large enough to accommodate the mature size of the vegetable you’re growing, and make sure they have drainage holes. Use a high-quality potting mix and water regularly.
What is companion planting and how does it work?
Companion planting is the practice of planting different vegetables and herbs together to benefit each other. Some plants can deter pests, attract beneficial insects, improve soil health, or enhance the flavor of neighboring plants. For example, planting basil near tomatoes can repel pests and improve the tomato’s flavor. Planting marigolds near vegetables can deter nematodes. Research companion planting combinations to find the best pairings for your garden.
How do I save seeds from my vegetables?
Saving seeds is a great way to preserve your favorite varieties and adapt them to your local climate. Choose healthy, disease-free plants to save seeds from. Allow the vegetables to fully mature on the plant before harvesting the seeds. Clean and dry the seeds thoroughly before storing them in a cool, dark, and dry place. Label the seeds with the variety name and date.
Leave a Comment