
Growing Peas Indoors? Absolutely! Forget waiting for spring and battling unpredictable weather. I’m going to show you how to enjoy fresh, sweet peas right from your windowsill, all year round. Imagine the satisfaction of snipping off tender pea shoots for your salad in the dead of winter – it’s easier than you think!
The history of pea cultivation stretches back thousands of years, with evidence suggesting they were enjoyed in the Near East as early as 7800 BC. While our ancestors likely didn’t have the luxury of indoor gardening, the desire for fresh produce, regardless of the season, is a timeless human pursuit. Today, with limited space and busy lives, many of us are turning to innovative solutions like indoor gardening to reconnect with nature and enjoy homegrown goodness.
Why should you learn this DIY trick? Well, for starters, growing peas indoors allows you to control the environment, minimizing pests and diseases that can plague outdoor crops. Plus, it’s a fantastic way to add a touch of green to your home and boost your mood. More importantly, you’ll have access to fresh, nutritious peas whenever you crave them, adding a vibrant and healthy element to your meals. So, let’s dive in and discover the secrets to a thriving indoor pea garden!
Growing Peas Indoors: A Complete DIY Guide
Okay, so you want to grow peas indoors? Awesome! I’m here to walk you through the whole process. It’s surprisingly easy and rewarding, especially when you get to munch on those sweet, fresh peas you grew yourself. Let’s get started!
Choosing the Right Pea Variety
First things first, not all pea varieties are created equal when it comes to indoor growing. We need to pick ones that are compact and don’t require a ton of space to vine out of control. Here are a few of my favorites:
* Dwarf Varieties: These are your best bet. Look for varieties like ‘Little Marvel,’ ‘Tom Thumb,’ or ‘Sugar Ann.’ They stay relatively small and manageable.
* Bush Varieties: These are also good options. They tend to be more compact than vining types. ‘Oregon Sugar Pod II’ is a popular choice.
* Avoid Tall Vining Varieties: Steer clear of varieties like ‘Telephone’ or ‘Alderman’ unless you have a massive indoor space and are prepared to provide a huge trellis. They’ll quickly take over!
Gathering Your Supplies
Before we get our hands dirty, let’s make sure we have everything we need. Here’s your shopping list:
* Pea Seeds: Obviously! Choose your preferred variety from the list above.
* Pots or Containers: I recommend pots that are at least 6 inches deep and wide. Peas need room for their roots to grow. You can use plastic pots, terracotta pots, or even repurposed containers like yogurt tubs (just make sure they have drainage holes!).
* Potting Mix: Use a good quality potting mix. Don’t use garden soil, as it can be too heavy and compact for container gardening. I like a mix that’s light and airy, with good drainage.
* Watering Can or Spray Bottle: For watering your peas.
* Grow Lights (Optional but Recommended): If you don’t have a sunny windowsill, grow lights are essential. Peas need plenty of light to thrive.
* Trellis or Support (Optional): While dwarf and bush varieties don’t need a huge trellis, they might appreciate a little support. You can use small stakes, bamboo skewers, or even twigs from your yard.
* Seed Starting Tray (Optional): If you prefer to start your seeds indoors before transplanting them to larger pots.
Planting Your Pea Seeds
Now for the fun part! Let’s get those pea seeds in the ground (or, well, in the pot!).
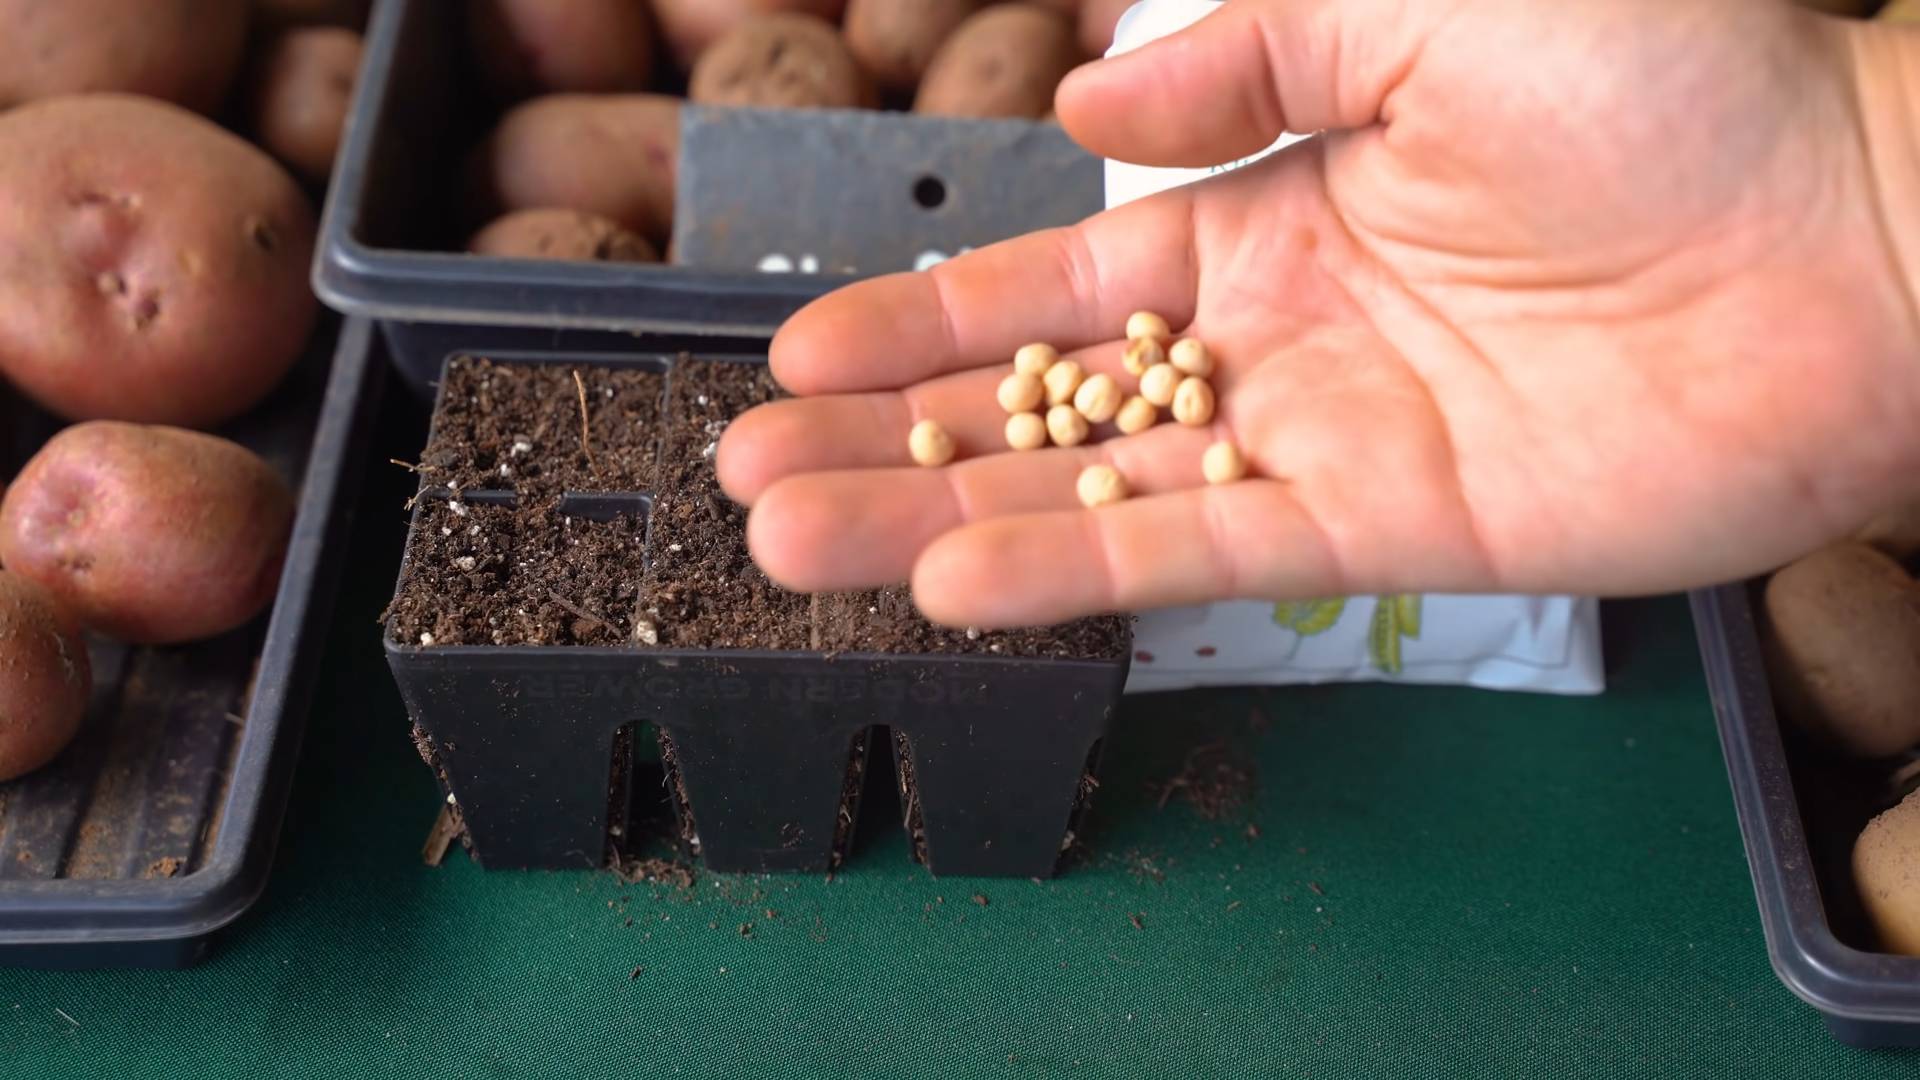
1. Soak the Seeds (Optional): Some people like to soak their pea seeds in water for 12-24 hours before planting. This can help speed up germination. I usually do this, but it’s not strictly necessary.
2. Fill Your Pots with Potting Mix: Fill your pots with potting mix, leaving about an inch of space at the top.
3. Plant the Seeds: Make small holes about an inch deep and 2-3 inches apart. Place one or two pea seeds in each hole. I usually plant two, just in case one doesn’t germinate.
4. Cover the Seeds: Gently cover the seeds with potting mix.
5. Water Thoroughly: Water the pots thoroughly until the water drains out of the bottom.
6. Label Your Pots: Don’t forget to label your pots with the variety of pea you planted and the date. This will help you keep track of things.
Providing the Right Environment
Peas need the right environment to thrive indoors. Here’s what you need to keep in mind:
* Light: Peas need at least 6-8 hours of sunlight per day. If you don’t have a sunny windowsill, use grow lights. Place the lights a few inches above the plants.
* Temperature: Peas prefer cooler temperatures, ideally between 60-70°F (15-21°C). Avoid placing them near heat sources like radiators.
* Watering: Keep the soil consistently moist, but not soggy. Water when the top inch of soil feels dry to the touch. Overwatering can lead to root rot.
* Air Circulation: Good air circulation is important to prevent fungal diseases. Make sure your plants have enough space around them. You can also use a small fan to improve air circulation.
Caring for Your Pea Plants
Once your pea plants have sprouted, it’s time to start caring for them.
1. Thinning (If Necessary): If you planted two seeds per hole and both germinated, you’ll need to thin them out. Choose the strongest seedling and snip off the weaker one at the base.
2. Providing Support (If Needed): If you’re growing a bush or dwarf variety, you might want to provide some support. Insert small stakes or bamboo skewers into the pot and tie the pea plants to them with twine.
3. Fertilizing: Peas don’t need a lot of fertilizer, but you can give them a light feeding every few weeks with a balanced liquid fertilizer. Follow the instructions on the fertilizer label. I usually use a diluted fish emulsion.
4. Pest Control: Keep an eye out for pests like aphids and spider mites. If you see any, you can spray them with insecticidal soap or neem oil.
5. Watering: Continue to water your pea plants regularly, keeping the soil consistently moist.
Harvesting Your Peas
The best part! Harvesting your peas is so rewarding.
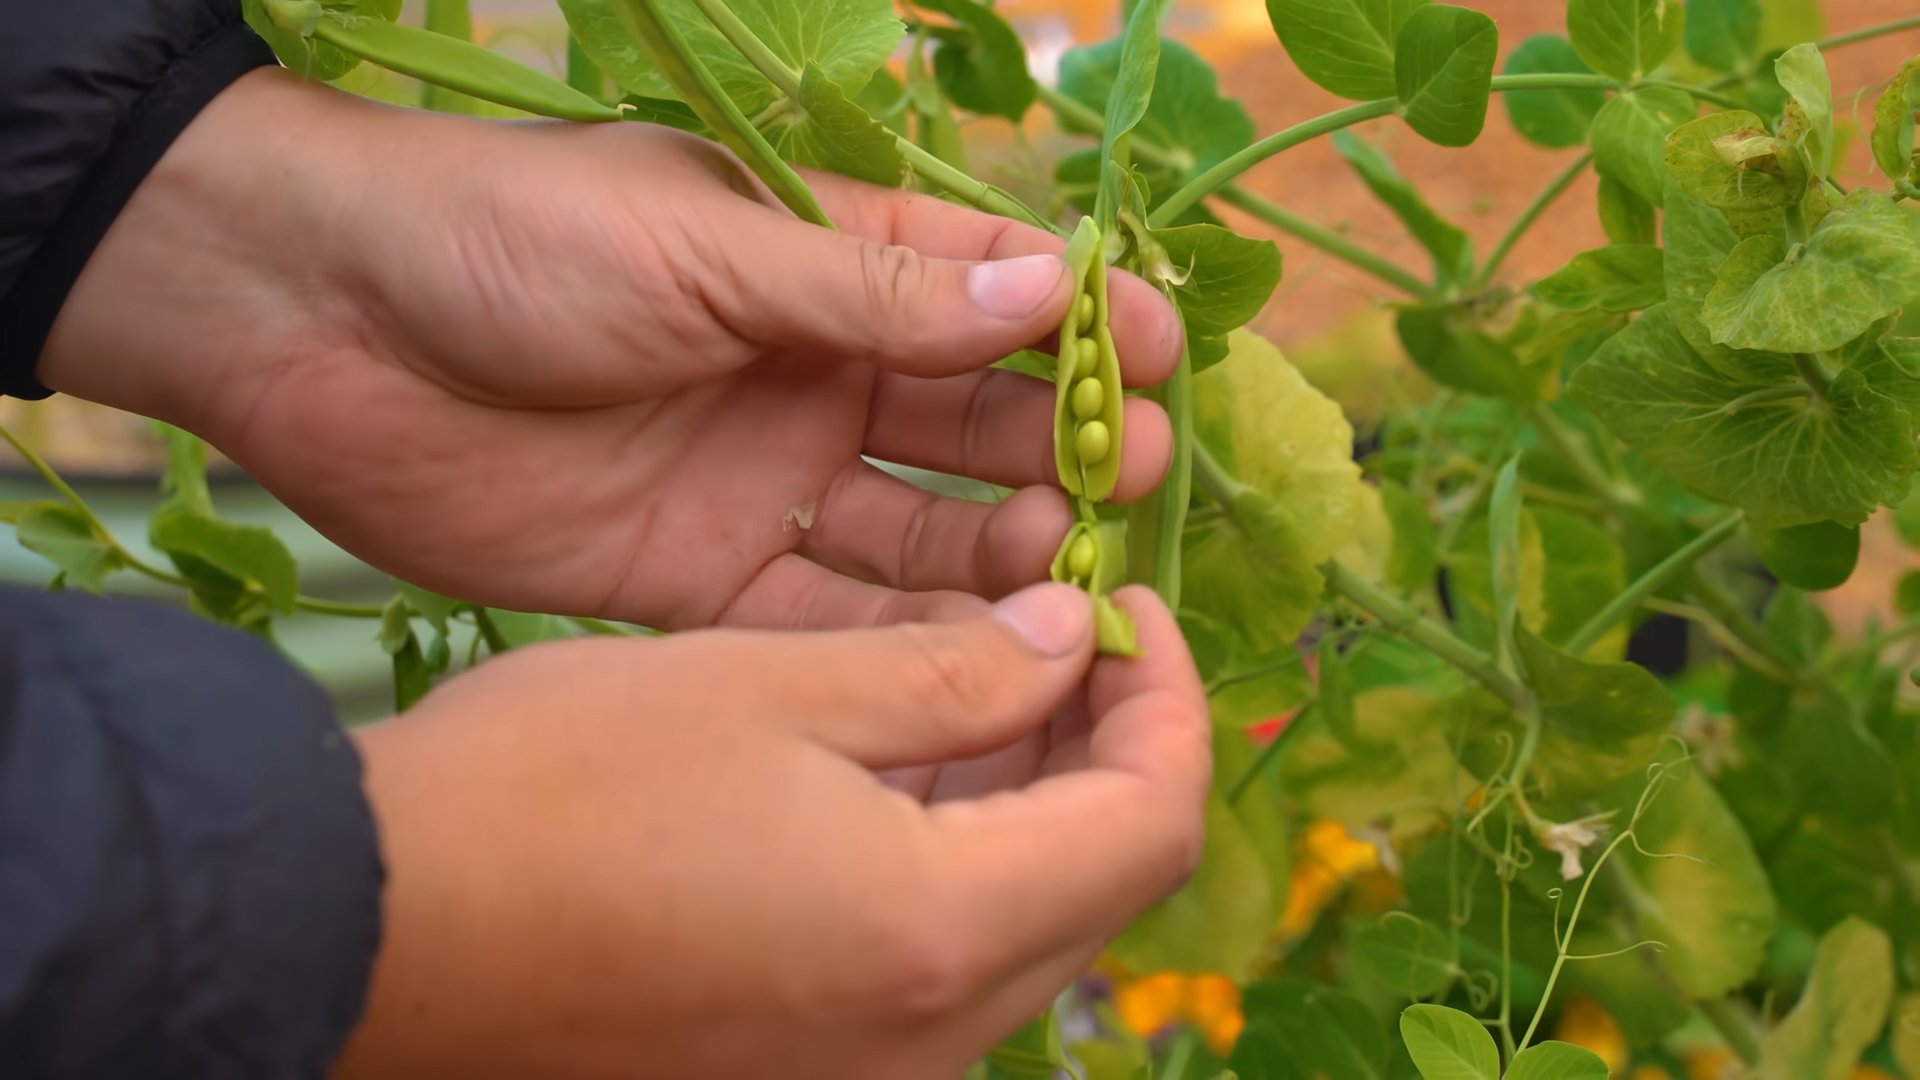
1. When to Harvest: The timing of the harvest depends on the variety of pea you’re growing. Generally, you can start harvesting when the pods are plump and filled with peas. For snap peas, harvest when the pods are still tender and crisp. For shelling peas, harvest when the pods are full and the peas are well-developed.
2. How to Harvest: Gently snap the pea pods off the plant. Be careful not to damage the plant.
3. Enjoy Your Harvest: Eat your peas fresh, or store them in the refrigerator for a few days. You can also freeze them for longer storage.
Troubleshooting Common Problems
Even with the best care, you might encounter some problems when growing peas indoors. Here are a few common issues and how to fix them:
* Poor Germination: If your pea seeds aren’t germinating, make sure the soil is warm enough and that you’re not overwatering. You can also try soaking the seeds before planting.
* Leggy Plants: If your pea plants are tall and spindly, they’re probably not getting enough light. Move them to a sunnier location or use grow lights.
* Yellowing Leaves: Yellowing leaves can be a sign of overwatering, underwatering, or nutrient deficiency. Check the soil moisture and adjust your watering accordingly. You can also try fertilizing your plants.
* Pests: Keep an eye out for pests like aphids and spider mites. Spray them with insecticidal soap or neem oil.
* Powdery Mildew: Powdery mildew is a fungal disease that can affect pea plants. It looks like a white powder on the leaves. Improve air circulation and spray the plants with a fungicide.
Extending Your Pea Harvest
Want to keep those fresh peas coming? Here are a few tips for extending your harvest:
* Succession Planting: Plant new pea seeds every few weeks to ensure a continuous harvest.
* Choose Early and Late Varieties: Plant a combination of early and late-maturing varieties to extend the harvest season.
* Provide Adequate Support: Make sure your pea plants have adequate support to maximize their growth and yield.
* Harvest Regularly: Harvest your
Okay, so you want to grow peas indoors? Awesome! I’m here to walk you through the whole process. It’s surprisingly easy and rewarding, especially when you get to munch on those sweet, fresh peas you grew yourself. Let’s get started!
Choosing the Right Pea Variety
First things first, not all pea varieties are created equal when it comes to indoor growing. We need to pick ones that are compact and don’t require a ton of space to vine out of control. Here are a few of my favorites:
* Dwarf Varieties: These are your best bet. Look for varieties like ‘Little Marvel,’ ‘Tom Thumb,’ or ‘Sugar Ann.’ They stay relatively small and manageable.
* Bush Varieties: These are also good options. They tend to be more compact than vining types. ‘Oregon Sugar Pod II’ is a popular choice.
* Avoid Tall Vining Varieties: Steer clear of varieties like ‘Telephone’ or ‘Alderman’ unless you have a massive indoor space and are prepared to provide a huge trellis. They’ll quickly take over!
Gathering Your Supplies
Before we get our hands dirty, let’s make sure we have everything we need. Here’s your shopping list:
* Pea Seeds: Obviously! Choose your preferred variety from the list above.
* Pots or Containers: I recommend pots that are at least 6 inches deep and wide. Peas need room for their roots to grow. You can use plastic pots, terracotta pots, or even repurposed containers like yogurt tubs (just make sure they have drainage holes!).
* Potting Mix: Use a good quality potting mix. Don’t use garden soil, as it can be too heavy and compact for container gardening. I like a mix that’s light and airy, with good drainage.
* Watering Can or Spray Bottle: For watering your peas.
* Grow Lights (Optional but Recommended): If you don’t have a sunny windowsill, grow lights are essential. Peas need plenty of light to thrive.
* Trellis or Support (Optional): While dwarf and bush varieties don’t need a huge trellis, they might appreciate a little support. You can use small stakes, bamboo skewers, or even twigs from your yard.
* Seed Starting Tray (Optional): If you prefer to start your seeds indoors before transplanting them to larger pots.
Planting Your Pea Seeds
Now for the fun part! Let’s get those pea seeds in the ground (or, well, in the pot!).
1. Soak the Seeds (Optional): Some people like to soak their pea seeds in water for 12-24 hours before planting. This can help speed up germination. I usually do this, but it’s not strictly necessary.
2. Fill Your Pots with Potting Mix: Fill your pots with potting mix, leaving about an inch of space at the top.
3. Plant the Seeds: Make small holes about an inch deep and 2-3 inches apart. Place one or two pea seeds in each hole. I usually plant two, just in case one doesn’t germinate.
4. Cover the Seeds: Gently cover the seeds with potting mix.
5. Water Thoroughly: Water the pots thoroughly until the water drains out of the bottom.
6. Label Your Pots: Don’t forget to label your pots with the variety of pea you planted and the date. This will help you keep track of things.
Providing the Right Environment
Peas need the right environment to thrive indoors. Here’s what you need to keep in mind:
* Light: Peas need at least 6-8 hours of sunlight per day. If you don’t have a sunny windowsill, use grow lights. Place the lights a few inches above the plants.
* Temperature: Peas prefer cooler temperatures, ideally between 60-70°F (15-21°C). Avoid placing them near heat sources like radiators.
* Watering: Keep the soil consistently moist, but not soggy. Water when the top inch of soil feels dry to the touch. Overwatering can lead to root rot.
* Air Circulation: Good air circulation is important to prevent fungal diseases. Make sure your plants have enough space around them. You can also use a small fan to improve air circulation.
Caring for Your Pea Plants
Once your pea plants have sprouted, it’s time to start caring for them.
1. Thinning (If Necessary): If you planted two seeds per hole and both germinated, you’ll need to thin them out. Choose the strongest seedling and snip off the weaker one at the base.
2. Providing Support (If Needed): If you’re growing a bush or dwarf variety, you might want to provide some support. Insert small stakes or bamboo skewers into the pot and tie the pea plants to them with twine.
3. Fertilizing: Peas don’t need a lot of fertilizer, but you can give them a light feeding every few weeks with a balanced liquid fertilizer. Follow the instructions on the fertilizer label. I usually use a diluted fish emulsion.
4. Pest Control: Keep an eye out for pests like aphids and spider mites. If you see any, you can spray them with insecticidal soap or neem oil.
5. Watering: Continue to water your pea plants regularly, keeping the soil consistently moist.
Harvesting Your Peas
The best part! Harvesting your peas is so rewarding.
1. When to Harvest: The timing of the harvest depends on the variety of pea you’re growing. Generally, you can start harvesting when the pods are plump and filled with peas. For snap peas, harvest when the pods are still tender and crisp. For shelling peas, harvest when the pods are full and the peas are well-developed.
2. How to Harvest: Gently snap the pea pods off the plant. Be careful not to damage the plant.
3. Enjoy Your Harvest: Eat your peas fresh, or store them in the refrigerator for a few days. You can also freeze them for longer storage.
Troubleshooting Common Problems
Even with the best care, you might encounter some problems when growing peas indoors. Here are a few common issues and how to fix them:
* Poor Germination: If your pea seeds aren’t germinating, make sure the soil is warm enough and that you’re not overwatering. You can also try soaking the seeds before planting.
* Leggy Plants: If your pea plants are tall and spindly, they’re probably not getting enough light. Move them to a sunnier location or use grow lights.
* Yellowing Leaves: Yellowing leaves can be a sign of overwatering, underwatering, or nutrient deficiency. Check the soil moisture and adjust your watering accordingly. You can also try fertilizing your plants.
* Pests: Keep an eye out for pests like aphids and spider mites. Spray them with insecticidal soap or neem oil.
* Powdery Mildew: Powdery mildew is a fungal disease that can affect pea plants. It looks like a white powder on the leaves. Improve air circulation and spray the plants with a fungicide.
Extending Your Pea Harvest
Want to keep those fresh peas coming? Here are a few tips for extending your harvest:
* Succession Planting: Plant new pea seeds every few weeks to ensure a continuous harvest.
* Choose Early and Late Varieties: Plant a combination of early and late-maturing varieties to extend the harvest season.
* Provide Adequate Support: Make sure your pea plants have adequate support to maximize their growth and yield.
* Harvest Regularly: Harvest your peas regularly to encourage the plants to produce more pods.
Additional Tips for Success
Here are a few extra tips to help you succeed with growing peas indoors:
* Use a Self-Watering Pot: Self-watering pots can help prevent overwatering and underwatering.
* Rotate Your Plants: Rotate your plants regularly to ensure they get even light exposure.
* Keep the Area Clean: Keep the area around your plants clean to prevent pests and diseases.
* Have Fun! Growing peas indoors should be an enjoyable experience. Don’t be afraid to experiment and learn from your mistakes.
Growing peas indoors is a fun and rewarding project. With a little bit of care and attention, you can enjoy fresh, homegrown peas all year round. Good luck, and happy gardening!
Conclusion
So, there you have it! Growing peas indoors is not only achievable, but it’s also a remarkably rewarding experience. Forget the limitations of seasonal weather and embrace the joy of harvesting fresh, sweet peas right from your own home. This DIY trick transforms any sunny windowsill or well-lit corner into a miniature edible garden, offering a continuous supply of these delightful legumes.
Why is this a must-try? Because it brings the freshness of the garden directly to your table, regardless of the season. Imagine adding vibrant, homegrown pea shoots to your salads, stir-fries, or even as a garnish for your favorite dishes. The taste difference is undeniable – a burst of sweetness and crispness that store-bought peas simply can’t match. Beyond the culinary benefits, growing peas indoors is a fantastic way to connect with nature, even in the heart of the city. It’s a therapeutic activity that can reduce stress and bring a sense of accomplishment as you watch your tiny seeds sprout and flourish.
But the fun doesn’t stop there! Feel free to experiment with different varieties of peas. Consider trying dwarf or bush varieties, which are particularly well-suited for indoor growing due to their compact size. You could also explore different types of supports for your pea plants. While bamboo stakes work perfectly well, you might want to get creative with trellises made from repurposed materials like twigs or even old coat hangers.
Another variation to consider is succession planting. By planting new seeds every few weeks, you can ensure a continuous harvest of fresh peas throughout the growing season. This is especially useful if you’re a big fan of peas and want to have a steady supply on hand.
And don’t forget about the pea shoots! These tender greens are incredibly nutritious and delicious. You can harvest them regularly as your plants grow, adding them to salads, sandwiches, or even juicing them for a healthy boost.
Ultimately, the success of growing peas indoors hinges on providing the right conditions: ample sunlight, well-draining soil, and consistent watering. But with a little care and attention, you’ll be amazed at how easy it is to cultivate these delightful legumes in your own home.
We wholeheartedly encourage you to give this DIY trick a try. It’s a simple, affordable, and incredibly satisfying way to enjoy fresh, homegrown peas year-round. And most importantly, we want to hear about your experience! Share your photos, tips, and challenges in the comments below. Let’s create a community of indoor pea growers and learn from each other. What varieties did you try? What challenges did you face? What successes did you celebrate? Your insights will be invaluable to other readers who are just starting out. So, grab your seeds, get your hands dirty, and embark on this exciting journey of growing peas indoors. You won’t regret it!
Frequently Asked Questions (FAQs)
What kind of peas are best for growing indoors?
Dwarf or bush pea varieties are generally the best choice for indoor growing. These varieties tend to be more compact and don’t require as much space as climbing varieties. Some popular options include ‘Little Marvel,’ ‘Tom Thumb,’ and ‘Sugar Ann.’ These varieties are known for their early maturity and suitability for container gardening. Climbing varieties can be grown indoors, but they will require a larger container and a more substantial support system.
How much sunlight do indoor peas need?
Peas need at least 6-8 hours of direct sunlight per day to thrive. If you don’t have a sunny windowsill, you can supplement with grow lights. Position the grow lights about 6-12 inches above the plants and keep them on for 12-16 hours per day. Insufficient light can lead to leggy growth and reduced yields. Rotate your pea plants regularly to ensure that all sides receive adequate light.
What kind of soil should I use for growing peas indoors?
Use a well-draining potting mix that is rich in organic matter. Avoid using garden soil, as it can become compacted and doesn’t drain well in containers. A good potting mix will provide the necessary nutrients and drainage for healthy pea growth. You can also amend the potting mix with compost or other organic materials to improve its fertility.
How often should I water my indoor pea plants?
Water your pea plants regularly, keeping the soil consistently moist but not waterlogged. Check the soil moisture by sticking your finger about an inch into the soil. If it feels dry, it’s time to water. Avoid overwatering, as this can lead to root rot. The frequency of watering will depend on factors such as the size of the container, the temperature, and the humidity.
Do I need to fertilize my indoor pea plants?
Peas are relatively light feeders, but they will benefit from occasional fertilization. Use a balanced liquid fertilizer diluted to half strength every 2-3 weeks. Avoid over-fertilizing, as this can lead to excessive foliage growth at the expense of pea production. You can also amend the soil with compost or other organic materials to provide a slow-release source of nutrients.
How do I support my indoor pea plants?
Peas need a support system to climb on. You can use bamboo stakes, trellises, or even repurposed materials like twigs or old coat hangers. Insert the supports into the container when you plant the seeds to avoid disturbing the roots later. Train the pea tendrils to climb onto the supports as they grow.
When can I harvest my indoor peas?
The time to harvest will depend on the variety of peas you are growing. Generally, peas are ready to harvest when the pods are plump and filled with peas. Snap peas can be harvested when the pods are still flat and tender. Pea shoots can be harvested at any time, snipping off the top few inches of the plant. Regular harvesting will encourage the plant to produce more peas.
How do I deal with pests and diseases on my indoor pea plants?
Indoor pea plants are generally less susceptible to pests and diseases than outdoor plants. However, they can still be affected by aphids, spider mites, and powdery mildew. Inspect your plants regularly for signs of infestation or disease. If you find any pests, you can try washing them off with a strong stream of water or using insecticidal soap. For powdery mildew, improve air circulation and avoid overhead watering.
Can I grow peas indoors year-round?
Yes, you can grow peas indoors year-round, provided you have adequate light and temperature. Peas prefer cooler temperatures, so avoid placing them near heat sources. Succession planting, as mentioned earlier, is key to maintaining a continuous harvest.
What are the benefits of growing peas indoors?
Growing peas indoors offers several benefits, including:
* Fresh, homegrown peas year-round
* A connection with nature, even in urban environments
* A therapeutic and rewarding activity
* The ability to control growing conditions
* Reduced exposure to pests and diseases
* A sustainable way to produce your own food
Growing peas indoors is a fantastic way to enjoy the taste of fresh, homegrown produce, regardless of the season. Give it a try and experience the joy of harvesting your own delicious peas!

Leave a Comment