
Growing potatoes in bags is a game-changer for any gardener, whether you’re a seasoned pro or just starting out! Imagine harvesting a bounty of delicious, homegrown potatoes from the comfort of your patio or balcony. No sprawling garden needed! This DIY trick isn’t just about convenience; it’s about unlocking a world of possibilities, especially if you’re short on space or dealing with challenging soil conditions.
The concept of container gardening, including growing root vegetables like potatoes, has been around for centuries. From ancient civilizations utilizing pots for herbs and spices to modern urban dwellers maximizing their limited spaces, the desire to cultivate our own food is deeply ingrained in human history. But the beauty of growing potatoes in bags lies in its simplicity and accessibility. It’s a modern twist on a time-honored tradition.
Let’s face it, traditional potato farming can be labor-intensive and require a significant amount of land. But with this clever DIY hack, you can bypass the digging, weeding, and potential soil-borne diseases that often plague in-ground potato crops. I’m going to show you how to create a thriving potato patch in a bag, offering you a fresh, flavorful harvest right at your fingertips. Get ready to ditch the store-bought spuds and embrace the joy of homegrown goodness!
DIY: Transforming Old T-Shirts into Stylish Reusable Shopping Bags
Hey there, fellow DIY enthusiasts! Are you drowning in old t-shirts that you can’t bear to throw away but never wear? I’ve got the perfect solution: turn them into super cute and eco-friendly reusable shopping bags! This project is not only a fantastic way to upcycle but also a fun and easy craft that anyone can tackle. Plus, you’ll be reducing your plastic consumption – win-win!
Materials You’ll Need
Before we dive in, let’s gather our supplies. Don’t worry, you probably already have most of these lying around:
* An old t-shirt (preferably cotton or a cotton blend – the thicker, the better for durability!)
* Sharp scissors or a rotary cutter
* A ruler or measuring tape
* A marker or fabric chalk
* Sewing machine (optional, but recommended for a stronger bag)
* Thread that matches your t-shirt
* Pins (optional, but helpful for securing fabric)
* Iron and ironing board (optional, but helpful for crisp edges)
* Cardboard or a cutting mat (to protect your work surface)
Choosing Your T-Shirt
The key to a great t-shirt bag is starting with the right shirt. Here’s what I look for:
* Fabric: Cotton or a cotton blend is ideal. Avoid super stretchy or thin materials, as they won’t hold up as well.
* Size: A larger t-shirt will naturally make a bigger bag. Consider what you’ll primarily use the bag for when choosing the size.
* Design: Think about the design on the shirt! Do you want it to be the focal point of your bag? A cool graphic or pattern can really make your bag stand out.
* Condition: Check for any major holes or stains. Small imperfections can be worked around, but large ones might compromise the bag’s integrity.
Step-by-Step Instructions
Alright, let’s get started! I’ll walk you through each step, making sure it’s super clear and easy to follow.
1. Preparing the T-Shirt
This is where we lay the groundwork for our awesome bag.
1. Lay it Flat: Place your t-shirt on a flat surface, like a table or the floor. Smooth out any wrinkles. I like to iron it quickly at this stage to get rid of any stubborn creases.
2. Cut off the Sleeves: Using your scissors, carefully cut off both sleeves. Try to follow the seam as closely as possible for a clean look. Don’t worry if it’s not perfect – we can tidy it up later.
3. Widen the Neckline (Optional): If you want a wider opening for your bag, you can cut the neckline a bit lower. I usually cut a gentle curve, but you can experiment with different shapes. Just be careful not to cut too low!
4. Turn Inside Out: Flip the t-shirt inside out. This will hide the raw edges of our cuts and give the bag a more polished look.
2. Creating the Bottom of the Bag
This is the most crucial part – creating a sturdy bottom that can hold all your groceries!
1. Pin the Bottom Edge: Fold the bottom edge of the t-shirt up about 3-4 inches (adjust this depending on how deep you want your bag to be). Pin the folded edge in place. This will create the bottom seam of the bag.
2. Sew the Bottom Seam: Using your sewing machine, sew a straight line along the pinned edge. I usually do a double stitch for extra strength. If you don’t have a sewing machine, you can hand-sew it using a backstitch.
3. Create the Corners (Box Corners): This is what gives the bag its shape and allows it to stand up on its own.
* Flatten the Corners: Flatten one of the bottom corners so that the side seam and the bottom seam line up, creating a triangle.
* Measure and Mark: Measure down from the point of the triangle along the side seam. I usually measure about 2-3 inches. Mark this point with your marker or fabric chalk.
* Draw a Line: Draw a straight line across the triangle, perpendicular to the side seam, at the marked point.
* Sew the Corner: Sew along the line you just drew. Again, I recommend a double stitch for strength.
* Trim the Excess: Trim off the excess fabric about 1/2 inch from the seam.
* Repeat: Repeat this process for the other corner.
4. Reinforce the Seams (Optional): For extra durability, you can reinforce the bottom seam and the corner seams with a zigzag stitch or by sewing over them multiple times.
3. Creating the Handles
Now, let’s make some handles so you can actually carry your awesome bag!
1. Cut the Strips: Using the remaining fabric from the sleeves (or any extra fabric you have), cut two strips that are about 3-4 inches wide and 18-24 inches long. The length will determine the length of your handles.
2. Fold and Iron (Optional): Fold each strip in half lengthwise and iron it to create a crease. Then, fold each edge in towards the center crease and iron again. Finally, fold the strip in half along the original crease and iron one last time. This will create a neat and sturdy handle. If you don’t want to iron, you can simply fold the edges in and pin them in place.
3. Sew the Handles: Sew along all four edges of each handle to secure the folds. I usually do a double stitch for extra strength.
4. Attach the Handles: Pin the handles to the top edge of the bag, positioning them evenly on either side. Make sure the handles are securely attached to the bag. I usually place the handles about 4-6 inches apart.
5. Sew the Handles to the Bag: Sew the handles to the bag using a strong stitch. I recommend sewing a square with an “X” inside for extra reinforcement.
4. Finishing Touches
Almost there! Just a few final steps to make your bag perfect.
1. Turn Right Side Out: Turn the bag right side out.
2. Inspect the Seams: Check all the seams to make sure they are secure. If you find any weak spots, reinforce them with extra stitching.
3. Trim Any Loose Threads: Snip off any loose threads to give the bag a clean and professional look.
4. Iron (Optional): Give the bag a final ironing to remove any wrinkles.
5. Optional Embellishments: This is where you can really get creative! Add buttons, patches, fabric paint, or any other embellishments you like to personalize your bag.
Alternative Handle Method (No Sewing Required!)
If you don’t have a sewing machine or prefer a no-sew option, here’s a simple way to create handles:
1. Cut Fringes: Instead of cutting off the sleeves, cut fringes along the top edge of the t-shirt, about 3-4 inches deep.
2. Tie the Fringes: Divide the fringes into pairs and tie each pair together in a knot.
3. Create the Handles: Tie the knotted pairs together in a row to create a chain. This chain will form your handles.
This method is super easy and gives your bag a fun, bohemian vibe! However, keep in mind that these handles might not be as strong as sewn handles, so avoid carrying extremely heavy items.
Tips and Tricks for Success
Here are a few extra tips to help you create the best t-shirt bag possible:
* Use a Sharp Blade: A sharp pair of scissors or a rotary cutter will make cutting the fabric much easier and cleaner.
* Practice Your Sewing: If you’re new to sewing, practice on a scrap piece of fabric before working on your bag.
* Reinforce Stress Points: Pay extra attention to reinforcing the seams at the bottom of the bag and where the handles attach, as these areas will bear the most weight.
* Get Creative with Embellishments: Don’t be afraid to personalize your bag with fun embellishments! Fabric paint, stencils, buttons, and patches are all great options.
* Wash Your T-Shirt First: Washing your t-shirt before you start will help prevent shrinkage after you’ve made the bag.
* Consider the Weight: Remember that the strength of your bag depends on the fabric of the t-shirt. Don’t overload it with extremely heavy items.
Troubleshooting Common Issues
Sometimes, things don’t go exactly as planned. Here are a few common issues and how to fix them:
* Seams are coming undone: Reinforce the seams with extra stitching or use a stronger
Conclusion
So, there you have it! Growing potatoes in bags is not just a gardening trend; it’s a game-changer for anyone, regardless of space or experience. We’ve walked you through the simple steps, highlighting the ease and efficiency of this method. But why is this DIY trick a must-try?
First and foremost, it democratizes potato cultivation. No sprawling garden? No problem! A sunny balcony, patio, or even a small deck is all you need. This accessibility opens up the joy of homegrown produce to apartment dwellers, urban gardeners, and anyone with limited outdoor space.
Secondly, the control you gain over the growing environment is unparalleled. You dictate the soil composition, ensuring optimal drainage and nutrient levels. You can easily move the bags to chase the sun or shelter them from harsh weather. This level of control translates to healthier plants and a more abundant harvest.
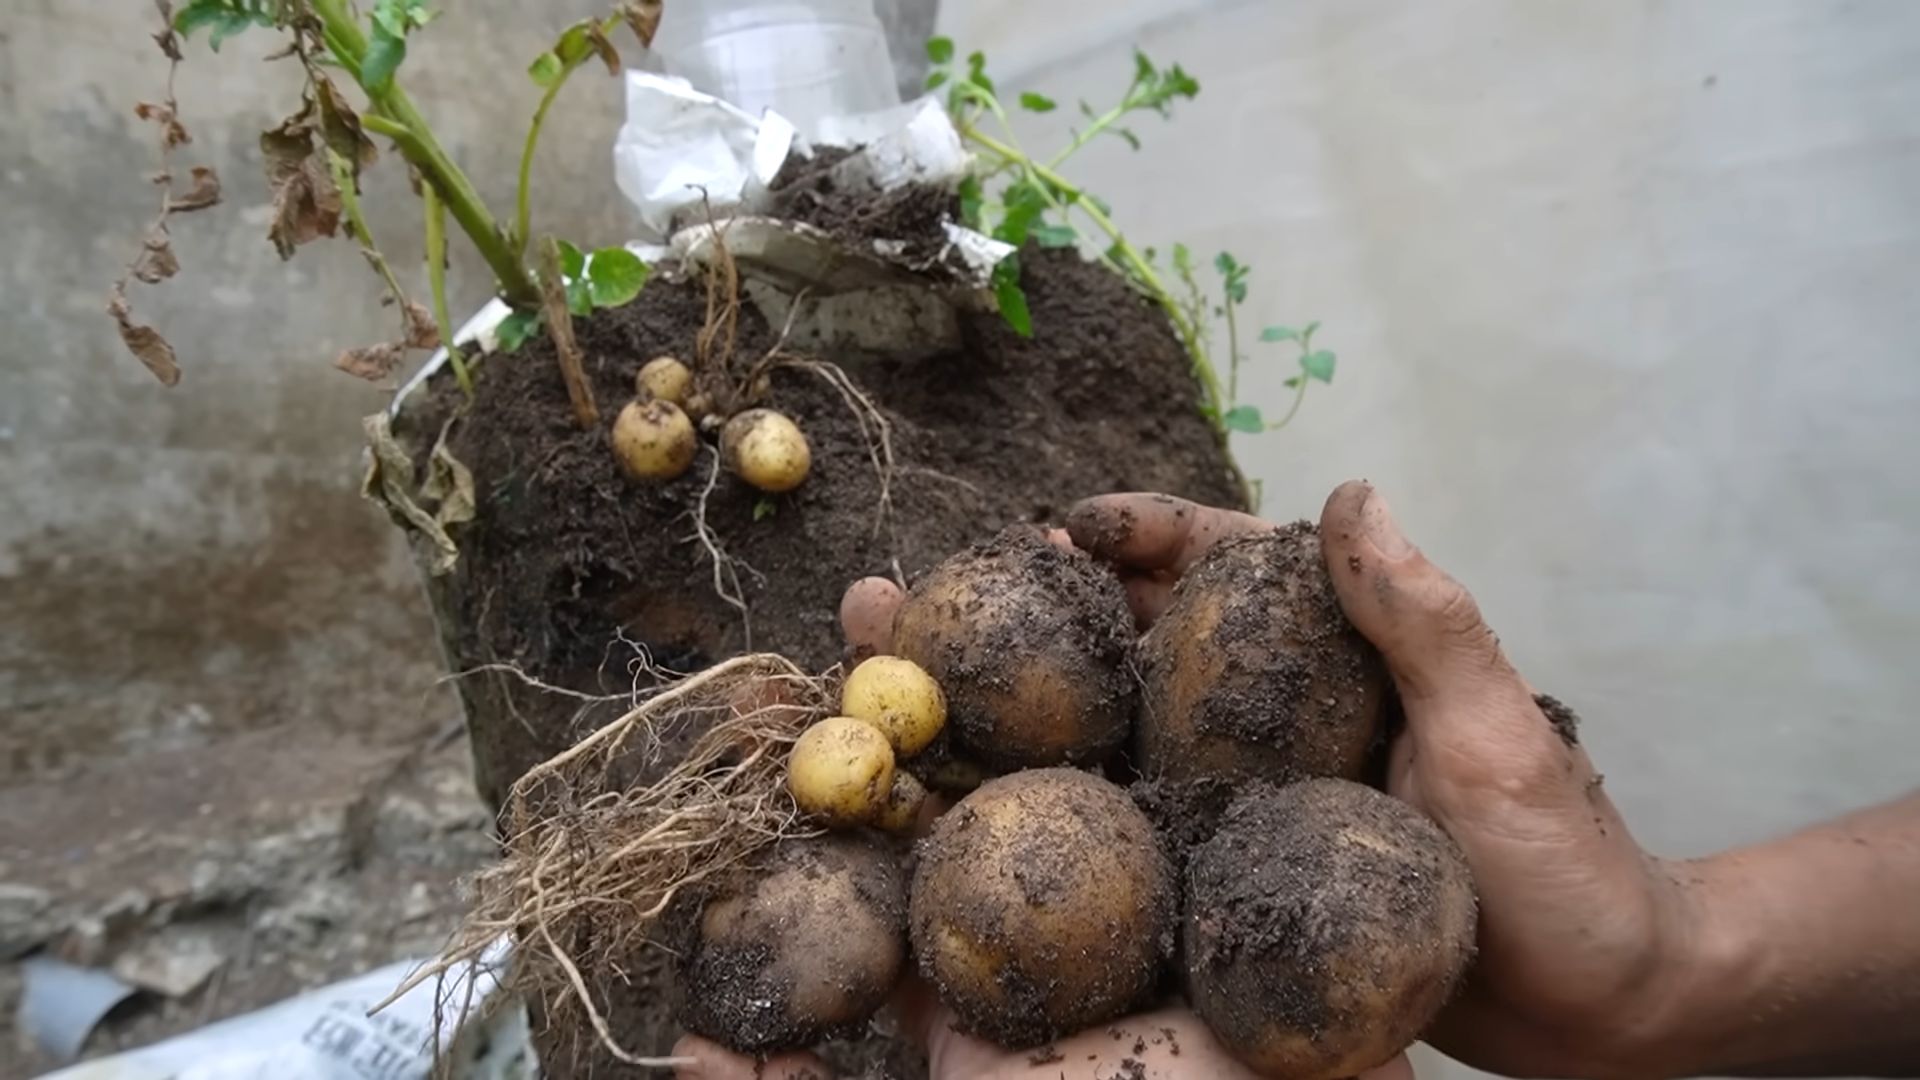
Thirdly, the harvesting process is incredibly satisfying. Forget digging and potentially damaging your precious potatoes. Simply tip the bag and sift through the soil to reveal your buried treasure. It’s like a potato-themed treasure hunt!
But the benefits don’t stop there. Growing potatoes in bags is also a fantastic learning experience. It’s a hands-on way to understand the life cycle of a plant, the importance of soil health, and the rewards of patience and care. It’s an educational activity for kids and a fulfilling hobby for adults.
Now, let’s talk variations. Feel free to experiment with different potato varieties. Russets, Yukon Golds, red potatoes – each offers a unique flavor and texture. You can also try companion planting. Marigolds, for example, can help deter pests. Basil can improve the flavor of your potatoes. Get creative and see what works best for you!
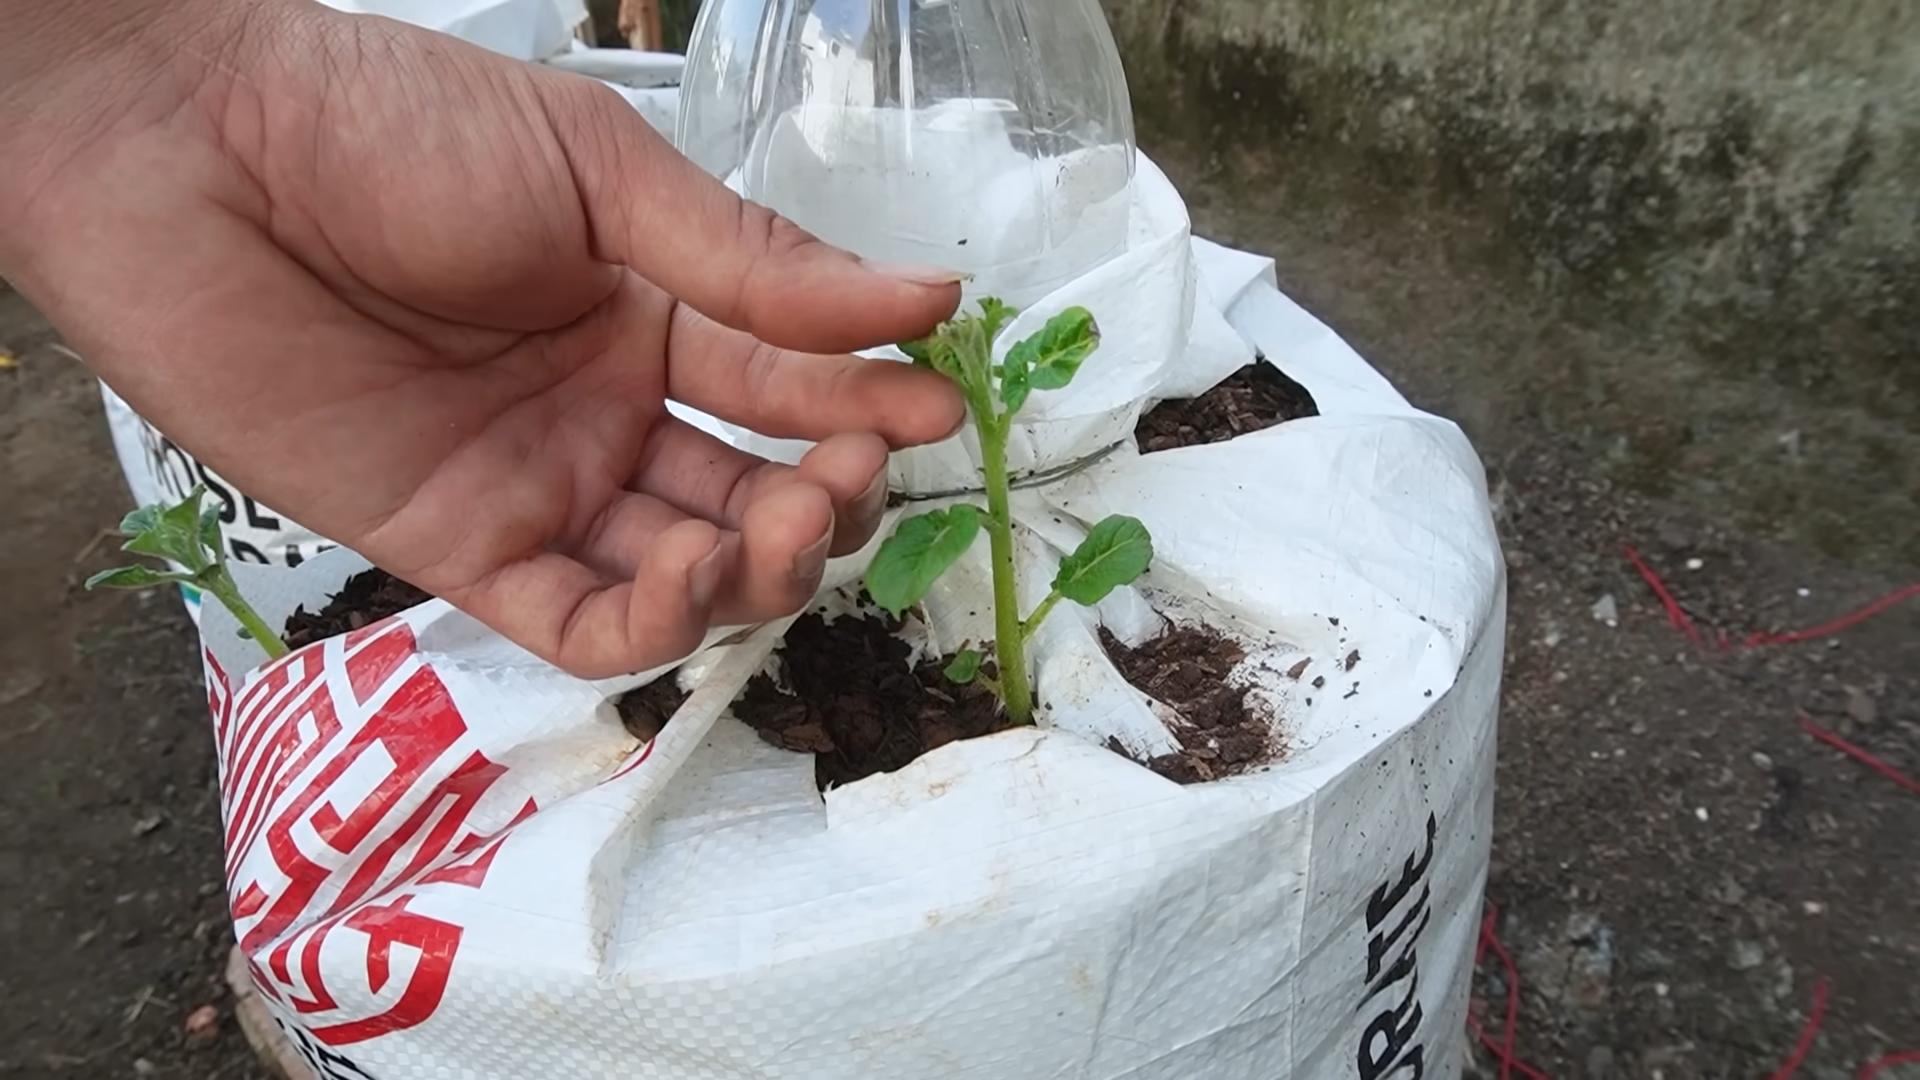
Consider using different types of containers too. While burlap bags are a classic choice, you can also use grow bags specifically designed for potatoes, large plastic buckets with drainage holes, or even repurposed laundry baskets lined with fabric. The key is to ensure good drainage and sufficient space for the potatoes to develop.
Don’t be afraid to amend your soil with compost or other organic matter. This will provide your potatoes with the nutrients they need to thrive. You can also add a slow-release fertilizer to the soil at planting time.
And finally, remember to water your potatoes regularly, especially during hot, dry weather. The soil should be consistently moist, but not waterlogged.
Growing potatoes in bags is more than just a gardening technique; it’s an invitation to connect with nature, to cultivate your own food, and to experience the satisfaction of a bountiful harvest. It’s a simple, rewarding, and accessible way to enjoy fresh, homegrown potatoes, no matter where you live.
So, what are you waiting for? Grab a bag, some seed potatoes, and get planting! We’re confident that you’ll be amazed by the results. And once you’ve harvested your first crop, we’d love to hear about your experience. Share your photos, tips, and tricks in the comments below. Let’s build a community of bag-grown potato enthusiasts! Happy gardening!
Frequently Asked Questions (FAQ)
What kind of potatoes are best for growing in bags?
The beauty of growing potatoes in bags is that you can experiment with almost any variety! However, some tend to perform better than others in this environment. Early-maturing varieties like Yukon Gold, Red Pontiac, and Irish Cobbler are excellent choices because they have a shorter growing season, which is beneficial in a confined space. These varieties also tend to produce a good yield of smaller to medium-sized potatoes, which are well-suited for bag cultivation. Russet potatoes, while popular, can also be grown in bags, but they may require a larger bag and more attention to watering and fertilization due to their longer growing season and larger size. Ultimately, the best potato for you will depend on your personal preferences and the specific growing conditions in your area. Consider your climate, soil type, and desired potato size and flavor when making your selection. Don’t be afraid to try different varieties to see what works best for you!
How often should I water my potatoes in bags?
Watering frequency is crucial for successful potato cultivation in bags. The general rule of thumb is to keep the soil consistently moist, but not waterlogged. Overwatering can lead to root rot, while underwatering can stunt growth and reduce yields. The ideal watering schedule will depend on several factors, including the weather, the type of soil you’re using, and the size of your bag. During hot, dry weather, you may need to water your potatoes every day or every other day. In cooler, wetter weather, you may only need to water them once or twice a week. A good way to check if your potatoes need water is to stick your finger into the soil about an inch deep. If the soil feels dry to the touch, it’s time to water. When watering, be sure to soak the entire bag thoroughly, allowing the water to drain out of the bottom. Avoid watering the foliage directly, as this can increase the risk of fungal diseases. Mulching around the base of the plants can also help to retain moisture and reduce the need for frequent watering.
What kind of soil should I use for growing potatoes in bags?
The ideal soil for growing potatoes in bags is a well-draining, nutrient-rich mix. Potatoes need loose soil to allow their tubers to develop properly. A heavy, compacted soil will restrict growth and can lead to misshapen potatoes. A good starting point is a mix of equal parts potting soil, compost, and perlite or vermiculite. The potting soil provides a base for the mix, while the compost adds essential nutrients and improves drainage. Perlite or vermiculite helps to aerate the soil and prevent compaction. You can also add other amendments to the soil, such as bone meal or rock phosphate, to provide additional phosphorus, which is important for root development. Avoid using garden soil in your bags, as it can be too heavy and may contain pests or diseases. Before planting, be sure to mix the soil thoroughly and moisten it slightly. This will help to ensure that the potatoes have a good start.
How much sunlight do potatoes in bags need?
Potatoes are sun-loving plants and require at least six to eight hours of direct sunlight per day to thrive. Insufficient sunlight can lead to leggy growth, reduced yields, and smaller potatoes. When choosing a location for your potato bags, select a spot that receives full sun throughout the day. If you live in a particularly hot climate, you may want to provide some afternoon shade to prevent the plants from overheating. You can also use shade cloth to filter the sunlight during the hottest part of the day. If you’re growing potatoes indoors, you’ll need to supplement with artificial lighting. Grow lights are a great option for providing the necessary light intensity and spectrum. Be sure to position the lights close enough to the plants to provide adequate illumination. Rotate the bags regularly to ensure that all sides of the plants receive equal sunlight.
How do I know when my potatoes are ready to harvest from the bag?
Knowing when to harvest your potatoes is key to enjoying the best flavor and texture. The timing will depend on the variety of potato you’re growing and your personal preferences. Generally, early-maturing varieties are ready to harvest about 70-80 days after planting, while late-maturing varieties may take 90-100 days. One of the easiest ways to tell if your potatoes are ready is to observe the foliage. As the potatoes mature, the leaves will begin to turn yellow and brown, and the stems will start to die back. This is a sign that the plant is diverting its energy from the foliage to the tubers. You can also gently feel around in the soil to check the size of the potatoes. If they’re the size you desire, you can go ahead and harvest them. To harvest, simply tip the bag over and sift through the soil to collect the potatoes. Be careful not to damage the potatoes during the harvesting process. If you’re not ready to harvest all of the potatoes at once, you can leave them in the bag for a few more weeks, as long as the soil is kept cool and dry.
Can I reuse the soil from my potato bags?
While you can technically reuse the soil from your potato bags, it’s generally not recommended without proper preparation and amendment. Potatoes are heavy feeders and deplete the soil of nutrients. Additionally, the soil may harbor pests or diseases that could affect future crops. If you choose to reuse the soil, it’s essential to replenish the nutrients and sterilize it to kill any potential pathogens. You can amend the soil with compost, aged manure, or a balanced fertilizer. Sterilizing the soil can be done by baking it in the oven or solarizing it in the sun. However, these methods can be time-consuming and may not be entirely effective. A safer and more convenient option is to simply use fresh soil for each planting season. This will ensure that your potatoes have the nutrients they need to thrive and will minimize the risk of pest and disease problems. You can also use the old soil to amend other parts of your garden, as long as you’re aware of the potential risks.

Leave a Comment