
Growing Potatoes in Buckets: Imagine harvesting a bounty of fresh, homegrown potatoes right from your patio or balcony! No sprawling garden needed. Sounds too good to be true? It’s not! For centuries, humans have cultivated potatoes in various ways, from traditional in-ground farming to innovative container gardening. The Incas of South America, where potatoes originated, were masters of terrace farming, a testament to their ingenuity in maximizing space and resources.
Today, we’re taking that spirit of innovation and applying it to a modern problem: limited space. Many of us dream of fresh, homegrown produce but lack the land to make it a reality. That’s where this DIY guide comes in. Growing Potatoes in Buckets is the perfect solution for apartment dwellers, urban gardeners, or anyone looking for an easy and efficient way to enjoy the taste of freshly dug potatoes.
I’m going to show you a simple, step-by-step method that will have you harvesting delicious potatoes in no time. Forget back-breaking digging and weeding; this method is clean, convenient, and incredibly rewarding. Plus, it’s a fantastic way to get kids involved in gardening and teach them about where their food comes from. So, grab your buckets, some seed potatoes, and let’s get started on this exciting gardening adventure!
Growing Potatoes in Buckets: A Bountiful Harvest on Your Patio!
Hey there, fellow gardening enthusiasts! Are you dreaming of fresh, homegrown potatoes but short on garden space? Well, I’ve got fantastic news for you: you can absolutely grow potatoes in buckets! It’s a super rewarding and surprisingly easy project, perfect for balconies, patios, or even just a sunny corner of your yard. I’ve been doing this for years, and let me tell you, there’s nothing quite like digging into a bucket and unearthing a treasure trove of delicious spuds. So, grab your buckets, some seed potatoes, and let’s get started!
What You’ll Need
Before we dive into the nitty-gritty, let’s gather our supplies. This is a pretty straightforward project, so you probably have a lot of these items already.
* Buckets: 5-gallon buckets are ideal, but you can use larger ones too. Make sure they’re clean and have drainage holes. I usually drill about 4-5 holes in the bottom.
* Seed Potatoes: These aren’t just any potatoes from the grocery store! Seed potatoes are specifically grown for planting and are certified disease-free. You can find them at your local garden center or online. Choose varieties that suit your taste and climate. I personally love Yukon Gold for their creamy texture and all-purpose use.
* Potting Mix: A good quality potting mix is crucial. Don’t use garden soil, as it can compact in the bucket and hinder drainage. I prefer a mix that’s light and airy, with good drainage.
* Fertilizer: A slow-release fertilizer formulated for vegetables will give your potatoes a boost. I like to use an organic option.
* Watering Can or Hose: For keeping your potatoes well-hydrated.
* Trowel or Small Shovel: For planting and adding soil.
* Optional: Straw or mulch to help retain moisture.
Preparing Your Buckets
Okay, let’s get our buckets ready for planting. This is a quick and easy step, but it’s important to do it right.
1. Drill Drainage Holes: If your buckets don’t already have them, drill about 4-5 drainage holes in the bottom. This is essential to prevent waterlogging, which can rot your potatoes.
2. Clean the Buckets: Make sure your buckets are clean and free of any debris. You can wash them with soap and water if needed.
3. Optional: Add a Layer of Gravel: Some people like to add a layer of gravel to the bottom of the bucket to improve drainage. I personally don’t find it necessary if you have good drainage holes and a well-draining potting mix, but it’s an option if you’re concerned.
Preparing Your Seed Potatoes
Now, let’s get our seed potatoes ready for planting. This is a crucial step to ensure healthy and productive plants.
1. Chitting (Optional but Recommended): Chitting is the process of encouraging your seed potatoes to sprout before planting. This gives them a head start and can result in an earlier harvest. To chit your potatoes, place them in a cool, bright location (but not direct sunlight) for a few weeks. You’ll see small sprouts, called “eyes,” starting to form.
2. Cutting (If Necessary): If your seed potatoes are large (bigger than an egg), you can cut them into smaller pieces. Each piece should have at least one or two “eyes.” Let the cut pieces dry for a day or two before planting to prevent rotting. I usually cut mine into pieces about the size of a golf ball.
3. Choosing the Right Seed Potatoes: Make sure your seed potatoes are firm and healthy. Avoid any that are soft, shriveled, or have signs of disease.
Planting Your Potatoes
Alright, the moment we’ve been waiting for! Let’s get those potatoes in the ground (or rather, in the bucket!).
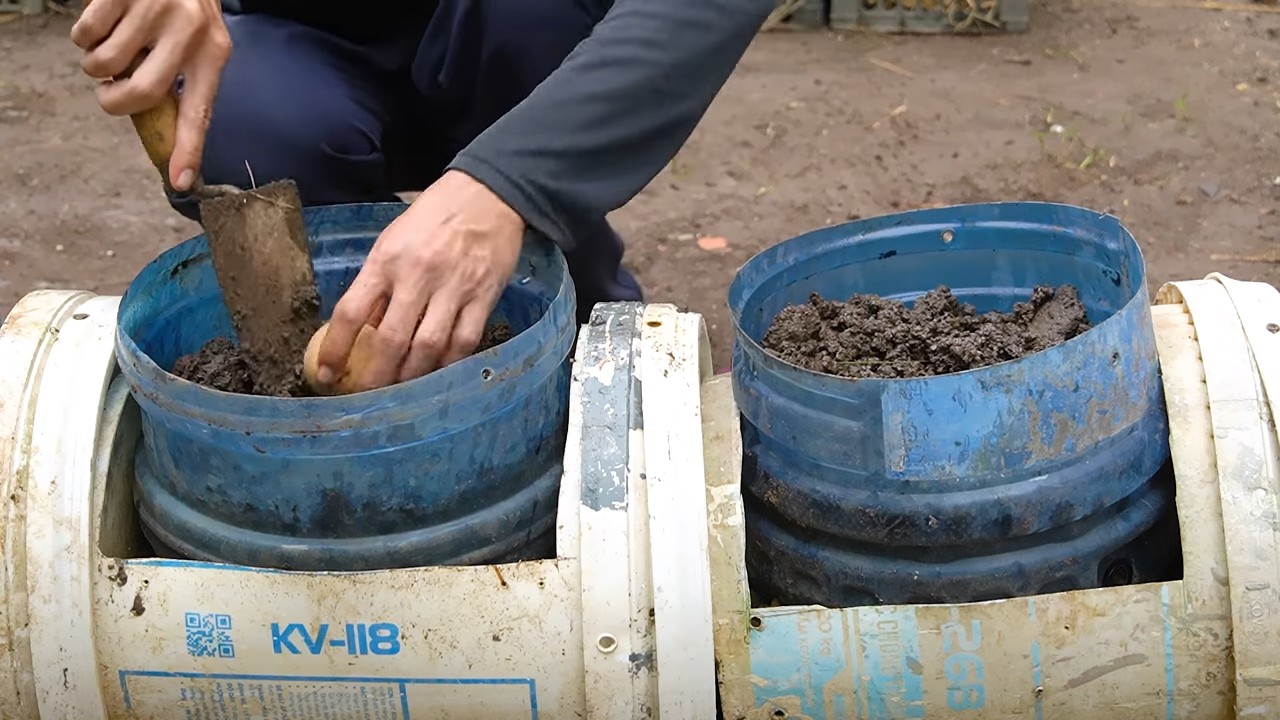
1. Add Potting Mix: Fill the bottom of your bucket with about 4-6 inches of potting mix.
2. Place the Seed Potatoes: Place your seed potatoes on top of the potting mix, with the “eyes” facing upwards. Space them evenly if you’re planting more than one potato per bucket. I usually plant 2-3 seed potatoes in a 5-gallon bucket.
3. Cover with Potting Mix: Cover the seed potatoes with another 4-6 inches of potting mix.
4. Water Thoroughly: Water the soil thoroughly until water drains out of the drainage holes.
5. Add Fertilizer: Sprinkle a slow-release fertilizer on top of the soil, following the instructions on the package.
Hilling Your Potatoes
This is where the magic happens! Hilling is the process of adding more soil to the bucket as the potato plants grow. This encourages the plants to produce more potatoes along the stems.
1. Wait for Growth: Once your potato plants have grown about 6-8 inches tall, it’s time to start hilling.
2. Add More Potting Mix: Add enough potting mix to cover the stems, leaving only the top few leaves exposed.
3. Repeat: Repeat this process every few weeks as the plants continue to grow, until the bucket is almost full. I usually hill my potatoes about 3-4 times during the growing season.
4. Water After Hilling: Water the soil thoroughly after each hilling.
Caring for Your Potato Plants
Now that your potatoes are planted and hilled, it’s time to provide them with the care they need to thrive.
1. Watering: Potatoes need consistent moisture, especially during hot weather. Water deeply whenever the top inch of soil feels dry to the touch. Avoid overwatering, as this can lead to root rot.
2. Sunlight: Potatoes need at least 6-8 hours of sunlight per day. Place your buckets in a sunny location.
3. Fertilizing: Continue to fertilize your potatoes every few weeks with a balanced fertilizer. Follow the instructions on the package.
4. Pest Control: Keep an eye out for pests like aphids, potato beetles, and flea beetles. You can control these pests with insecticidal soap or neem oil. I prefer to use organic methods whenever possible.
5. Disease Prevention: Potatoes can be susceptible to diseases like blight. To prevent diseases, make sure your plants have good air circulation and avoid overhead watering.
Harvesting Your Potatoes
The most exciting part! It’s time to reap the rewards of your hard work.
1. When to Harvest: You can start harvesting “new potatoes” (small, tender potatoes) about 7-8 weeks after planting. To harvest new potatoes, carefully dig around the base of the plant and remove a few potatoes. For mature potatoes, wait until the plants have flowered and the foliage starts to die back. This usually takes about 10-12 weeks.
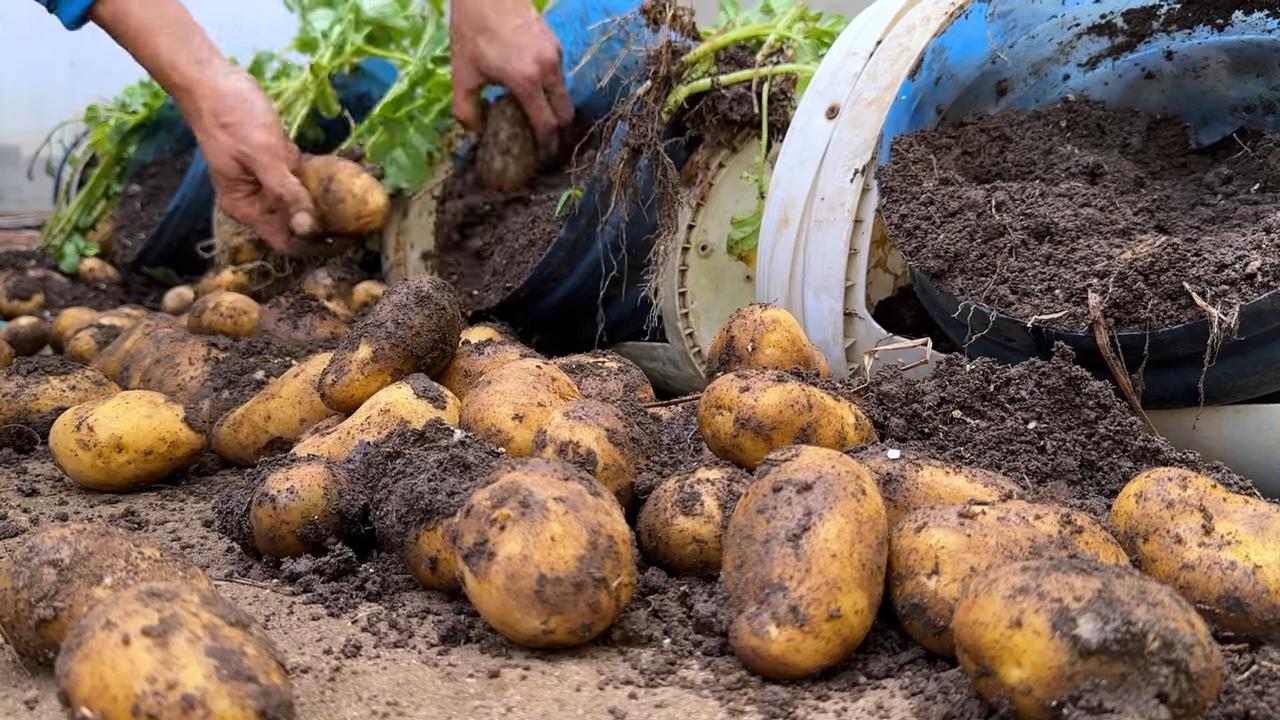
2. How to Harvest: To harvest your potatoes, simply tip the bucket over and carefully remove the soil. You’ll find a treasure trove of potatoes nestled within!
3. Curing (Optional): If you’re planning to store your potatoes, you can cure them for a few weeks. To cure potatoes, spread them out in a cool, dark, and well-ventilated place. This will help them develop a thicker skin and prevent rotting.
Troubleshooting
Even with the best care, you might encounter a few challenges along the way. Here are some common problems and how to fix them.
* Yellowing Leaves: This could be a sign of overwatering, underwatering, or nutrient deficiency. Check the soil moisture and adjust your watering accordingly. Fertilize your plants with a balanced fertilizer.
* Potato Beetles: These pesky beetles can quickly defoliate your potato plants. Handpick them off the plants or spray with insecticidal soap or neem oil.
* Blight: This fungal disease can cause brown spots on the leaves and stems. To prevent blight, make sure your plants have good air circulation and avoid overhead watering. If you see signs of blight, remove the affected leaves and spray with a fungicide.
* Small Potatoes: This could be due to overcrowding, lack of nutrients, or insufficient sunlight. Make sure you’re planting enough seed potatoes per bucket and fertilizing regularly. Place your buckets in a sunny location.
Choosing the Right Potato Variety
Selecting the right potato variety is crucial for a successful harvest. Consider your climate, taste preferences, and intended use when making your choice. Here are a few popular varieties:
* Yukon Gold: A versatile, all-purpose potato with a creamy texture and buttery flavor. Great for baking, mashing, and roasting.
* Red Pontiac: A red-skinned potato with a waxy texture. Excellent for boiling and potato salads.
* Russet Burbank: A classic baking potato with a fluffy texture. Perfect for French fries
Conclusion
So, there you have it! Growing potatoes in buckets is not just a gardening trend; it’s a game-changer for anyone, regardless of space or experience. We’ve walked through the simple steps, highlighted the benefits, and hopefully, inspired you to ditch the traditional potato patch and embrace this innovative method.
Why is this DIY trick a must-try? Because it offers a level of control and convenience that in-ground gardening simply can’t match. Imagine harvesting fresh, homegrown potatoes right from your patio, balcony, or even a sunny corner of your kitchen. No more back-breaking digging, no more battling weeds across a vast garden bed, and significantly reduced risk of soilborne pests and diseases. The contained environment allows you to tailor the soil composition perfectly to your potatoes’ needs, ensuring optimal growth and a bountiful harvest. Plus, the mobility of buckets means you can chase the sun, protect your plants from unexpected frost, or even move them indoors during extreme weather.
But the beauty of growing potatoes in buckets lies not only in its practicality but also in its adaptability. Feel free to experiment with different potato varieties. Russets, Yukon Golds, fingerlings – each will bring its unique flavor and texture to your table. Consider adding companion plants like marigolds or basil to your buckets to deter pests naturally and enhance the overall health of your potato plants. You can also adjust the size of your buckets depending on the space you have available and the size of the potato variety you choose. Smaller buckets are perfect for dwarf varieties, while larger buckets will accommodate more prolific growers.
Don’t be afraid to get creative with your container choices, too. While standard plastic buckets are a reliable option, you can also use repurposed containers like old trash cans, laundry baskets (lined with landscape fabric), or even grow bags. Just ensure that your chosen container has adequate drainage holes to prevent waterlogging.
The key to success with this method is consistent watering and fertilization. Potatoes are heavy feeders, so regular applications of a balanced fertilizer are essential for healthy growth and abundant tuber production. Keep a close eye on your plants for any signs of pests or diseases, and address them promptly to prevent them from spreading.
Ultimately, growing potatoes in buckets is a rewarding and enjoyable experience that connects you to the food you eat. It’s a chance to learn about the life cycle of a plant, to nurture something from seed to harvest, and to savor the unparalleled taste of homegrown potatoes.
We wholeheartedly encourage you to give this DIY trick a try. It’s easier than you think, and the results are well worth the effort. Once you’ve harvested your first bucket of homegrown potatoes, we’re confident you’ll be hooked!
And most importantly, we want to hear about your experience! Share your photos, tips, and stories with us in the comments below. Let’s create a community of bucket potato growers and learn from each other’s successes and challenges. What varieties did you try? What soil mix did you find most effective? What challenges did you encounter, and how did you overcome them? Your insights will help other aspiring potato growers and contribute to the collective knowledge of this innovative gardening technique. So, grab a bucket, some seed potatoes, and get ready to embark on a delicious and rewarding gardening adventure! Let’s get growing!
Frequently Asked Questions (FAQ)
What kind of potatoes are best for growing in buckets?
While you can grow almost any type of potato in a bucket, some varieties tend to perform better than others. Determinate varieties, which produce all their potatoes at once, are generally a better choice for container gardening than indeterminate varieties, which continue to produce potatoes throughout the growing season. Some popular and successful choices include:
* **Yukon Gold:** These potatoes are known for their creamy texture and buttery flavor. They are relatively early maturing and produce a good yield in containers.
* **Red Pontiac:** These red-skinned potatoes are another excellent choice for buckets. They are disease-resistant and produce a good number of medium-sized potatoes.
* **Fingerling Potatoes:** These long, slender potatoes are a gourmet favorite. They come in various colors and flavors and are well-suited to container growing.
* **Russet Potatoes:** While russets can be grown in buckets, they require larger containers due to their size and growth habit. Choose a smaller russet variety if possible.
Ultimately, the best potato variety for you will depend on your personal preferences and the growing conditions in your area. Don’t be afraid to experiment with different varieties to see what works best for you.
How big of a bucket do I need?
The size of the bucket you need will depend on the variety of potato you are growing. As a general rule, a 5-gallon bucket is the minimum size recommended for most potato varieties. However, larger buckets (10 gallons or more) will provide more room for the roots to grow and can result in a larger harvest.
For smaller varieties like fingerling potatoes, a 5-gallon bucket may be sufficient. For larger varieties like russets, a 10-gallon or even a 20-gallon bucket is recommended.
Regardless of the size of the bucket you choose, make sure it has adequate drainage holes to prevent waterlogging.
What kind of soil should I use?
Potatoes need well-draining soil that is rich in organic matter. A good potting mix is essential for successful bucket potato growing. Avoid using garden soil, as it can be too heavy and compact, which can hinder root growth and drainage.
A good soil mix for growing potatoes in buckets should consist of:
* **Potting Mix:** This provides a light and airy base for the soil.
* **Compost:** This adds organic matter and nutrients to the soil.
* **Peat Moss or Coco Coir:** These help to retain moisture in the soil.
* **Perlite or Vermiculite:** These improve drainage and aeration.
You can purchase a pre-made potting mix specifically designed for vegetables, or you can create your own mix by combining equal parts potting mix, compost, and peat moss or coco coir.
How often should I water my potato plants?
Potatoes need consistent moisture to thrive, especially during tuber formation. Water your potato plants deeply whenever the top inch of soil feels dry to the touch. Avoid overwatering, as this can lead to root rot.
The frequency of watering will depend on the weather conditions and the size of your bucket. During hot, dry weather, you may need to water your plants daily. During cooler, wetter weather, you may only need to water them every few days.
A good way to check if your plants need water is to stick your finger into the soil. If the soil feels dry to the touch, it’s time to water.
How often should I fertilize my potato plants?
Potatoes are heavy feeders and require regular fertilization to produce a good harvest. Fertilize your potato plants every 2-3 weeks with a balanced fertilizer that is specifically formulated for vegetables.
A balanced fertilizer will contain equal amounts of nitrogen, phosphorus, and potassium (N-P-K). You can also use a fertilizer that is slightly higher in phosphorus, as this nutrient is essential for tuber development.
Follow the instructions on the fertilizer package carefully, and avoid over-fertilizing, as this can damage your plants.
How do I know when my potatoes are ready to harvest?
The timing of your potato harvest will depend on the variety of potato you are growing and the growing conditions in your area. Generally, potatoes are ready to harvest when the foliage begins to yellow and die back.
You can also check for maturity by gently digging around the base of the plant and feeling for the size of the potatoes. If the potatoes are the size you want, you can harvest them.
To harvest your potatoes, simply tip the bucket over and carefully remove the soil. You can then pick out the potatoes and store them in a cool, dark place.
Can I reuse the soil from my potato buckets?
Yes, you can reuse the soil from your potato buckets, but it’s important to amend it with fresh compost and fertilizer before planting again. Potatoes are heavy feeders, so the soil will be depleted of nutrients after one growing season.
Before reusing the soil, remove any remaining potato roots or tubers. You can also sterilize the soil by baking it in the oven at 200 degrees Fahrenheit for 30 minutes. This will kill any harmful pathogens or pests that may be present in the soil.
After sterilizing the soil, amend it with fresh compost and fertilizer before planting again. This will ensure that your new potato plants have the nutrients they need to thrive.
Leave a Comment