
Growing potatoes in containers might sound intimidating, but trust me, it’s one of the most rewarding and surprisingly simple DIY projects you can undertake in your home garden! Imagine harvesting your own fresh, earthy potatoes right from your patio or balcony – the taste is simply unbeatable. For centuries, cultivating potatoes has been a cornerstone of diets worldwide, from the Andean highlands where they originated to the bustling kitchens of today.
But let’s face it, not everyone has acres of farmland to dedicate to potato cultivation. That’s where this DIY trick comes in! Growing potatoes in containers allows even apartment dwellers and those with limited space to enjoy the satisfaction of growing their own food. Plus, it’s a fantastic way to control the soil quality, prevent pests, and enjoy a cleaner harvest.
In this article, I’m going to share my tried-and-true methods for successfully growing potatoes in containers, from choosing the right container and seed potatoes to mastering the “hilling” technique for a bountiful harvest. Get ready to roll up your sleeves and discover the joy of homegrown potatoes – you’ll be amazed at how easy and fun it is!
Growing Potatoes in Containers: A Bumper Crop on Your Patio!
Hey there, fellow garden enthusiasts! I’m so excited to share my favorite way to grow potatoes – in containers! Forget digging up a huge plot of land; this method is perfect for small spaces, patios, balconies, or even just adding a touch of rustic charm to your garden. Plus, harvesting is a breeze! Let’s get started on how you can grow your own delicious potatoes in containers.
What You’ll Need
Before we dive in, let’s gather our supplies. This is crucial for a smooth and successful potato-growing adventure.
* Large Containers: Think big! We’re talking at least 10-gallon containers, but 20-gallon ones are even better. The bigger, the better, as it gives the potatoes plenty of room to grow. I personally love using those large plastic storage tubs – they’re affordable and durable. Just make sure they have drainage holes!
* Seed Potatoes: These aren’t your regular grocery store potatoes. Seed potatoes are specifically grown for planting and are certified disease-free. You can find them at your local garden center or online. Choose varieties that suit your taste – Russets for baking, Yukon Golds for all-purpose use, or Red Potatoes for boiling.
* Well-Draining Potting Mix: This is super important! Regular garden soil is too heavy and will compact in containers, hindering potato growth. Opt for a high-quality potting mix that’s light and airy. You can even amend it with compost for extra nutrients.
* Compost: Speaking of compost, this is black gold for your potatoes! It adds essential nutrients and improves soil structure.
* Water: Potatoes need consistent moisture, so have a watering can or hose handy.
* Fertilizer (Optional): A balanced, slow-release fertilizer can give your potatoes an extra boost, but it’s not strictly necessary if you’re using good quality potting mix and compost.
* Gardening Gloves: Protect your hands from dirt and potential irritants.
* Trowel or Shovel: For planting and adding soil.
Preparing Your Seed Potatoes
This step is crucial for getting a head start on your potato crop.
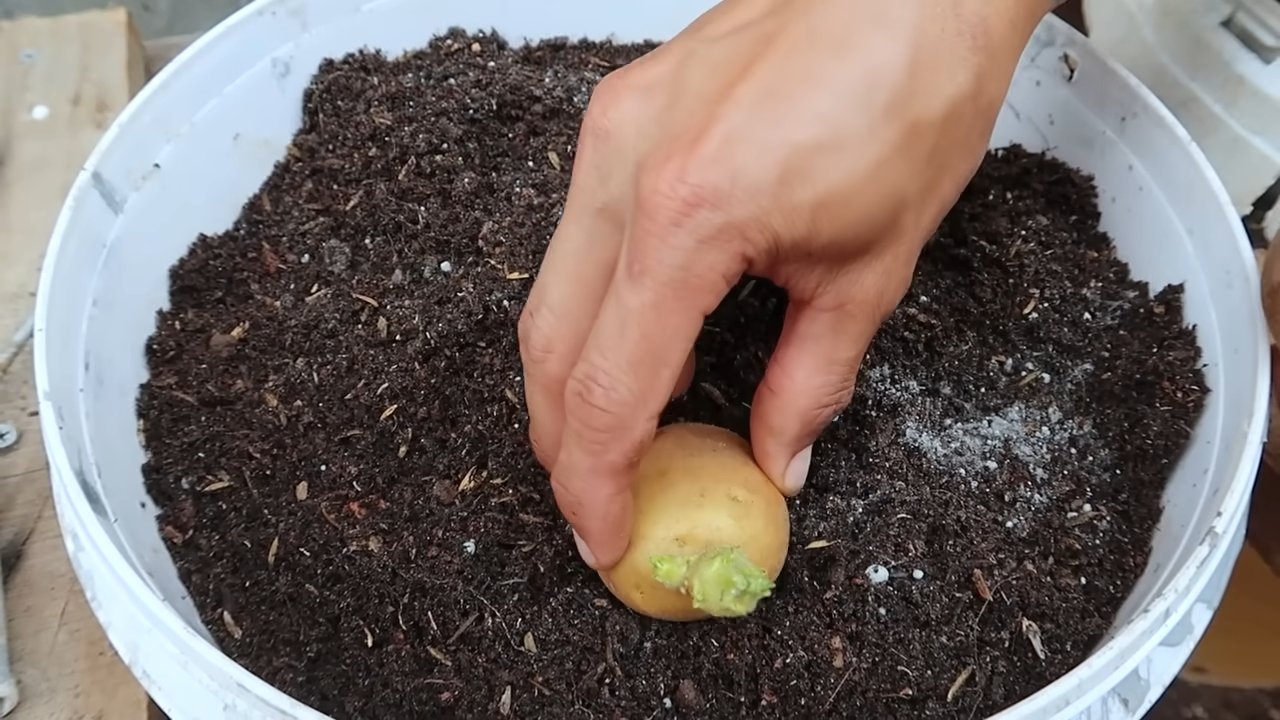
* Chitting (Sprouting): About 2-3 weeks before planting, place your seed potatoes in a cool, bright location (but not direct sunlight). This encourages them to sprout “eyes,” which are the little buds that will grow into potato plants. You can use an egg carton or a shallow tray to hold them.
* Cutting (Optional): If your seed potatoes are large (bigger than an egg), you can cut them into smaller pieces, ensuring each piece has at least 2-3 eyes. Let the cut pieces dry for a day or two to callous over, which helps prevent rot. I usually don’t cut mine unless they’re really big.
Planting Your Potatoes
Now for the fun part – getting those potatoes in the ground (or, in this case, the container!).
1. Prepare the Container: Make sure your container has adequate drainage holes. If not, drill some! Add a layer of gravel or broken pottery to the bottom to improve drainage.
2. Initial Soil Layer: Fill the container with about 4-6 inches of potting mix and compost. Mix them well.
3. Planting the Seed Potatoes: Place the seed potatoes (or cut pieces) on top of the soil, with the eyes facing upwards. Space them about 8-10 inches apart if you’re planting multiple potatoes in the same container.
4. Cover with Soil: Cover the seed potatoes with another 4-6 inches of potting mix and compost.
5. Water Thoroughly: Water the container well until the water drains out of the bottom.
“Hilling” Your Potatoes
This is the secret to maximizing your potato harvest! Hilling encourages the potato plants to produce more tubers along the stems.
1. Wait for Growth: As the potato plants grow, they’ll start to emerge from the soil. Wait until the stems are about 6-8 inches tall.
2. Add More Soil: Add more potting mix and compost to the container, burying the stems up to the bottom set of leaves. This is the “hilling” process.
3. Repeat: Continue hilling every 2-3 weeks as the plants grow, until you reach the top of the container. Leave a few inches of space at the top for watering.
Caring for Your Potato Plants
Consistent care is key to a healthy and productive potato crop.
* Watering: Potatoes need consistent moisture, especially during tuber formation. Water deeply whenever the top inch of soil feels dry to the touch. Avoid overwatering, as this can lead to rot.
* Sunlight: Potatoes need at least 6-8 hours of sunlight per day. Place your containers in a sunny location.
* Fertilizing (Optional): If you’re using a slow-release fertilizer, follow the package instructions. You can also side-dress with compost every few weeks.
* Pest Control: Keep an eye out for pests like aphids, potato beetles, and flea beetles. Hand-pick them off or use an organic insecticide if necessary.
* Disease Prevention: Proper watering and good air circulation can help prevent diseases like blight. Avoid overhead watering, which can spread fungal diseases.
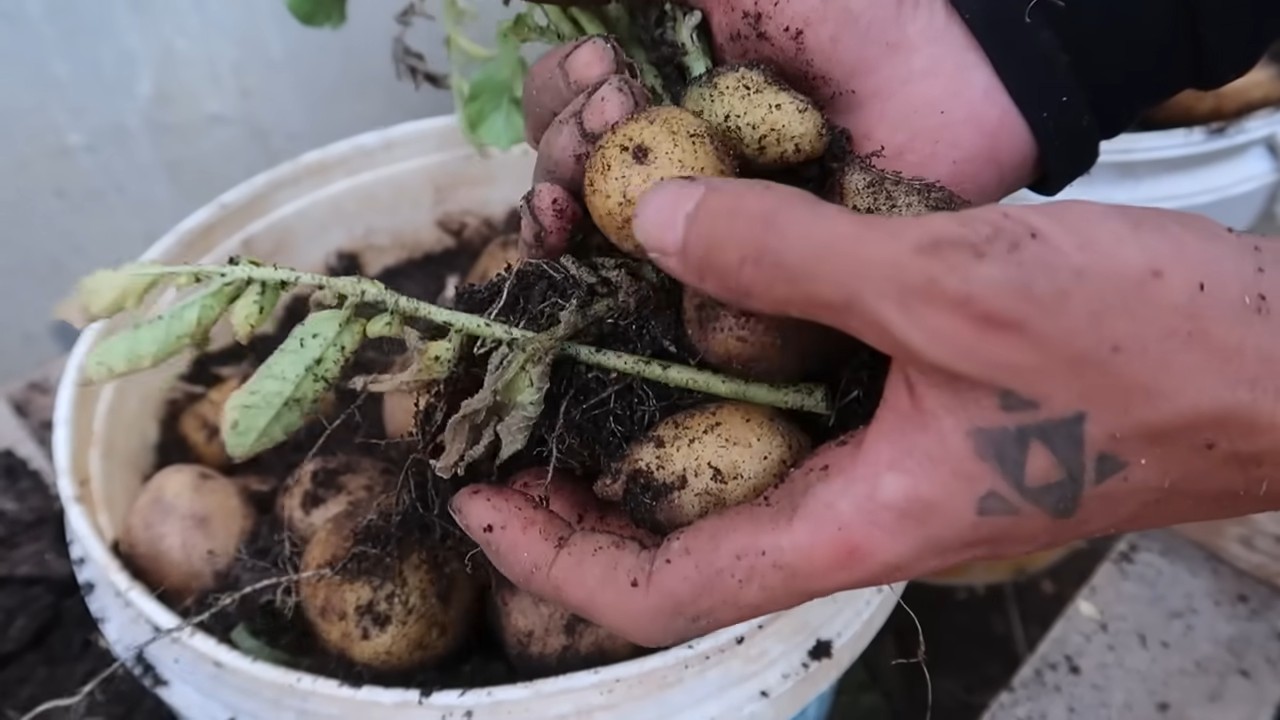
Harvesting Your Potatoes
The moment we’ve all been waiting for – harvesting those homegrown potatoes!
* When to Harvest: You can harvest “new potatoes” (small, tender potatoes) about 7-8 weeks after planting. For mature potatoes, wait until the foliage starts to turn yellow and die back, usually around 10-12 weeks after planting.
* Harvesting New Potatoes: Gently dig around the base of the plant and harvest the smaller potatoes. Be careful not to disturb the rest of the plant, as it will continue to produce more potatoes.
* Harvesting Mature Potatoes: Once the foliage has died back, stop watering the plants. Let the soil dry out for a week or two. Then, carefully dump the container onto a tarp or sheet. Gently sift through the soil and collect your potatoes!
* Curing (Optional): If you plan to store your potatoes for a longer period, you can cure them. Spread them out in a cool, dark, and well-ventilated place for about a week. This helps to toughen the skins and prevent rot.
Troubleshooting
Even with the best care, you might encounter some challenges along the way. Here are a few common issues and how to address them:
* Yellowing Leaves: This could be a sign of overwatering, underwatering, nutrient deficiency, or disease. Check the soil moisture, fertilize if necessary, and look for signs of pests or diseases.
* Small Potatoes: This could be due to insufficient sunlight, lack of nutrients, or overcrowding. Make sure your plants are getting enough sunlight, fertilize regularly, and use larger containers if necessary.
* Rotting Potatoes: This is usually caused by overwatering or poor drainage. Make sure your containers have adequate drainage holes and avoid overwatering.
Choosing the Right Potato Variety
Selecting the right potato variety is key to a successful and satisfying harvest. Here’s a breakdown of some popular choices:
* Russet Potatoes: These are the classic baking potatoes, known for their fluffy texture and earthy flavor. They’re also great for making fries.
* Yukon Gold Potatoes: These all-purpose potatoes have a creamy texture and buttery flavor. They’re excellent for boiling, mashing, roasting, and frying.
* Red Potatoes: These waxy potatoes hold their shape well when cooked, making them ideal for boiling, salads, and potato soups.
* Fingerling Potatoes: These small, elongated potatoes have a unique shape and a firm texture. They’re delicious roasted or steamed.
* Purple Potatoes: These vibrant potatoes add a pop of color to any dish. They have a slightly nutty flavor and are great for roasting, mashing, or making potato chips.
Tips for Success
Here are a few extra tips to help you grow the best potatoes possible:
* Rotate Your Crops: Avoid planting potatoes in the same container year after year. This can help prevent soilborne diseases.
* Use Organic Practices: Opt for organic potting mix, compost, and fertilizers to grow healthy and sustainable potatoes.
* Mulch: Add a layer of mulch around the base of the plants to help retain moisture and suppress weeds.
* Be Patient: Growing potatoes takes time and patience. Don’t get discouraged if you don’t see results immediately.
Enjoy Your Homegrown Potatoes!
There you have it! Growing potatoes in containers is a rewarding and easy way to enjoy fresh, homegrown potatoes, even if you don’t have a lot of space. I hope this guide has inspired you to give it a try. Happy gardening, and happy eating!
Conclusion
So, there you have it! Growing potatoes in containers is not just a gardening trend; it’s a game-changer for anyone with limited space, a desire for fresh, homegrown produce, or simply a yearning to connect with nature. We’ve walked through the steps, from selecting the right container and seed potatoes to nurturing your plants and harvesting your bounty. But why is this DIY trick a must-try?
First and foremost, it democratizes potato cultivation. No sprawling acreage is required. A sunny balcony, a patio, or even a well-lit deck can become your personal potato patch. This accessibility makes fresh, organic potatoes available to a wider range of people, regardless of their living situation.
Secondly, container gardening offers unparalleled control. You dictate the soil composition, the watering schedule, and the pest management strategies. This level of control translates to healthier plants and, ultimately, more delicious and nutritious potatoes. You can tailor the environment to perfectly suit the needs of your chosen potato variety, maximizing your yield and minimizing potential problems.
Thirdly, it’s incredibly rewarding. There’s something deeply satisfying about nurturing a plant from a small seed potato to a thriving, potato-laden specimen. The anticipation of the harvest, the joy of digging into the soil, and the pride of serving your own homegrown potatoes are experiences that simply can’t be replicated by buying them at the store.
But the beauty of growing potatoes in containers lies not only in its practicality and reward but also in its adaptability. Feel free to experiment with different potato varieties. Russets, Yukon Golds, fingerlings – each offers a unique flavor and texture profile. Try adding companion plants like marigolds or basil to deter pests and enhance the overall health of your container garden. Consider using different types of containers – fabric pots, plastic tubs, even repurposed barrels – to find what works best for your space and aesthetic preferences.
Variations and Suggestions:
* Vertical Potato Towers: For those truly limited on space, consider building a vertical potato tower. These structures allow you to grow multiple layers of potatoes in a single, compact footprint.
* Self-Watering Containers: If you’re prone to forgetting to water your plants, invest in self-watering containers. These containers have a reservoir at the bottom that slowly releases water to the soil, keeping your potatoes consistently hydrated.
* Organic Fertilizers: While chemical fertilizers can provide quick results, organic fertilizers like compost tea or worm castings offer a more sustainable and environmentally friendly approach to feeding your potato plants.
* Succession Planting: Plant new seed potatoes every few weeks to ensure a continuous harvest throughout the growing season.
We encourage you to embrace this DIY trick and embark on your own potato-growing adventure. Don’t be afraid to experiment, learn from your mistakes, and adapt the techniques to suit your specific needs and preferences. And most importantly, share your experiences! Post photos of your container gardens, share your tips and tricks, and connect with other potato enthusiasts online. Let’s create a community of container potato growers and spread the joy of homegrown goodness. So, grab your seed potatoes, your containers, and your gardening gloves, and get ready to experience the magic of growing your own potatoes! This method of **growing potatoes in containers** is a simple way to get started.
Frequently Asked Questions (FAQ)
Q: What is the best type of container for growing potatoes?
A: The best type of container for growing potatoes is one that is at least 15 gallons in size and has drainage holes. Fabric pots are a popular choice because they allow for good airflow and drainage, preventing the roots from becoming waterlogged. Plastic tubs and repurposed barrels can also be used, but make sure they have adequate drainage. The material of the container isn’t as important as the size and drainage capabilities. Dark-colored containers can heat up quickly in direct sunlight, so consider using lighter colors or providing shade during the hottest part of the day.
Q: What kind of soil should I use for growing potatoes in containers?
A: Potatoes need well-draining, nutrient-rich soil. A good mix consists of equal parts potting soil, compost, and perlite or vermiculite. The potting soil provides a base for the plants to grow, the compost adds essential nutrients, and the perlite or vermiculite improves drainage and aeration. Avoid using garden soil, as it can be too heavy and compact, hindering root growth. You can also amend your soil with slow-release organic fertilizer to provide a steady supply of nutrients throughout the growing season.
Q: How often should I water my container potatoes?
A: Water your container potatoes regularly, especially during hot and dry weather. The soil should be kept consistently moist, but not waterlogged. Check the soil moisture by sticking your finger about an inch into the soil. If it feels dry, it’s time to water. Overwatering can lead to root rot, so be sure to allow the soil to dry out slightly between waterings. The frequency of watering will depend on the size of your container, the weather conditions, and the type of soil you’re using.
Q: How much sunlight do potatoes need?
A: Potatoes need at least six hours of direct sunlight per day to thrive. Choose a location for your container garden that receives plenty of sunlight throughout the day. If you live in a particularly hot climate, you may need to provide some afternoon shade to prevent the plants from overheating. Insufficient sunlight can result in weak, leggy plants and reduced potato production.
Q: How do I “hill” potatoes in a container?
A: “Hilling” is the process of adding more soil to the container as the potato plants grow. This encourages the plants to produce more potatoes along the buried stem. Start by filling the container about one-third full with soil. As the plants grow, gradually add more soil, burying the lower portion of the stem. Continue this process until the container is almost full. Be careful not to bury the leaves of the plant.
Q: When should I harvest my container potatoes?
A: You can begin harvesting “new potatoes” (small, immature potatoes) about 7-8 weeks after planting. To harvest new potatoes, carefully dig around the edges of the container and remove a few potatoes. For mature potatoes, wait until the foliage begins to die back, usually about 12-15 weeks after planting. At this point, the potatoes will have developed a thicker skin and will store better. To harvest, simply dump the contents of the container onto a tarp or other surface and collect the potatoes.
Q: What are some common pests and diseases that affect container potatoes?
A: Common pests that can affect container potatoes include aphids, potato beetles, and flea beetles. Diseases include early blight, late blight, and potato scab. Regularly inspect your plants for signs of pests or diseases. If you find any, take action immediately. Organic pest control methods include using insecticidal soap, neem oil, or hand-picking pests off the plants. To prevent diseases, ensure good air circulation, avoid overwatering, and use disease-resistant potato varieties.
Q: Can I grow potatoes in containers indoors?
A: While it’s possible to grow potatoes in containers indoors, it can be challenging. Potatoes need a lot of sunlight, which can be difficult to provide indoors. If you do decide to grow potatoes indoors, you’ll need to supplement with grow lights. You’ll also need to ensure good air circulation and proper drainage. It’s generally easier and more successful to grow potatoes in containers outdoors.
Q: Can I reuse the soil from my potato containers?
A: It’s generally not recommended to reuse the soil from your potato containers for growing potatoes again. Potatoes can deplete the soil of nutrients, and the soil may also harbor pests or diseases. However, you can reuse the soil for other plants that are not susceptible to the same pests or diseases. Before reusing the soil, amend it with compost and other organic matter to replenish the nutrients.
Q: What if my potato plants are flowering?
A: Potato plants flowering is a normal part of their growth cycle. While some believe that flowering indicates the plant is putting energy into producing flowers rather than potatoes, it doesn’t necessarily mean you’ll have a smaller harvest. You can remove the flowers if you prefer, but it’s not essential. The most important thing is to provide your plants with adequate sunlight, water, and nutrients.
Leave a Comment