
Growing Sprouts at Home is easier than you think, and I’m here to show you how! Forget those pricey trips to the health food store – imagine having a constant supply of fresh, nutrient-packed sprouts right on your kitchen counter. Sounds amazing, right?
Sprouting, in fact, isn’t a new-fangled health trend. It has roots stretching back centuries! Ancient cultures, particularly in Asia, recognized the incredible nutritional power of sprouted seeds and beans. They understood that sprouting unlocks a wealth of vitamins and enzymes, making these tiny powerhouses even more beneficial. Think of it as nature’s way of supercharging your food!
But why should *you* bother growing sprouts at home? Well, beyond the historical significance and nutritional benefits, it’s incredibly practical. In today’s world, where we’re all looking for ways to eat healthier, save money, and reduce our environmental impact, sprouting ticks all the boxes. Plus, it’s a fun and rewarding project, even if you don’t have a green thumb. I’ll guide you through simple DIY methods that require minimal effort and equipment. Get ready to add a burst of freshness to your salads, sandwiches, and stir-fries with your very own homegrown sprouts!

Growing Sprouts at Home: A Beginner’s Guide
Hey there, fellow food enthusiasts! Ever thought about growing your own food, but felt intimidated by the whole gardening thing? Well, I’ve got the perfect solution for you: sprouts! They’re incredibly easy to grow, packed with nutrients, and add a delicious crunch to salads, sandwiches, and just about anything else. Plus, you can grow them right in your kitchen, no green thumb required! Let’s dive into how you can become a sprout-growing pro.
What You’ll Need
Before we get started, let’s gather our supplies. The beauty of sprouting is that you probably already have most of these things lying around.
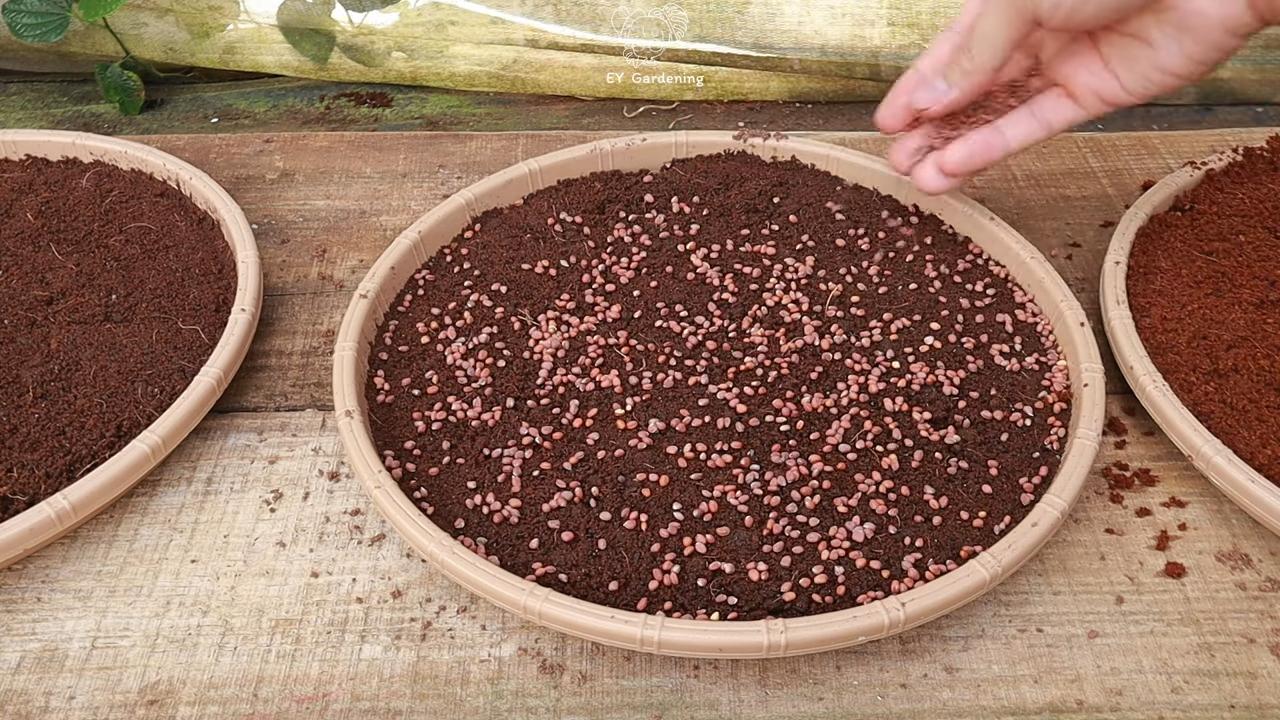
* Sprouting Seeds: This is the most important part! You can use a variety of seeds, including alfalfa, broccoli, radish, mung beans, lentils, and even quinoa. Make sure you buy seeds specifically labeled for sprouting, as regular garden seeds may be treated with chemicals. I usually get mine from the health food store or online.
* Sprouting Jar or Container: A wide-mouth mason jar works perfectly. You can also use a plastic container, but make sure it’s food-grade and BPA-free. I prefer glass because it’s easier to clean and doesn’t retain odors.
* Sprouting Lid or Cheesecloth: You’ll need something to cover the jar and allow for drainage. A sprouting lid with a mesh screen is ideal, but you can also use cheesecloth secured with a rubber band. I’ve even used a piece of nylon stocking in a pinch!
* Water: Clean, filtered water is best.
* A Dark Place: Sprouts don’t need light to germinate, so a cupboard or drawer works great.
* A Well-Ventilated Area: After the initial soaking, you’ll want to keep your sprouts in a place with good air circulation to prevent mold growth.
Step-by-Step Sprouting Guide
Okay, now for the fun part! Here’s how to grow your own delicious sprouts:
1. Soaking the Seeds:
* Measure Your Seeds: Start with a small amount of seeds. They expand significantly during sprouting, so don’t overcrowd your jar. I usually use 1-2 tablespoons of small seeds like alfalfa or broccoli, and ¼ – ½ cup of larger seeds like mung beans or lentils.
* Rinse Thoroughly: Place the seeds in your sprouting jar and rinse them well with cool water. This removes any debris or dust.
* Add Water: Fill the jar with cool water, about 2-3 times the volume of the seeds.
* Soak Time: Cover the jar with your sprouting lid or cheesecloth and let the seeds soak in a dark place for the recommended time. This varies depending on the type of seed:
* Alfalfa, Broccoli, Radish: 4-8 hours
* Mung Beans, Lentils: 8-12 hours
* Quinoa: 2-4 hours
* Why Soaking is Important: Soaking hydrates the seeds and triggers the germination process. It’s like waking them up and telling them it’s time to grow!
2. Draining and Rinsing:
* Drain the Water: After the soaking period, drain the water thoroughly through the sprouting lid or cheesecloth. Make sure to get rid of all the water, as standing water can lead to mold.
* Rinse Again: Rinse the seeds with fresh, cool water. This helps to keep them clean and hydrated.
* Invert the Jar: Place the jar upside down at an angle in a bowl or rack to allow for proper drainage. This is crucial to prevent water from pooling at the bottom. I usually use a dish rack.
3. Rinsing and Draining (The Daily Grind!):
* Rinse 2-3 Times a Day: This is the most important part of the sprouting process! Rinse the sprouts with fresh, cool water 2-3 times a day. This keeps them hydrated and prevents mold growth.
* Drain Thoroughly: After each rinse, make sure to drain the water completely. Again, standing water is the enemy!
* Maintain Airflow: Keep the jar inverted at an angle in a well-ventilated area. This allows air to circulate around the sprouts.
* Why Rinse So Often?: Rinsing provides the sprouts with the moisture they need to grow and washes away any metabolic byproducts that can contribute to spoilage.
4. Harvesting Your Sprouts:
* Check for Readiness: Sprouts are usually ready to harvest in 3-7 days, depending on the type of seed and your personal preference. They should have small tails and, in some cases, tiny green leaves.
* Green Up (Optional): If you want your sprouts to be greener, you can expose them to indirect sunlight for a day or two before harvesting. This will encourage chlorophyll production. Be careful not to expose them to direct sunlight, as this can dry them out.
* Final Rinse: Give the sprouts a final rinse with cool water.
* Remove Hulls (Optional): Some people prefer to remove the seed hulls before eating the sprouts. You can do this by placing the sprouts in a bowl of water and gently agitating them. The hulls will float to the top and can be skimmed off. I usually don’t bother with this step, as the hulls are perfectly edible.
* Drain Well: Drain the sprouts thoroughly. You can use a salad spinner to remove excess water.
5. Storing Your Sprouts:
* Dry Thoroughly: The key to storing sprouts is to make sure they are completely dry. Excess moisture will lead to spoilage.
* Store in the Refrigerator: Place the sprouts in a clean, airtight container lined with a paper towel. The paper towel will absorb any excess moisture.
* Shelf Life: Sprouts will typically last for 5-7 days in the refrigerator.
* Check for Spoilage: Before eating, always check the sprouts for any signs of spoilage, such as a slimy texture, a foul odor, or mold growth. If you see any of these signs, discard the sprouts immediately.
Troubleshooting Common Sprouting Problems
Even with the best intentions, sometimes things can go wrong. Here are some common sprouting problems and how to fix them:
* Mold Growth: This is the most common problem. It’s usually caused by insufficient rinsing, poor drainage, or lack of airflow. To prevent mold growth, make sure to rinse the sprouts thoroughly 2-3 times a day, drain them well, and keep them in a well-ventilated area. If you see mold, discard the entire batch.
* Rotting Seeds: This is usually caused by overwatering or using old seeds. Make sure to use fresh seeds and avoid overwatering.
* Slow Germination: This can be caused by cold temperatures or using old seeds. Try keeping the sprouts in a warmer location and using fresh seeds.
* Unpleasant Odor: This can be caused by bacterial growth. Make sure to rinse the sprouts thoroughly and keep them clean.
Seed Specific Tips
While the general process is the same, here are a few tips for specific types of seeds:
* Alfalfa: These are small and easy to sprout. They have a mild, slightly sweet flavor.
* Broccoli: These have a slightly spicy, radish-like flavor. They are a great source of sulforaphane, a powerful antioxidant.
* Radish: These are very spicy and add a kick to any dish.
* Mung Beans: These are larger and require a longer soaking time. They have a mild, slightly nutty flavor.
* Lentils: These are also larger and require a longer soaking time. They have a hearty, earthy flavor.
* Quinoa: These are very small and can be a bit tricky to sprout. They have a slightly bitter flavor, so it’s important to rinse them well.
Why I Love Sprouting
I’ve been sprouting for years, and I absolutely love it! It’s such a rewarding feeling to grow your own food, even if it’s just a small amount. Sprouts are incredibly versatile and can be used in so many different ways. I add them to salads, sandwiches, soups, and even smoothies. They’re also a great way to add extra nutrients to your diet.
Sprouts are a nutritional powerhouse! They’re packed with vitamins, minerals, enzymes, and antioxidants. They’re also a good source of protein and fiber.
So, what are you waiting for? Give sprouting a try! It’s easy, fun, and a great way to add fresh, healthy food to your diet. Happy sprouting!
Conclusion
So, there you have it! Growing sprouts at home is not only incredibly easy and cost-effective, but it’s also a fantastic way to inject a burst of fresh, living nutrients into your diet, especially during the colder months when fresh produce might be less readily available or more expensive. Forget those pre-packaged sprouts that can sometimes be a little… questionable. With this simple DIY method, you’re in complete control of the process, ensuring freshness, cleanliness, and the satisfaction of knowing exactly where your food comes from.
This isn’t just about saving money; it’s about empowering yourself to cultivate a healthier lifestyle. Imagine adding a handful of crunchy alfalfa sprouts to your morning avocado toast, or sprinkling some spicy radish sprouts over your lunchtime salad. The possibilities are endless! And the best part? You can tailor your sprout garden to your own taste preferences.
Why is this DIY trick a must-try? Because it’s a game-changer. It’s a sustainable, space-saving, and incredibly rewarding way to access fresh, nutrient-rich food year-round. It’s a project that even the most novice gardener can successfully undertake, and it’s a fantastic way to get kids involved in the process of growing their own food.
Variations and Suggestions
Don’t be afraid to experiment! Once you’ve mastered the basics, you can start exploring different types of seeds. Try broccoli sprouts for their potent antioxidant properties, or mung bean sprouts for a classic Asian-inspired addition to stir-fries. You can even create your own sprout mixes for a unique flavor profile.
Consider using different sprouting containers as well. While a mason jar is a great starting point, you might eventually want to invest in a multi-tiered sprouting system for larger yields. You can also explore using hemp mats or other specialized sprouting media.
And remember, hygiene is key. Always use clean water and thoroughly rinse your sprouts at least twice a day to prevent the growth of mold or bacteria. If you notice any signs of spoilage, discard the sprouts immediately.
We are confident that you will find that growing sprouts at home is a rewarding experience.
Share Your Sprouting Success!
We’re so excited for you to embark on your sprouting journey! We encourage you to give this DIY trick a try and see for yourself how easy and rewarding it can be. And most importantly, we want to hear about your experience! Share your photos, tips, and favorite sprout combinations in the comments below. Let’s build a community of sprout enthusiasts and inspire others to embrace the power of homegrown goodness. Happy sprouting!
Frequently Asked Questions (FAQ)
What types of seeds are best for sprouting?
The best seeds for sprouting are those specifically labeled for sprouting or microgreens. These seeds have been tested for germination rates and are less likely to be treated with chemicals that could be harmful. Some popular choices include alfalfa, broccoli, radish, mung bean, lentil, and clover. Avoid using seeds intended for planting in the garden, as they may have been treated with fungicides or other chemicals. Always purchase your seeds from a reputable source to ensure quality and safety.
How long does it take for sprouts to grow?
The sprouting time varies depending on the type of seed. Generally, most sprouts will be ready to harvest in 3 to 7 days. Alfalfa and clover sprouts typically take 5 to 7 days, while radish and broccoli sprouts may be ready in as little as 3 to 5 days. Mung bean sprouts, often used in Asian cuisine, can take slightly longer, around 5 to 7 days. Keep a close eye on your sprouts and harvest them when they have reached your desired length and leaf development.
How do I prevent mold from growing on my sprouts?
Preventing mold growth is crucial for successful sprouting. The key is to maintain good hygiene and proper ventilation. Always use clean water and thoroughly rinse your sprouts at least twice a day. Ensure that your sprouting container has adequate drainage to prevent water from pooling at the bottom. Avoid overcrowding the container with too many seeds, as this can restrict airflow. If you live in a humid environment, consider using a fan to improve air circulation around your sprouts. If you notice any signs of mold, such as a fuzzy or slimy appearance, discard the entire batch immediately.
How do I store sprouts after harvesting?
Once your sprouts are ready to harvest, rinse them thoroughly and drain them well. Gently pat them dry with a clean paper towel or salad spinner. Store the sprouts in a clean, airtight container in the refrigerator. They should last for up to a week, but it’s best to use them as soon as possible for optimal freshness and flavor. Check the sprouts daily for any signs of spoilage and discard them if necessary.
Can I eat sprouts if they have green leaves?
Yes, it’s perfectly safe to eat sprouts with green leaves. The green color indicates that the sprouts have been exposed to light and have begun to photosynthesize, producing chlorophyll. In fact, some people prefer the taste of sprouts with green leaves, as they tend to be slightly sweeter and more flavorful. However, avoid exposing your sprouts to direct sunlight for extended periods, as this can cause them to become bitter or tough.
Are there any health risks associated with eating sprouts?
While sprouts are generally safe to eat, there is a small risk of foodborne illness if they are not grown or handled properly. Sprouts are grown in warm, humid conditions, which can also be conducive to the growth of bacteria such as Salmonella and E. coli. To minimize this risk, always purchase your seeds from a reputable source, use clean water and equipment, and thoroughly rinse your sprouts before eating them. If you are pregnant, elderly, or have a weakened immune system, it’s best to cook sprouts before consuming them to kill any potential bacteria.
Can I grow sprouts without a special sprouting container?
Yes, you can absolutely grow sprouts without a special sprouting container. A simple mason jar with a sprouting lid or cheesecloth secured with a rubber band works perfectly well. You can also use a colander or strainer lined with cheesecloth. The key is to ensure that your container provides adequate drainage and ventilation.
What do I do if my sprouts smell bad?
A foul odor is a sign that your sprouts have spoiled and should be discarded immediately. This is usually caused by bacterial contamination or inadequate rinsing. Always rinse your sprouts thoroughly at least twice a day and ensure that your sprouting container has good drainage. If you notice a bad smell, do not eat the sprouts.
Can I grow sprouts in soil?
While you can grow some types of sprouts in soil, it’s not the traditional method. Typically, sprouts are grown without soil, using only water and air. However, you can grow microgreens in soil, which are similar to sprouts but are allowed to grow for a longer period and develop true leaves. Microgreens are harvested by cutting the stems above the soil line.
How much light do sprouts need?
Sprouts don’t need a lot of light. In fact, they should be kept in a dark or dimly lit area for the first few days to encourage germination. Once the sprouts have started to grow, you can expose them to indirect sunlight to help them develop chlorophyll and turn green. Avoid exposing them to direct sunlight, as this can cause them to become bitter or tough.
Leave a Comment