
Growing water spinach at home can be surprisingly easy and rewarding, even if you don’t have a sprawling garden! Have you ever dreamed of snipping fresh, vibrant greens right from your backyard (or balcony!) to add to your stir-fries or salads? This DIY guide will unlock the secrets to cultivating this delicious and nutritious vegetable, bringing a taste of Southeast Asia right to your table.
Water spinach, also known as “kangkong,” has a rich history, deeply rooted in Asian cuisines for centuries. It’s a staple in many dishes across Southeast Asia, prized for its mild flavor and impressive nutritional benefits. But you don’t need to travel halfway across the world to enjoy it!
In today’s busy world, finding fresh, healthy, and affordable produce can be a challenge. That’s where growing water spinach at home comes in! This DIY project is perfect for beginners and experienced gardeners alike. It’s a fantastic way to reduce your grocery bill, enjoy organic greens, and connect with nature, all while adding a unique and flavorful ingredient to your meals. Plus, it’s incredibly satisfying to watch your own food grow from seed to plate. Let’s dive in and discover how you can easily cultivate this amazing vegetable in your own space!

Wasserspinat zu Hause anbauen: Dein DIY-Leitfaden für üppiges Grün
Hey Pflanzenfreunde! Habt ihr schon mal Wasserspinat probiert? Dieses knackige, leicht nussige Gemüse ist super lecker und unglaublich vielseitig. Und das Beste daran? Ihr könnt es ganz einfach selbst zu Hause anbauen! Ich zeige euch, wie ihr mit ein paar einfachen Schritten und Materialien euren eigenen kleinen Wasserspinat-Garten erschaffen könnt. Los geht’s!
Was du brauchst: Die Zutaten für deinen Wasserspinat-Erfolg
Bevor wir loslegen, hier eine Liste mit allem, was du für dein Wasserspinat-Projekt benötigst:
* Wasserspinat-Samen oder Stecklinge: Du kannst Samen online oder in einem Gartencenter kaufen. Stecklinge sind auch eine tolle Option, wenn du bereits Zugang zu einer Wasserspinat-Pflanze hast.
* Ein Gefäß: Ein großer Eimer, eine Wanne, ein Pflanzkübel oder sogar ein umfunktionierter Behälter – Hauptsache, er ist wasserdicht und fasst mindestens 20 Liter.
* Erde: Normale Blumenerde oder Gartenerde ist perfekt. Du brauchst keine spezielle Erde.
* Wasser: Leitungswasser ist in Ordnung, aber lass es am besten ein paar Stunden stehen, damit das Chlor verdunsten kann.
* Dünger: Ein wasserlöslicher Dünger für Blattgemüse ist ideal, aber du kannst auch organischen Dünger verwenden.
* Sonnenlicht: Wasserspinat liebt die Sonne! Ein sonniger Standort ist entscheidend für ein gutes Wachstum.
* Optional: Ein Rankgitter oder Stäbe, um die Pflanzen beim Wachsen zu unterstützen.
Die Vorbereitung: Der Grundstein für deinen Wasserspinat-Garten
Bevor wir mit dem Pflanzen beginnen, müssen wir ein paar Vorbereitungen treffen. Das ist wichtig, damit der Wasserspinat sich wohlfühlt und prächtig gedeiht.
1. Das Gefäß vorbereiten: Reinige dein Gefäß gründlich, um sicherzustellen, dass keine schädlichen Rückstände vorhanden sind. Wenn du ein Gefäß ohne Abflusslöcher verwendest (was ideal für Wasserspinat ist), achte darauf, dass es wirklich wasserdicht ist.
2. Die Erde vorbereiten: Fülle das Gefäß mit Erde, aber lass oben noch ein paar Zentimeter Platz. Die Erde sollte locker und gut durchlässig sein.
3. Die Samen vorbereiten (optional): Wenn du Samen verwendest, kannst du sie über Nacht in Wasser einweichen, um die Keimung zu beschleunigen. Das ist aber kein Muss.
Aussaat und Anpflanzen: Der Startschuss für dein grünes Paradies
Jetzt kommt der spannende Teil: das Aussäen oder Anpflanzen des Wasserspinats!
1. Aussaat (wenn du Samen verwendest): Verteile die Samen gleichmäßig auf der Erde. Drücke sie leicht an und bedecke sie mit einer dünnen Schicht Erde. Gieße die Erde vorsichtig an, sodass sie feucht, aber nicht durchnässt ist.
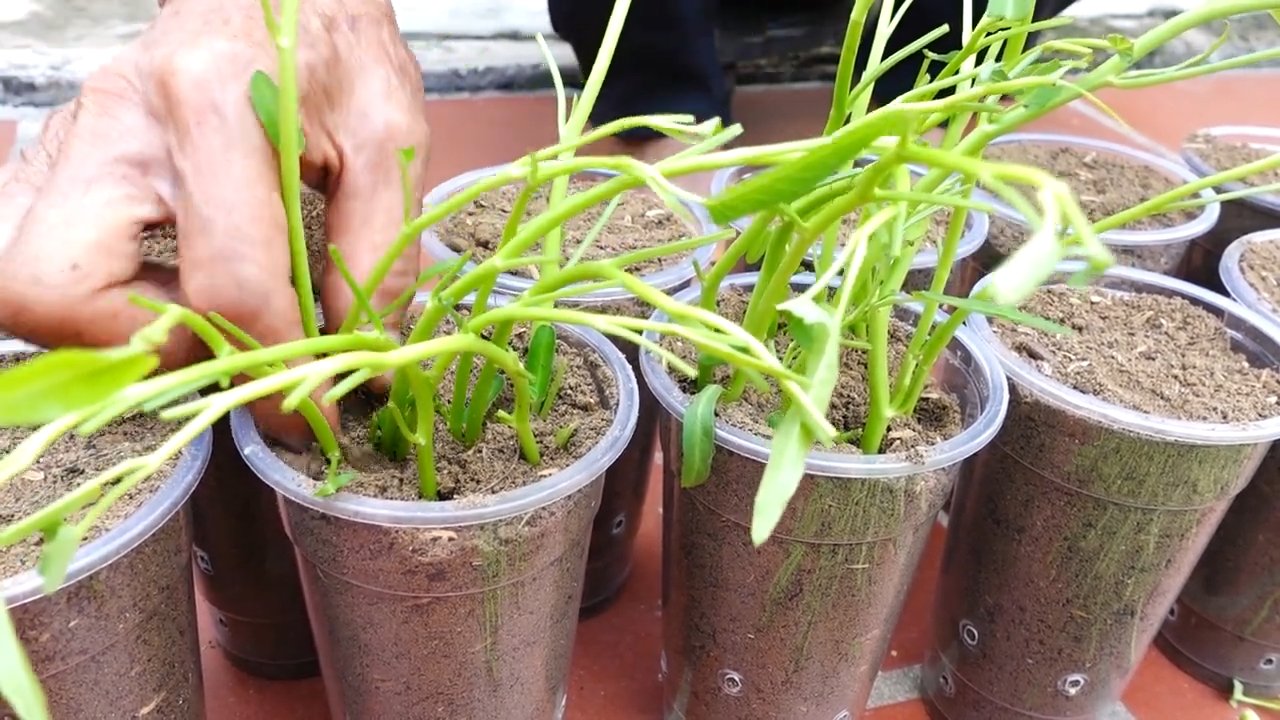
2. Anpflanzen (wenn du Stecklinge verwendest): Schneide gesunde Stecklinge von einer bestehenden Wasserspinat-Pflanze ab. Die Stecklinge sollten etwa 10-15 cm lang sein. Entferne die unteren Blätter, damit die Stecklinge besser Wurzeln schlagen können. Stecke die Stecklinge in die Erde, sodass etwa die Hälfte im Boden ist. Gieße die Erde vorsichtig an.
3. Der Standort: Stelle das Gefäß an einen sonnigen Ort. Wasserspinat braucht mindestens 6 Stunden Sonnenlicht pro Tag, um optimal zu wachsen.
Die Pflege: Damit dein Wasserspinat sich rundum wohlfühlt
Die richtige Pflege ist entscheidend, damit dein Wasserspinat gesund und kräftig wächst. Hier sind ein paar Tipps, die du beachten solltest:
1. Gießen: Wasserspinat liebt Wasser! Halte die Erde immer feucht, aber nicht durchnässt. Am besten gießt du täglich, besonders an heißen Tagen. Du kannst auch Wasser in das Gefäß füllen, sodass die Wurzeln immer im Wasser stehen.
2. Düngen: Dünge den Wasserspinat alle zwei Wochen mit einem wasserlöslichen Dünger für Blattgemüse. Befolge dabei die Anweisungen auf der Verpackung. Du kannst auch organischen Dünger verwenden, wie zum Beispiel Komposttee oder verdünnte Brennnesseljauche.
3. Beschneiden: Regelmäßiges Beschneiden fördert das Wachstum und verhindert, dass die Pflanzen zu lang und dünn werden. Schneide die Triebspitzen ab, um die Verzweigung anzuregen.
4. Rankhilfe (optional): Wenn deine Wasserspinat-Pflanzen sehr lang werden, kannst du ihnen eine Rankhilfe anbieten. Das kann ein Rankgitter, Stäbe oder einfach ein paar Schnüre sein.
5. Schädlinge und Krankheiten: Wasserspinat ist relativ resistent gegen Schädlinge und Krankheiten. Gelegentlich können Blattläuse auftreten. Diese kannst du einfach mit einem Wasserstrahl abspülen oder mit einem biologischen Insektizid bekämpfen.
Die Ernte: Der Lohn deiner Mühe
Nach etwa 4-6 Wochen kannst du deinen ersten Wasserspinat ernten!
1. Der richtige Zeitpunkt: Ernte den Wasserspinat, wenn die Stängel etwa 20-30 cm lang sind.
2. Die Erntetechnik: Schneide die Stängel mit einem scharfen Messer oder einer Schere ab. Lass die unteren Blätter stehen, damit die Pflanze weiterwachsen kann.
3. Die Lagerung: Wasserspinat ist nicht sehr lange haltbar. Am besten verarbeitest du ihn sofort nach der Ernte. Du kannst ihn aber auch für ein paar Tage im Kühlschrank aufbewahren. Wickle ihn dazu in ein feuchtes Tuch.
Extra-Tipps für den Wasserspinat-Profi
* Wasserspinat im Winter: In kälteren Regionen kannst du Wasserspinat auch im Haus anbauen. Stelle das Gefäß an ein helles Fenster oder verwende eine Pflanzenlampe.
* Wasserspinat vermehren: Du kannst Wasserspinat ganz einfach durch Stecklinge vermehren. Schneide einfach ein paar gesunde Stecklinge ab und stecke sie in Wasser. Nach ein paar Tagen bilden sich Wurzeln und du kannst die Stecklinge in Erde pflanzen.
* Wasserspinat in Hydrokultur: Wasserspinat eignet sich auch hervorragend für den Anbau in Hydrokultur. Dabei werden die Pflanzen nicht in Erde, sondern in einer Nährlösung gezogen.
Häufige Fehler und wie du sie vermeidest
* Zu wenig Sonne: Wasserspinat braucht viel Sonne. Wenn er zu wenig Licht bekommt, wird er lang und dünn und bildet keine kräftigen Blätter.
* Zu wenig Wasser: Wasserspinat ist eine Wasserpflanze. Wenn er zu wenig Wasser bekommt, welken die Blätter und die Pflanze stirbt ab.
* Zu viel Dünger: Zu viel Dünger kann die Wurzeln verbrennen und die Pflanze schädigen. Befolge immer die Anweisungen auf der Verpackung.
* Schädlinge ignorieren: Kontrolliere deine Pflanzen regelmäßig auf Schädlinge. Je früher du sie entdeckst, desto einfacher ist es, sie zu bekämpfen.
Wasserspinat in der Küche: Inspiration für deine Gerichte
Wasserspinat ist unglaublich vielseitig und kann in vielen verschiedenen Gerichten verwendet werden. Hier sind ein paar Ideen:
* Gebratener Wasserspinat: Ein Klassiker! Brate den Wasserspinat mit Knoblauch, Chili und Sojasauce an.
* Wasserspinat-Suppe: Eine leckere und gesunde Suppe. Koche den Wasserspinat mit Brühe, Ingwer und Knoblauch.
* Wasserspinat-Salat: Ein erfrischender Salat mit Wasserspinat, Gurke, Tomaten und einem leichten Dressing.
* Wasserspinat-Curry: Ein aromatisches Curry mit Wasserspinat, Kokosmilch und Gewürzen.
* Wasserspinat-Smoothie: Ein grüner Smoothie mit Wasserspinat, Banane, Mango und Joghurt.
Ich hoffe, dieser Leitfaden hat dir geholfen, deinen eigenen Wasserspinat-Garten zu starten. Viel Spaß beim Anbauen und Genießen! Und denk daran: Mit ein bisschen Geduld und
Conclusion
So, there you have it! Growing water spinach at home is not only achievable, but it’s also incredibly rewarding. From the vibrant green leaves gracing your table to the sheer satisfaction of nurturing your own food, this DIY project is a game-changer for any home cook or gardening enthusiast. Forget relying solely on grocery stores; with a little effort and the right conditions, you can have a constant supply of fresh, crisp water spinach right at your fingertips.
But why is this a must-try? Beyond the convenience, consider the superior quality. Homegrown water spinach boasts a freshness and flavor profile that store-bought varieties simply can’t match. You control the growing environment, ensuring it’s free from harmful pesticides and chemicals. Plus, it’s a fantastic way to reduce your carbon footprint by minimizing transportation and packaging waste.
Ready to take your water spinach cultivation to the next level? Experiment with different growing mediums. While we’ve focused on soil and water methods, you can also explore hydroponics for even faster growth and nutrient control. Try varying the nutrient solutions you use, observing how different formulations affect the taste and texture of your harvest. Consider adding companion plants like basil or mint to deter pests naturally and potentially enhance the flavor of your water spinach.
Don’t be afraid to get creative with your harvest! Water spinach is incredibly versatile in the kitchen. Stir-fries are a classic, but it’s also delicious in soups, salads, and even as a steamed side dish. Experiment with different sauces and seasonings to find your favorite flavor combinations. Think garlic, ginger, chili, soy sauce, oyster sauce – the possibilities are endless!
We wholeheartedly encourage you to embark on this exciting DIY adventure. Growing water spinach at home is a simple yet profound way to connect with nature, enhance your culinary creations, and embrace a more sustainable lifestyle. We are confident that you will find the process both enjoyable and incredibly satisfying.
Now, we want to hear from you! Have you tried growing water spinach at home before? What challenges did you face, and what tips would you share with fellow gardeners? We invite you to share your experiences, photos, and recipes in the comments below. Let’s create a community of water spinach enthusiasts and learn from each other’s successes and failures. Your insights could be invaluable to someone just starting out. So, grab your seeds, prepare your growing medium, and get ready to enjoy the delicious rewards of your own homegrown water spinach! We can’t wait to see what you create!
Frequently Asked Questions (FAQ)
What are the ideal growing conditions for water spinach?
Water spinach thrives in warm, humid environments with plenty of sunlight. Aim for at least 6 hours of direct sunlight per day. The ideal temperature range is between 70°F and 85°F (21°C and 29°C). Water spinach also requires consistently moist soil or water, depending on your chosen growing method. Ensure proper drainage if growing in soil to prevent root rot. If growing in water, change the water regularly to prevent stagnation and algae growth.
How long does it take to grow water spinach from seed to harvest?
Water spinach is a fast-growing plant. Under optimal conditions, you can expect to harvest your first crop within 4 to 6 weeks from planting seeds. Subsequent harvests can be done every 2 to 3 weeks as the plant continues to grow and produce new leaves. The exact time frame may vary depending on factors such as temperature, sunlight, and nutrient availability.
What are some common pests and diseases that affect water spinach, and how can I prevent them?
Common pests that may affect water spinach include aphids, spider mites, and leaf miners. To prevent infestations, regularly inspect your plants for signs of pests. You can use organic pest control methods such as neem oil, insecticidal soap, or introducing beneficial insects like ladybugs. Diseases like fungal leaf spots can occur in humid conditions. Ensure good air circulation around your plants and avoid overwatering to prevent fungal growth. Remove any infected leaves promptly to prevent the spread of disease.
Can I grow water spinach indoors?
Yes, you can grow water spinach indoors, but you’ll need to provide adequate lighting. A sunny windowsill that receives at least 6 hours of direct sunlight is ideal. If you don’t have enough natural light, you can supplement with grow lights. Use a well-draining potting mix and ensure proper ventilation to prevent fungal diseases. Consider using a hydroponic system for indoor growing, as it can provide optimal nutrient delivery and water management.
What kind of fertilizer should I use for water spinach?
Water spinach benefits from regular fertilization to support its rapid growth. Use a balanced fertilizer with equal amounts of nitrogen, phosphorus, and potassium (e.g., 10-10-10). You can also use organic fertilizers such as compost tea, fish emulsion, or seaweed extract. Apply fertilizer every 2 to 3 weeks, following the instructions on the product label. Avoid over-fertilizing, as this can lead to excessive vegetative growth and reduced flavor.
How do I harvest water spinach?
Harvest water spinach by cutting the stems about 4 to 6 inches above the soil or water line. This will encourage the plant to produce new shoots and leaves. You can harvest individual leaves as needed or cut entire stems. It’s best to harvest in the morning when the leaves are crisp and fresh. Avoid harvesting during the hottest part of the day, as the leaves may wilt quickly.
Is water spinach safe to eat? Are there any precautions I should take?
Water spinach is generally safe to eat, but it’s important to source it from a reputable source or grow it yourself to ensure it’s free from contaminants. Avoid consuming water spinach that has been grown in polluted water or soil, as it can accumulate heavy metals and other toxins. Wash the leaves thoroughly before cooking to remove any dirt or debris. People with kidney problems should consume water spinach in moderation due to its high oxalate content.
Can I grow water spinach in containers? What size container should I use?
Yes, water spinach can be successfully grown in containers. Choose a container that is at least 12 inches deep and 12 inches wide to provide enough space for the roots to grow. Ensure the container has drainage holes to prevent waterlogging. Use a well-draining potting mix and provide regular watering and fertilization. You can grow multiple plants in a larger container, spacing them about 6 to 8 inches apart.
How do I save seeds from water spinach?
Saving seeds from water spinach can be a bit challenging, as it requires allowing the plant to flower and produce seeds. Water spinach typically flowers in response to shorter day lengths, so you may need to wait until the fall or winter months. Allow the flowers to dry on the plant, then collect the seed pods. Extract the seeds from the pods and dry them thoroughly before storing them in an airtight container in a cool, dark place. Note that seeds saved from hybrid varieties may not produce plants that are true to type.
What are some creative ways to use water spinach in cooking?
Beyond stir-fries, water spinach can be used in a variety of dishes. Add it to soups and stews for a nutritious boost. Use it as a base for salads, pairing it with other greens, vegetables, and dressings. Steam or blanch it and serve it as a side dish with garlic and soy sauce. You can also use it in omelets, frittatas, and quiches. Experiment with different flavor combinations and cooking methods to discover your favorite ways to enjoy this versatile vegetable. Don’t be afraid to try pickling or fermenting water spinach for a unique and tangy treat.

Leave a Comment