
Growing water spinach easily is simpler than you might think, and I’m here to show you how! Have you ever dreamt of harvesting fresh, vibrant greens right from your own backyard, ready to add a delicious and nutritious boost to your meals? Well, dream no more! This DIY guide will unlock the secrets to cultivating this amazing vegetable, also known as Ong Choy, right at home.
Water spinach has a rich history, deeply rooted in Asian cuisine and culture. For centuries, it’s been a staple in dishes across Southeast Asia, prized for its mild flavor and impressive nutritional value. Beyond its culinary uses, it’s also been recognized in traditional medicine for its potential health benefits. But you don’t need to travel to Asia to enjoy this fantastic vegetable.
In today’s fast-paced world, knowing how to growing water spinach easily is more valuable than ever. Imagine skipping the grocery store lines and enjoying the satisfaction of harvesting your own organic, pesticide-free greens. Plus, it’s a fantastic way to connect with nature, reduce your carbon footprint, and add a touch of green to your living space. Whether you’re a seasoned gardener or a complete beginner, this step-by-step guide will empower you to grow your own thriving water spinach patch. Let’s get started!
Wasserspinat (Ong Choy) einfach selbst anbauen: Eine DIY-Anleitung
Hallo liebe Gartenfreunde! Ich liebe Wasserspinat, auch bekannt als Ong Choy oder Morning Glory. Er ist knackig, lecker und super einfach anzubauen, selbst wenn du keinen grünen Daumen hast. In diesem Artikel zeige ich dir, wie du diesen asiatischen Liebling in deinem eigenen Garten oder sogar in einem Topf auf dem Balkon ziehen kannst. Los geht’s!
Was du brauchst:
* Samen oder Stecklinge: Du kannst Wasserspinat entweder aus Samen ziehen oder Stecklinge von einer bereits gewachsenen Pflanze nehmen. Samen sind leichter zu bekommen, aber Stecklinge wachsen schneller.
* Behälter: Ein Topf, ein Eimer, eine Wanne oder sogar ein alter Wäschekorb – alles ist möglich, solange es groß genug ist und Abflusslöcher hat (oder du bereit bist, sehr vorsichtig zu gießen).
* Erde: Normale Blumenerde oder eine Mischung aus Gartenerde und Kompost funktioniert prima. Wasserspinat ist nicht wählerisch.
* Wasser: Viel Wasser! Wasserspinat liebt es feucht.
* Sonnenlicht: Mindestens 6 Stunden Sonnenlicht pro Tag sind ideal.
* Optional: Flüssigdünger für Gemüse (aber nicht unbedingt notwendig).
Aussaat aus Samen:
1. Samen vorbereiten: Wasserspinatsamen haben eine harte Schale. Um die Keimung zu beschleunigen, kannst du sie 24 Stunden in lauwarmem Wasser einweichen. Das macht die Schale weicher und hilft den kleinen Keimlingen, leichter herauszukommen.
2. Aussaat: Fülle deinen Behälter mit Erde. Drücke die Erde leicht an und verteile die Samen gleichmäßig auf der Oberfläche. Bedecke die Samen mit einer dünnen Schicht Erde (ca. 1 cm).
3. Gießen: Gieße die Erde vorsichtig, aber gründlich. Sie sollte feucht, aber nicht patschnass sein.
4. Standort: Stelle den Behälter an einen warmen und sonnigen Ort.
5. Geduld: Die Samen keimen normalerweise innerhalb von 7-14 Tagen. Halte die Erde während dieser Zeit feucht.
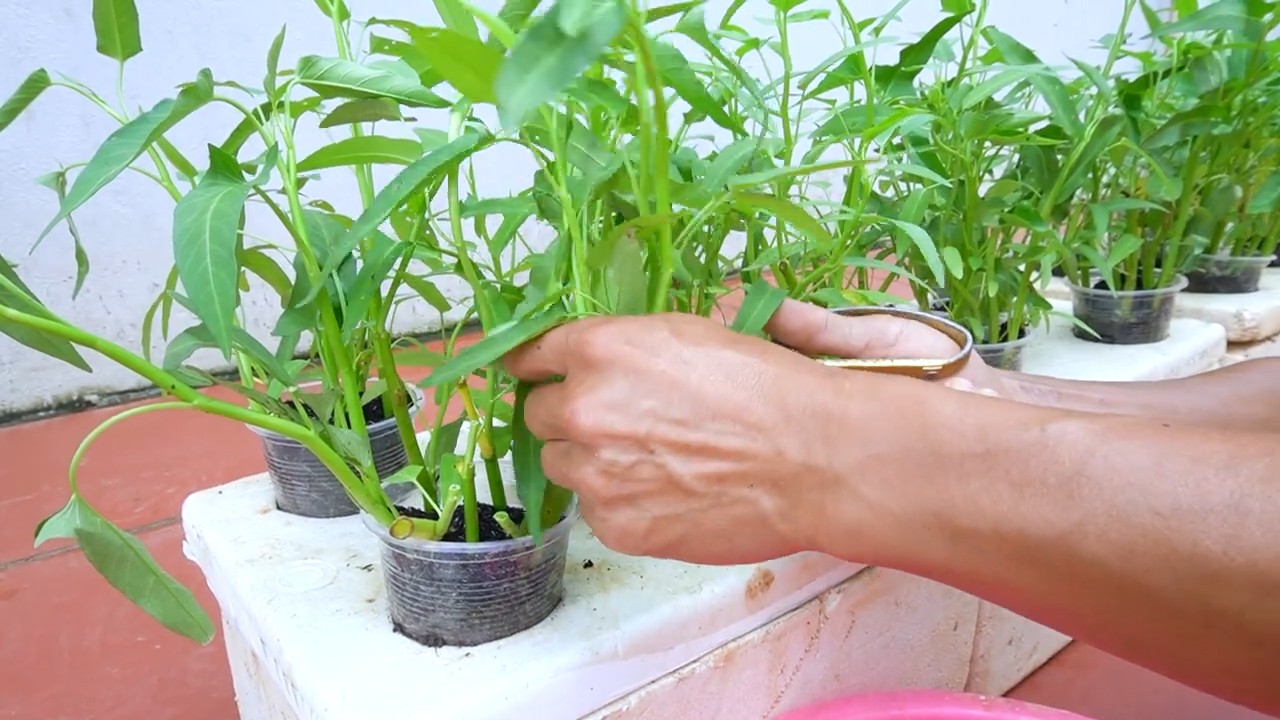
Anzucht aus Stecklingen:
1. Stecklinge schneiden: Suche dir eine gesunde Wasserspinatpflanze und schneide etwa 15-20 cm lange Stecklinge ab. Entferne die unteren Blätter, damit nur noch die oberen Blätter übrig bleiben.
2. Bewurzelung: Es gibt zwei Möglichkeiten, die Stecklinge zu bewurzeln:
* Im Wasser: Stelle die Stecklinge in ein Glas Wasser. Achte darauf, dass die unteren Blätter nicht im Wasser sind, da sie sonst faulen können. Wechsle das Wasser alle paar Tage. Nach etwa einer Woche sollten sich Wurzeln bilden.
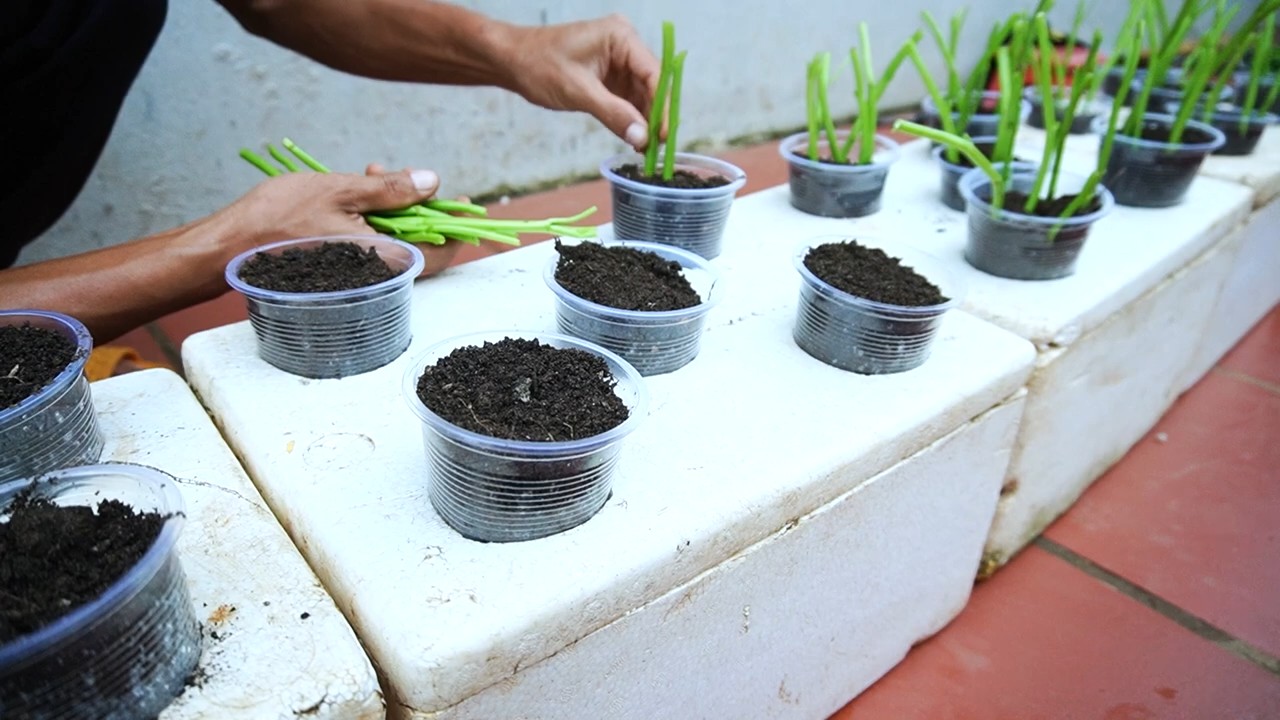
* Direkt in der Erde: Stecke die Stecklinge direkt in feuchte Erde. Halte die Erde feucht und stelle den Behälter an einen warmen und sonnigen Ort.
3. Einpflanzen: Sobald die Stecklinge Wurzeln gebildet haben (oder wenn du sie direkt in die Erde gesteckt hast und sie neue Blätter bilden), kannst du sie in deinen endgültigen Behälter umpflanzen.
Pflege des Wasserspinats:
* Gießen: Wasserspinat liebt Wasser! Gieße ihn regelmäßig, besonders an heißen Tagen. Die Erde sollte immer feucht sein. Wenn du ihn in einem Topf anbaust, kannst du ihn sogar in einen Untersetzer mit Wasser stellen, damit er sich selbst mit Wasser versorgen kann.
* Düngen: Wenn du möchtest, kannst du deinen Wasserspinat alle paar Wochen mit einem Flüssigdünger für Gemüse düngen. Das ist aber nicht unbedingt notwendig, besonders wenn du gute Erde verwendest.
* Sonnenlicht: Wasserspinat braucht mindestens 6 Stunden Sonnenlicht pro Tag.
* Ernten: Du kannst deinen Wasserspinat ernten, sobald er etwa 20-30 cm hoch ist. Schneide die Stängel einfach mit einem Messer oder einer Schere ab. Die Pflanze wird weiterwachsen und neue Triebe bilden, sodass du immer wieder ernten kannst.
* Schädlinge: Wasserspinat ist relativ resistent gegen Schädlinge. Gelegentlich können Blattläuse auftreten. Diese kannst du einfach mit einem Wasserstrahl abspritzen oder mit einer milden Seifenlösung behandeln.
Detaillierte Anleitung in Phasen:
Phase 1: Vorbereitung (Samen oder Stecklinge)
* Samen:
1. Samen auswählen: Kaufe qualitativ hochwertige Wasserspinatsamen. Achte auf das Verfallsdatum.
2. Einweichen (optional): Lege die Samen für 24 Stunden in lauwarmes Wasser. Dies hilft, die Keimung zu beschleunigen.
3. Behälter vorbereiten: Wähle einen Behälter mit guter Drainage. Fülle ihn mit Blumenerde oder einer Mischung aus Gartenerde und Kompost.
* Stecklinge:
1. Gesunde Pflanze finden: Suche eine gesunde Wasserspinatpflanze, von der du Stecklinge nehmen kannst.
2. Stecklinge schneiden: Schneide 15-20 cm lange Stecklinge direkt unterhalb eines Blattknotens ab.
3. Blätter entfernen: Entferne die unteren Blätter, damit nur noch die oberen Blätter übrig bleiben. Dies verhindert Fäulnis.
Phase 2: Anzucht (Aussaat oder Bewurzelung)
* Aussaat:
1. Erde vorbereiten: Drücke die Erde im Behälter leicht an.
2. Samen säen: Verteile die Samen gleichmäßig auf der Oberfläche der Erde.
3. Bedecken: Bedecke die Samen mit einer dünnen Schicht Erde (ca. 1 cm).
4. Gießen: Gieße die Erde vorsichtig, aber gründlich.
5. Standort: Stelle den Behälter an einen warmen und sonnigen Ort.
6. Feuchtigkeit halten: Halte die Erde feucht, aber nicht patschnass.
* Bewurzelung:
1. Im Wasser: Stelle die Stecklinge in ein Glas Wasser. Achte darauf, dass die unteren Blätter nicht im Wasser sind.
2. Wasser wechseln: Wechsle das Wasser alle paar Tage.
3. Wurzelbildung beobachten: Nach etwa einer Woche sollten sich Wurzeln bilden.
4. Direkt in der Erde: Stecke die Stecklinge direkt in feuchte Erde.
5. Feuchtigkeit halten: Halte die Erde feucht und stelle den Behälter an einen warmen und sonnigen Ort.
Phase 3: Pflege und Ernte
1. Umpflanzen (falls nötig): Wenn du die Stecklinge im Wasser bewurzelt hast, pflanze sie in einen Behälter mit Erde, sobald die Wurzeln ausreichend entwickelt sind.
2. Gießen: Gieße den Wasserspinat regelmäßig, besonders an heißen Tagen. Die Erde sollte immer feucht sein.
3. Düngen (optional): Dünge den Wasserspinat alle paar Wochen mit einem Flüssigdünger für Gemüse.
4. Sonnenlicht: Stelle sicher, dass der Wasserspinat mindestens 6 Stunden Sonnenlicht pro Tag bekommt.
5. Ernten: Ernte den Wasserspinat, sobald er etwa 20-30 cm hoch ist. Schneide die Stängel mit einem Messer oder einer Schere ab.
6. Regelmäßige Ernte: Durch regelmäßige Ernte förderst du das Wachstum neuer Triebe.
7. Schädlingskontrolle: Kontrolliere den Wasserspinat regelmäßig auf Schädlinge. Bei Bedarf mit einem Wasserstrahl abspritzen oder mit einer milden Seifenlösung behandeln.
Tipps und Tricks:
* Wasserspinat im Wasser anbauen: Du kannst Wasserspinat auch direkt im Wasser anbauen. Stelle einfach die Stecklinge in einen Behälter mit Wasser und füge etwas Flüssigdünger hinzu. Wechsle das Wasser regelmäßig.
* Wasserspinat im Winter anbauen: Wenn du einen hellen und warmen Platz hast, kannst du Wasserspinat auch im Winter anbauen.
Conclusion
So, there you have it! Growing water spinach easily at home is not just a possibility; it’s a rewarding and surprisingly simple endeavor. We’ve walked through the steps, demystified the process, and hopefully, ignited your green thumb. But why should you actually take the plunge and try this DIY trick?
First and foremost, think about the freshness. Imagine harvesting crisp, vibrant water spinach just moments before you toss it into your stir-fry or add it to your soup. The flavor difference between homegrown and store-bought is undeniable. You’ll experience a level of freshness and vibrancy that you simply can’t replicate otherwise. Plus, you have complete control over the growing environment, ensuring that your water spinach is free from harmful pesticides and chemicals.
Beyond the superior taste and health benefits, growing your own water spinach is incredibly cost-effective. A single packet of seeds can yield a bountiful harvest, saving you money on repeated trips to the grocery store. And let’s not forget the sheer satisfaction of nurturing a plant from seed to table. It’s a therapeutic and fulfilling experience that connects you to the natural world.
But the beauty of this DIY project lies in its adaptability. Feel free to experiment with different growing mediums. While we’ve focused on hydroponics and container gardening, you can also try growing water spinach directly in your garden bed, provided you have a consistently moist and sunny location. Consider adding organic fertilizers to boost growth and enhance the flavor of your harvest.
Variations to Explore:
* Vertical Gardening: If you’re short on space, explore vertical gardening techniques. Water spinach thrives in hanging baskets or stacked planters, adding a touch of greenery to your balcony or patio.
* Aquaponics: For a more advanced setup, consider integrating water spinach into an aquaponics system. The plants will filter the water for your fish, while the fish waste provides nutrients for the plants.
* Different Varieties: While the most common variety is the Chinese water spinach, explore other cultivars to discover different flavors and textures.
We encourage you to embrace the challenge and embark on your own water spinach growing journey. Don’t be afraid to experiment, learn from your mistakes, and adapt the techniques to suit your specific environment and preferences.
Most importantly, we want to hear about your experiences! Share your photos, tips, and challenges in the comments section below. Let’s create a community of water spinach enthusiasts, sharing our knowledge and inspiring others to grow their own food.
So, grab your seeds, prepare your growing medium, and get ready to enjoy the delicious rewards of homegrown water spinach. Happy growing!
Frequently Asked Questions (FAQ)
Q: How long does it take to grow water spinach from seed?
A: Generally, you can expect to harvest your first batch of water spinach about 4-6 weeks after planting the seeds. The exact time frame depends on factors such as temperature, sunlight, and the specific variety you’re growing. Warmer temperatures and ample sunlight will accelerate growth.
Q: What are the ideal growing conditions for water spinach?
A: Water spinach thrives in warm, humid environments with plenty of sunlight. Aim for at least 6 hours of direct sunlight per day. The ideal temperature range is between 75°F and 85°F (24°C and 29°C). Consistent moisture is crucial, as the plant prefers to grow in wet or even submerged conditions.
Q: Can I grow water spinach indoors?
A: Yes, you can absolutely grow water spinach indoors, especially if you live in a climate with cold winters. To successfully grow it indoors, you’ll need to provide adequate lighting, either through a sunny window or with grow lights. Ensure the plants receive at least 6 hours of light per day. Maintain a warm and humid environment, and water frequently to keep the soil consistently moist.
Q: What kind of soil is best for growing water spinach?
A: Water spinach is not particularly picky about soil type, but it prefers a rich, well-draining soil that retains moisture. A mix of potting soil, compost, and perlite or vermiculite works well. The most important factor is ensuring that the soil remains consistently moist. You can also grow water spinach hydroponically, without any soil at all, using a nutrient-rich water solution.
Q: How often should I water my water spinach?
A: Water spinach needs consistent moisture to thrive. Water it daily, or even twice a day in hot weather, to keep the soil consistently moist. If you’re growing it in a container, make sure the container has drainage holes to prevent waterlogging. If you’re growing it hydroponically, ensure the roots are submerged in the nutrient solution.
Q: What kind of fertilizer should I use for water spinach?
A: Water spinach benefits from regular fertilization. Use a balanced liquid fertilizer, diluted to half strength, every 2-3 weeks. You can also use organic fertilizers such as compost tea or fish emulsion. Avoid over-fertilizing, as this can lead to excessive vegetative growth at the expense of flavor.
Q: How do I harvest water spinach?
A: You can start harvesting water spinach when the stems are about 6-8 inches long. Simply cut the stems a few inches above the soil line. The plant will continue to produce new shoots, allowing for multiple harvests. Regular harvesting encourages bushier growth and prevents the plant from becoming leggy.
Q: Are there any pests or diseases that affect water spinach?
A: Water spinach is generally resistant to pests and diseases, but it can occasionally be affected by aphids, spider mites, or fungal diseases. To prevent pest infestations, inspect your plants regularly and remove any affected leaves. You can also use insecticidal soap or neem oil to control pests. To prevent fungal diseases, ensure good air circulation and avoid overwatering.
Q: Can I eat water spinach raw?
A: While water spinach can be eaten raw, it’s generally recommended to cook it before consumption. Cooking helps to break down the plant’s cellulose, making it easier to digest. It also reduces the risk of bacterial contamination.
Q: How do I store harvested water spinach?
A: To store harvested water spinach, wrap it in a damp paper towel and place it in a plastic bag in the refrigerator. It will stay fresh for up to 3-5 days. For longer storage, you can blanch the water spinach for a few minutes and then freeze it.
Q: Is growing water spinach easily something that can be done in all climates?
A: While water spinach thrives in warm climates, it can be grown in cooler climates with some extra care. Start the seeds indoors a few weeks before the last expected frost. Transplant the seedlings outdoors when the weather warms up, and provide protection from frost if necessary. You can also use a greenhouse or cold frame to extend the growing season.

Leave a Comment