
Hanging Pot Mint Growing: Imagine stepping onto your balcony or into your garden and being greeted by the invigorating aroma of fresh mint. Sounds idyllic, right? Well, it doesn’t have to be just a dream! For centuries, cultivating herbs like mint has been a cherished practice, dating back to ancient civilizations who valued its medicinal and culinary properties. Today, even with limited space, you can enjoy the benefits of homegrown mint with a simple and rewarding DIY project: hanging pot mint growing.
But why choose a hanging pot? Well, let’s be honest, we all crave a little bit of green in our lives, but not everyone has acres of land. Hanging pots are the perfect solution for small spaces, apartments, or even just adding a touch of vertical interest to your existing garden. Plus, mint has a reputation for being a bit of a rambunctious grower, and containing it in a hanging pot helps prevent it from taking over your entire garden! I’m going to show you how easy it is to create your own thriving mint garden in a hanging pot.
This DIY guide will walk you through every step, from choosing the right pot and soil to ensuring your mint thrives. You’ll learn simple tricks and hacks that will make hanging pot mint growing a breeze, even if you’re a complete beginner. Get ready to enjoy fresh mint for teas, cocktails, and culinary creations all season long!
DIY Hanging Pot Mint Garden: A Refreshing Project
Hey there, fellow plant enthusiasts! I’m super excited to share this fun and fragrant DIY project with you: creating a hanging pot mint garden. Not only is it a fantastic way to add some greenery to your space, but you’ll also have fresh mint readily available for mojitos, teas, and all sorts of culinary adventures! Plus, containing mint in a pot is crucial, trust me, it’s a prolific grower and can quickly take over your garden if left unchecked. Let’s get started!
Materials You’ll Need
Before we dive in, let’s gather all the necessary supplies. This will make the process smoother and more enjoyable.
* A Pot with Drainage Holes: Choose a pot that’s at least 8 inches in diameter. Terracotta or plastic pots work well. Make sure it has drainage holes to prevent waterlogging.
* Potting Soil: Use a high-quality potting mix specifically formulated for containers. This will provide the mint with the nutrients it needs to thrive.
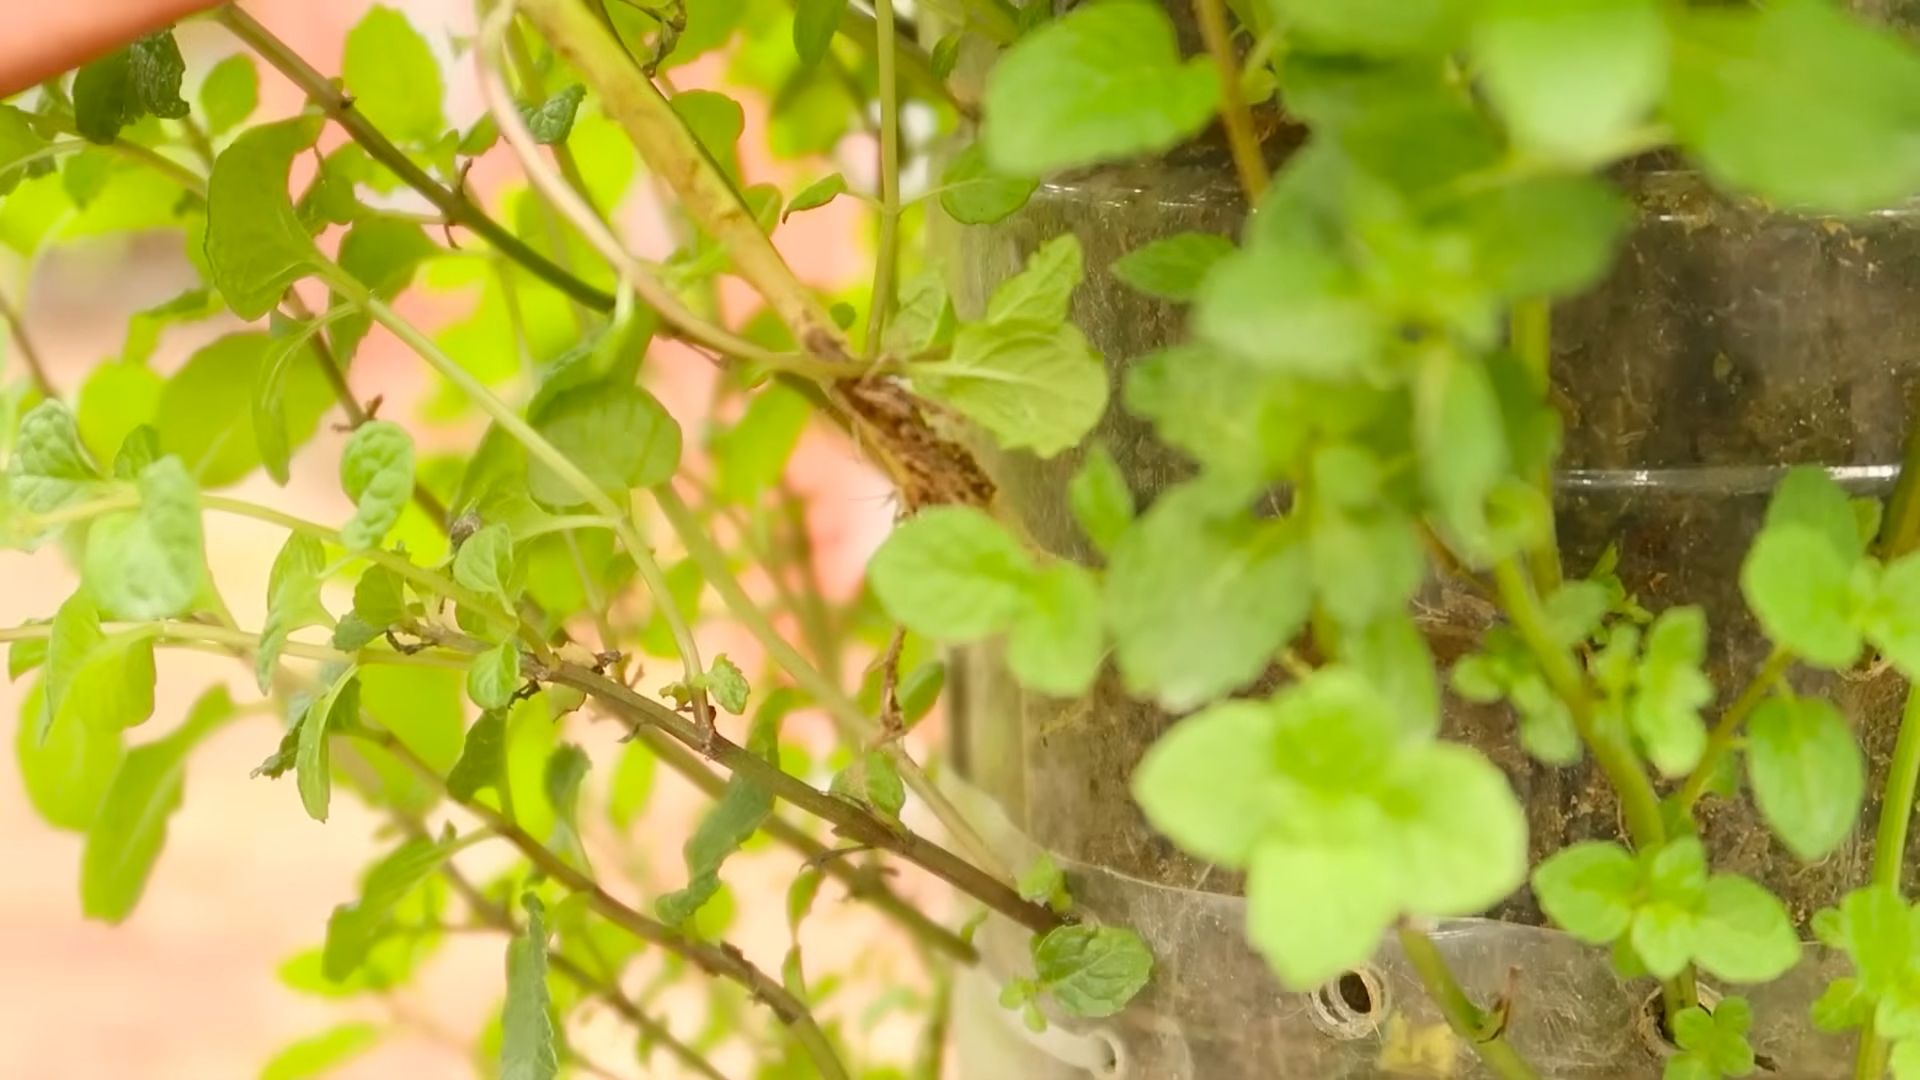
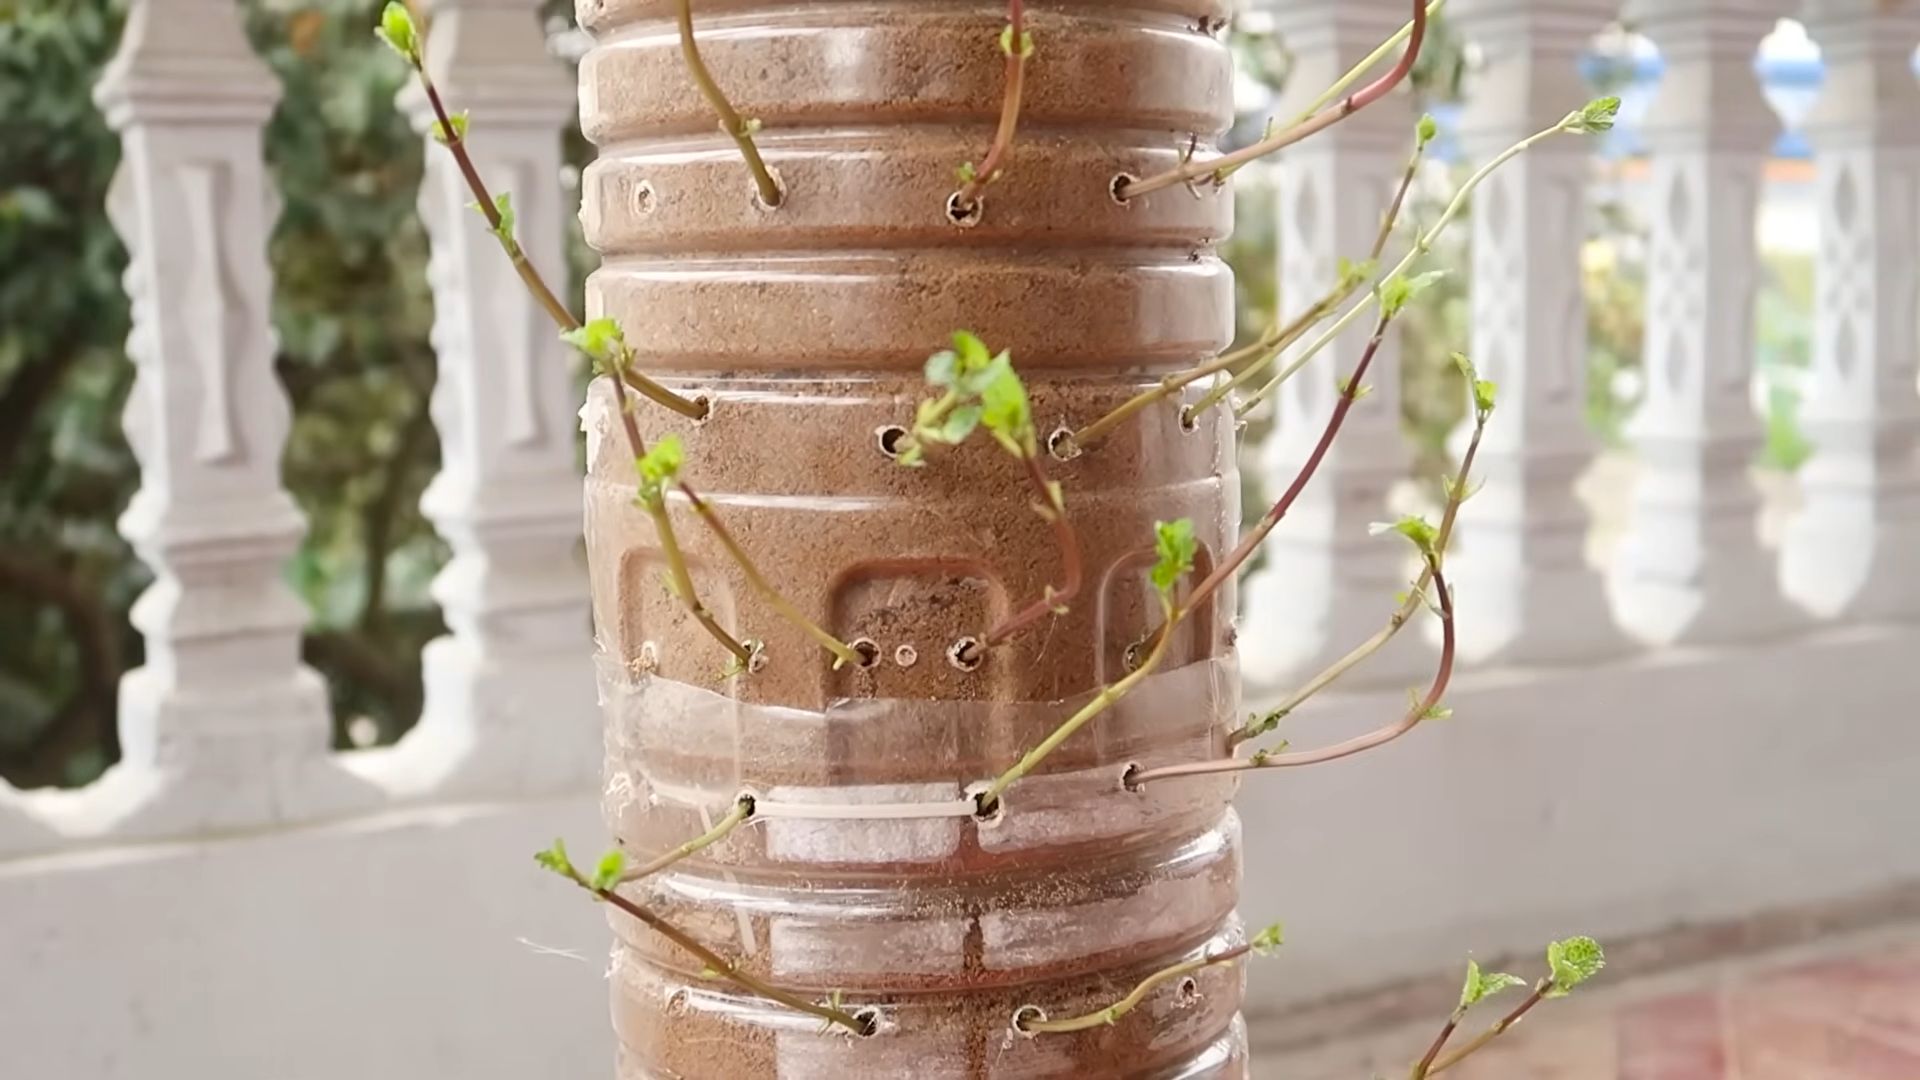
* Mint Seedlings or Cuttings: You can either start from seeds (which takes longer) or purchase established mint seedlings from a local nursery. Alternatively, you can propagate mint cuttings from an existing plant.
* Hanging Planter Hardware: This includes a sturdy chain or rope, S-hooks, and a hanging bracket or hook to attach the pot to. Make sure the hardware is strong enough to support the weight of the pot, soil, and plant.
* Optional: Landscape Fabric or Coffee Filter: To prevent soil from washing out of the drainage holes.
* Watering Can or Hose: For watering your mint.
* Gloves: To keep your hands clean.
* Scissors or Pruning Shears: For trimming and harvesting your mint.
Preparing Your Pot
This step is crucial for ensuring proper drainage and preventing soil loss.
1. Line the Drainage Holes (Optional): If you’re concerned about soil washing out, cut a piece of landscape fabric or a coffee filter slightly larger than the drainage holes. Place it inside the pot, covering the holes. This will allow water to drain while keeping the soil in place.
2. Add Potting Soil: Fill the pot with potting soil, leaving about an inch or two of space at the top. This will prevent the soil from overflowing when you water. Gently pat down the soil to remove any air pockets.
Planting Your Mint
Now comes the fun part – planting your mint!
1. Prepare the Mint Seedlings or Cuttings: If you’re using seedlings, gently remove them from their containers. If the roots are tightly bound, gently loosen them with your fingers. If you’re using cuttings, make sure they have developed roots before planting.
2. Create Planting Holes: Dig small holes in the soil, spaced a few inches apart. The number of holes will depend on the size of your pot and the number of seedlings or cuttings you have.
3. Plant the Mint: Place the seedlings or cuttings into the holes, making sure the top of the root ball is level with the surrounding soil. Gently fill in the holes with soil and pat it down.
4. Water Thoroughly: Water the newly planted mint thoroughly until water drains out of the drainage holes. This will help settle the soil and encourage root growth.
Attaching the Hanging Hardware
This is where your pot transforms into a hanging garden!
1. Attach the Chain or Rope: Most hanging pots have pre-drilled holes or designated spots for attaching the hanging hardware. If your pot doesn’t have these, you may need to drill holes (be careful not to crack the pot). Attach the chain or rope to the pot using S-hooks or other suitable connectors. Make sure the connections are secure and can support the weight of the pot.
2. Test the Stability: Before hanging the pot, test its stability by lifting it slightly. Make sure the chain or rope is evenly distributed and the pot is balanced.
3. Hang the Pot: Choose a location that receives at least 4-6 hours of sunlight per day. Hang the pot from a sturdy bracket or hook. Make sure the bracket or hook is securely attached to a wall, ceiling, or other support structure.
Caring for Your Hanging Mint Garden
Proper care is essential for keeping your mint garden healthy and thriving.
* Watering: Mint prefers consistently moist soil, but avoid overwatering. Water when the top inch of soil feels dry to the touch. Check the soil moisture regularly, especially during hot weather.
* Sunlight: Mint thrives in full sun to partial shade. Aim for at least 4-6 hours of sunlight per day. If you live in a hot climate, provide some afternoon shade to prevent the leaves from scorching.
* Fertilizing: Feed your mint with a balanced liquid fertilizer every 2-4 weeks during the growing season. Follow the instructions on the fertilizer label.
* Pruning: Regular pruning is essential for keeping your mint plant bushy and productive. Pinch off the tips of the stems to encourage branching. You can also harvest leaves as needed for culinary use.
* Pest Control: Mint is generally pest-resistant, but it can occasionally be affected by aphids or spider mites. If you notice any pests, treat them with insecticidal soap or neem oil.
* Overwintering: In colder climates, mint may die back during the winter. You can either bring the pot indoors or protect it from frost by covering it with burlap or mulch.
Troubleshooting
Even with the best care, you might encounter some issues. Here’s how to address them:
* Yellowing Leaves: This could be a sign of overwatering, underwatering, or nutrient deficiency. Check the soil moisture and adjust your watering schedule accordingly. If the soil is consistently wet, allow it to dry out slightly before watering again. If the soil is dry, water thoroughly. You may also need to fertilize your mint.
* Leggy Growth: This is often caused by insufficient sunlight. Move your mint to a sunnier location or provide supplemental lighting.
* Brown Spots on Leaves: This could be a sign of fungal disease. Remove any affected leaves and treat the plant with a fungicide. Ensure good air circulation around the plant.
* Pests: As mentioned earlier, aphids and spider mites can sometimes infest mint plants. Treat them with insecticidal soap or neem oil.
Harvesting Your Mint
One of the best parts of growing your own mint is being able to harvest it whenever you need it!
1. When to Harvest: You can start harvesting mint leaves as soon as the plant is established. The best time to harvest is in the morning, after the dew has dried.
2. How to Harvest: Use scissors or pruning shears to cut off stems just above a leaf node (the point where leaves grow from the stem). This will encourage new growth.
3. Storing Your Mint: Freshly harvested mint can be stored in the refrigerator for up to a week. Wrap the stems in a damp paper towel and place them in a plastic bag. You can also dry mint leaves for longer storage. To dry mint, hang the stems upside down in a cool, dry place or use a dehydrator.
Propagating Mint
Mint is incredibly easy to propagate, which means you can easily expand your mint collection!
1. Stem Cuttings: Take a stem cutting that is about 4-6 inches long. Remove the leaves from the bottom inch of the cutting.
2. Rooting in Water: Place the cutting in a glass of water, making sure the bottom inch is submerged. Place the glass in a bright, indirect light location.
3. Planting: After a few weeks, the cutting will develop roots. Once the roots are about an inch long, you can plant the cutting in a pot filled with potting soil.
4. Care: Water the newly planted cutting thoroughly and keep the soil moist until it is established.
Creative Uses for Your Homegrown Mint
Now that you have a thriving mint garden, let’s explore some of the many ways you can use your fresh mint!
* Mojitos: The classic mint cocktail! Muddle mint leaves with lime juice, sugar, and rum, then top with soda water.
* Mint Tea: Steep fresh mint leaves in hot water for a refreshing and soothing tea.
* Mint Juleps: Another classic cocktail, perfect for a hot summer day.
* Salads: Add chopped mint to salads for a burst of fresh flavor.
* Desserts: Use mint to garnish desserts like chocolate cake, ice cream, or fruit salads.
* Lamb Dishes: Mint sauce is a traditional accompaniment to lamb dishes.
* Pesto: Make a refreshing mint pesto to toss with pasta or spread on sandwiches.
* Infused Water: Add mint leaves to a pitcher of water for a refreshing and flavorful drink.
* Garnish: Use mint
Conclusion
So, there you have it! Transforming an ordinary pot into a self-watering, hanging haven for your mint is not just a project; it’s an investment in fresh flavor, aromatic bliss, and a touch of green elegance for your space. We’ve walked you through the simple steps, highlighting how easy it is to create a thriving environment for your mint, all while adding a unique decorative element to your home or garden.
Why is this DIY hanging pot mint growing trick a must-try? Because it solves several common problems associated with growing mint. Overwatering and underwatering become less of a concern thanks to the self-watering reservoir. Limited space is no longer an obstacle, as the hanging design allows you to cultivate mint even on a small balcony or patio. And let’s not forget the aesthetic appeal – a cascading curtain of vibrant green mint leaves adds a touch of natural beauty wherever it hangs.
But the beauty of this project lies in its adaptability. Feel free to experiment with different types of pots. Terracotta pots, with their porous nature, can be particularly beneficial for aeration. You can also explore different types of rope or macrame for hanging, allowing you to customize the look to perfectly match your personal style. Consider adding companion plants like marigolds or nasturtiums to deter pests and attract beneficial insects.
Don’t be afraid to get creative with your hanging pot mint growing setup! You could even create a tiered system with multiple hanging pots at different levels, creating a stunning vertical garden. Think about incorporating other herbs alongside your mint, such as basil, oregano, or thyme, to create a fragrant and functional herb garden.
We’re confident that once you experience the joy of harvesting your own fresh mint, you’ll never go back to store-bought again. Imagine the refreshing mojitos, the flavorful teas, and the aromatic garnishes you can create with your homegrown mint. The possibilities are endless!
So, grab your supplies, follow our simple instructions, and embark on this rewarding DIY adventure. We encourage you to try this hanging pot mint growing method and witness the transformation firsthand. And most importantly, we want to hear about your experience! Share your photos, tips, and variations in the comments below. Let’s create a community of mint-loving gardeners and inspire each other with our creative hanging pot creations. Happy growing!
Frequently Asked Questions (FAQ)
What type of mint is best for growing in a hanging pot?
While most mint varieties will thrive in a hanging pot, some are particularly well-suited. Peppermint and spearmint are popular choices due to their robust growth and distinct flavors. Chocolate mint and apple mint are also excellent options, offering unique aromas and culinary applications. Consider the flavor profile you prefer and choose a variety that aligns with your needs. Remember that mint spreads aggressively, so keeping it contained in a pot is ideal.
How often should I water my hanging pot mint?
The beauty of the self-watering system is that it reduces the frequency of watering. However, it’s still important to monitor the moisture level of the soil. Check the reservoir regularly and refill it when it’s running low. The frequency will depend on factors such as the weather, the size of the pot, and the type of mint. In general, during hot and dry periods, you may need to refill the reservoir more frequently. During cooler, wetter periods, you can reduce the frequency. A good rule of thumb is to check the soil moisture by sticking your finger about an inch into the soil. If it feels dry, it’s time to refill the reservoir.
What kind of soil should I use for my hanging pot mint?
Mint prefers well-draining soil that is rich in organic matter. A good potting mix specifically formulated for herbs is an excellent choice. You can also create your own mix by combining equal parts of potting soil, compost, and perlite or vermiculite. The compost will provide essential nutrients, while the perlite or vermiculite will improve drainage and aeration. Avoid using garden soil, as it can be too heavy and compact, leading to poor drainage and root rot.
How much sunlight does my hanging pot mint need?
Mint thrives in partial shade to full sun. Ideally, it should receive at least 4-6 hours of sunlight per day. However, in hot climates, it’s best to provide some afternoon shade to prevent the leaves from scorching. If you’re growing your mint indoors, place it near a sunny window or supplement with a grow light. Observe your mint closely and adjust its location as needed to ensure it’s receiving the optimal amount of sunlight.
How do I fertilize my hanging pot mint?
Mint is a relatively low-maintenance plant and doesn’t require heavy fertilization. However, a light feeding every few weeks during the growing season can help promote healthy growth and abundant foliage. Use a balanced liquid fertilizer diluted to half strength. Alternatively, you can amend the soil with compost or worm castings to provide a slow-release source of nutrients. Avoid over-fertilizing, as this can lead to leggy growth and a less intense flavor.
How do I prevent pests and diseases from affecting my hanging pot mint?
Mint is generally resistant to pests and diseases, but it can occasionally be affected by aphids, spider mites, or powdery mildew. To prevent these problems, ensure good air circulation around the plant and avoid overwatering. Inspect your mint regularly for any signs of pests or diseases. If you spot any problems, treat them promptly with an appropriate organic insecticide or fungicide. Neem oil is an effective natural remedy for many common pests and diseases.
How do I harvest my hanging pot mint?
Harvesting mint is easy and encourages new growth. Simply snip off the stems just above a leaf node. You can harvest up to one-third of the plant at a time without harming it. The best time to harvest mint is in the morning, after the dew has dried. This is when the leaves are at their most flavorful. Use your harvested mint fresh or dry it for later use.
Can I grow other herbs in the same hanging pot as my mint?
While it’s tempting to create a mixed herb garden, it’s generally best to grow mint on its own due to its aggressive spreading habit. Mint can quickly outcompete other herbs for resources, potentially smothering them. If you do want to grow other herbs in the same pot, choose varieties that are equally vigorous and can tolerate similar growing conditions. Consider herbs like oregano or thyme, which are also relatively drought-tolerant. However, be prepared to monitor the growth of each plant closely and prune as needed to prevent the mint from taking over.
How do I overwinter my hanging pot mint?
In colder climates, mint may die back during the winter. To overwinter your hanging pot mint, bring it indoors before the first frost. Place it in a cool, bright location and reduce watering. You can also prune the plant back to a few inches above the soil line. In the spring, once the weather warms up, you can move the pot back outdoors. Alternatively, you can take cuttings from your mint in the fall and root them indoors to ensure you have a fresh supply of mint for the following year.
My mint is growing leggy and sparse. What am I doing wrong?
Leggy and sparse growth in mint can be caused by several factors, including insufficient sunlight, overwatering, or lack of nutrients. Ensure your mint is receiving at least 4-6 hours of sunlight per day. Avoid overwatering and allow the soil to dry out slightly between waterings. Fertilize your mint regularly with a balanced liquid fertilizer. Pruning your mint regularly can also help encourage bushier growth. Simply snip off the stems just above a leaf node to promote new growth.

Leave a Comment