
Hanging sweet potato growing – it sounds like something out of a fairytale, doesn’t it? Imagine lush, vibrant vines cascading down from hanging baskets, not just adding a touch of whimsical beauty to your space, but also providing you with a delicious and nutritious harvest. Forget the traditional garden plot; we’re taking sweet potato cultivation to new heights!
For centuries, sweet potatoes have been a staple in diets around the world, particularly in South America and Asia. Beyond their culinary uses, they hold cultural significance, often symbolizing prosperity and good fortune. Now, you can bring a piece of that history and a whole lot of fresh produce right to your doorstep (or balcony!).
But why should you consider hanging sweet potato growing? Well, for starters, it’s a fantastic solution for those with limited space. Apartment dwellers, balcony gardeners, and anyone looking to maximize their yield in a small area will find this method incredibly rewarding. Plus, it’s a fun and unique way to add visual interest to your outdoor (or even indoor!) space. I’m excited to show you how to create your own hanging sweet potato garden, step-by-step, with simple DIY tricks and hacks that will have you harvesting a bounty in no time. Get ready to impress your friends and family with your green thumb and enjoy the satisfaction of growing your own food, even if you don’t have a traditional garden!
DIY Hängende Süßkartoffel-Gärten: Ein Leitfaden für Anfänger
Hey Leute! Habt ihr jemals daran gedacht, eure eigenen Süßkartoffeln anzubauen, aber keinen Platz im Garten? Keine Sorge, ich habe die perfekte Lösung für euch: Hängende Süßkartoffel-Gärten! Das ist nicht nur platzsparend, sondern auch eine super coole Art, Gemüse anzubauen und eure Terrasse oder euren Balkon aufzupeppen. Lasst uns gemeinsam in dieses spannende Projekt eintauchen!
Was ihr braucht: Die Materialliste
Bevor wir loslegen, hier eine Liste mit allen Dingen, die ihr für euren hängenden Süßkartoffel-Garten benötigt. Keine Sorge, die meisten Sachen habt ihr wahrscheinlich schon zu Hause!
* Süßkartoffeln: Am besten Bio-Süßkartoffeln, da diese weniger wahrscheinlich mit Wachstumsinhibitoren behandelt wurden.
* Große Eimer oder Pflanzgefäße: Mindestens 20 Liter Fassungsvermögen, idealerweise mit Drainagelöchern.
* Blumenerde: Hochwertige Blumenerde ist entscheidend für ein gutes Wachstum.
* Kompost: Für zusätzliche Nährstoffe und eine bessere Bodenstruktur.
* Wasser: Zum Gießen, natürlich!
* Messer oder scharfes Werkzeug: Zum Schneiden der Süßkartoffeln (optional).
* Zahnstocher: Zum Aufhängen der Süßkartoffeln über Wasser (optional).
* Dicke Schnur oder Kette: Zum Aufhängen der Eimer oder Pflanzgefäße.
* Bohrmaschine (optional): Zum Bohren von Drainagelöchern, falls eure Eimer keine haben.
* Handschuhe: Um eure Hände sauber zu halten.
* Geduld: Süßkartoffeln brauchen Zeit zum Wachsen!
Phase 1: Die Süßkartoffel zum Sprießen bringen
Der erste Schritt ist, die Süßkartoffel zum Sprießen zu bringen. Das nennt man auch “Slips” ziehen. Keine Angst, das ist einfacher als es klingt!
1. Die Süßkartoffel vorbereiten: Es gibt zwei Möglichkeiten. Entweder ihr legt die ganze Süßkartoffel in Wasser oder ihr schneidet sie in zwei Hälften. Wenn ihr sie schneidet, achtet darauf, dass jede Hälfte mindestens ein “Auge” hat, aus dem ein Trieb wachsen kann.
2. Die Zahnstocher-Methode (optional): Steckt Zahnstocher in die Mitte der Süßkartoffel, sodass sie auf dem Rand eines Glases oder einer Schüssel balancieren kann. Füllt das Glas mit Wasser, sodass die untere Hälfte der Süßkartoffel im Wasser ist.
3. Die Wasserbad-Methode (optional): Legt die ganze Süßkartoffel in eine Schüssel oder einen Behälter mit Wasser, sodass etwa die Hälfte der Kartoffel bedeckt ist.
4. Warten und Beobachten: Stellt das Glas oder die Schüssel an einen warmen, hellen Ort, aber nicht in direktes Sonnenlicht. Wechselt das Wasser alle paar Tage, um es sauber zu halten. Nach ein paar Wochen sollten kleine Triebe, die sogenannten “Slips”, aus der Süßkartoffel wachsen.
5. Die Slips ernten: Sobald die Slips etwa 15-20 cm lang sind, könnt ihr sie vorsichtig von der Süßkartoffel abbrechen oder abschneiden. Achtet darauf, dass ihr die Wurzeln nicht beschädigt.
Phase 2: Die Pflanzgefäße vorbereiten
Während eure Süßkartoffel-Slips wachsen, können wir uns um die Pflanzgefäße kümmern.
1. Die Eimer oder Pflanzgefäße vorbereiten: Stellt sicher, dass eure Eimer oder Pflanzgefäße Drainagelöcher haben. Wenn nicht, bohrt ein paar Löcher in den Boden. Das ist wichtig, damit das Wasser ablaufen kann und die Wurzeln nicht faulen.
2. Die Erde mischen: Mischt die Blumenerde mit Kompost. Das Verhältnis sollte etwa 2:1 sein (2 Teile Blumenerde, 1 Teil Kompost). Der Kompost sorgt für zusätzliche Nährstoffe und verbessert die Bodenstruktur.
3. Die Eimer befüllen: Füllt die Eimer oder Pflanzgefäße mit der Erdmischung. Lasst etwa 5-10 cm Platz bis zum Rand.
4. Die Aufhängung vorbereiten: Befestigt die dicke Schnur oder Kette an den Eimern oder Pflanzgefäßen. Achtet darauf, dass die Aufhängung stabil ist und das Gewicht der bepflanzten Eimer tragen kann.
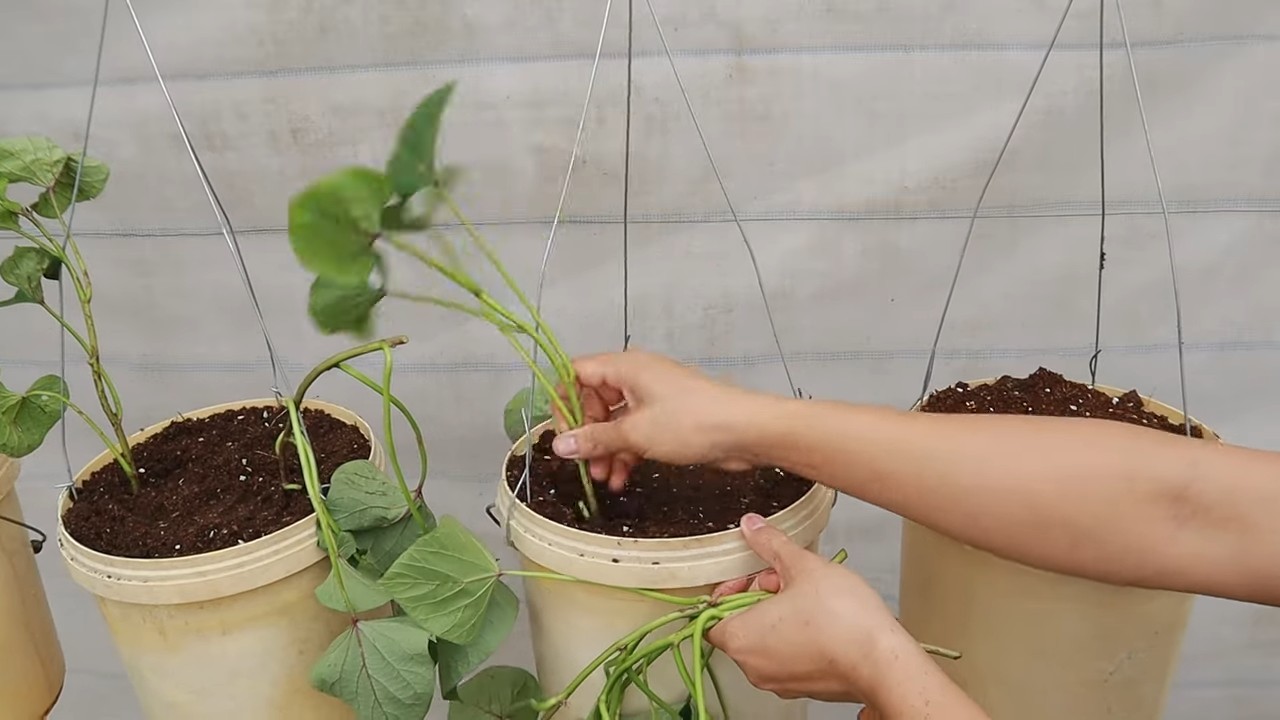
Phase 3: Die Süßkartoffel-Slips einpflanzen
Jetzt kommt der spannende Teil: Das Einpflanzen der Süßkartoffel-Slips!
1. Die Slips vorbereiten: Entfernt die unteren Blätter von den Slips, sodass nur noch die oberen Blätter übrig sind. Das hilft den Slips, schneller Wurzeln zu schlagen.
2. Löcher graben: Macht kleine Löcher in die Erde in den Eimern oder Pflanzgefäßen. Die Löcher sollten tief genug sein, um die Wurzeln der Slips aufzunehmen.
3. Die Slips einpflanzen: Setzt die Slips vorsichtig in die Löcher und bedeckt die Wurzeln mit Erde. Drückt die Erde leicht an.
4. Gießen: Gießt die Slips gründlich an. Die Erde sollte feucht, aber nicht nass sein.
Phase 4: Pflege und Wachstum
Nach dem Einpflanzen ist es wichtig, eure Süßkartoffel-Pflanzen gut zu pflegen, damit sie gesund wachsen und viele leckere Süßkartoffeln produzieren.
1. Gießen: Gießt eure Süßkartoffel-Pflanzen regelmäßig, besonders während trockener Perioden. Die Erde sollte immer feucht sein, aber nicht nass. Vermeidet Staunässe, da dies zu Wurzelfäule führen kann.
2. Düngen: Düngt eure Süßkartoffel-Pflanzen alle paar Wochen mit einem organischen Dünger. Das sorgt für zusätzliche Nährstoffe und fördert das Wachstum.
3. Sonnenlicht: Süßkartoffeln brauchen viel Sonnenlicht, mindestens 6-8 Stunden pro Tag. Stellt eure hängenden Gärten an einen sonnigen Ort.
4. Schädlinge und Krankheiten: Achtet auf Schädlinge und Krankheiten. Wenn ihr Probleme feststellt, behandelt die Pflanzen mit einem geeigneten Mittel.
5. Ranken schneiden (optional): Süßkartoffeln bilden lange Ranken. Ihr könnt diese Ranken schneiden, um das Wachstum der Knollen zu fördern.
Phase 5: Die Ernte
Nach etwa 3-4 Monaten sind eure Süßkartoffeln erntereif!
1. Den richtigen Zeitpunkt erkennen: Die Blätter der Süßkartoffel-Pflanzen werden gelb und beginnen abzusterben. Das ist ein Zeichen dafür, dass die Knollen reif sind.
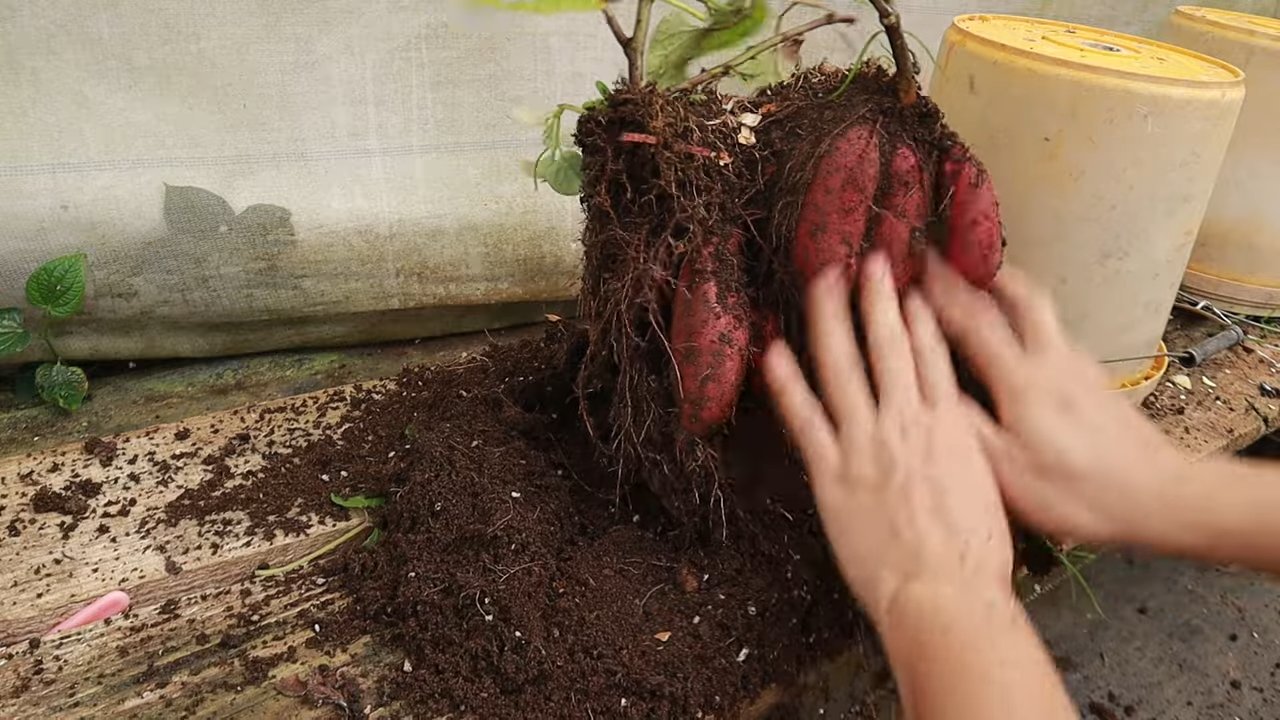
2. Die Ernte: Gießt die Erde vor der Ernte gründlich an. Das erleichtert das Ausgraben der Knollen. Kippt den Eimer vorsichtig aus und sucht nach den Süßkartoffeln.
3. Die Süßkartoffeln trocknen: Lasst die Süßkartoffeln nach der Ernte ein paar Tage an einem warmen, trockenen Ort trocknen. Das härtet die Schale und verbessert die Lagerfähigkeit.
Zusätzliche Tipps und Tricks
* Sortenwahl: Es gibt viele verschiedene Süßkartoffel-Sorten. Wählt eine Sorte, die für euer Klima geeignet ist.
* Vertikales Gärtnern: Hängende Gärten sind eine tolle Möglichkeit, vertikal zu gärtnern und den Platz optimal zu nutzen.
* Kreativität: Seid kreativ bei der Gestaltung eurer hängenden Gärten. Ihr könnt verschiedene Eimer, Pflanzgefäße und Aufhängungen verwenden.
* Nachhaltigkeit: Verwendet recycelte Materialien für eure hängenden Gärten. Das ist gut für die Umwelt und spart Geld.
* Gemeinschaft: Teilt eure Erfahrungen mit anderen Gärtnern. Ihr könnt voneinander lernen und euch gegenseitig inspirieren.
Ich hoffe, dieser Leitfaden hat euch geholfen, euren eigenen hängenden Süßkartoffel-Garten anzulegen. Viel Spaß beim Gärtnern und lasst es euch schmecken!
Conclusion
So, there you have it! Transforming a humble sweet potato into a cascading curtain of vibrant greenery, laden with edible treasures, is not just a gardening project; it’s an experience. This DIY hanging sweet potato growing method is a must-try for several compelling reasons. First and foremost, it’s incredibly space-efficient. If you’re short on garden space, live in an apartment with a balcony, or simply want to add a unique vertical element to your existing garden, this is the perfect solution. Forget sprawling vines taking over your precious flowerbeds; this method keeps everything contained and visually stunning.
Beyond space-saving, this technique offers a fascinating way to observe the entire life cycle of the sweet potato. From the initial sprouting to the development of the vines and the eventual formation of new sweet potatoes, you’ll have a front-row seat to nature’s magic. It’s an educational and rewarding experience for gardeners of all ages and skill levels.
Furthermore, the aesthetic appeal is undeniable. A hanging sweet potato vine is a conversation starter, a focal point, and a beautiful addition to any outdoor or even indoor space (with sufficient light, of course!). The lush green foliage creates a calming and inviting atmosphere, and the promise of homegrown sweet potatoes adds an extra layer of excitement.
But the benefits don’t stop there. Growing your own sweet potatoes allows you to control the entire process, ensuring that your produce is free from harmful pesticides and chemicals. You’ll be enjoying the freshest, most flavorful sweet potatoes imaginable, knowing exactly where they came from and how they were grown.
Ready to take your hanging sweet potato growing to the next level? Consider these variations:
* Different Sweet Potato Varieties: Experiment with different varieties of sweet potatoes to see which ones thrive best in your climate and growing conditions. Beauregard, Jewel, and Japanese sweet potatoes are all popular choices.
* Companion Planting: Plant herbs like basil or thyme in the same container to deter pests and enhance the flavor of your sweet potatoes.
* Creative Containers: While a simple bucket or hanging basket works perfectly well, don’t be afraid to get creative with your container choices. Repurpose old tires, wooden crates, or even fabric grow bags for a unique and eco-friendly look.
* Indoor Growing: With ample sunlight or grow lights, you can even grow sweet potatoes indoors. This is a great option for those who live in colder climates or want to enjoy fresh sweet potatoes year-round.
We’re confident that you’ll find this DIY hanging sweet potato growing method to be both enjoyable and rewarding. It’s a simple, affordable, and effective way to grow your own food, beautify your space, and connect with nature.
So, what are you waiting for? Grab a sweet potato, a container, and some soil, and get started today! We can’t wait to hear about your experiences. Share your photos, tips, and tricks in the comments below. Let’s create a community of hanging sweet potato enthusiasts and inspire others to give this amazing DIY project a try. Happy growing!
Frequently Asked Questions (FAQ)
What kind of sweet potato should I use for growing?
You can use any sweet potato you find at the grocery store, but organic sweet potatoes are often recommended as they are less likely to be treated with sprout inhibitors. Look for sweet potatoes that are firm and free from blemishes or soft spots. Older sweet potatoes that have already started to sprout are ideal, as they will give you a head start. Popular varieties like Beauregard, Jewel, and Japanese sweet potatoes all work well for this method. Experimenting with different varieties can be a fun way to discover your favorites.
How long does it take for a sweet potato to sprout?
The time it takes for a sweet potato to sprout can vary depending on factors such as temperature, humidity, and the variety of sweet potato. Generally, you can expect to see sprouts within 2-4 weeks. To speed up the process, keep the sweet potato in a warm, humid environment. You can also try placing it in a sunny location, but avoid direct sunlight, which can dry it out. Regularly misting the sweet potato with water can also help to encourage sprouting.
What kind of soil should I use?
A well-draining potting mix is essential for growing sweet potatoes in containers. Avoid using garden soil, as it can be too heavy and compact, which can hinder root growth. A good potting mix will provide adequate drainage while still retaining enough moisture to keep the sweet potato hydrated. You can also amend your potting mix with compost or other organic matter to improve its fertility and drainage.
How often should I water my hanging sweet potato?
The frequency of watering will depend on factors such as the size of your container, the type of soil you’re using, and the weather conditions. As a general rule, water your hanging sweet potato when the top inch of soil feels dry to the touch. Avoid overwatering, as this can lead to root rot. During hot, dry weather, you may need to water more frequently. Conversely, during cooler, wetter weather, you may need to water less often.
How much sunlight does a hanging sweet potato need?
Sweet potatoes thrive in full sun, which means they need at least 6-8 hours of direct sunlight per day. If you’re growing your sweet potato indoors, place it near a sunny window or supplement with grow lights. Insufficient sunlight can result in leggy growth and reduced sweet potato production.
How do I fertilize my hanging sweet potato?
Sweet potatoes are heavy feeders, so regular fertilization is important for optimal growth and sweet potato production. Use a balanced fertilizer, such as a 10-10-10 or 20-20-20, according to the package directions. You can also use organic fertilizers, such as compost tea or fish emulsion. Fertilize every 2-3 weeks during the growing season.
When can I harvest my sweet potatoes?
Sweet potatoes are typically ready to harvest in the fall, about 90-120 days after planting. The leaves will start to turn yellow and the vines will begin to die back. To harvest, carefully dig around the base of the plant and gently lift the sweet potatoes out of the soil. Be careful not to damage the sweet potatoes during harvesting.
Can I eat the sweet potato leaves?
Yes, sweet potato leaves are edible and nutritious. They can be eaten raw in salads or cooked like spinach. The leaves are a good source of vitamins A and C, as well as fiber and antioxidants. However, it’s important to note that some people may be sensitive to the leaves and experience mild digestive upset. If you’re trying sweet potato leaves for the first time, start with a small amount and see how you react.
How do I store my harvested sweet potatoes?
After harvesting, cure your sweet potatoes for 7-10 days in a warm, humid place (around 80-85°F and 85-90% humidity). This process helps to heal any cuts or bruises and improves the flavor and storage life of the sweet potatoes. After curing, store your sweet potatoes in a cool, dry, and dark place (around 55-60°F). Properly cured and stored sweet potatoes can last for several months.
What if my sweet potato doesn’t produce any sweet potatoes?
There are several reasons why your sweet potato may not produce any sweet potatoes. Insufficient sunlight, lack of fertilization, and poor soil drainage are all common culprits. Make sure your sweet potato is getting enough sunlight, fertilize regularly, and use a well-draining potting mix. Also, ensure that the container is large enough to accommodate the growing sweet potatoes. If you’ve addressed these issues and your sweet potato still isn’t producing, it may simply be a matter of patience. Sweet potatoes can sometimes take longer to mature, especially in cooler climates.

Leave a Comment