
Hydroponic Celery Growing at Home might sound like something out of a sci-fi movie, but trust me, it’s totally achievable and incredibly rewarding! Forget those limp, flavorless celery stalks from the grocery store. Imagine crisp, vibrant celery, bursting with flavor, grown right in your own home, year-round. Sounds amazing, right?
For centuries, celery has been prized not only for its culinary uses but also for its medicinal properties. From ancient Egypt, where it was used in wreaths and medicinal remedies, to its modern-day role as a crunchy snack and soup staple, celery has a rich history. But what if I told you that you could bypass the traditional garden altogether and cultivate this versatile vegetable indoors, using the magic of hydroponics?
Let’s face it, traditional gardening can be a challenge. Pests, unpredictable weather, and limited space can all put a damper on your green thumb aspirations. That’s where hydroponic celery growing at home comes in! This DIY guide will walk you through the simple steps of setting up your own hydroponic system, even if you’re a complete beginner. You’ll learn how to choose the right system, select the best nutrients, and troubleshoot common problems. Get ready to enjoy a constant supply of fresh, delicious celery, all while saving money and reducing your environmental impact. Let’s get started!

Growing Celery Hydroponically: A Beginner’s Guide
Hey there, fellow plant enthusiasts! Have you ever thought about growing your own celery? It’s surprisingly easy, and even more surprisingly, you can do it without any soil! That’s right, we’re diving into the world of hydroponics, and I’m going to show you how to grow celery right in your own home. Get ready for fresh, crunchy celery whenever you want it!
Why Hydroponic Celery?
Before we jump in, let’s talk about why hydroponics is a fantastic option for growing celery:
* Faster Growth: Hydroponic systems deliver nutrients directly to the roots, resulting in faster growth compared to traditional soil gardening.
* Less Space: You don’t need a big garden! Hydroponics is perfect for small spaces, apartments, or even just a sunny windowsill.
* Fewer Pests and Diseases: Soil can harbor pests and diseases. Hydroponics minimizes these risks, leading to healthier plants.
* Year-Round Growing: With the right setup, you can grow celery indoors year-round, regardless of the weather outside.
* Control Over Nutrients: You have precise control over the nutrients your celery receives, ensuring optimal growth and flavor.
What You’ll Need
Okay, let’s gather our supplies. Don’t worry, you probably have some of these things already!
* Celery Stalk: This is the most important part! You can use a celery stalk from the grocery store. Choose one that looks healthy and has a good base.
* Shallow Dish or Container: A small bowl, a plastic container, or even a yogurt container will work perfectly.
* Water: Tap water is fine, but filtered water is even better.
* Hydroponic Nutrients: You’ll need a balanced hydroponic nutrient solution. You can find these at most garden centers or online. Look for one specifically formulated for leafy greens.
* Growing Medium (Optional): While not strictly necessary for starting, you might want to use a growing medium like coco coir, perlite, or rockwool cubes later on.
* Net Pots (Optional): If you decide to use a growing medium, you’ll need net pots to hold the celery and the medium.
* Hydroponic System (Optional): For long-term growth, consider a simple hydroponic system like a Kratky system or a Deep Water Culture (DWC) system.
* Grow Lights (Optional): If you don’t have a sunny spot, you’ll need grow lights to provide adequate light for your celery.
* Spray Bottle: For misting the celery leaves.
* Sharp Knife: For cutting the celery stalk.
* pH Meter (Optional): To monitor the pH of your nutrient solution. Celery prefers a pH between 6.0 and 6.8.
Step-by-Step Instructions: Regrowing Celery from a Stalk
This is the easiest way to get started. We’re basically regrowing celery from the base of a stalk you’d normally throw away!
1. Prepare the Celery Stalk: Using your sharp knife, cut off the celery stalks about 2 inches from the base. You want to keep the base intact, as this is where the new growth will emerge. Don’t discard the stalks you cut off! You can use them in cooking.
2. Place the Base in Water: Put the celery base in your shallow dish or container. Add enough water to cover the bottom inch of the base. Be careful not to submerge the entire base, as this can cause it to rot.
3. Find a Sunny Spot: Place the dish in a bright, sunny location. A windowsill that gets at least 6 hours of sunlight per day is ideal. If you don’t have enough sunlight, you can use grow lights.
4. Change the Water Regularly: Change the water every 1-2 days to keep it fresh and prevent algae growth.
5. Observe New Growth: Within a few days, you should start to see new growth emerging from the center of the celery base. These will be small, light green leaves.
6. Transplant to a Growing Medium (Optional): Once the new leaves are a few inches tall, you can transplant the celery to a growing medium like coco coir or perlite. This will provide more support for the plant and allow it to develop a stronger root system. To do this, gently remove the celery from the water and place it in a net pot filled with your chosen growing medium.
7. Introduce Hydroponic Nutrients: If you’re using a growing medium, it’s time to start adding hydroponic nutrients to the water. Follow the instructions on the nutrient solution bottle to determine the correct dosage. Start with a diluted solution and gradually increase the concentration as the plant grows.
8. Maintain the Water Level: Keep the water level in the container or hydroponic system at a level that just touches the bottom of the net pot. This will allow the roots to access the nutrients and water.
9. Monitor pH (Optional): Use a pH meter to monitor the pH of your nutrient solution. Adjust the pH as needed to keep it between 6.0 and 6.8.
10. Provide Adequate Light: Ensure your celery receives at least 6 hours of sunlight per day, or supplement with grow lights.
11. Harvest Your Celery: After a few weeks, your celery will be ready to harvest. You can either harvest the entire plant or just cut off the outer stalks as needed.
Setting Up a Simple Hydroponic System (Optional)
For longer-term growth and larger celery ha
Hey there, fellow plant enthusiasts! Have you ever thought about growing your own celery? It’s surprisingly easy, and even more surprisingly, you can do it without any soil! That’s right, we’re diving into the world of hydroponics, and I’m going to show you how to grow celery right in your own home. Get ready for fresh, crunchy celery whenever you want it!
Why Hydroponic Celery?
Before we jump in, let’s talk about why hydroponics is a fantastic option for growing celery:
* Faster Growth: Hydroponic systems deliver nutrients directly to the roots, resulting in faster growth compared to traditional soil gardening.
* Less Space: You don’t need a big garden! Hydroponics is perfect for small spaces, apartments, or even just a sunny windowsill.
* Fewer Pests and Diseases: Soil can harbor pests and diseases. Hydroponics minimizes these risks, leading to healthier plants.
* Year-Round Growing: With the right setup, you can grow celery indoors year-round, regardless of the weather outside.
* Control Over Nutrients: You have precise control over the nutrients your celery receives, ensuring optimal growth and flavor.
What You’ll Need
Okay, let’s gather our supplies. Don’t worry, you probably have some of these things already!
* Celery Stalk: This is the most important part! You can use a celery stalk from the grocery store. Choose one that looks healthy and has a good base.
* Shallow Dish or Container: A small bowl, a plastic container, or even a yogurt container will work perfectly.
* Water: Tap water is fine, but filtered water is even better.
* Hydroponic Nutrients: You’ll need a balanced hydroponic nutrient solution. You can find these at most garden centers or online. Look for one specifically formulated for leafy greens.
* Growing Medium (Optional): While not strictly necessary for starting, you might want to use a growing medium like coco coir, perlite, or rockwool cubes later on.
* Net Pots (Optional): If you decide to use a growing medium, you’ll need net pots to hold the celery and the medium.
* Hydroponic System (Optional): For long-term growth, consider a simple hydroponic system like a Kratky system or a Deep Water Culture (DWC) system.
* Grow Lights (Optional): If you don’t have a sunny spot, you’ll need grow lights to provide adequate light for your celery.
* Spray Bottle: For misting the celery leaves.
* Sharp Knife: For cutting the celery stalk.
* pH Meter (Optional): To monitor the pH of your nutrient solution. Celery prefers a pH between 6.0 and 6.8.
Step-by-Step Instructions: Regrowing Celery from a Stalk
This is the easiest way to get started. We’re basically regrowing celery from the base of a stalk you’d normally throw away!
1. Prepare the Celery Stalk: Using your sharp knife, cut off the celery stalks about 2 inches from the base. You want to keep the base intact, as this is where the new growth will emerge. Don’t discard the stalks you cut off! You can use them in cooking.
2. Place the Base in Water: Put the celery base in your shallow dish or container. Add enough water to cover the bottom inch of the base. Be careful not to submerge the entire base, as this can cause it to rot.
3. Find a Sunny Spot: Place the dish in a bright, sunny location. A windowsill that gets at least 6 hours of sunlight per day is ideal. If you don’t have enough sunlight, you can use grow lights.
4. Change the Water Regularly: Change the water every 1-2 days to keep it fresh and prevent algae growth.
5. Observe New Growth: Within a few days, you should start to see new growth emerging from the center of the celery base. These will be small, light green leaves.
6. Transplant to a Growing Medium (Optional): Once the new leaves are a few inches tall, you can transplant the celery to a growing medium like coco coir or perlite. This will provide more support for the plant and allow it to develop a stronger root system. To do this, gently remove the celery from the water and place it in a net pot filled with your chosen growing medium.
7. Introduce Hydroponic Nutrients: If you’re using a growing medium, it’s time to start adding hydroponic nutrients to the water. Follow the instructions on the nutrient solution bottle to determine the correct dosage. Start with a diluted solution and gradually increase the concentration as the plant grows.
8. Maintain the Water Level: Keep the water level in the container or hydroponic system at a level that just touches the bottom of the net pot. This will allow the roots to access the nutrients and water.
9. Monitor pH (Optional): Use a pH meter to monitor the pH of your nutrient solution. Adjust the pH as needed to keep it between 6.0 and 6.8.
10. Provide Adequate Light: Ensure your celery receives at least 6 hours of sunlight per day, or supplement with grow lights.
11. Harvest Your Celery: After a few weeks, your celery will be ready to harvest. You can either harvest the entire plant or just cut off the outer stalks as needed.
Setting Up a Simple Hydroponic System (Optional)
For longer-term growth and larger celery harvests, consider setting up a simple hydroponic system. Here are two easy options:
Kratky System
The Kratky method is a passive hydroponic system, meaning it doesn’t require any pumps or electricity. It’s super simple to set up!
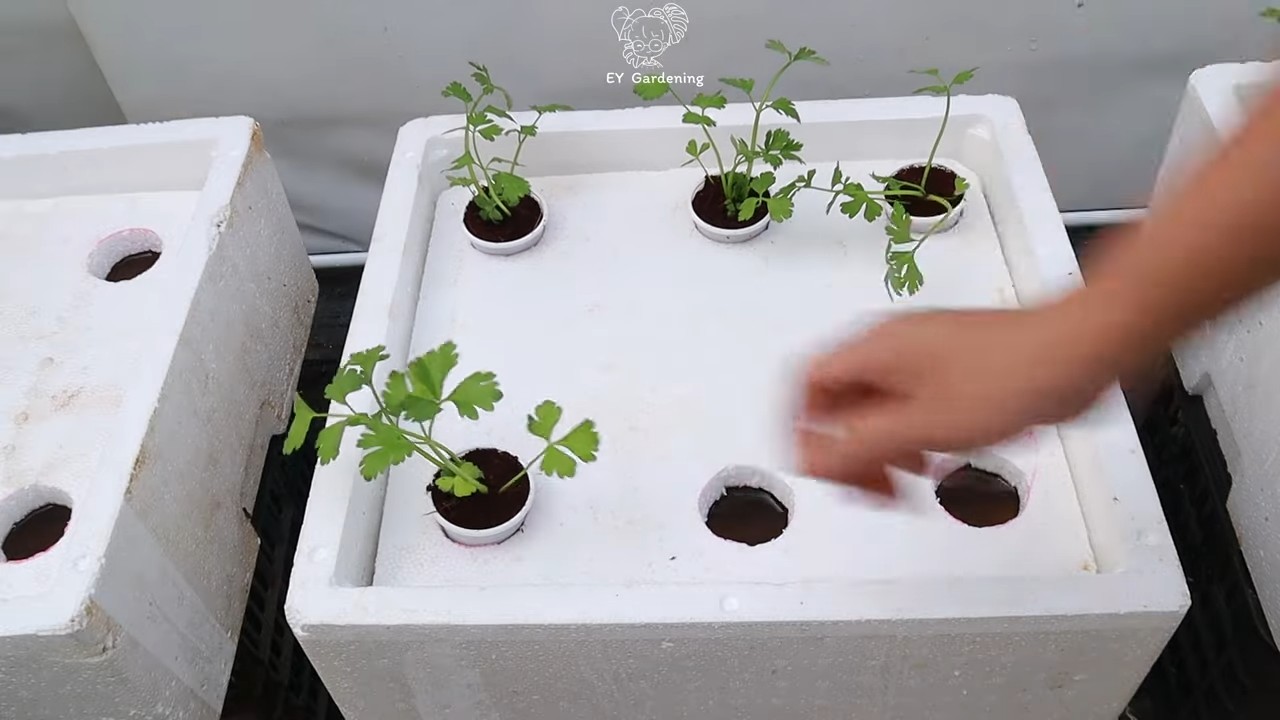
1. Choose a Container: Select a large, opaque container with a lid. A plastic storage bin works well.
2. Cut Holes for Net Pots: Cut holes in the lid that are slightly smaller than the diameter of your net pots. The number of holes will depend on the size of your container and how much celery you want to grow.
3. Fill the Container with Nutrient Solution: Fill the container with your hydroponic nutrient solution.
4. Place Celery in Net Pots: Place your celery plants in net pots filled with your chosen growing medium (coco coir, perlite, etc.).
5. Place Net Pots in Holes: Place the net pots in the holes in the lid, ensuring that the bottom of the net pots is submerged in the nutrient solution.
6. Provide Light: Place the system in a sunny location or use grow lights.
7. Monitor Water Level: As the plants grow, they will absorb the nutrient solution. Monitor the water level and add more solution as needed. The roots will naturally adjust to the water level, creating an air gap that prevents them from rotting.
Deep Water Culture (DWC) System
A DWC system is another simple hydroponic method that involves suspending the roots of your celery in a nutrient-rich solution that is constantly aerated.
1. Choose a Container: Select a large, opaque container. A 5-gallon bucket works well.
2. Cut a Hole for the Net Pot: Cut a hole in the lid that is slightly smaller than the diameter of your net pot.
3. Add an Air Stone and Air Pump: Place an air stone at the bottom of the container and connect it to an air pump. The air pump will provide oxygen to the roots, preventing them from suffocating.
4. Fill the Container with Nutrient Solution: Fill the container with your hydroponic nutrient solution.
5. Place Celery in Net Pot: Place your celery plant in a net pot filled with your chosen growing medium.
6. Place Net Pot in Hole: Place the net pot in the hole in the lid, ensuring that the bottom of the net pot is submerged in the nutrient solution.
7. Turn on the Air Pump: Turn on the air pump to aerate the nutrient solution.
8. Provide Light: Place the system in a sunny location or use grow lights.
9. Monitor Water Level and pH: Regularly monitor the water level and pH of the nutrient solution and adjust as needed.
Tips for Success
Here are a few extra tips to help you grow healthy and delicious hydroponic celery:
* Start with a Healthy Stalk: Choose a celery stalk that is firm, crisp, and has a good green color. Avoid stalks that are wilted or have brown spots.
* Use a Balanced Nutrient Solution: Celery needs a balanced nutrient solution to thrive. Look for a solution that is specifically formulated for leafy greens.
* Provide Adequate Light: Celery
Conclusion
So, there you have it! Growing your own celery hydroponically at home is not just a fun experiment; it’s a game-changer for fresh produce enthusiasts. Forget those limp, flavorless stalks from the grocery store. With this simple DIY trick, you can enjoy crisp, vibrant celery bursting with flavor, all grown right in your own kitchen.
Why is this a must-try? Because it’s incredibly rewarding, surprisingly easy, and significantly reduces food waste. You’re not just growing celery; you’re cultivating a sustainable practice that connects you to your food source. Imagine the satisfaction of snipping off a stalk for your morning smoothie, knowing exactly where it came from and how it was grown. Plus, hydroponics minimizes the risk of soilborne diseases and pests, leading to healthier, more robust plants.
But the fun doesn’t stop there! Feel free to experiment with different nutrient solutions to see how they affect the flavor and growth rate of your celery. Try adding a small amount of Epsom salt to the solution for extra magnesium, which can enhance chlorophyll production and result in deeper green leaves. You can also explore different hydroponic systems, from simple Kratky setups to more advanced deep water culture systems, as your confidence grows.
Consider these variations to personalize your hydroponic celery growing experience:
* Flavor Infusion: Add a small amount of organic flavoring to your nutrient solution. Think a hint of lemon or a touch of chili for a subtle flavor boost. Be cautious and start with very small amounts to avoid harming your plants.
* Companion Planting: While technically not companion planting in the traditional sense, you can grow other herbs like parsley or chives alongside your celery in separate hydroponic containers. This creates a mini indoor garden and provides a variety of fresh ingredients.
* Seed Starting vs. Regrowing: While this guide focuses on regrowing celery from a store-bought base, you can also start from seed. This requires a bit more patience but allows you to choose specific celery varieties.
Don’t be intimidated by the term “hydroponics.” This method is far more accessible than you might think. With a few basic supplies and a little bit of patience, you’ll be harvesting your own delicious celery in no time.
We wholeheartedly encourage you to give this DIY trick a try. It’s a fantastic way to bring a touch of green into your home, reduce your reliance on store-bought produce, and enjoy the unparalleled flavor of homegrown celery.
And most importantly, we want to hear about your experience! Share your photos, tips, and challenges in the comments below. Let’s build a community of hydroponic celery enthusiasts and learn from each other. What nutrient solutions worked best for you? Did you encounter any unexpected hurdles? Your insights could help other aspiring hydroponic gardeners succeed. So, get growing and let’s celebrate the joy of fresh, homegrown celery together! Remember, mastering **hydroponic celery growing** is easier than you think!
Frequently Asked Questions (FAQ)
What exactly is hydroponics, and is it difficult?
Hydroponics is a method of growing plants without soil, using water-based nutrient solutions to provide the necessary elements for growth. It might sound complicated, but it’s surprisingly straightforward, especially for beginners. The difficulty level depends on the system you choose. Regrowing celery from a base is one of the easiest entry points into hydroponics, requiring minimal equipment and effort. More advanced systems, like deep water culture or nutrient film technique, involve more components and require closer monitoring, but even those are manageable with a bit of research and practice. The key is to start simple and gradually expand your knowledge and skills.
What kind of nutrient solution should I use for hydroponic celery?
A balanced hydroponic nutrient solution specifically formulated for leafy greens is ideal. These solutions typically contain the essential macronutrients (nitrogen, phosphorus, potassium) and micronutrients (iron, manganese, zinc, etc.) that celery needs to thrive. You can find these solutions at most garden centers or online retailers. Follow the instructions on the label carefully, as over-fertilizing can be harmful to your plants. Alternatively, you can create your own nutrient solution using readily available ingredients, but this requires a more in-depth understanding of plant nutrition. For beginners, a pre-mixed solution is generally recommended.
How often should I change the nutrient solution?
The frequency of nutrient solution changes depends on the size of your container and the growth rate of your celery. As a general rule, change the solution every 1-2 weeks. This helps prevent the buildup of salts and other impurities that can inhibit plant growth. It’s also important to monitor the pH of the solution regularly and adjust it as needed to maintain a range of 6.0-6.5, which is optimal for celery growth. Use a pH meter or testing strips to check the pH level.
How much light does hydroponic celery need?
Celery requires plenty of light to grow well. Aim for at least 6-8 hours of direct sunlight per day. If you don’t have access to sufficient natural light, you can supplement with grow lights. LED grow lights are a popular choice because they are energy-efficient and provide the full spectrum of light that plants need. Place the grow lights about 6-12 inches above the celery plants.
Can I grow other vegetables hydroponically using the same method?
Yes, you can! The basic principles of hydroponics apply to a wide range of vegetables and herbs. Leafy greens like lettuce, spinach, and kale are particularly well-suited to hydroponic growing. Other vegetables that can be grown hydroponically include tomatoes, peppers, cucumbers, and strawberries. However, each plant has its own specific nutrient requirements and environmental preferences, so it’s important to research the best practices for each crop.
My celery is growing slowly. What could be the problem?
Several factors can contribute to slow growth in hydroponic celery. Insufficient light, inadequate nutrient solution, improper pH levels, and temperature fluctuations are all potential culprits. Make sure your celery is receiving enough light, that you’re using a balanced nutrient solution, and that the pH of the solution is within the optimal range (6.0-6.5). Also, ensure that the temperature is consistent and within the ideal range for celery (60-70°F). If you’ve ruled out these factors, consider checking for pests or diseases.
Is hydroponically grown celery as nutritious as soil-grown celery?
Yes, hydroponically grown celery can be just as nutritious, and in some cases, even more nutritious than soil-grown celery. The nutrient content of celery depends on the quality of the nutrient solution and the growing conditions. By providing plants with a balanced and readily available source of nutrients, hydroponics can actually enhance the nutritional value of the produce.
How do I prevent algae growth in my hydroponic system?
Algae growth is a common problem in hydroponic systems, especially those exposed to light. To prevent algae growth, keep your nutrient solution covered and shielded from light as much as possible. You can also add a small amount of hydrogen peroxide to the solution to kill algae spores. Regularly clean your hydroponic containers to remove any algae buildup.
Can I use tap water for my hydroponic system?
It depends on the quality of your tap water. If your tap water is heavily chlorinated or contains high levels of minerals, it’s best to use filtered or distilled water. Chlorinated water can harm beneficial bacteria in the nutrient solution, and high mineral levels can interfere with nutrient uptake. Test your tap water to determine its suitability for hydroponics.
How long does it take to grow celery hydroponically?
Regrowing celery from a base typically takes 2-3 weeks to produce noticeable growth. However, it can take several months to fully mature a celery plant from seed. The exact time frame depends on the variety of celery, the growing conditions, and the nutrient solution used. Be patient and consistent with your care, and you’ll be rewarded with fresh, homegrown celery in due time.


Leave a Comment