
Lazy melon gardening – sounds like an oxymoron, right? But what if I told you that you could enjoy juicy, homegrown melons without breaking your back or spending hours toiling in the sun? Forget the image of endless weeding and constant watering! This article is your passport to a relaxed and rewarding melon harvest.
Melons have a rich history, dating back to ancient Egypt and beyond. For centuries, they’ve been prized for their sweetness and refreshing qualities. But let’s be honest, traditional melon cultivation can be demanding. That’s where these DIY tricks and hacks come in. We’re talking about smart shortcuts and clever techniques that will transform your melon patch from a chore into a joy.
In today’s busy world, who has time for complicated gardening? That’s why I’m so excited to share these secrets with you. Whether you’re a seasoned gardener looking for ways to simplify your routine or a complete beginner intimidated by the thought of growing your own food, these tips will empower you to succeed. Imagine biting into a perfectly ripe, sun-warmed melon that you grew yourself – without all the fuss. Lazy melon gardening is not just about saving time and effort; it’s about making gardening accessible and enjoyable for everyone. So, grab your gardening gloves (or don’t!), and let’s get started!
Der faule Gärtner: Melonenanbau leicht gemacht!
Hallo liebe Gartenfreunde! Seid ihr auch so verrückt nach saftigen, süßen Melonen, aber habt nicht die Zeit oder Lust, euch stundenlang um sie zu kümmern? Keine Sorge, ich habe da was für euch! Ich zeige euch, wie ihr mit ein paar cleveren Tricks und Kniffen trotzdem eine reiche Melonenernte einfahren könnt – ganz ohne euch krumm zu legen. Lasst uns gemeinsam den faulen Gärtner in uns entdecken!
Die Vorbereitung: Der Grundstein für eine entspannte Ernte
Bevor wir loslegen, müssen wir ein paar Dinge vorbereiten. Das ist wie beim Kochen: Die richtige Mise en Place ist die halbe Miete!
* Die richtige Melonensorte wählen: Nicht jede Melone ist gleich. Für den faulen Gärtner eignen sich besonders robuste und schnell wachsende Sorten. Wassermelonen wie ‘Sugar Baby’ oder ‘Bush Sugar Baby’ sind eine gute Wahl, da sie relativ klein bleiben und früh reifen. Bei Honigmelonen empfehle ich ‘Honey Gold’ oder ‘Early Dew’. Cantaloupe-Melonen wie ‘Athena’ sind ebenfalls pflegeleicht. Informiert euch am besten im Gartencenter oder online über Sorten, die in eurer Region gut gedeihen.
* Der perfekte Standort: Melonen lieben die Sonne! Sucht euch einen sonnigen Platz in eurem Garten aus, der mindestens 6-8 Stunden direkte Sonneneinstrahlung pro Tag bekommt. Der Boden sollte gut durchlässig und nährstoffreich sein.
* Bodenverbesserung: Melonen sind Starkzehrer, das heißt, sie brauchen viele Nährstoffe. Bevor ihr pflanzt, solltet ihr den Boden mit Kompost oder gut verrottetem Mist anreichern. Das sorgt für eine gute Grundlage und spart euch später das Düngen.
* Vorkultur (optional, aber empfehlenswert): Um den Melonen einen kleinen Vorsprung zu verschaffen, könnt ihr sie ab April im Haus vorziehen. Das ist zwar nicht unbedingt notwendig, aber es verkürzt die Anbauzeit im Freien und erhöht die Chancen auf eine reiche Ernte.
Die Aussaat oder Pflanzung: Der Start in die Melonensaison
Jetzt geht es ans Eingemachte! Ob ihr die Melonen direkt ins Beet sät oder vorgezogene Pflanzen verwendet, hängt von euren Vorlieben und den klimatischen Bedingungen ab.
Aussaat im Freien:
1. Warten auf die richtige Zeit: Melonen sind frostempfindlich. Wartet also unbedingt, bis keine Frostgefahr mehr besteht, bevor ihr sie ins Freie sät. Das ist in der Regel Mitte Mai der Fall.
2. Löcher vorbereiten: Grabt im Abstand von etwa 60-90 cm Löcher in den Boden. Die Löcher sollten etwa 2-3 cm tief sein.
3. Säen: Legt 2-3 Samen in jedes Loch.
4. Bedecken: Bedeckt die Samen mit Erde und gießt sie vorsichtig an.
5. Geduld haben: Es dauert etwa 7-14 Tage, bis die Samen keimen.
Pflanzung von vorgezogenen Pflanzen:
1. Abhärten: Bevor ihr die vorgezogenen Pflanzen ins Freie setzt, solltet ihr sie einige Tage lang abhärten. Das bedeutet, dass ihr sie tagsüber für ein paar Stunden nach draußen stellt und sie nachts wieder reinholt. So gewöhnen sie sich langsam an die Außentemperaturen.
2. Pflanzlöcher vorbereiten: Grabt im Abstand von etwa 60-90 cm Löcher in den Boden. Die Löcher sollten so tief sein, wie die Töpfe, in denen die Pflanzen gewachsen sind.
3. Pflanzen einsetzen: Nehmt die Pflanzen vorsichtig aus den Töpfen und setzt sie in die Löcher.
4. Anhäufeln: Füllt die Löcher mit Erde auf und drückt sie leicht an.
5. Angießen: Gießt die Pflanzen gründlich an.
Die Pflege: Weniger ist mehr!
Hier kommt der Clou für den faulen Gärtner: Wir minimieren den Pflegeaufwand!
* Gießen: Melonen brauchen regelmäßig Wasser, besonders während der Fruchtbildung. Gießt sie am besten morgens, damit die Blätter über den Tag abtrocknen können. Vermeidet Staunässe, da dies zu Pilzkrankheiten führen kann. Eine Mulchschicht aus Stroh oder Holzhackschnitzeln hilft, die Feuchtigkeit im Boden zu halten und Unkraut zu unterdrücken.
* Düngen (sparsam): Wenn ihr den Boden vor der Pflanzung gut mit Kompost oder Mist angereichert habt, müsst ihr nicht unbedingt düngen. Wenn ihr aber das Gefühl habt, dass die Pflanzen etwas Unterstützung brauchen, könnt ihr sie alle paar Wochen mit einem organischen Dünger düngen. Achtet darauf, dass der Dünger reich an Kalium ist, da dies die Fruchtbildung fördert.
* Unkraut jäten (minimal): Eine dicke Mulchschicht hilft, Unkraut zu unterdrücken. Wenn doch mal Unkraut wächst, könnt ihr es einfach herausziehen.
* Ranken lenken: Melonenranken können ganz schön wuchern. Wenn sie euch zu viel Platz wegnehmen, könnt ihr sie vorsichtig in die gewünschte Richtung lenken.
* Früchte schützen: Wenn die Melonen reifen, solltet ihr sie vor Schädlingen wie Schnecken und Vögeln schützen. Ihr könnt sie zum Beispiel auf Stroh oder Holzbretter legen, damit sie nicht im direkten Kontakt mit dem Boden sind.
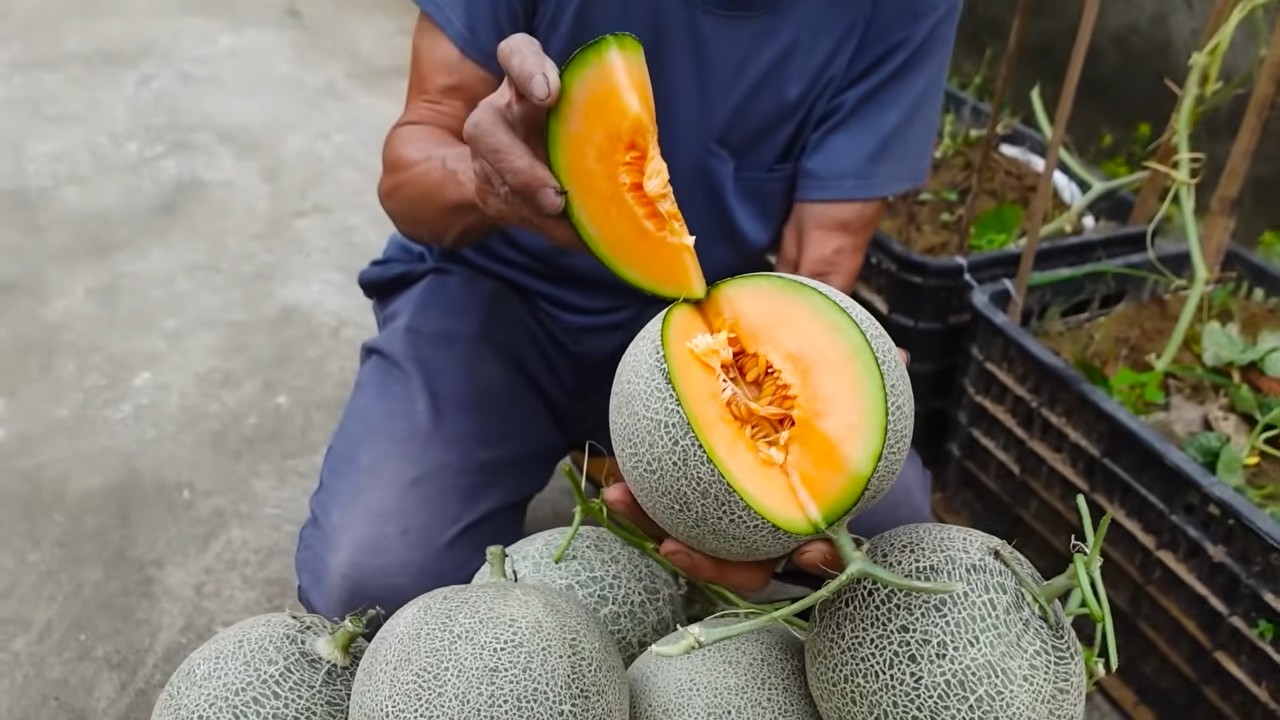
Die Ernte: Der Lohn der Mühe (oder eben nicht so viel Mühe!)
Der Moment, auf den wir alle gewartet haben! Die Erntezeit hängt von der Melonensorte und den klimatischen Bedingungen ab. In der Regel sind Melonen etwa 80-100 Tage nach der Aussaat reif.
* Reife erkennen: Es gibt verschiedene Anzeichen, an denen ihr erkennen könnt, ob eine Melone reif ist:
* Die Schale verliert ihren Glanz und wird matter.
* Die Stelle, an der die Melone auf dem Boden liegt, wird gelblich.
* Wenn ihr auf die Melone klopft, sollte sie hohl klingen.
* Der Stielansatz trocknet ein.
* Ernten: Schneidet die Melone mit einem scharfen Messer oder einer Gartenschere vom Stiel ab. Lasst dabei ein paar Zentimeter Stiel an der Melone.
* Genießen: Jetzt könnt ihr eure selbst gezogenen Melonen genießen! Sie schmecken am besten, wenn sie gut gekühlt sind.
Zusätzliche Tipps für den faulen Gärtner:
* Mulchen, mulchen, mulchen! Eine dicke Mulchschicht ist euer bester Freund. Sie hält die Feuchtigkeit im Boden, unterdrückt Unkraut und schützt die Melonen vor dem direkten Kontakt mit dem Boden.
* Automatische Bewässerung: Wenn ihr noch fauler sein wollt, könnt ihr ein automatisches Bewässerungssystem installieren. Das spart euch das tägliche Gießen.
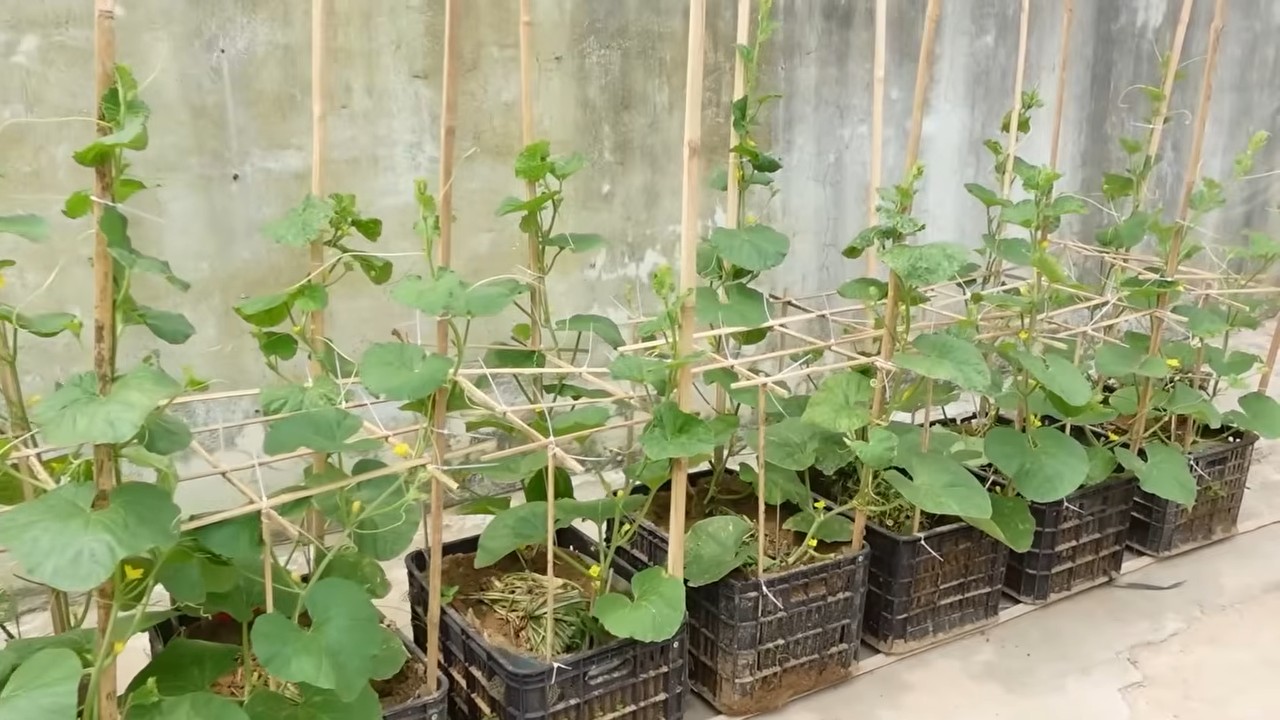
* Klettergerüst: Einige Melonensorten können auch an einem Klettergerüst gezogen werden. Das spart Platz und sorgt für eine gute Belüftung der Pflanzen. Achtet aber darauf, dass das Gerüst stabil genug ist, um das Gewicht der Melonen zu tragen.
* Schneckenkorn: Wenn ihr Probleme mit Schnecken habt, könnt ihr Schneckenkorn streuen. Achtet aber darauf, dass es für Haustiere und Kinder unzugänglich ist.
* Netze gegen Vögel: Wenn Vögel eure Melonen anpicken, könnt ihr sie mit Netzen schützen.
Ich hoffe, diese Anleitung hilft euch dabei, eine reiche Melonenernte einzufahren – ganz ohne viel Aufwand. Lasst es euch schmecken! Und denkt daran: Gärtnern soll Spaß machen! Also entspannt euch und genießt die Zeit in eurem Garten. Viel Erfolg!
Conclusion
So, there you have it! Lazy melon gardening isn’t just a catchy phrase; it’s a pathway to a bountiful harvest with minimal effort. We’ve explored how to sidestep the common pitfalls of melon cultivation, focusing on techniques that prioritize efficiency and yield. From choosing the right varieties to employing strategic mulching and watering methods, every step is designed to maximize your success while minimizing your workload.
But why is this DIY trick a must-try? Because it empowers even the most time-strapped gardener to enjoy the sweet, juicy reward of homegrown melons. Imagine biting into a perfectly ripe cantaloupe or watermelon, knowing you nurtured it from seed to table with a fraction of the usual effort. That’s the promise of lazy melon gardening. It’s about working smarter, not harder, and reaping the delicious benefits.
Beyond the core techniques we’ve discussed, there’s plenty of room for experimentation and personalization. Consider these variations to tailor the lazy melon gardening approach to your specific needs and preferences:
* **Vertical Gardening:** If space is limited, train your melon vines to grow vertically on trellises or fences. This not only saves space but also improves air circulation, reducing the risk of fungal diseases. Choose smaller melon varieties for vertical gardening to avoid straining the supports.
* **Companion Planting:** Strategically plant companion plants alongside your melons to deter pests and attract beneficial insects. Marigolds, nasturtiums, and basil are excellent choices for repelling common melon pests.
* **Self-Watering Containers:** For container gardening, consider using self-watering containers or wicking beds. These systems provide a consistent supply of moisture to your melon plants, reducing the need for frequent watering.
* **Grafting:** For advanced gardeners, grafting melon plants onto more vigorous rootstocks can improve disease resistance and overall plant health. This technique is particularly useful in areas with challenging soil conditions.
* **Succession Planting:** Extend your melon harvest by planting seeds or seedlings at staggered intervals throughout the growing season. This ensures a continuous supply of fresh melons for your table.
Ultimately, the key to successful lazy melon gardening is adaptability. Observe your plants closely, adjust your techniques as needed, and don’t be afraid to experiment. The goal is to find a system that works best for you and your garden.
We wholeheartedly encourage you to give this DIY trick a try. Embrace the principles of lazy melon gardening and discover the joy of growing your own delicious melons with minimal effort. And most importantly, we want to hear about your experiences! Share your successes, challenges, and variations in the comments below. Let’s build a community of lazy melon gardeners and learn from each other. Your insights could inspire others to embark on their own melon-growing adventures. Happy gardening!
Frequently Asked Questions (FAQ)
What exactly is “lazy melon gardening,” and how is it different from traditional melon gardening?
Lazy melon gardening is a streamlined approach to growing melons that prioritizes efficiency and minimizes the amount of time and effort required. Unlike traditional methods that often involve intensive soil preparation, frequent watering, and meticulous pest control, lazy melon gardening focuses on techniques like no-till gardening, strategic mulching, drought-tolerant varieties, and natural pest management strategies. The goal is to achieve a bountiful harvest with less work. It’s about working *smarter*, not harder.
What are the best melon varieties for lazy melon gardening?
The best melon varieties for lazy melon gardening are those that are naturally disease-resistant, drought-tolerant, and relatively low-maintenance. Some excellent choices include:
* **Watermelons:** ‘Sugar Baby’ (early maturing and compact), ‘Blacktail Mountain’ (cold-tolerant), ‘Moon and Stars’ (heirloom variety with beautiful foliage).
* **Cantaloupes:** ‘Minnesota Midget’ (early maturing and compact), ‘Athena’ (disease-resistant), ‘Hales Best Jumbo’ (classic cantaloupe flavor).
* **Honeydew:** ‘Honey Globe’ (reliable producer), ‘Temptation’ (sweet and flavorful).
* **Other Melons:** ‘Casaba’ (long shelf life), ‘Crenshaw’ (sweet and aromatic).
Consider your local climate and growing conditions when selecting melon varieties. Look for varieties that are specifically recommended for your region.
How important is soil preparation for lazy melon gardening? Can I really skip tilling?
Soil preparation is still important, but lazy melon gardening emphasizes no-till or minimal-till methods. Instead of tilling, focus on improving soil health by adding organic matter, such as compost, aged manure, or leaf mold. This will improve drainage, water retention, and nutrient availability. You can also use cover crops to enrich the soil and suppress weeds. While tilling can initially loosen the soil, it also disrupts the soil structure and can lead to erosion. No-till methods promote a healthier soil ecosystem, which benefits your melon plants in the long run.
What’s the best way to water melons in a lazy melon gardening system?
Consistent and efficient watering is crucial for melon production. The best approach is to use drip irrigation or soaker hoses, which deliver water directly to the roots of the plants, minimizing water waste and reducing the risk of fungal diseases. Water deeply and infrequently, rather than shallowly and frequently. Mulching around the plants will also help to retain moisture in the soil. Monitor the soil moisture regularly and adjust your watering schedule as needed. Avoid overhead watering, as this can promote fungal diseases.
How do I deal with pests and diseases in a lazy melon garden without using harsh chemicals?
Lazy melon gardening prioritizes natural pest and disease management strategies. Some effective techniques include:
* **Companion Planting:** Plant herbs and flowers that attract beneficial insects and repel pests.
* **Crop Rotation:** Rotate your melon crops each year to prevent the buildup of soilborne diseases and pests.
* **Handpicking:** Regularly inspect your plants for pests and remove them by hand.
* **Neem Oil:** Apply neem oil to control a wide range of pests and diseases.
* **Floating Row Covers:** Use floating row covers to protect young plants from pests.
* **Good Air Circulation:** Ensure good air circulation around your plants to prevent fungal diseases.
* **Healthy Soil:** Healthy soil leads to healthy plants, which are more resistant to pests and diseases.
How much space do melons need to grow successfully?
Melons generally require a significant amount of space to grow successfully. Watermelons typically need the most space, requiring at least 6-8 feet between plants. Cantaloupes and honeydews can be planted closer together, with about 3-4 feet between plants. If you’re growing melons vertically on trellises, you can reduce the spacing somewhat. However, it’s important to provide adequate support for the vines and fruits. Consider the mature size of the melon variety when determining spacing.
Can I grow melons in containers using the lazy melon gardening method?
Yes, you can grow melons in containers using the lazy melon gardening method, but you’ll need to choose smaller melon varieties and use large containers. Select containers that are at least 20 gallons in size and have good drainage. Use a high-quality potting mix and amend it with compost or other organic matter. Water regularly and fertilize as needed. Vertical gardening techniques are particularly well-suited for container-grown melons.
How do I know when my melons are ripe and ready to harvest?
Determining when a melon is ripe can be tricky, but here are some general guidelines:
* **Watermelons:** Look for a dull, rather than shiny, rind. The underside of the melon (where it rests on the ground) should be yellow or cream-colored. Thump the melon; a ripe watermelon will have a deep, hollow sound.
* **Cantaloupes:** The stem should slip easily from the melon when it’s ripe. The rind should have a distinct aroma and a slightly soft texture.
* **Honeydews:** The rind should turn from green to a creamy yellow color. The blossom end of the melon should be slightly soft.
Practice makes perfect! With experience, you’ll develop a better sense of when your melons are ripe.
What if I encounter problems with my lazy melon garden? Where can I find help?
If you encounter problems with your lazy melon garden, don’t despair! There are many resources available to help you troubleshoot and find solutions. Start by consulting your local extension office, which can provide expert advice on gardening in your region. Online gardening forums and communities can also be a valuable source of information and support. And of course, feel free to ask questions in the comments section of this article! We’re here to help you succeed.


Leave a Comment