
Mushroom Growing Morning Routine: Imagine starting your day not with the blare of an alarm, but with the earthy aroma of fresh mushrooms, cultivated right in your own home! For centuries, mushroom cultivation has been a revered practice, from ancient civilizations in Asia who prized them for their medicinal properties to modern-day foodies seeking sustainable and delicious ingredients. But let’s be honest, the thought of growing mushrooms can seem intimidating, right?
That’s where this DIY guide comes in! I’m going to share my tried-and-true mushroom growing morning routine, a simple yet effective system that will help you nurture your fungi friends and reap the rewards of a bountiful harvest. Forget complicated setups and expensive equipment. This is all about creating a manageable and enjoyable routine that fits seamlessly into your daily life.
Why do you need this? Because growing your own mushrooms is not only incredibly rewarding, but it’s also a fantastic way to reduce your carbon footprint, enjoy fresh, organic produce, and impress your friends with your newfound green thumb (or should I say, brown thumb?). Plus, incorporating this mushroom growing morning routine into your day is a fantastic way to connect with nature and add a touch of magic to your everyday life. So, grab your coffee, and let’s get started!
My Simple Guide to a Thriving Mushroom Growing Morning Routine
Okay, mushroom enthusiasts! Let’s dive into my daily routine for ensuring a bountiful mushroom harvest. I’ve found that consistency is key when it comes to cultivating these fascinating fungi, and a dedicated morning routine sets the stage for success. This isn’t about complicated procedures; it’s about creating a nurturing environment and keeping a watchful eye on your precious mycelium.
Understanding the Basics
Before we jump into the nitty-gritty, let’s quickly recap the fundamental needs of most cultivated mushrooms. Remember, this is a general guide, and specific requirements may vary depending on the species you’re growing. Always research the specific needs of your chosen mushroom variety!
* Humidity: Mushrooms thrive in humid environments. Think damp forest floor.
* Temperature: Each species has its ideal temperature range. Maintaining this range is crucial for pinning (the formation of baby mushrooms) and overall growth.
* Air Exchange: Mushrooms need fresh air to breathe, just like us! Stagnant air can lead to problems like mold and stunted growth.
* Light: While mushrooms don’t photosynthesize like plants, they do need some light to orient themselves and trigger pinning. Indirect light is usually best.
* Cleanliness: Contamination is the enemy! Maintaining a clean growing environment is essential to prevent unwanted molds and bacteria from taking over.
My Daily Mushroom Morning Routine: Step-by-Step
Here’s my tried-and-true morning routine, broken down into easy-to-follow steps:
1. Visual Inspection (5 minutes):
* This is the most important part! I start by carefully examining each of my mushroom growing containers or bags. I’m looking for any signs of trouble, such as:
* Mold: Keep an eye out for any unusual colors or textures. Green, black, or orange spots are red flags. Cobweb mold looks like, well, cobwebs!
* Bacterial Blotch: This appears as slimy, brown spots on the mushroom caps.
* Stunted Growth: Are the mushrooms growing at the expected rate? If they seem to be lagging behind, there might be an issue.
* Pests: Check for tiny flies, gnats, or other unwanted visitors.
* Dryness: Is the substrate (the material the mushrooms are growing on) looking dry?
* Excess Moisture: Conversely, is there standing water in the container? This can lead to problems.
* I make notes of anything unusual in a small notebook. This helps me track progress and identify potential problems early on.
* Pro Tip: Use a magnifying glass for a closer look, especially when inspecting for mold or pests.
2. Humidity Check and Adjustment (5-10 minutes):
* I use a hygrometer (a device that measures humidity) to check the humidity levels in my growing area.
* If the humidity is too low:
* I mist the inside of the growing container or tent with a fine mist of water. Be careful not to spray the mushrooms directly, as this can cause spotting.
* I might also increase the humidity in the surrounding room by using a humidifier or placing trays of water near the growing area.
* For fruiting chambers, I check the water level in the bottom and refill as needed.
* If the humidity is too high:
* I increase ventilation by opening the container or tent for a short period.
* I might also use a small fan to circulate the air.
* I make sure there’s no standing water in the container.
* Important: Different mushroom species have different humidity requirements. Research your specific variety! Oyster mushrooms, for example, generally need higher humidity than shiitake mushrooms.
3. Air Exchange (5 minutes):
* Even if the humidity is perfect, mushrooms need fresh air.
* I open the growing container or tent for a few minutes to allow for air exchange.
* I gently fan the air around the mushrooms to help circulate it.
* If I’m using a fruiting chamber, I make sure the air vents are open and not blocked.
* Caution: Be careful not to introduce contaminants during air exchange. Avoid opening the container in dusty or drafty areas.
4. Temperature Monitoring (2 minutes):
* I use a thermometer to check the temperature in my growing area.
* If the temperature is too low:
* I might use a small space heater to warm the room.
* I make sure the growing container is not in a drafty area.
* If the temperature is too high:
* I might use a fan to cool the room.
* I make sure the growing container is not in direct sunlight.
* Remember: Maintaining a stable temperature is crucial for mushroom growth. Fluctuations can stress the mushrooms and lead to problems.
5. Watering (if needed) (5 minutes):
* I only water if the substrate is looking dry. Overwatering is a common mistake that can lead to mold and bacterial growth.
* I use a spray bottle to mist the substrate with distilled water.
* I aim for even moisture, but not saturation. The substrate should feel damp to the touch, but not soggy.
* Tip: Lift the container to feel its weight. A lighter container indicates that the substrate is drying out.
6. Pest Control (if needed) (5 minutes):
* If I notice any pests, I take immediate action.
* I might use sticky traps to catch flying insects.
* I might also use a natural insecticide, such as neem oil, to control pests.
* Important: Always use pest control methods that are safe for mushrooms and humans. Avoid harsh chemicals.
* I remove any visible pests by hand.
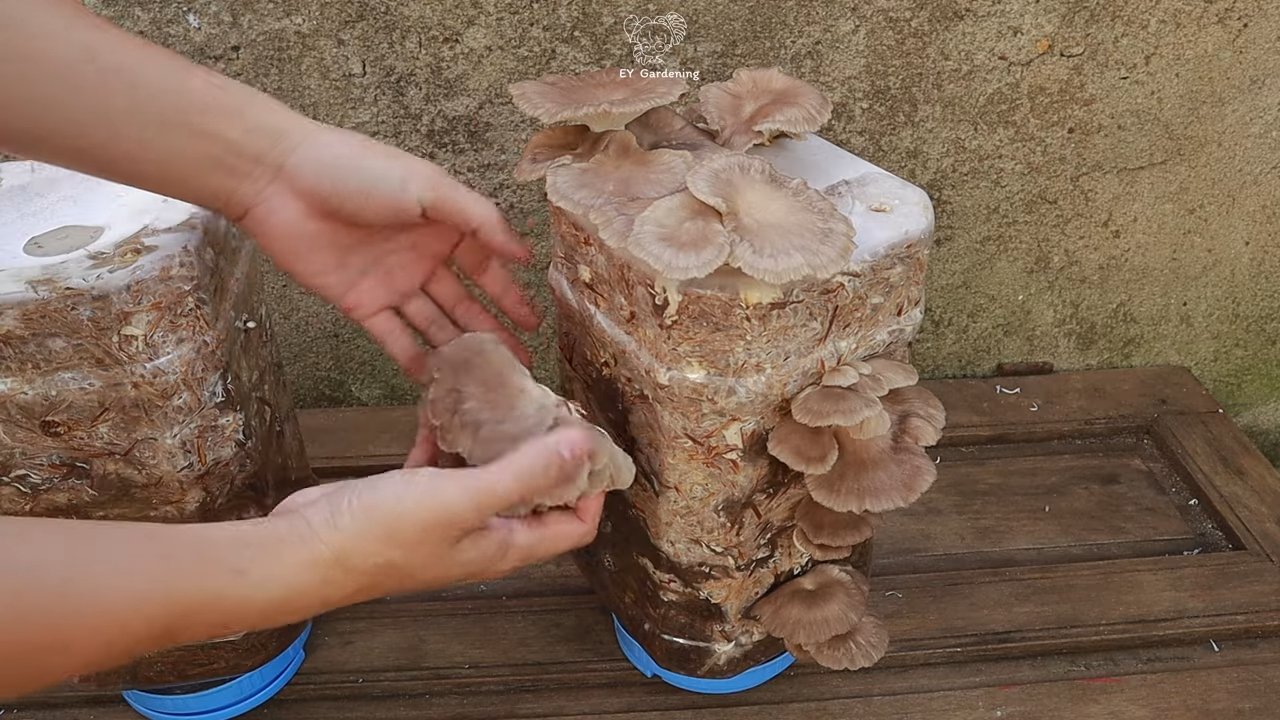
7. Harvesting (if ready) (5-15 minutes):
* If any mushrooms are ready to harvest, I carefully pick them.
* I use a sharp knife to cut the mushrooms at the base of the stem.
* I try to avoid disturbing the surrounding mycelium.
* I store the harvested mushrooms in the refrigerator in a paper bag.
* Timing is Key: Harvesting at the right time is crucial for flavor and texture. Generally, you want to harvest before the caps fully open and release spores.
Troubleshooting Common Issues
Even with a diligent morning routine, problems can still arise. Here are some common issues and how I address them:
* Green Mold (Trichoderma): This is a common contaminant. If I find it, I immediately isolate the affected container to prevent it from spreading. I might try to remove the mold with a spoon, but if it’s widespread, I’ll discard the entire substrate.
* Cobweb Mold (Dactylium): This mold looks like fine, grayish cobwebs. I treat it with a diluted hydrogen peroxide solution.
* Bacterial Blotch: This is caused by excessive moisture. I increase ventilation and reduce watering.
* Pinning Problems: If the mushrooms aren’t pinning, it could be due to low humidity, poor air exchange, or incorrect temperature. I adjust these factors accordingly.
* Stunted Growth: This could be caused by a variety of factors, including contamination, nutrient deficiencies, or incorrect environmental conditions. I try to identify the underlying cause and address it.
Adapting the Routine to Your Needs
This is just a general guide, and you’ll need to adapt it to your specific needs and growing conditions. The key is to be observant, consistent, and responsive to the needs of your mushrooms.
* Frequency: While I do this every morning, you might find that you only need to do it every other day, depending on your environment and the species you’re growing.
* Time: The amount of time you spend on each step will vary depending on the size of your operation and the complexity of your setup.
* Equipment: You might need to invest in additional equipment, such as a humidifier, a fan, or a more sophisticated temperature controller.
Beyond the Morning: Other Important Considerations
While my morning routine is crucial, it’s not the only thing that matters. Here are some other important considerations for successful mushroom growing:
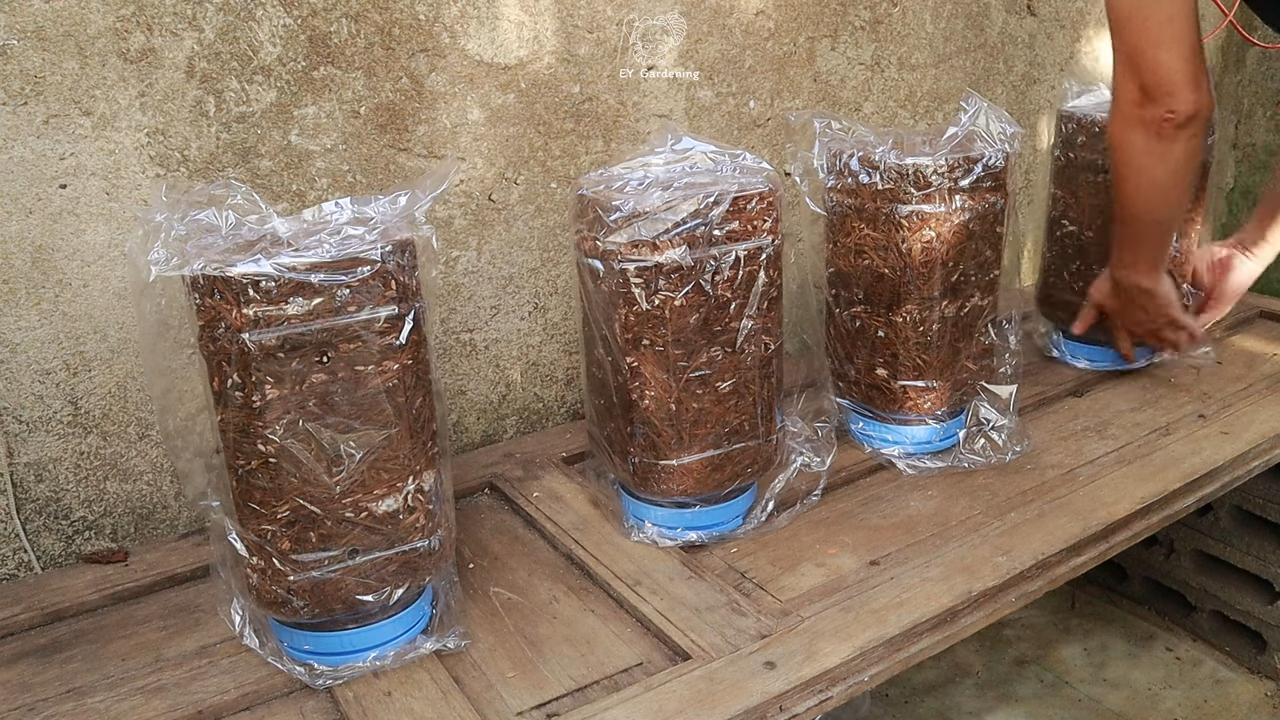
* Substrate Preparation: The quality of your substrate is essential. Make sure it’s properly sterilized or pasteurized to prevent contamination.
* Inoculation: Use a high-quality spawn from a reputable source.
* Incubation: Maintain the correct temperature and humidity during the incubation phase.
* Fruiting Chamber: If you’re using a fruiting chamber, make sure it’s properly designed and maintained.
* Cleanliness: Maintain a clean
Conclusion
So, there you have it! Transforming your mushroom growing morning routine with these simple DIY tricks isn’t just about saving time; it’s about cultivating a deeper connection with your fungal friends and maximizing your yield. We’ve explored how a few strategic adjustments, like automating your misting system or creating a dedicated observation station, can significantly impact the health and productivity of your mushroom grow.
Think about it: no more frantic dashes to the grow tent before work, no more worrying about inconsistent humidity levels. Instead, you’ll be greeted each morning by a thriving ecosystem, ready to reward your efforts with a bountiful harvest. This isn’t just a routine; it’s an investment in your passion, a way to streamline your process and truly enjoy the magic of mushroom cultivation.
But don’t just take our word for it. The beauty of DIY is its adaptability. Feel free to experiment with these suggestions and tailor them to your specific needs and growing environment. Perhaps you’ll discover a unique way to integrate a smart home device for even more precise environmental control. Or maybe you’ll find that a simple, hand-crafted humidity sensor works perfectly for your setup. The possibilities are endless!
Consider these variations to further enhance your mushroom growing morning routine:
* Automated Lighting Schedules: Integrate smart bulbs with timers to mimic natural light cycles, promoting optimal growth and pinning.
* Nutrient Supplementation System: Design a simple drip system to deliver diluted nutrient solutions directly to your substrate, boosting yields and overall health.
* Data Logging: Use a small notebook or spreadsheet to track temperature, humidity, and growth progress. This data will help you identify patterns and optimize your growing conditions over time.
* Integrated Pest Management: Incorporate preventative measures like sticky traps or beneficial insects into your morning routine to minimize the risk of contamination and pest infestations.
Ultimately, the goal is to create a system that works for you, one that allows you to nurture your mushrooms with ease and efficiency. We firmly believe that these DIY tricks are a game-changer for any serious mushroom grower. They’re cost-effective, customizable, and, most importantly, they empower you to take control of your cultivation process.
We urge you to give these techniques a try. Start small, experiment with different approaches, and don’t be afraid to get creative. The world of mushroom growing is full of surprises, and the journey of discovery is just as rewarding as the harvest itself.
And most importantly, we want to hear about your experiences! Share your successes, your challenges, and your unique DIY solutions in the comments below. Let’s build a community of passionate mushroom growers, sharing our knowledge and inspiring each other to achieve even greater success. Your insights could be invaluable to someone just starting out, and together, we can unlock the full potential of this fascinating and rewarding hobby. So, get growing, get creative, and get sharing! Let’s revolutionize our mushroom growing morning routines, one DIY trick at a time.
Frequently Asked Questions (FAQ)
Q1: Why is a consistent morning routine so important for mushroom growing?
A: Consistency is key in mushroom cultivation. Mushrooms are highly sensitive to environmental fluctuations, and a consistent morning routine helps maintain optimal conditions for growth. This includes things like maintaining proper humidity levels, ensuring adequate airflow, and monitoring for any signs of contamination or pests. A well-structured routine minimizes stress on your mushrooms, leading to healthier growth and higher yields. By addressing these needs first thing in the morning, you set the stage for a productive day of growth.
Q2: I’m a beginner. Are these DIY tricks too advanced for me?
A: Absolutely not! While some of the suggestions might seem intimidating at first, they are all designed to be simple and accessible, even for beginners. Start with the basics, like creating a dedicated observation station or implementing a simple misting schedule. As you gain experience, you can gradually incorporate more advanced techniques like automated misting systems or data logging. The beauty of DIY is that you can customize everything to your skill level and resources. Don’t be afraid to experiment and learn as you go. The most important thing is to start and gain hands-on experience.
Q3: What are the most common mistakes people make in their mushroom growing morning routine?
A: Some common mistakes include neglecting humidity control, failing to provide adequate airflow, and overlooking early signs of contamination. Many beginners also underestimate the importance of consistent monitoring. For example, forgetting to mist regularly can lead to dry substrate and stunted growth. Ignoring early signs of mold or bacteria can quickly lead to widespread contamination. A well-defined morning routine helps prevent these mistakes by ensuring that all critical aspects of mushroom care are addressed consistently.
Q4: How much time should I dedicate to my mushroom growing morning routine?
A: The amount of time required will vary depending on the size and complexity of your grow setup. However, even a small, basic setup should require no more than 15-30 minutes per day. With automated systems in place, you can significantly reduce this time. The key is to prioritize the most important tasks, such as humidity control, airflow, and contamination monitoring. As you gain experience, you’ll become more efficient and be able to complete your routine in less time.
Q5: What if I don’t have the budget for fancy automated systems?
A: That’s perfectly fine! Many of the most effective DIY tricks are low-cost or even free. For example, you can create a simple humidity tent using a plastic bag or container. You can use a spray bottle to manually mist your mushrooms. You can even build a simple airflow system using a small fan and some duct tape. The key is to be resourceful and creative. There are countless ways to improve your mushroom growing morning routine without breaking the bank.
Q6: How can I tell if my mushroom growing morning routine is working?
A: The most obvious sign of a successful routine is healthy mushroom growth. Look for strong, vibrant mushrooms with no signs of discoloration or disease. You should also see consistent pinning and fruiting. Another indicator is a stable and consistent growing environment. Monitor temperature and humidity levels to ensure they are within the optimal range for your chosen mushroom species. Finally, pay attention to your own experience. Are you feeling less stressed and more confident in your ability to care for your mushrooms? If so, then your routine is likely working well.
Q7: What are some resources for learning more about DIY mushroom growing techniques?
A: There are many excellent resources available online and in print. Online forums and communities dedicated to mushroom growing are a great place to ask questions and share experiences. YouTube is also a valuable resource, with countless videos demonstrating various DIY techniques. Look for reputable sources and be sure to verify information before implementing it. Books on mushroom cultivation can also provide a wealth of knowledge and inspiration.
Q8: Can these DIY tricks be adapted for different types of mushrooms?
A: Yes, absolutely! While the specific requirements may vary depending on the mushroom species, the underlying principles of these DIY tricks remain the same. For example, all mushrooms require adequate humidity and airflow, so techniques for controlling these factors will be applicable regardless of the species you are growing. Just be sure to research the specific needs of your chosen mushroom and adjust your routine accordingly.
Q9: How do I prevent contamination in my mushroom grow?
A: Preventing contamination is crucial for successful mushroom growing. Start by maintaining a clean and sterile environment. Use proper sterilization techniques when preparing your substrate and tools. Wear gloves and a mask when working with your mushrooms. Regularly clean your grow area with a disinfectant solution. Monitor your mushrooms closely for any signs of mold or bacteria. If you detect contamination, remove the affected mushrooms immediately to prevent it from spreading. A proactive approach to hygiene is essential for minimizing the risk of contamination.
Q10: What should I do if I encounter problems with my mushroom grow?
A: Don’t panic! Problems are a normal part of the mushroom growing process. The first step is to identify the problem. Is it a lack of humidity? Is there contamination? Is the temperature too high or too low? Once you’ve identified the problem, research potential solutions. Consult online forums, books, or experienced growers for advice. Don’t be afraid to experiment with different approaches until you find what works best for you. Remember that learning from your mistakes is an essential part of becoming a successful mushroom grower.

Leave a Comment