
Recycled bottles sugarcane growing – sounds like something out of a sci-fi movie, right? But trust me, it’s a surprisingly simple and incredibly rewarding way to bring a touch of the tropics to your own backyard (or even your balcony!). I’m so excited to share this ingenious DIY trick with you!
Sugarcane, with its tall, graceful stalks, has a rich history, deeply intertwined with cultures across the globe. From its origins in Southeast Asia to its cultivation in the Caribbean and beyond, sugarcane has been a vital crop for centuries. While traditionally grown on a large scale, I’m here to show you how to enjoy the sweetness of homegrown sugarcane, even if you’re short on space.
Why should you try growing sugarcane in recycled bottles? Well, for starters, it’s a fantastic way to reduce waste and give those plastic bottles a new lease on life. But more importantly, it allows you to experience the joy of growing your own food, no matter where you live. Imagine the satisfaction of harvesting your own sugarcane and using it to sweeten your tea, make fresh juice, or even try your hand at homemade molasses! Plus, it’s a fantastic conversation starter and a fun project to do with kids. This DIY project is not only eco-friendly but also budget-friendly, making it accessible to everyone. So, let’s dive in and discover the secrets of successful recycled bottles sugarcane growing!
Grow Sugarcane in Recycled Bottles: A Sweet DIY Project!
Hey there, fellow plant enthusiasts! Ever thought about growing your own sugarcane? It might sound like a tropical dream, but trust me, it’s totally doable, even in a small space, and especially with a little help from recycled bottles! I’m going to walk you through how to turn those empty plastic containers into mini sugarcane farms. It’s a fun, eco-friendly project that’ll give you a sweet reward (literally!) down the line.
What You’ll Need
Before we dive in, let’s gather our supplies. This is a pretty low-cost project, which is always a win!
* Recycled Plastic Bottles: The sturdier, the better. Think soda bottles, juice bottles, or even water bottles. I usually aim for bottles that are at least 2 liters in size, but bigger is always better.
* Sugarcane Stalks: You can usually find these at local nurseries, farmers’ markets, or even online. Look for healthy stalks with visible nodes (those little bumps where roots will sprout).
* Potting Soil: A well-draining potting mix is crucial. You can use a commercial mix or create your own by combining garden soil, compost, and perlite.
* Sharp Knife or Scissors: For cutting the bottles and sugarcane.
* Water: For watering your sugarcane, of course!
* Optional: Rooting Hormone: This can help speed up the rooting process, but it’s not essential.
* Optional: Pebbles or Gravel: For drainage at the bottom of the bottles.
Preparing the Bottles
This is where we transform those discarded bottles into cozy homes for our sugarcane.
1. Clean the Bottles: Give those bottles a good scrub with soap and water to remove any residue. Rinse them thoroughly and let them dry completely. This is important to prevent any mold or bacteria from harming your sugarcane.
2. Cut the Bottles: There are a couple of ways to do this, depending on the size of your bottles and your preference.
* Option 1: Cut in Half: This is my go-to method for larger bottles. Cut the bottle in half horizontally. You’ll use the bottom half as the planter and the top half (inverted) as a sort of humidity dome initially.
* Option 2: Cut Off the Top: For smaller bottles, you can simply cut off the top portion, creating an open-top container.
3. Drill Drainage Holes: This is absolutely essential! Sugarcane needs well-draining soil to thrive. Use a drill or a sharp object (like a nail heated with a lighter – be careful!) to create several drainage holes in the bottom of each bottle. I usually aim for at least 4-5 holes.
4. Add Drainage Layer (Optional): If you want to be extra cautious about drainage, add a layer of pebbles or gravel to the bottom of each bottle before adding the soil. This will help prevent the roots from sitting in water.
Preparing the Sugarcane
Now, let’s get those sugarcane stalks ready for planting.
1. Inspect the Stalks: Carefully examine your sugarcane stalks. Look for any signs of damage or disease. Healthy stalks should be firm and green.
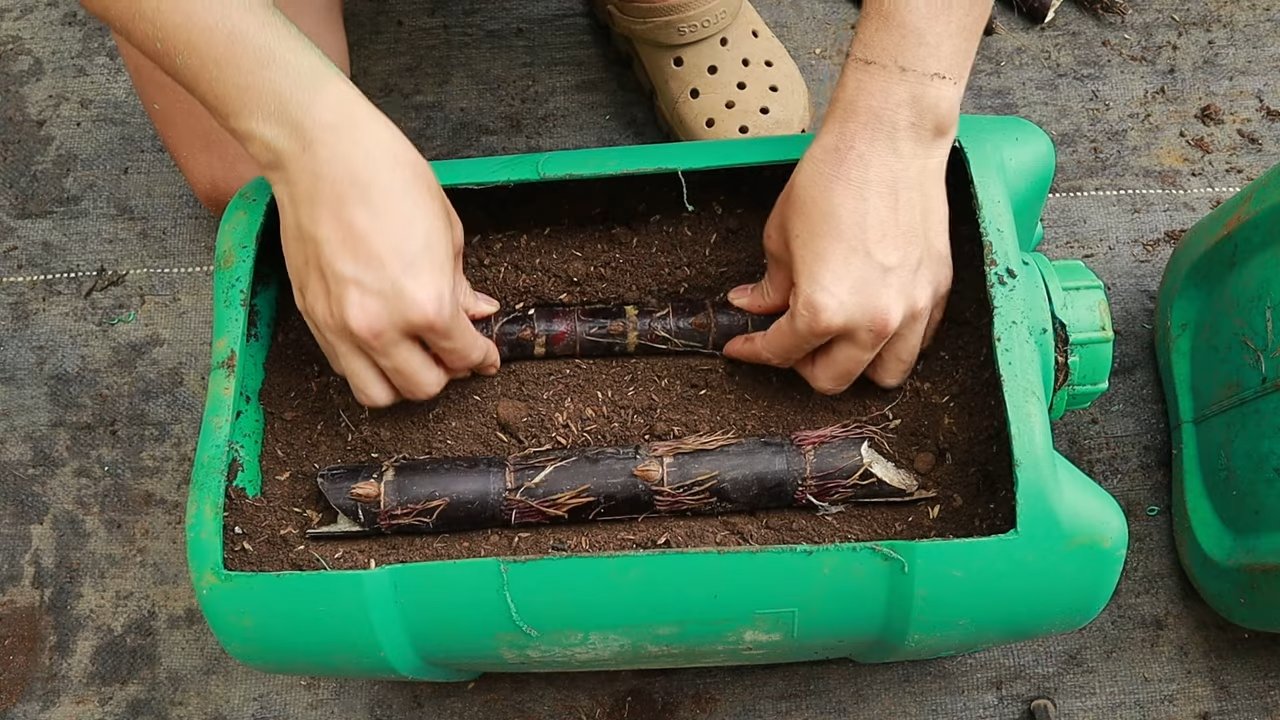
2. Cut the Stalks (If Necessary): If your stalks are very long, you can cut them into smaller sections, each containing at least 2-3 nodes. This will give you more plants! Use a clean, sharp knife or pruning shears to make the cuts.
3. Optional: Apply Rooting Hormone: If you’re using rooting hormone, dip the cut ends of the sugarcane stalks into the powder or liquid. This will encourage root development.
Planting the Sugarcane
Alright, the moment we’ve been waiting for! Let’s get those sugarcane stalks planted.
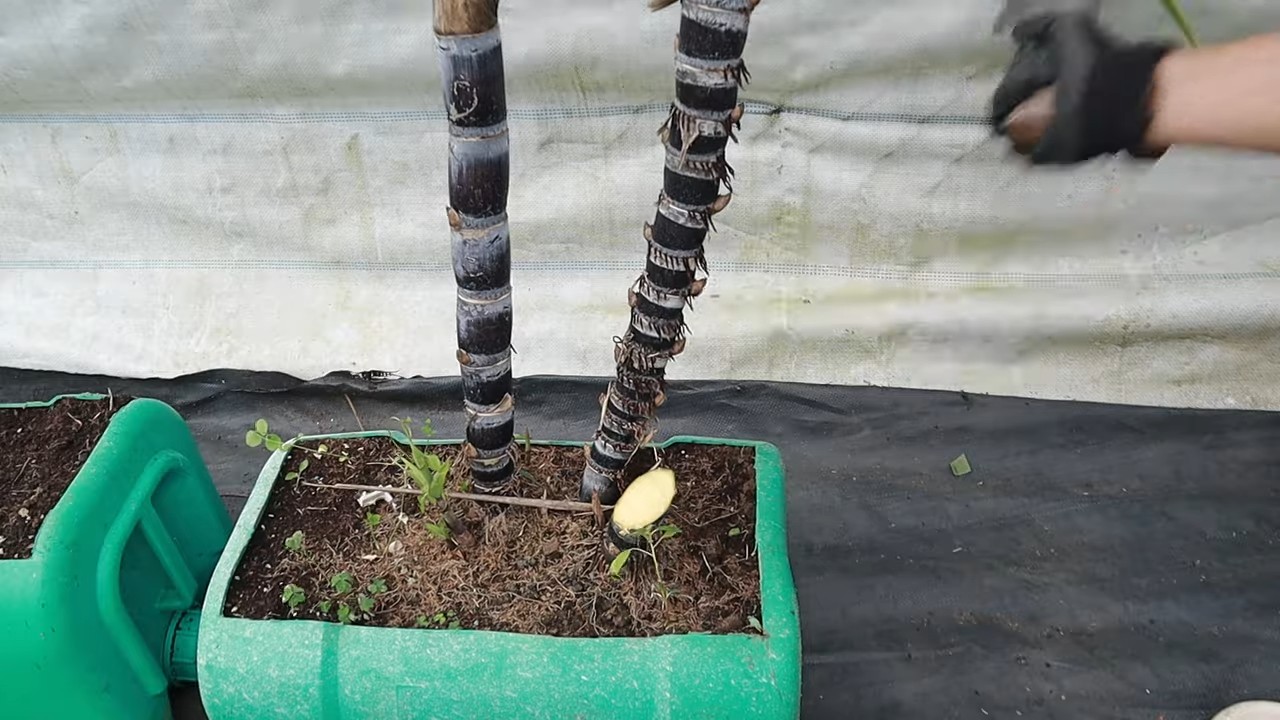
1. Fill the Bottles with Soil: Fill each bottle with potting soil, leaving about an inch of space at the top. Gently pat down the soil to remove any air pockets.
2. Plant the Sugarcane: Lay the sugarcane stalk horizontally on top of the soil. Make sure at least one node is touching the soil. Gently press the stalk into the soil, covering it lightly. You don’t want to bury it too deep.
3. Water Thoroughly: Water the soil thoroughly until water drains out of the drainage holes. This will help settle the soil and provide moisture to the sugarcane.
4. Create a Humidity Dome (Optional): If you cut the bottles in half, invert the top half and place it over the bottom half to create a humidity dome. This will help keep the soil moist and create a warm, humid environment that sugarcane loves. If you just cut the tops off, you can skip this step.
Caring for Your Sugarcane
Now that your sugarcane is planted, it’s time to provide the care it needs to thrive.
1. Sunlight: Sugarcane needs plenty of sunlight – at least 6-8 hours per day. Place your bottles in a sunny location, such as a windowsill or a balcony. If you don’t have enough natural sunlight, you can supplement with a grow light.
2. Watering: Keep the soil consistently moist, but not soggy. Water when the top inch of soil feels dry to the touch. During hot weather, you may need to water more frequently.
3. Fertilizing: Sugarcane is a heavy feeder, so it needs regular fertilization. Use a balanced fertilizer (e.g., 10-10-10) every 2-3 weeks during the growing season. Follow the instructions on the fertilizer package.
4. Humidity: Sugarcane loves humidity. If you live in a dry climate, you can increase humidity by misting the plants regularly or placing a tray of water near the bottles.
5. Temperature: Sugarcane thrives in warm temperatures, ideally between 70-90°F (21-32°C). Protect your plants from frost and cold temperatures.
6. Remove the Humidity Dome (If Applicable): Once you see new growth emerging from the nodes, you can remove the humidity dome. This usually takes about 2-3 weeks.
7. Repotting: As your sugarcane grows, it may eventually outgrow its bottle. When this happens, you’ll need to repot it into a larger container. Choose a pot that is at least twice the size of the original bottle.
Troubleshooting
Even with the best care, you might encounter some problems along the way. Here are a few common issues and how to address them:
* Yellowing Leaves: This could be a sign of overwatering, underwatering, or nutrient deficiency. Check the soil moisture and adjust your watering accordingly. If the soil is consistently moist, reduce watering. If the soil is dry, increase watering. You may also need to fertilize your plants.
* Brown Spots on Leaves: This could be a sign of fungal disease. Remove any affected leaves and treat the plants with a fungicide. Make sure to improve air circulation around the plants.
* Pests: Sugarcane can be susceptible to pests such as aphids and spider mites. Inspect your plants regularly and treat any infestations with an insecticidal soap or neem oil.
Harvesting Your Sugarcane
After several months of care, your sugarcane will be ready to harvest!
1. Timing: Sugarcane is typically ready to harvest in about 9-12 months, depending on the climate and growing conditions. The stalks will be thick and mature, and the leaves will start to turn brown.
2. Harvesting: Use a sharp knife or machete to cut the sugarcane stalks at the base.
3. Extracting the Juice: There are several ways to extract the juice from your sugarcane. You can use a sugarcane juicer, a blender, or even a mortar and pestle.
4. Enjoy! Once you’ve extracted the juice, you can enjoy it fresh or use it to make sugarcane juice, molasses, or even rum!
Extra Tips for Success
* Choose the Right Variety: Some sugarcane varieties are better suited for container growing than others. Look for dwarf or compact varieties.
* Provide Support: As your sugarcane grows taller, it may need support to prevent it from falling over. You can use stakes or trellises to provide support.
* Be Patient: Sugarcane takes time to grow, so don’t get discouraged if you don’t see results immediately. Just keep providing the care it needs, and you’ll eventually be rewarded with a sweet harvest.
* Experiment: Don’t be afraid to experiment with different techniques and methods. Gardening is all about learning and adapting.
Growing sugarcane in recycled bottles is a rewarding and sustainable project that anyone can do. With a little patience and care, you can enjoy the sweet taste of homegrown sugarcane! Happy growing!
Conclusion
So, there you have it! Transforming discarded plastic bottles into miniature sugarcane havens is not just a clever upcycling project; it’s a gateway to a more sustainable lifestyle and a surprisingly rewarding gardening experience. We’ve shown you how to take something destined for the landfill and give it a new purpose, all while cultivating your own sweet sugarcane.
But why is this DIY trick a must-try? Beyond the obvious environmental benefits of reducing plastic waste, growing sugarcane in recycled bottles offers several advantages. It’s incredibly space-efficient, making it ideal for urban gardeners with limited outdoor areas. The controlled environment within the bottle can help regulate moisture and temperature, leading to healthier and faster growth. Plus, it’s a fantastic educational tool, especially for children, teaching them about plant life cycles, resourcefulness, and the importance of environmental stewardship.
Don’t think you’re limited to just the method we’ve outlined. Feel free to experiment! Try using different types of plastic bottles – larger bottles can accommodate more sugarcane stalks, while smaller ones might be perfect for starting seedlings. You can also explore different soil mixtures to find what works best for your local climate and sugarcane variety. Consider adding drainage holes to the bottom of the bottles if you live in a particularly rainy area to prevent waterlogging.
For a decorative touch, paint the bottles with vibrant colors or add labels to identify different sugarcane varieties. You could even create a vertical garden by hanging the bottles from a wall or fence, turning your upcycled project into a stunning visual display.
The possibilities are truly endless, and the only limit is your imagination. This method of growing sugarcane in recycled bottles is not just about producing a sweet treat; it’s about embracing creativity, sustainability, and a deeper connection with nature.
We wholeheartedly encourage you to give this DIY trick a try. It’s a simple, affordable, and incredibly satisfying way to contribute to a greener planet while enjoying the fruits (or rather, the stalks) of your labor. Once you’ve embarked on your sugarcane-growing adventure, we’d love to hear about your experiences! Share your photos, tips, and challenges in the comments below. Let’s build a community of eco-conscious gardeners who are passionate about upcycling and growing their own food. Together, we can make a difference, one recycled bottle and one sugarcane stalk at a time. Let us know what you think of this **recycled bottles sugarcane growing** method.
Frequently Asked Questions (FAQ)
1. What type of plastic bottles are best for growing sugarcane?
Ideally, you should use food-grade plastic bottles, such as those that previously contained water, juice, or soda. These are generally made from PET (polyethylene terephthalate) or HDPE (high-density polyethylene), which are considered relatively safe for plant growth. Avoid using bottles that contained harsh chemicals or cleaning products, as these could contaminate the soil and harm your sugarcane. Thoroughly wash and rinse the bottles before using them to remove any residue. Clear or translucent bottles are preferable as they allow sunlight to reach the soil, but you can also use colored bottles, especially if you’re placing them in a location with intense sunlight, as they can help prevent overheating of the soil.
2. What kind of soil should I use for growing sugarcane in recycled bottles?
Sugarcane thrives in well-draining, fertile soil. A good mix would be a combination of potting soil, compost, and perlite or vermiculite. The potting soil provides essential nutrients, the compost enriches the soil with organic matter, and the perlite or vermiculite improves drainage and aeration. You can also add a small amount of slow-release fertilizer to provide a steady supply of nutrients to your sugarcane. Avoid using heavy clay soil, as it can become waterlogged and suffocate the roots. The ideal pH level for sugarcane is between 6.0 and 7.0. You can test the pH of your soil using a soil testing kit and adjust it accordingly if necessary.
3. How often should I water my sugarcane grown in recycled bottles?
Watering frequency depends on several factors, including the climate, the size of the bottle, and the type of soil you’re using. Generally, you should water your sugarcane when the top inch of soil feels dry to the touch. Avoid overwatering, as this can lead to root rot. Ensure that the bottle has adequate drainage to prevent water from accumulating at the bottom. During hot and dry weather, you may need to water more frequently, while during cooler or rainy weather, you can reduce the watering frequency. Check the soil moisture regularly and adjust your watering schedule accordingly.
4. How much sunlight does sugarcane need when grown in recycled bottles?
Sugarcane requires at least 6-8 hours of direct sunlight per day to thrive. Place your recycled bottle sugarcane garden in a sunny location where it will receive ample sunlight. If you live in an area with intense sunlight, you may need to provide some shade during the hottest part of the day to prevent the leaves from scorching. You can also rotate the bottles regularly to ensure that all sides of the sugarcane receive equal sunlight. If you don’t have access to enough natural sunlight, you can supplement with artificial grow lights.
5. How do I fertilize sugarcane grown in recycled bottles?
Sugarcane is a heavy feeder and requires regular fertilization to maintain healthy growth. You can use a balanced fertilizer with a ratio of 10-10-10 or 14-14-14. Apply the fertilizer according to the instructions on the package. You can also use organic fertilizers, such as compost tea or fish emulsion. Fertilize your sugarcane every 2-4 weeks during the growing season. Avoid over-fertilizing, as this can burn the roots.
6. How long does it take for sugarcane to mature when grown in recycled bottles?
The time it takes for sugarcane to mature depends on the variety, climate, and growing conditions. Generally, it takes about 9-12 months for sugarcane to reach maturity. You’ll know your sugarcane is ready to harvest when the stalks are thick and juicy and the leaves begin to turn brown.
7. Can I grow sugarcane indoors in recycled bottles?
While sugarcane prefers outdoor conditions, it is possible to grow it indoors in recycled bottles, provided you can provide adequate sunlight and humidity. Place the bottles near a sunny window or use artificial grow lights. You may also need to increase the humidity by misting the plants regularly or using a humidifier. Keep in mind that sugarcane grown indoors may not grow as large or produce as much sugar as sugarcane grown outdoors.
8. How do I harvest sugarcane grown in recycled bottles?
To harvest sugarcane, use a sharp knife or machete to cut the stalks close to the base. Remove the leaves and outer layers of the stalk. You can then chew on the stalk to extract the sweet juice or use a juicer to extract the juice for other purposes.
9. What are some common problems I might encounter when growing sugarcane in recycled bottles, and how can I address them?
Some common problems include pests (such as aphids or sugarcane borers), diseases (such as red rot), and nutrient deficiencies. Regularly inspect your plants for signs of pests or diseases and take appropriate action. You can use organic pesticides or fungicides to control pests and diseases. Ensure that your sugarcane is receiving adequate nutrients by fertilizing regularly.
10. Can I grow different varieties of sugarcane in recycled bottles?
Yes, you can grow different varieties of sugarcane in recycled bottles. Experiment with different varieties to see which ones thrive best in your local climate and growing conditions. Be sure to label the bottles clearly so you can keep track of which variety is which.

Leave a Comment