
Regrow Enoki Mushrooms at Home? Absolutely! Imagine harvesting a fresh batch of those delicate, snow-white Enoki mushrooms right from your kitchen. It’s not just a culinary dream; it’s a surprisingly simple and rewarding DIY project that anyone can tackle. For centuries, Enoki mushrooms, also known as “golden needle mushrooms,” have been a staple in East Asian cuisine, prized for their unique texture and subtle, earthy flavor. They’re a fantastic addition to soups, stir-fries, and salads, adding a touch of elegance and umami.
But why buy them at the store when you can cultivate your own? In today’s world, where sustainability and self-sufficiency are increasingly important, learning to regrow Enoki mushrooms at home is a fantastic way to reduce your carbon footprint, save money, and connect with nature. Plus, it’s incredibly satisfying to watch these fascinating fungi flourish under your care. This DIY guide will walk you through each step, from preparing your substrate to harvesting your first crop. Get ready to embark on a fun and flavorful journey into the world of home mushroom cultivation!
Regrow Enoki Mushrooms at Home: A Fun and Frugal DIY Project
Hey mushroom lovers! Ever bought a package of enoki mushrooms and felt bad tossing the little root cluster? Well, guess what? You don’t have to! You can actually regrow those tasty little guys right at home. It’s a super fun and surprisingly easy DIY project. I’m going to walk you through the whole process, step-by-step, so you can enjoy a fresh supply of enoki mushrooms without breaking the bank.
What You’ll Need
Before we dive in, let’s gather our supplies. This is a pretty low-cost project, which is always a win in my book!
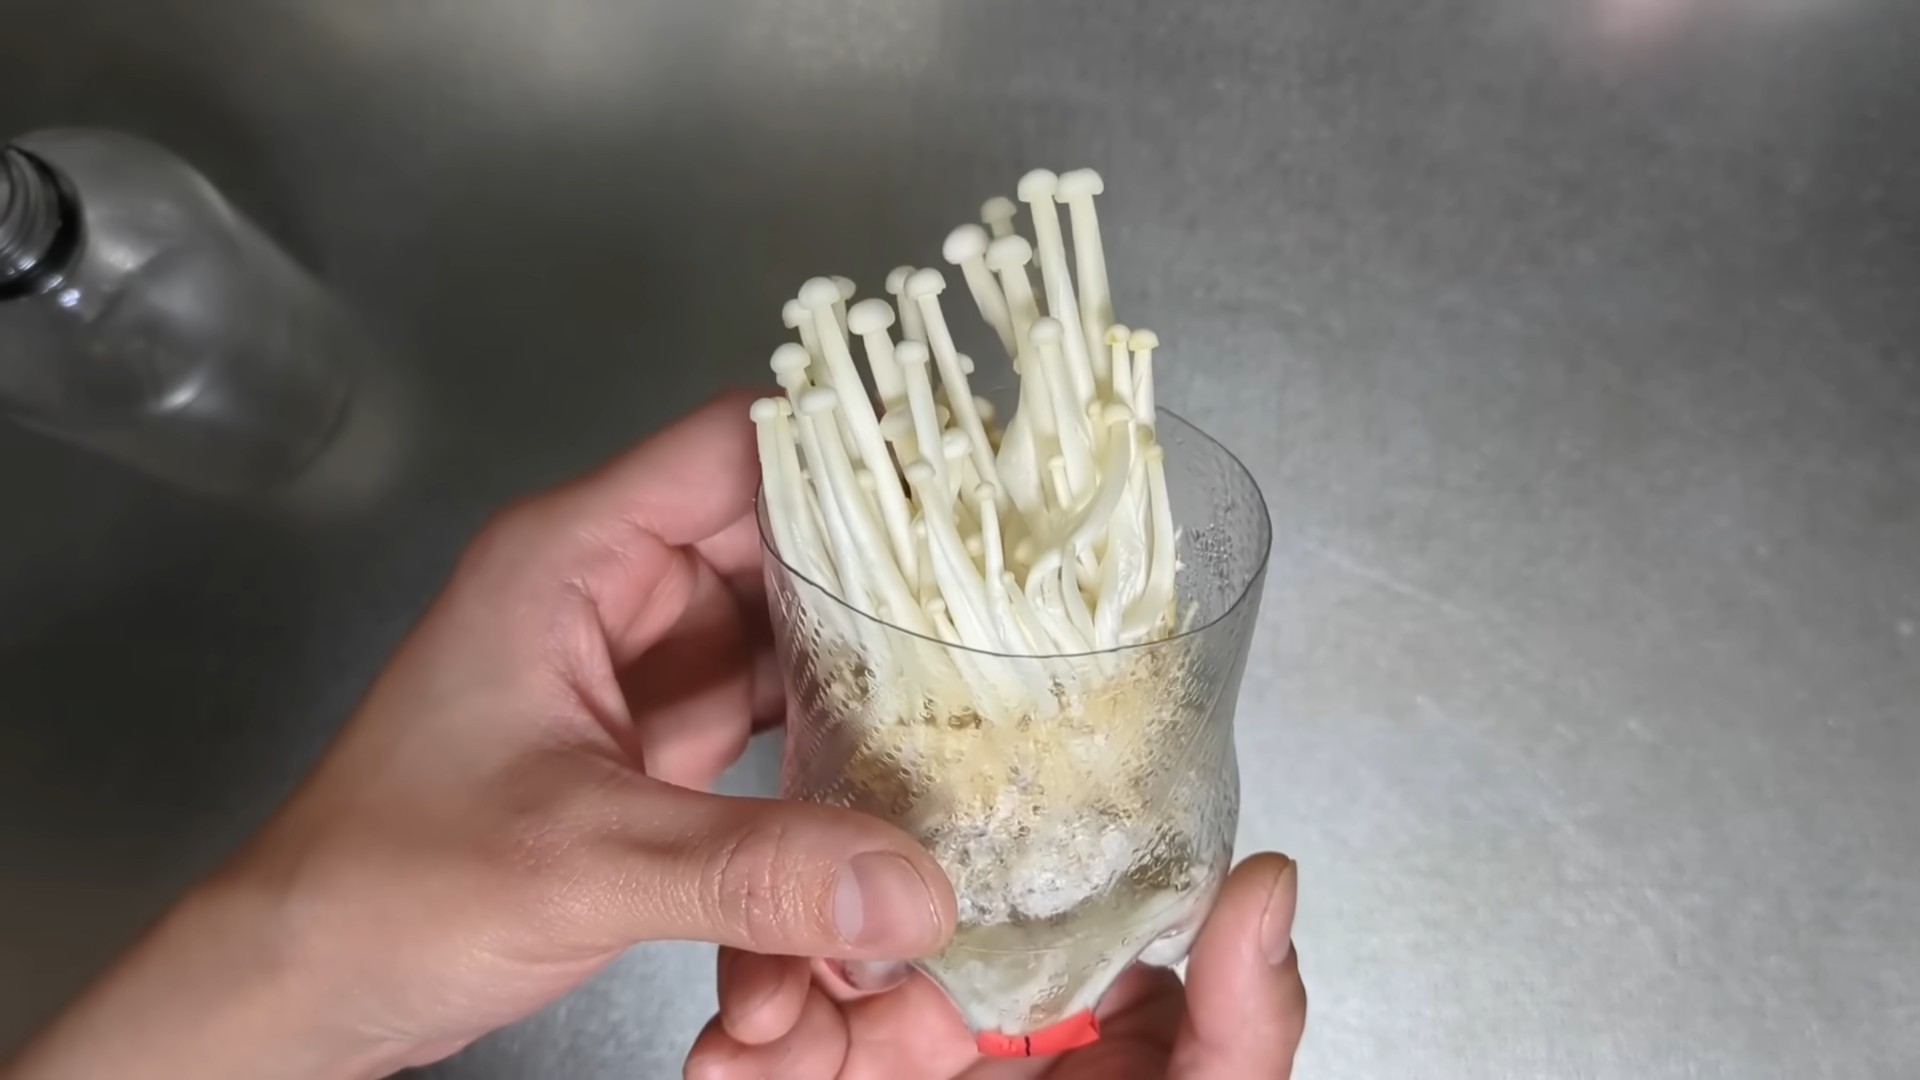
* Enoki Mushroom Root Cluster: This is the base of the enoki mushrooms you buy at the store. Don’t throw it away after you’ve used the rest of the mushrooms!
* Clean Container: A plastic container, glass jar, or even a clean yogurt container will work. Just make sure it’s clean to prevent contamination.
* Cardboard: Plain, unprinted cardboard is best. Think cereal boxes or shipping boxes.
* Coffee Grounds: Used coffee grounds are perfect! They provide nutrients for the mushrooms. Make sure they’re cooled down, of course.
* Water: Tap water is fine, but filtered water is even better.
* Spray Bottle: For misting the mushrooms.
* Rubbing Alcohol: For sterilizing your tools and work area.
* Gloves: Optional, but recommended to keep things sanitary.
* Optional: Hydrogen Peroxide (3%): To help prevent mold.
Preparing the Substrate
The substrate is the material the mushrooms will grow in. We’re going to create a nutrient-rich environment using cardboard and coffee grounds.
1. Sterilize Your Work Area: Before you start, wipe down your work surface with rubbing alcohol. This helps prevent unwanted mold and bacteria from interfering with your mushroom growth.
2. Prepare the Cardboard: Tear the cardboard into small pieces, about 1-2 inches square. Remove any tape or glossy labels.
3. Pasteurize the Cardboard: This step is crucial to kill off any competing organisms in the cardboard. There are a couple of ways to do this:
* Microwave Method: Place the cardboard pieces in a microwave-safe bowl and add enough water to completely submerge them. Microwave on high for 2-3 minutes, or until the water is boiling. Let it cool completely before handling.
* Boiling Water Method: Place the cardboard pieces in a pot and cover them with boiling water. Let them soak for about an hour. Drain the water and let the cardboard cool completely.
4. Prepare the Coffee Grounds: If you’re using fresh coffee grounds, let them cool completely before using them. Used coffee grounds are already pasteurized from the brewing process, so you can use them as is.
5. Mix the Substrate: In a clean bowl, mix the pasteurized cardboard and coffee grounds. Aim for a ratio of about 2 parts cardboard to 1 part coffee grounds. The mixture should be damp but not soggy. Squeeze out any excess water.
6. Optional: Add Hydrogen Peroxide: Add a tablespoon of 3% hydrogen peroxide to the substrate mix. This helps prevent mold growth.
Inoculating the Substrate
Now comes the fun part – introducing the enoki mushroom culture to our substrate!
1. Prepare the Enoki Root Cluster: Gently rinse the enoki mushroom root cluster under cool water to remove any dirt or debris.
2. Place the Substrate in the Container: Fill your clean container with the cardboard and coffee ground mixture. Leave about an inch of space at the top.
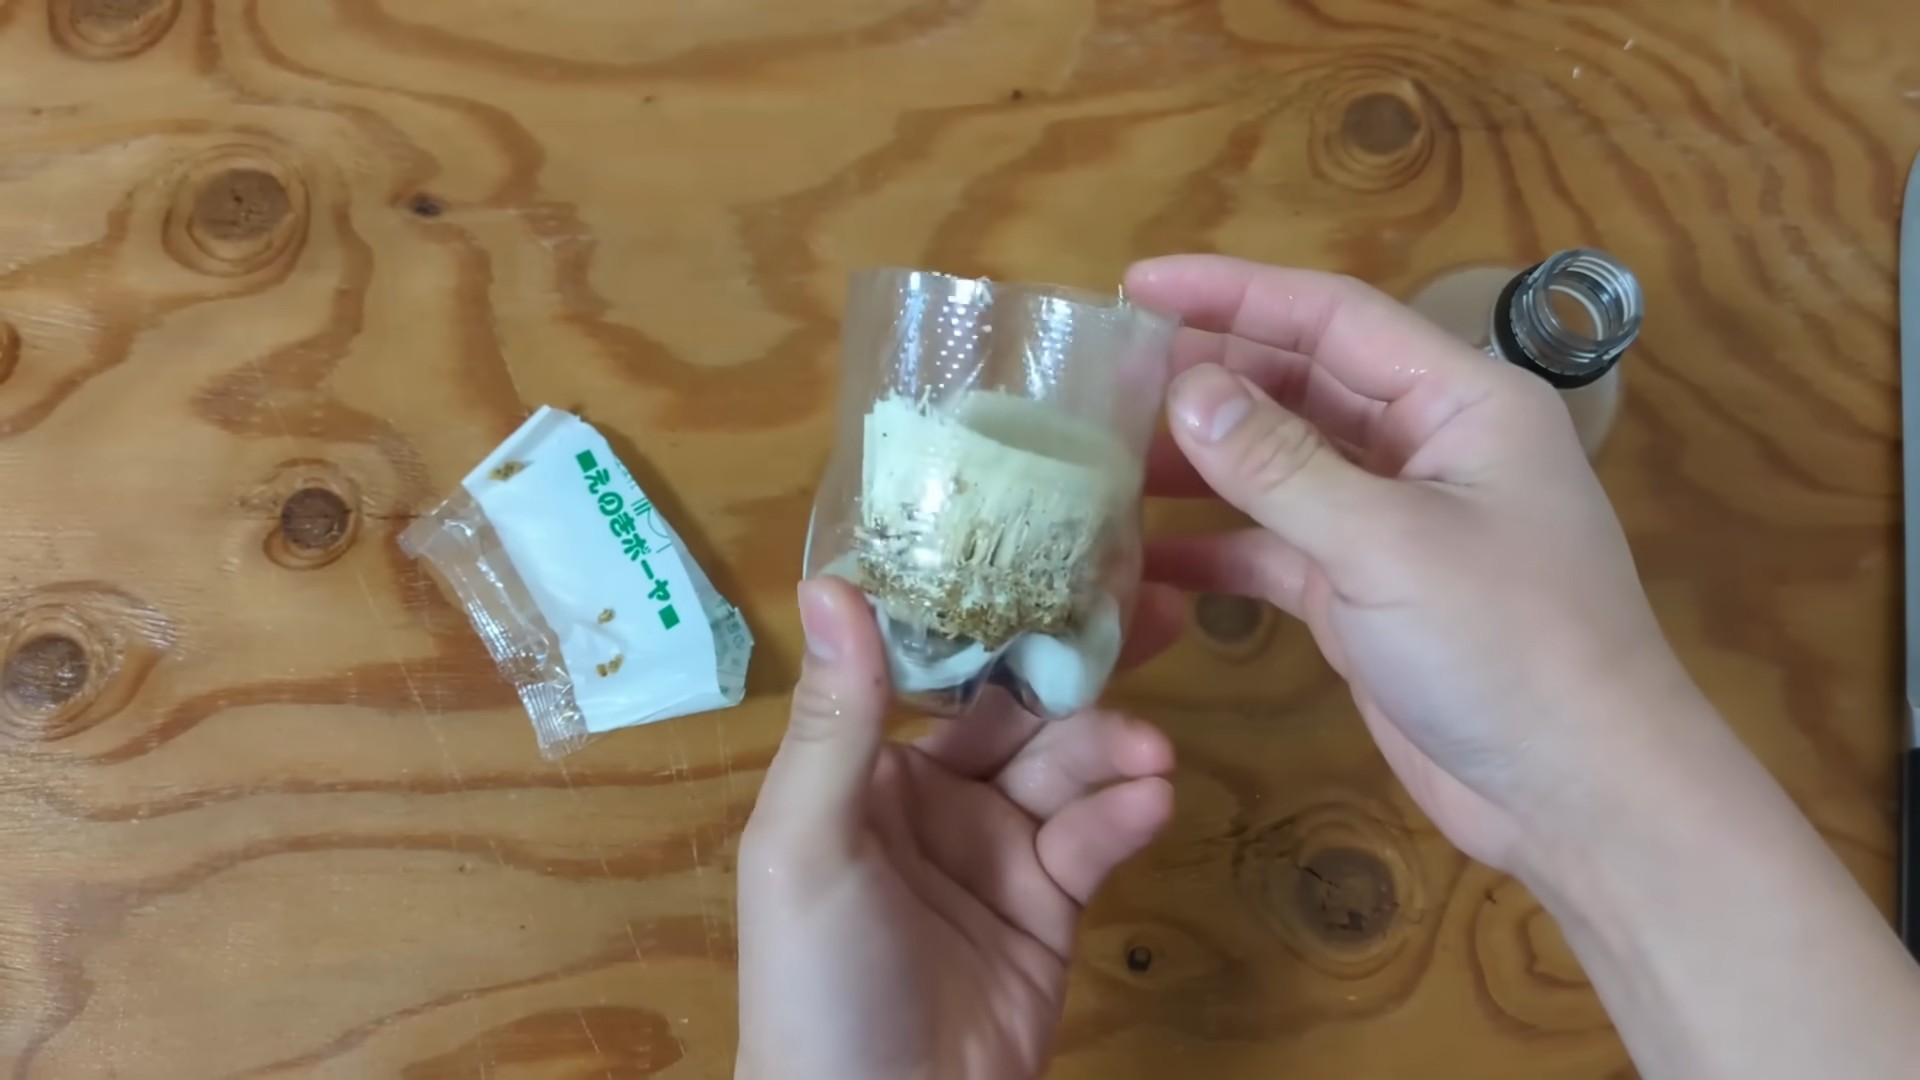
3. Bury the Root Cluster: Gently bury the enoki mushroom root cluster in the center of the substrate. Make sure the cut end (where the mushrooms were attached) is facing up.
4. Cover the Root Cluster: Lightly cover the root cluster with a thin layer of the substrate.
5. Mist with Water: Use your spray bottle to mist the substrate with water. You want it to be damp but not soaking wet.
Creating the Ideal Growing Environment
Enoki mushrooms need a cool, dark, and humid environment to thrive. Here’s how to create the perfect conditions:
1. Choose a Location: Find a cool, dark place in your home. A basement, closet, or even a shelf in your refrigerator can work. The ideal temperature is between 45-65°F (7-18°C).
2. Maintain Humidity: Enoki mushrooms need high humidity. To maintain humidity, you can:
* Cover the Container: Place a lid loosely on the container or cover it with plastic wrap. Make sure there are some air holes for ventilation.
* Place in a Plastic Bag: Put the container inside a large plastic bag and seal it. Again, make sure there are some air holes.
* Mist Regularly: Mist the substrate with water 1-2 times a day to keep it moist.
3. Monitor for Mold: Keep a close eye on your container for any signs of mold. Mold can appear as white, green, or black fuzzy patches. If you see mold, remove the affected area immediately. You can also spray the area with a diluted hydrogen peroxide solution (1 part hydrogen peroxide to 10 parts water).
Patience is Key: Waiting for Growth
Mushroom growing takes time, so be patient! It can take several weeks for the enoki mushrooms to start growing.
1. Check Regularly: Check your container every day for signs of growth. You should start to see small white pins (baby mushrooms) forming on the substrate.
2. Maintain Conditions: Continue to maintain the cool, dark, and humid environment. Mist the substrate regularly to keep it moist.
3. Light Exposure (Optional): Once the mushrooms start to form, you can expose them to a small amount of indirect light. This will help them develop their characteristic long, thin stems. However, avoid direct sunlight, as it can dry them out.
Harvesting Your Enoki Mushrooms
After a few weeks, your enoki mushrooms should be ready to harvest!
1. Harvest Time: The mushrooms are ready to harvest when the stems are about 4-6 inches long and the caps are still small and tight.
2. Harvesting Technique: Use a clean knife or scissors to cut the mushrooms at the base of the stem, near the substrate.
3. Enjoy Your Harvest: Congratulations! You’ve successfully regrown enoki mushrooms at home. Use them in soups, salads, stir-fries, or any other dish you like.
Troubleshooting
Sometimes, things don’t go exactly as planned. Here are some common problems and how to fix them:
* No Growth: If you don’t see any growth after several weeks, it could be due to several factors:
* Temperature: Make sure the temperature is within the ideal range (45-65°F).
* Humidity: Ensure the humidity is high enough.
* Contamination: Check for mold or other contaminants.
* Substrate: Make sure the substrate is properly pasteurized and has the right moisture content.
* Mold Growth: Mold is a common problem in mushroom growing. To prevent mold:
* Sterilize: Sterilize your tools and work area thoroughly.
* Pasteurize: Properly pasteurize the substrate.
* Ventilation: Provide adequate ventilation to prevent moisture buildup.
* Hydrogen Peroxide: Use a diluted hydrogen peroxide solution to kill mold.
* Mushrooms are Drying Out: If the mushrooms are drying out, increase the humidity by misting them more frequently or covering the container more tightly.
Tips for Success
Here are a few extra tips to help you succeed with your enoki mushroom growing project:
* Use Fresh Root Clusters: The fresher the root cluster, the better your chances of success.
* Maintain Cleanliness: Cleanliness is key to preventing contamination.
* Be Patient: Mushroom growing takes time, so don’t get discouraged if you don’t see results immediately.
* Experiment: Don’t be afraid to experiment with different substrates and growing conditions.
* Document Your Progress: Keep track of your progress and take notes on what works and what doesn’t.
Can I Get Multiple Harvests?
Yes! You can often get multiple harvests from the same root cluster. After harvesting your first batch of mushrooms, continue to maintain the growing environment. Mist the substrate regularly and keep it in a cool, dark place. You should see another flush of mushrooms in a few weeks. The subsequent harvests may be smaller than the first, but it’s still a great way
Conclusion
So, there you have it! Regrowing Enoki mushrooms at home isn’t just a fun experiment; it’s a gateway to a sustainable and delicious addition to your culinary repertoire. Forget those expensive grocery store prices and the often-disappointing quality of store-bought Enoki. With this simple DIY trick, you can cultivate your own supply of these delicate, flavorful fungi, ensuring freshness and saving money in the process.
Why is this a must-try? Because it’s incredibly rewarding to witness the magic of mushroom regeneration firsthand. It’s a tangible connection to the natural world, right in your own kitchen. Plus, the taste of freshly regrown Enoki mushrooms is simply unparalleled. They’re crisper, more flavorful, and bursting with umami goodness.
Beyond the basic method, there’s plenty of room for experimentation. Try using different types of growing mediums, such as sawdust or even coffee grounds, to see how it affects the flavor and texture of your mushrooms. You could also experiment with different light levels to influence the color and shape of the stems. Some growers even add a small amount of nutrient solution to the water to boost growth.
Consider this: you can use the regrown Enoki in a myriad of dishes. Add them to stir-fries for a delightful crunch, toss them into soups for a delicate flavor, or use them as a garnish for salads and noodle dishes. The possibilities are endless! Imagine the satisfaction of serving a dish featuring Enoki mushrooms that you grew yourself.
This DIY project is also a fantastic way to introduce children to the wonders of mycology and sustainable living. It’s a hands-on learning experience that teaches them about the life cycle of fungi and the importance of reducing food waste.
We wholeheartedly encourage you to give this DIY Enoki mushroom regrowing trick a try. It’s easy, affordable, and incredibly satisfying. Don’t be intimidated if your first attempt isn’t perfect. Like any skill, it takes practice and patience. The key is to observe, learn, and adapt.
Once you’ve successfully regrown your own Enoki mushrooms, we’d love to hear about your experience! Share your photos, tips, and variations in the comments below. Let’s create a community of home mushroom growers and inspire others to embrace the joy of cultivating their own food. Your insights could be invaluable to someone just starting out. So, grab those Enoki mushroom stems, get your container ready, and embark on this exciting culinary adventure. Happy growing!
Frequently Asked Questions
What exactly are Enoki mushrooms, and why should I bother regrowing them?
Enoki mushrooms, also known as Enokitake, are long, thin, white mushrooms with small caps. They have a mild, slightly fruity flavor and a crisp texture, making them a popular addition to Asian cuisine. Regrowing them at home offers several advantages: it’s more sustainable than buying them from the store, it reduces food waste, it’s cost-effective, and you get to enjoy the freshest possible Enoki mushrooms. Plus, it’s a fun and educational project!
How long does it take to regrow Enoki mushrooms?
The time it takes to regrow Enoki mushrooms can vary depending on environmental factors like temperature and humidity. Generally, you can expect to see new growth within one to two weeks. It may take another week or two for the mushrooms to reach a harvestable size. Be patient and consistent with your care, and you’ll be rewarded with a fresh batch of Enoki.
What’s the best container to use for regrowing Enoki mushrooms?
A clean, food-safe plastic container with a lid is ideal. The container should be large enough to accommodate the Enoki stems and some growing medium. A clear container will allow you to easily monitor the growth of the mushrooms. You can also use a glass jar, but make sure it’s thoroughly cleaned and sanitized.
What kind of growing medium should I use?
While you can regrow Enoki mushrooms in just water, using a growing medium will provide them with additional nutrients and support. Some popular options include:
* **Water:** Plain tap water works, but distilled or filtered water is preferable. Change the water every few days to prevent bacterial growth.
* **Coffee Grounds:** Used coffee grounds are a great source of nutrients for mushrooms. Make sure they are cooled and drained before adding them to the container.
* **Sawdust:** Hardwood sawdust is another excellent growing medium. Sterilize it before use by boiling it in water for a few minutes.
* **Vermiculite:** This mineral is lightweight and retains moisture well, making it a good choice for mushroom cultivation.
* **A mixture of these:** Experiment with different combinations to see what works best for you.
How much light do Enoki mushrooms need?
Enoki mushrooms don’t need a lot of light. In fact, they grow best in a dark or dimly lit environment. Too much light can cause them to develop thicker stems and smaller caps. A spot in a cool, dark corner of your kitchen or pantry is perfect.
How often should I water the Enoki mushrooms?
If you’re using a growing medium, keep it consistently moist but not waterlogged. You can mist the mushrooms with water every day or two to maintain humidity. If you’re growing them in just water, change the water every few days to prevent bacterial growth.
What if my Enoki mushrooms start to turn brown or moldy?
Browning or mold can indicate a problem with the growing environment. Make sure the container is clean, the growing medium is fresh, and the humidity is not too high. Remove any affected mushrooms immediately to prevent the problem from spreading. If the problem persists, try using a different growing medium or moving the container to a cooler location.
Can I eat the regrown Enoki mushrooms raw?
While Enoki mushrooms are generally safe to eat raw, it’s always best to cook them to reduce the risk of foodborne illness. Cooking also enhances their flavor and texture.
How many times can I regrow Enoki mushrooms from the same stems?
You can typically regrow Enoki mushrooms from the same stems several times, but the yield will decrease with each subsequent attempt. After a few cycles, the stems will become depleted of nutrients and will no longer produce mushrooms.
Is there anything else I should know to ensure success?
Patience is key! Don’t be discouraged if your first attempt isn’t perfect. Experiment with different growing mediums, light levels, and watering schedules to find what works best for you. And most importantly, have fun! Regrowing Enoki mushrooms is a rewarding and educational experience that you can enjoy for years to come.

Leave a Comment