
Rooftop Corn Growing Easy: Imagine stepping onto your rooftop and harvesting fresh, juicy corn, right in the heart of the city! Sounds like a dream, right? Well, it doesn’t have to be! For centuries, humans have cultivated crops in innovative ways, from the hanging gardens of Babylon to the ingenious terrace farming of the Incas. Now, it’s our turn to embrace urban agriculture and bring a touch of the countryside to our own homes.
But why corn, and why on the roof? Well, let’s face it, space is a premium these days, especially in urban environments. Rooftops often go unused, becoming the perfect blank canvas for a thriving garden. And corn? It’s a surprisingly rewarding crop to grow, offering a delicious and nutritious harvest. Plus, there’s something incredibly satisfying about nurturing a plant from seed to table, knowing you’ve grown your own food.
This DIY guide is your passport to successful rooftop corn growing easy. We’ll break down the process into simple, manageable steps, from choosing the right containers and soil to providing the necessary sunlight and water. Whether you’re a seasoned gardener or a complete beginner, I’m confident that you can transform your rooftop into a corn-filled oasis. So, grab your gardening gloves, and let’s get started!
DIY Rooftop Corn Garden: A Beginner’s Guide
Hey there, fellow gardening enthusiasts! Ever dreamt of growing your own corn, but you’re stuck in the city with limited space? Well, I’m here to tell you that a rooftop corn garden is totally achievable, even for beginners! I’ve done it, and trust me, if I can, you can too. It’s a rewarding experience, and nothing beats the taste of fresh, homegrown corn. Let’s dive into how you can create your own little cornfield in the sky!
What You’ll Need
Before we get started, let’s gather all the necessary materials. This will make the process smoother and prevent any frustrating mid-project runs to the store.
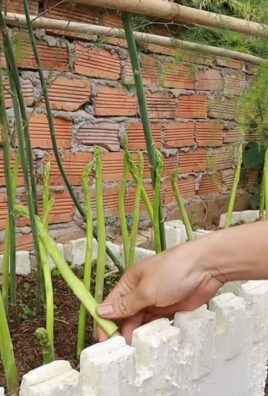
* Large Containers: Think big! Corn plants need plenty of room for their roots to grow. I recommend containers that are at least 24 inches in diameter and 24 inches deep. Plastic tubs, large pots, or even repurposed barrels will work. Make sure they have drainage holes!
* High-Quality Potting Mix: Don’t skimp on the soil! Corn is a heavy feeder, so you’ll need a nutrient-rich potting mix. I like to use a mix specifically formulated for vegetables, or you can create your own by combining compost, peat moss, and perlite.
* Corn Seeds: Choose a variety that’s suitable for container gardening. Shorter varieties like ‘On Deck’ or ‘Trinity’ are great options. You can find these at your local garden center or online.
* Slow-Release Fertilizer: This will provide your corn plants with a steady supply of nutrients throughout the growing season. Look for a fertilizer with a balanced NPK ratio (nitrogen, phosphorus, and potassium).
* Watering Can or Hose: Essential for keeping your corn plants hydrated.
* Trowel or Shovel: For planting the seeds and transplanting seedlings.
* Support Structures (Optional): Depending on the variety you choose and the weather conditions in your area, you might need to provide some support for your corn stalks. Bamboo stakes or tomato cages can work well.
* Bird Netting (Optional): Birds love corn seeds and young seedlings, so netting can help protect your crop.
* Gloves: To keep your hands clean and protected.
* Measuring Tape: To ensure proper spacing between plants.
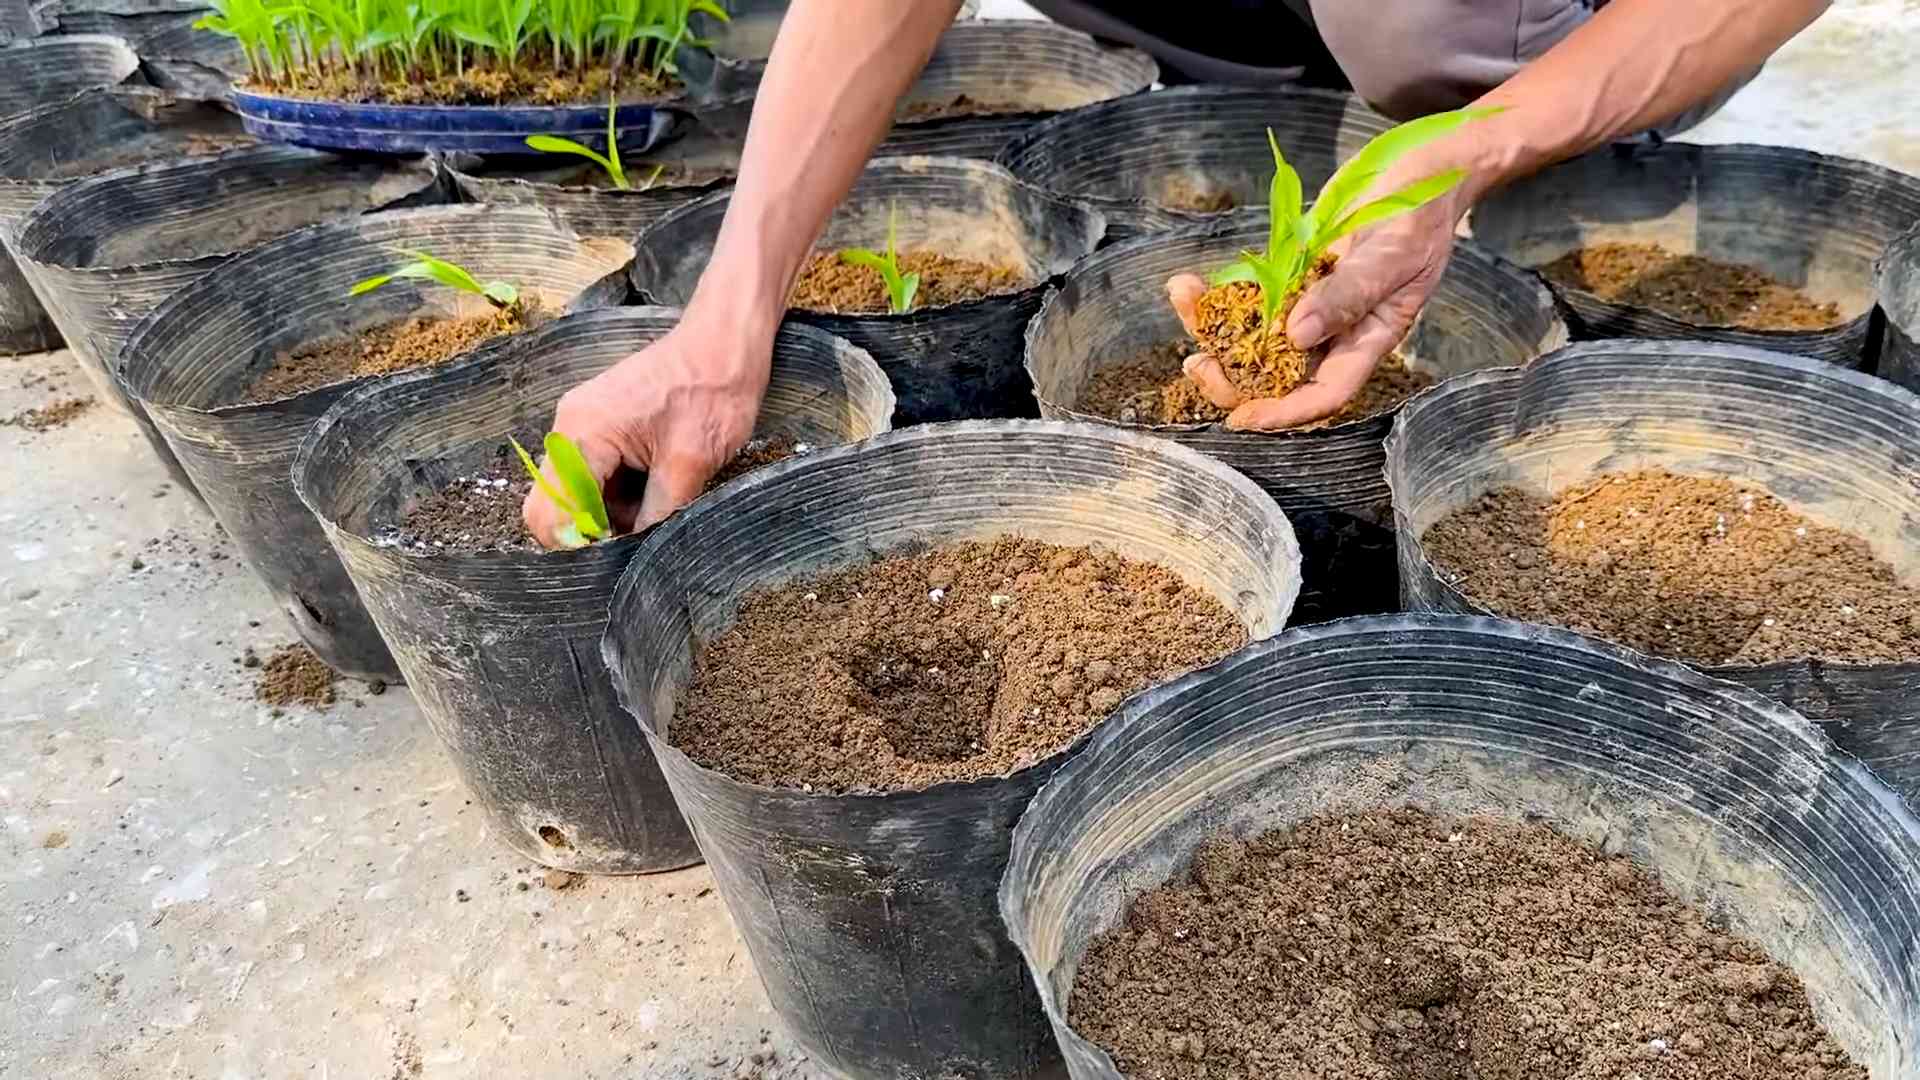
Preparing Your Containers
This step is crucial for ensuring proper drainage and providing a healthy environment for your corn plants.
1. Clean Your Containers: If you’re using repurposed containers, make sure to clean them thoroughly with soap and water to remove any dirt or debris.
2. Ensure Drainage: If your containers don’t have drainage holes, drill some! Corn plants don’t like to sit in soggy soil. I usually drill at least four holes, each about half an inch in diameter.
3. Add a Layer of Gravel (Optional): Some gardeners like to add a layer of gravel or pebbles to the bottom of the container to improve drainage. I find it helpful, especially in areas with heavy rainfall.
4. Fill with Potting Mix: Fill your containers with the high-quality potting mix, leaving a few inches of space at the top.
Planting Your Corn Seeds
Now for the fun part! Planting the seeds is where the magic begins.
1. Sow the Seeds: Plant your corn seeds about 1-2 inches deep and 4-6 inches apart. I usually plant 3-4 seeds per container, just to be safe. If all the seeds germinate, you can thin them out later, keeping the strongest seedling.
2. Water Gently: After planting, water the soil gently to moisten it. Be careful not to overwater, as this can cause the seeds to rot.
3. Provide Sunlight: Place your containers in a location that receives at least 6-8 hours of direct sunlight per day. Corn plants are sun-loving!
4. Protect from Birds: If you’re concerned about birds eating your seeds, cover the containers with bird netting until the seedlings emerge.
Caring for Your Corn Plants
Consistent care is key to a successful rooftop corn garden.
1. Water Regularly: Corn plants need consistent moisture, especially during hot weather. Water deeply whenever the top inch of soil feels dry to the touch. I usually water every day or two, depending on the weather.
2. Fertilize Regularly: Corn is a heavy feeder, so you’ll need to fertilize regularly to provide it with the nutrients it needs. Apply a slow-release fertilizer according to the package directions. You can also supplement with liquid fertilizer every few weeks.
3. Thin Seedlings (If Necessary): If all your seeds germinate, thin out the seedlings, keeping the strongest one in each container.
4. Provide Support (If Needed): As your corn plants grow taller, they may need some support to prevent them from falling over. Use bamboo stakes or tomato cages to provide support.
5. Watch for Pests and Diseases: Keep an eye out for common corn pests like aphids, corn earworms, and spider mites. Treat any infestations promptly with insecticidal soap or neem oil. Also, be aware of potential diseases like corn smut and rust.
6. Pollination Assistance (Important!): Corn is wind-pollinated. Since you’re growing in containers, you might need to help with pollination. When the tassels (the male flowers at the top of the plant) appear, gently shake the plants to release pollen. You can also use a small paintbrush to transfer pollen from the tassels to the silks (the female flowers that emerge from the developing ears of corn). Do this every day for a week or two to ensure good pollination.
Harvesting Your Corn
The moment you’ve been waiting for! Harvesting your own homegrown corn is incredibly satisfying.
1. Check for Ripeness: Corn is typically ready to harvest about 60-90 days after planting, depending on the variety. The silks will turn brown and dry, and the ears will feel plump and full.
2. Test for Doneness: Peel back a small portion of the husk and puncture a kernel with your fingernail. If the liquid that comes out is milky, the corn is ready to harvest. If it’s clear, the corn needs more time to ripen.
3. Harvest Carefully: To harvest, grasp the ear firmly and twist it downward. The ear should snap off easily from the stalk.
4. Enjoy Your Harvest: Cook and enjoy your fresh, homegrown corn! It’s delicious grilled, boiled, or roasted. You can also freeze or can your corn for later use.
Troubleshooting Tips
Even with the best planning, things can sometimes go wrong. Here are a few common problems and how to fix them:
* Poor Germination: If your seeds aren’t germinating, make sure the soil is moist but not waterlogged. Also, check the expiration date on your seed packet. Old seeds may have a lower germination rate.
* Yellowing Leaves: Yellowing leaves can be a sign of nutrient deficiency. Make sure you’re fertilizing regularly with a balanced fertilizer.
* Stunted Growth: Stunted growth can be caused by a variety of factors, including poor soil, lack of sunlight, or pest infestations. Make sure your corn plants are getting enough sunlight, water, and nutrients.
* Lack of Pollination: If your corn ears aren’t filling out properly, it could be due to poor pollination. Try hand-pollinating the plants as described above.
* Pest Problems: If you’re dealing with pests, identify the pest and treat it accordingly. Insecticidal soap and neem oil are effective for many common corn pests.
Choosing the Right Corn Variety
Selecting the right corn variety is crucial for success in container gardening. You’ll want to choose a variety that is relatively short and compact, and that is well-suited to growing in containers. Here are a few of my favorite varieties for rooftop gardens:
* ‘On Deck’: This is a super-sweet variety that is specifically bred for container gardening. It produces short, sturdy stalks and delicious, flavorful ears.
* ‘Trinity’: Another excellent choice for containers, ‘Trinity’ is a compact variety that produces multiple ears per stalk.
* ‘Golden Bantam’: A classic heirloom variety that is known for its sweet flavor and tender kernels. While it can grow a bit taller than the other varieties, it can still be successfully grown in containers with proper support.
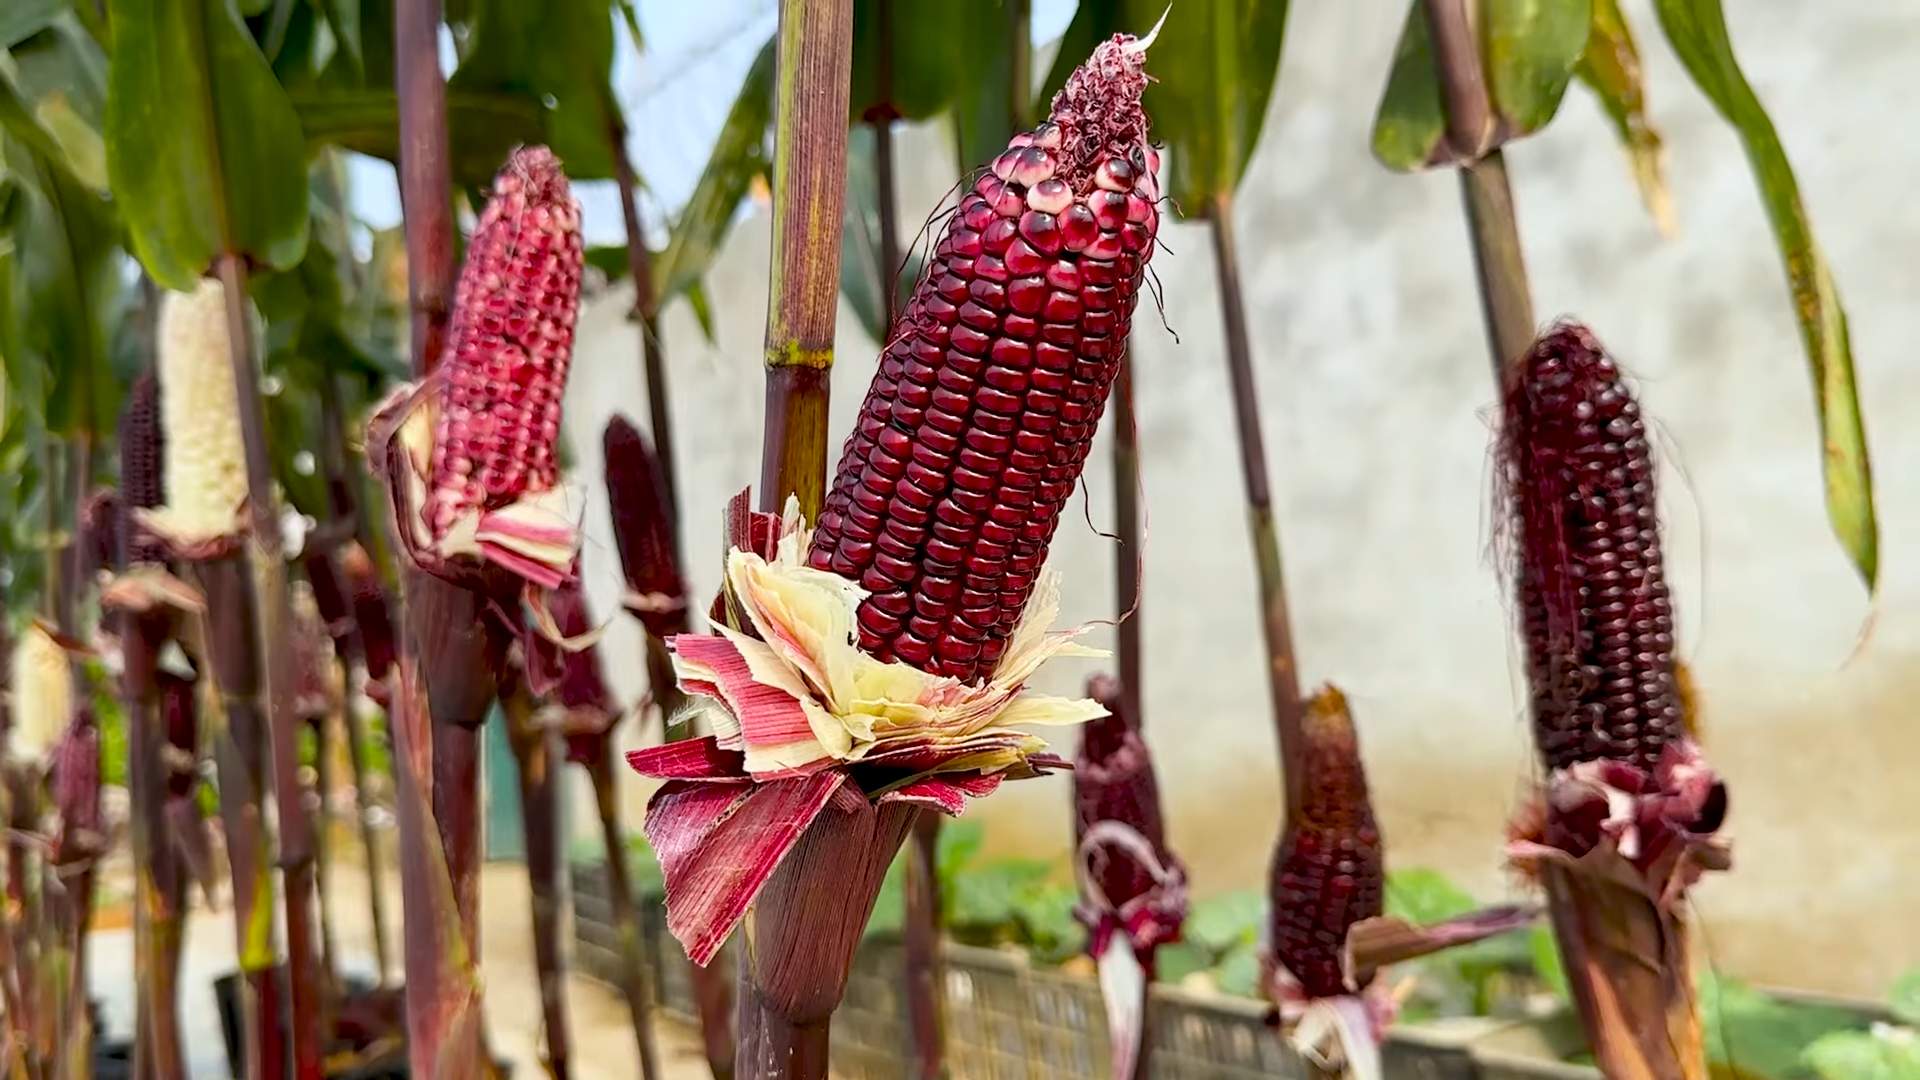
* ‘Blue Hopi’: If you’re looking for something a little different, try ‘Blue Hopi’. This variety produces beautiful blue kernels that can be used to make cornmeal or tortillas.
Optimizing Your Rooftop Garden for Corn
To maximize your corn yield and create a thriving rooftop garden, consider these additional tips:
* Wind Protection: Rooftops can be windy, which can damage your corn plants. Consider using windbreaks, such as trellises or screens, to protect your plants from strong winds
Conclusion
So, there you have it! Transforming your rooftop into a thriving cornfield might sound like a whimsical dream, but with a little planning and effort, it’s entirely achievable. This DIY rooftop corn growing method isn’t just about producing fresh, delicious corn; it’s about connecting with nature in an urban environment, reducing your carbon footprint, and experiencing the immense satisfaction of growing your own food from seed to table.
Why is this a must-try? Because it’s more than just a gardening project; it’s a statement. It’s a statement about sustainability, resourcefulness, and the power of individuals to make a difference. Imagine stepping onto your rooftop and harvesting ears of sweet corn, knowing that you nurtured them from tiny seedlings. The taste of homegrown corn, bursting with flavor, is simply unmatched by anything you can find in a store. Plus, you’ll have the bragging rights of being the coolest gardener in the neighborhood!
But the benefits extend beyond the culinary. Rooftop gardens, especially those featuring taller plants like corn, can help insulate your building, reducing energy consumption and lowering your utility bills. They also provide a habitat for pollinators, contributing to biodiversity in your urban ecosystem. And let’s not forget the sheer joy and therapeutic value of gardening. Tending to your corn plants can be a relaxing and rewarding activity, a welcome escape from the stresses of city life.
Ready to take your rooftop garden to the next level? Here are a few suggestions and variations to consider:
* Companion Planting: Maximize your space and improve your corn’s health by planting companion crops like beans and squash. This classic “Three Sisters” method is a time-tested way to create a symbiotic relationship between your plants. The beans provide nitrogen to the soil, the squash shades the soil and suppresses weeds, and the corn provides a structure for the beans to climb.
* Vertical Growing: If space is limited, explore vertical growing techniques. Use trellises or other supports to encourage your corn plants to grow upwards, maximizing your yield in a smaller footprint.
* Different Corn Varieties: Don’t limit yourself to just one type of corn! Experiment with different varieties to find your favorites. Consider growing sweet corn, popcorn, or even ornamental corn for a splash of color.
* Water Conservation: Implement water-saving techniques like drip irrigation or rainwater harvesting to conserve water and reduce your environmental impact.
* Organic Practices: Embrace organic gardening practices by using natural fertilizers and pest control methods. This will ensure that your corn is healthy, delicious, and free from harmful chemicals.
We wholeheartedly encourage you to give this DIY rooftop corn growing method a try. It’s an adventure in urban agriculture that will reward you with fresh produce, a connection to nature, and a sense of accomplishment. Don’t be afraid to experiment, adapt the techniques to your specific environment, and most importantly, have fun!
Once you’ve harvested your first crop of rooftop corn, we’d love to hear about your experience. Share your photos, tips, and stories with us in the comments below. Let’s create a community of rooftop corn growers and inspire others to embrace sustainable urban gardening. Your success story could be the inspiration someone else needs to start their own rooftop corn adventure!
Frequently Asked Questions (FAQ)
What type of corn is best for rooftop growing?
The best type of corn for rooftop growing depends on your personal preferences and the size of your growing space. Dwarf varieties of sweet corn are generally a good choice for smaller spaces, as they don’t grow as tall as traditional varieties. Some popular dwarf sweet corn varieties include ‘On Deck’, ‘Golden Bantam’, and ‘Trinity’. For larger rooftops, you can consider growing taller varieties of sweet corn, popcorn, or even ornamental corn. Just be sure to provide adequate support for taller plants to prevent them from toppling over in strong winds. Consider also the length of your growing season. Choose varieties that mature within the timeframe available in your region.
How much sunlight does rooftop corn need?
Corn requires at least 6-8 hours of direct sunlight per day to thrive. Choose a location on your rooftop that receives ample sunlight throughout the day. If your rooftop is partially shaded, you may need to supplement with grow lights to ensure that your corn plants receive enough light. Monitor your plants closely and adjust their position as needed to maximize their exposure to sunlight.
What kind of soil is best for growing corn on a rooftop?
Corn prefers well-draining, fertile soil that is rich in organic matter. A good potting mix specifically designed for vegetables is a great option for rooftop containers. You can also amend your soil with compost, aged manure, or other organic materials to improve its fertility and drainage. Avoid using heavy clay soil, as it can become waterlogged and suffocate the roots of your corn plants. Ensure your containers have adequate drainage holes to prevent water from pooling at the bottom.
How often should I water my rooftop corn?
Corn needs consistent moisture, especially during hot weather. Water your corn plants deeply and regularly, ensuring that the soil is evenly moist but not waterlogged. The frequency of watering will depend on the weather conditions, the size of your containers, and the type of soil you are using. Check the soil moisture regularly by sticking your finger into the soil. If the top inch of soil feels dry, it’s time to water. Consider using a drip irrigation system or soaker hoses to deliver water directly to the roots of your plants, minimizing water waste.
How do I fertilize my rooftop corn?
Corn is a heavy feeder and requires regular fertilization to produce a good yield. Use a balanced fertilizer that is specifically formulated for vegetables. Apply fertilizer according to the package directions, typically every 2-3 weeks during the growing season. You can also supplement with organic fertilizers like compost tea or fish emulsion. Avoid over-fertilizing, as this can lead to excessive vegetative growth and reduced ear production.
How do I protect my rooftop corn from pests and diseases?
Rooftop gardens are generally less susceptible to pests and diseases than ground-level gardens, but it’s still important to take precautions. Inspect your plants regularly for signs of pests or diseases. Common pests that can affect corn include aphids, corn earworms, and spider mites. Control pests by handpicking them off the plants, using insecticidal soap, or introducing beneficial insects like ladybugs. Prevent diseases by providing good air circulation, avoiding overwatering, and using disease-resistant varieties of corn.
How do I know when my rooftop corn is ready to harvest?
The timing of harvest will depend on the variety of corn you are growing. Sweet corn is typically ready to harvest about 20-25 days after the silks emerge. The silks should be brown and dry, and the kernels should be plump and milky when pierced. Popcorn is ready to harvest when the husks are dry and brown, and the kernels are hard and glassy. Ornamental corn can be harvested when the husks are dry and the kernels are fully colored.
Can I grow corn in containers on my rooftop?
Yes, you can definitely grow corn in containers on your rooftop! Choose large containers that are at least 12 inches in diameter and 12 inches deep to provide enough room for the roots to grow. Make sure the containers have drainage holes to prevent waterlogging. Use a well-draining potting mix and provide adequate support for the plants, especially if you are growing taller varieties.
What are the benefits of growing corn on my rooftop?
Growing corn on your rooftop offers a multitude of benefits, including:
* Fresh, delicious corn that is free from pesticides and herbicides.
* A connection to nature and a sense of accomplishment.
* Reduced carbon footprint by growing your own food locally.
* Improved air quality and reduced urban heat island effect.
* Insulation for your building, reducing energy consumption.
* Habitat for pollinators and increased biodiversity.
* A unique and rewarding gardening experience.
Is rooftop corn growing easy for beginners?
Yes, rooftop corn growing can be easy for beginners, especially if you start with dwarf varieties and follow the basic guidelines outlined in this article. Don’t be afraid to experiment and learn from your mistakes. Gardening is a journey, and every season brings new opportunities to improve your skills. With a little patience and effort, you can successfully grow corn on your rooftop and enjoy the many rewards that it offers.
Leave a Comment