
Smart cleaning hacks – who doesn’t want them? Let’s be honest, cleaning isn’t exactly anyone’s favorite pastime. We all dream of sparkling homes without spending hours scrubbing and sweating. But what if I told you that achieving a pristine living space could be easier, faster, and even…dare I say…fun? That’s where smart cleaning hacks come in!
For centuries, people have sought clever ways to maintain their homes. From ancient civilizations using natural remedies to modern innovations in cleaning technology, the quest for efficiency has always been a driving force. Think about it – our grandmothers had their own secret concoctions and techniques passed down through generations. These weren’t just random tips; they were time-tested methods for keeping their homes clean and healthy.
In today’s busy world, time is a precious commodity. Juggling work, family, and personal commitments leaves little room for extensive cleaning routines. That’s why these smart cleaning hacks are so essential. They offer practical solutions to common cleaning challenges, allowing you to reclaim your weekends and enjoy a cleaner, healthier home without sacrificing your precious free time. I’m excited to share some of my favorite DIY cleaning tricks that will transform your cleaning routine from a chore into a breeze!
DIY Smart Cleaning Hacks: Making Your Life Easier!
Okay, let’s dive into some seriously clever cleaning hacks that I’ve personally tested and swear by. These aren’t your grandma’s cleaning tips (though, no offense to grandmas!). These are designed to be efficient, use common household items, and save you time and money. Get ready to revolutionize your cleaning routine!
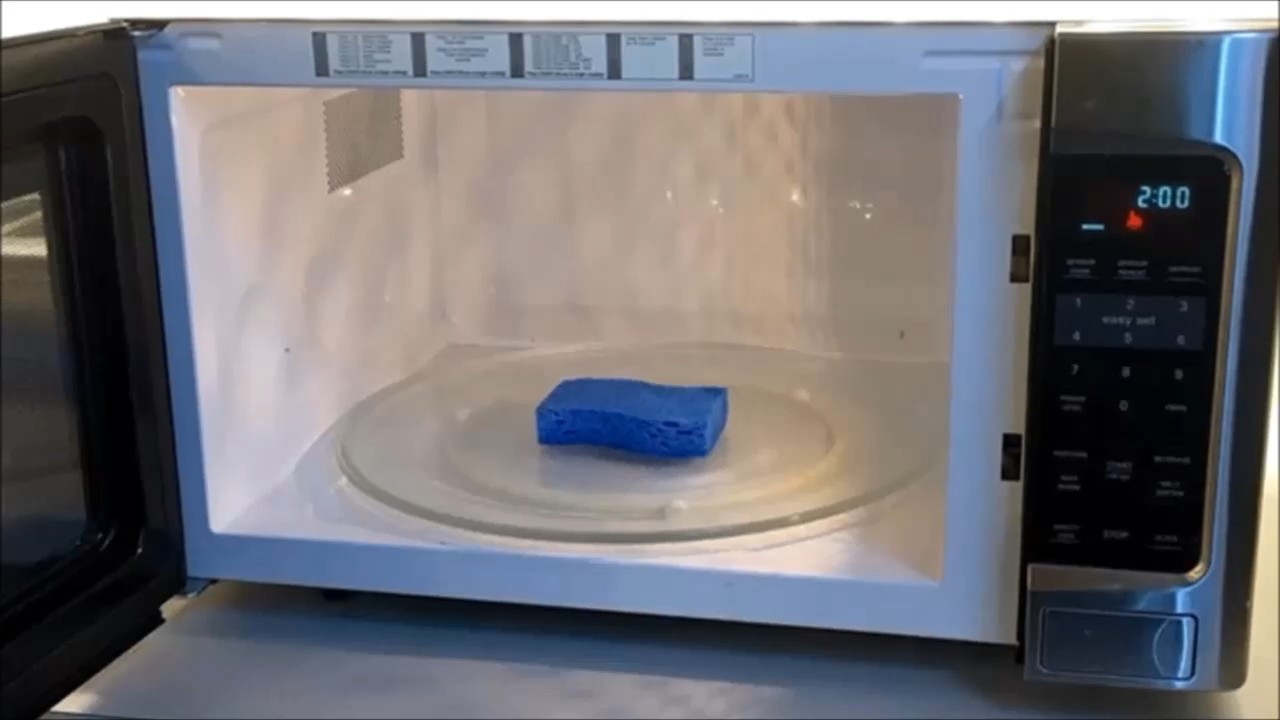
Cleaning Your Microwave Like a Pro
Microwaves. We love them, we use them constantly, and we often neglect cleaning them. But fear not! This hack is so easy, you’ll wonder why you haven’t been doing it all along.
What you’ll need:
* 1 cup of water
* 1 tablespoon of white vinegar or lemon juice
* Microwave-safe bowl
* Clean sponge or cloth
Step-by-step instructions:
1. Mix the solution: In your microwave-safe bowl, combine the water and vinegar (or lemon juice). I prefer lemon juice because it leaves a fresher scent, but vinegar works just as well for loosening grime.
2. Microwave it: Place the bowl in the microwave and heat on high for 5-10 minutes. The goal is to get the water boiling and create steam. The steam will loosen all the splattered food inside.
3. Let it sit: Once the timer goes off, don’t open the microwave immediately! Let it sit for another 5 minutes. This allows the steam to really work its magic.
4. Wipe it down: Carefully remove the bowl (it will be hot!). Use your sponge or cloth to wipe down the inside of the microwave. You’ll be amazed at how easily the grime comes off. For stubborn spots, you might need a little extra elbow grease, but usually, it’s a breeze.
5. Clean the turntable: Don’t forget to remove and wash the turntable! You can usually just wash it with soap and water in the sink.
6. Dry it off: Finally, dry the inside of the microwave with a clean cloth. And voila! A sparkling clean microwave with minimal effort.
Unclogging Drains Without Harsh Chemicals
Clogged drains are a nightmare. But before you reach for those harsh chemical drain cleaners, try this natural and effective method. It’s safer for your pipes, better for the environment, and often works just as well (if not better!).
What you’ll need:
* 1 cup of baking soda
* 1 cup of white vinegar
* Boiling water
* Plunger (optional, but helpful)
Step-by-step instructions:
1. Pour in the baking soda: Carefully pour the baking soda down the clogged drain. Try to get as much of it down the drain as possible.
2. Add the vinegar: Next, pour the vinegar down the drain. You’ll hear a fizzing sound – that’s the chemical reaction between the baking soda and vinegar, which helps to break down the clog.
3. Let it fizz: Let the mixture fizz and bubble for about 30 minutes. This is crucial for allowing the reaction to work its magic.
4. Flush with boiling water: After 30 minutes, carefully pour a pot of boiling water down the drain. The hot water helps to flush away the loosened debris.
5. Repeat if necessary: If the drain is still clogged, repeat the process. Sometimes, a particularly stubborn clog requires a second treatment.
6. Use a plunger (optional): If the baking soda and vinegar mixture doesn’t completely clear the clog, try using a plunger after flushing with boiling water. The plunging action can help to dislodge any remaining debris.
Cleaning Your Shower Head for Better Water Pressure
Over time, shower heads can get clogged with mineral deposits, leading to reduced water pressure and an uneven spray. This simple cleaning hack will restore your shower head to its former glory.
What you’ll need:
* White vinegar
* Plastic bag (a Ziploc bag works well)
* Rubber band or twist tie
* Old toothbrush
Step-by-step instructions:
1. Fill the bag with vinegar: Pour enough white vinegar into the plastic bag to completely submerge the shower head.
2. Attach the bag to the shower head: Carefully position the bag over the shower head, ensuring that the shower head is fully submerged in the vinegar. Secure the bag with a rubber band or twist tie.
3. Let it soak: Let the shower head soak in the vinegar for at least 30 minutes, or even better, overnight. The longer it soaks, the more effectively the vinegar will dissolve the mineral deposits.
4. Remove the bag and scrub: Remove the bag and discard the vinegar. Use an old toothbrush to scrub away any remaining mineral deposits from the shower head. Pay close attention to the nozzles.
5. Rinse thoroughly: Turn on the shower and let the water run for a few minutes to flush out any remaining vinegar and debris.
6. Enjoy your improved water pressure: You should now have a shower head with improved water pressure and a more even spray.
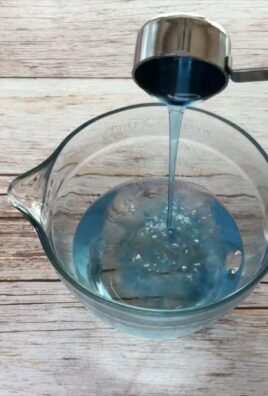
Making Your Own All-Purpose Cleaner
Why spend a fortune on expensive cleaning products when you can make your own effective all-purpose cleaner with just a few simple ingredients? This recipe is safe, natural, and smells great!
What you’ll need:
* Spray bottle
* 1/4 cup white vinegar
* 1 tablespoon baking soda
* Water
* 10-20 drops of your favorite essential oil (optional, but recommended for a pleasant scent)
Step-by-step instructions:
1. Combine ingredients: In the spray bottle, combine the vinegar and baking soda. Be prepared for a little fizzing!
2. Add water: Slowly add water to the spray bottle, leaving some room at the top.
3. Add essential oils (optional): If you’re using essential oils, add them now. Lemon, lavender, and tea tree oil are all great choices for cleaning.
4. Shake well: Secure the spray bottle lid and shake well to combine all the ingredients.
5. Use and enjoy: Your all-purpose cleaner is now ready to use! Simply spray it on surfaces and wipe clean with a cloth. It’s great for cleaning countertops, sinks, and other surfaces.
Cleaning Your Blender Easily
Blenders are fantastic, but cleaning them can be a pain. This hack makes it incredibly easy.
What you’ll need:
* Water
* Dish soap
Step-by-step instructions:
1. Fill with water: After using your blender, immediately fill it about halfway with warm water.
2. Add soap: Add a squirt of dish soap.
3. Blend: Secure the lid and blend on high speed for about 30-60 seconds.
4. Rinse: Pour out the soapy water and rinse the blender thoroughly.
5. Dry: Let the blender air dry or dry it with a clean towel.
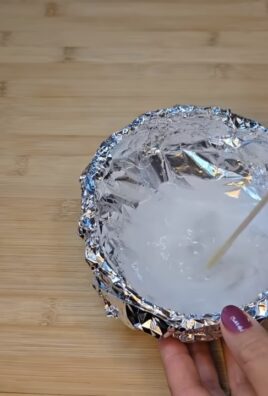
Freshening Your Mattress
Mattresses can harbor dust mites and odors. This simple trick will freshen your mattress and help you sleep better.
What you’ll need:
* Baking soda
* Essential oil (optional)
* Vacuum cleaner with upholstery attachment
Step-by-step instructions:
1. Mix baking soda and essential oil (optional): In a bowl, mix baking soda with a few drops of your favorite essential oil (lavender is great for relaxation).
2. Sprinkle on mattress: Generously sprinkle the baking soda mixture over your entire mattress.
3. Let it sit: Let the baking soda sit on the mattress for at least 30 minutes, or even better, for a few hours. This allows the baking soda to absorb odors and moisture.
4. Vacuum: Thoroughly vacuum the mattress using the upholstery attachment. Make sure to get into all the crevices.
Cleaning Burnt Food from Pots and Pans
Burnt food stuck to the bottom of pots and pans is a common kitchen woe. But don’t despair! This hack can save your cookware.
What you’ll need:
* Water
* Baking soda
* Dish soap
* Scrubbing sponge or pad
Step-by-step instructions:
1. Soak the pan: Fill the burnt pot or pan with water and add a generous amount of baking soda (about 2 tablespoons per quart of water).
2. Boil the mixture: Bring the water and baking soda mixture to a boil on the stovetop.
3. Simmer: Reduce the heat and let the mixture simmer for about 15-30 minutes, stirring occasionally.
4. Let it cool: Remove the pan from the heat and let it cool completely.
5.
Conclusion
So, there you have it! This simple yet incredibly effective DIY cleaning trick is more than just a shortcut; it’s a game-changer for anyone looking to maintain a sparkling clean home without breaking the bank or relying on harsh chemicals. We’ve shown you how to harness the power of everyday ingredients to tackle common cleaning challenges, saving you time, money, and effort.
Why is this a must-try? Because it’s practical, eco-friendly, and delivers noticeable results. Forget spending a fortune on specialized cleaning products that often contain questionable ingredients. This DIY approach puts you in control, allowing you to customize your cleaning solutions to suit your specific needs and preferences. Plus, it’s incredibly satisfying to create something effective from scratch!
But the benefits don’t stop there. This method is gentle on surfaces, reducing the risk of damage or discoloration. It’s also safer for your family and pets, as you’re avoiding the harsh fumes and residues associated with many commercial cleaners. In a world increasingly focused on sustainability, embracing DIY cleaning is a small but significant step towards a greener lifestyle.
Looking for variations? Absolutely! For a boost of disinfecting power, add a few drops of tea tree oil or eucalyptus oil to your solution. These essential oils not only enhance the cleaning properties but also leave behind a refreshing, natural scent. If you’re dealing with stubborn stains, try pre-treating the area with a paste made from baking soda and water before applying your DIY cleaner. For cleaning glass and mirrors, dilute the solution further with water to prevent streaks. Experiment with different ratios and ingredients to find what works best for your home and cleaning style.
This smart cleaning hack is a true winner!
We’re confident that once you try this DIY cleaning trick, you’ll be amazed by the results. It’s a simple, effective, and sustainable way to keep your home clean and fresh. So, ditch the expensive cleaners and embrace the power of DIY!
Now, we want to hear from you! Give this cleaning trick a try and share your experience in the comments below. Let us know what variations you’ve tried, what challenges you’ve overcome, and what amazing results you’ve achieved. Your feedback will not only help other readers but also inspire us to continue sharing valuable DIY tips and tricks. Let’s build a community of savvy cleaners who are passionate about creating a clean, healthy, and sustainable home environment. Don’t forget to share this article with your friends and family so they can benefit from this amazing cleaning hack too! We can’t wait to see your success stories!
Frequently Asked Questions (FAQs)
What exactly makes this DIY cleaning trick “smart”?
The “smart” aspect comes from its efficiency and resourcefulness. It leverages readily available, inexpensive ingredients that are often already in your pantry or bathroom. Instead of relying on complex chemical formulations, it harnesses the natural cleaning properties of these ingredients to achieve impressive results. It’s also smart because it’s adaptable – you can adjust the recipe to suit different cleaning needs and preferences. Finally, it’s a smart choice for the environment and your health, reducing your exposure to harsh chemicals and minimizing waste.
Is this DIY cleaning solution safe for all surfaces?
While generally safe, it’s always a good idea to test the solution on an inconspicuous area first, especially on delicate surfaces like wood or painted walls. Avoid using abrasive scrubbers on easily scratched surfaces. For porous materials like grout, you may need to let the solution sit for a few minutes before scrubbing. If you’re unsure about a particular surface, consult the manufacturer’s instructions or a professional cleaner. Remember, dilution is key – a weaker solution is often safer than a concentrated one.
Can I use different essential oils besides tea tree or eucalyptus?
Absolutely! Tea tree and eucalyptus are great for their antibacterial and antiviral properties, but you can experiment with other essential oils to customize the scent and cleaning power. Lavender is known for its calming aroma and antiseptic properties. Lemon and orange essential oils are excellent degreasers and leave a fresh, citrusy scent. Peppermint oil can help deter pests and has a refreshing, invigorating aroma. Just be sure to use pure essential oils and avoid synthetic fragrances, which may contain harmful chemicals. Always dilute essential oils properly before use, as they can be irritating to the skin and respiratory system in concentrated form.
How long will the DIY cleaning solution last?
Since this solution doesn’t contain any preservatives, it’s best to make it fresh each time you need it. However, if you have leftover solution, you can store it in an airtight container in a cool, dark place for up to a week. Be sure to label the container clearly to avoid confusion. If the solution starts to look cloudy or develop an unusual odor, discard it. Making a fresh batch ensures that you’re using the most effective and potent cleaning solution.
What if I don’t have all the ingredients listed? Can I substitute them?
In many cases, you can substitute ingredients. For example, if you don’t have white vinegar, you can use lemon juice as a substitute, although the scent will be different. Baking soda can be replaced with washing soda for a stronger cleaning action, but be cautious when using washing soda on delicate surfaces. If you’re missing an essential oil, you can simply omit it or substitute it with another essential oil that you have on hand. The key is to understand the purpose of each ingredient and find a suitable alternative that provides similar benefits.
My DIY cleaning solution isn’t working as well as I expected. What am I doing wrong?
There could be several reasons why your DIY cleaning solution isn’t performing as well as you hoped. First, make sure you’re using the correct ratios of ingredients. Too much or too little of one ingredient can affect the solution’s effectiveness. Second, consider the type of dirt or grime you’re trying to clean. Some stains and messes require more aggressive cleaning methods. Third, ensure that you’re using the right tools and techniques. A good scrub brush or microfiber cloth can make a big difference. Finally, remember that DIY cleaning solutions may not be as powerful as commercial cleaners, so you may need to apply more elbow grease or repeat the cleaning process.
Can I use this DIY cleaning trick on my laundry?
While some of the ingredients in this DIY cleaning solution can be used in laundry, it’s not specifically formulated for that purpose. Vinegar can be used as a fabric softener and to remove odors, while baking soda can help brighten whites. However, it’s important to use these ingredients in moderation and to follow the instructions on your washing machine and detergent. For heavily soiled laundry, you may need to use a commercial laundry detergent.
Is this DIY cleaning solution safe for septic systems?
Yes, this DIY cleaning solution is generally safe for septic systems. The ingredients are biodegradable and won’t harm the beneficial bacteria that are essential for septic system function. However, it’s always a good idea to use cleaning products sparingly, regardless of whether they’re commercial or DIY. Avoid pouring large amounts of any cleaning solution down the drain at once, as this can disrupt the balance of your septic system.
How does this smart cleaning hack compare to commercial cleaning products in terms of cost?
This DIY cleaning hack is significantly more cost-effective than purchasing commercial cleaning products. The ingredients are typically much cheaper and can be bought in bulk, further reducing the cost per use. Plus, you’re not paying for fancy packaging or marketing campaigns. Over time, the savings can really add up, making this a budget-friendly cleaning solution.
Where can I find more smart cleaning hacks like this one?
Keep an eye on our website for more articles and tips on DIY cleaning, home organization, and sustainable living. You can also find a wealth of information online through blogs, forums, and social media groups dedicated to DIY cleaning and eco-friendly living. Don’t be afraid to experiment and try new things – you might just discover your own smart cleaning hacks!

Leave a Comment