
Soil bag chili growing – sounds intriguing, right? I’m so excited to share this incredibly simple and rewarding DIY project with you! Forget those fancy raised beds or complicated container setups. We’re going back to basics, embracing a method that’s both space-saving and surprisingly effective for cultivating fiery chilies.
Chili peppers have a rich history, dating back thousands of years in the Americas. They weren’t just a food source; they held cultural and medicinal significance. From ancient rituals to adding zest to everyday meals, chilies have always been a vibrant part of human life. Now, you can easily bring that vibrant history to your own backyard (or balcony!) with this simple trick.
Why should you try soil bag chili growing? Well, let’s face it, not everyone has a sprawling garden. Apartment dwellers, renters, or those with limited mobility often miss out on the joy of growing their own food. This method eliminates those barriers! It’s a fantastic way to recycle those large soil bags, reduce waste, and create a mini-garden practically anywhere. Plus, who doesn’t love the satisfaction of harvesting their own fresh chilies, ready to spice up any dish? Get ready to unleash your inner gardener and enjoy a bountiful harvest with minimal effort!
Growing Chili Peppers Directly in a Soil Bag: A DIY Guide
Hey there, fellow chili enthusiasts! Ever dreamt of a bountiful chili harvest without the hassle of traditional gardening? Well, you’re in the right place! I’m going to walk you through a super easy and effective method: growing chili peppers directly in a soil bag. It’s perfect for small spaces, beginners, and anyone who wants a low-maintenance way to spice up their life (literally!).
This method is fantastic because it minimizes transplant shock, reduces weeding, and provides excellent drainage. Plus, it’s incredibly satisfying to see those fiery peppers thriving in what was once just a bag of soil!
What You’ll Need
Before we dive in, let’s gather our supplies. This is a pretty straightforward project, so the list is nice and short:
* A bag of potting mix (not garden soil!). I recommend a large bag, at least 2 cubic feet, especially if you plan on growing multiple plants per bag. Look for a mix that’s well-draining and contains perlite or vermiculite.
* Chili pepper seedlings or seeds. If you’re starting from seeds, you’ll need to germinate them separately first. I usually buy seedlings to save time.
* A sharp knife or scissors.
* Watering can or hose.
* Fertilizer (optional, but recommended). A balanced fertilizer or one specifically formulated for peppers and tomatoes works best.
* Gloves (optional, but I always wear them to avoid getting dirt under my nails!).
* Stakes or cages (optional, but recommended for taller varieties).
Choosing the Right Soil Bag
Not all soil bags are created equal! Here’s what to look for:
* Size: As I mentioned earlier, a larger bag (2 cubic feet or more) is ideal. This gives your chili plants plenty of room to grow and prevents them from becoming root-bound.
* Material: Most soil bags are made of plastic, which is fine. Just make sure the plastic is thick enough to withstand the elements and the weight of the soil.
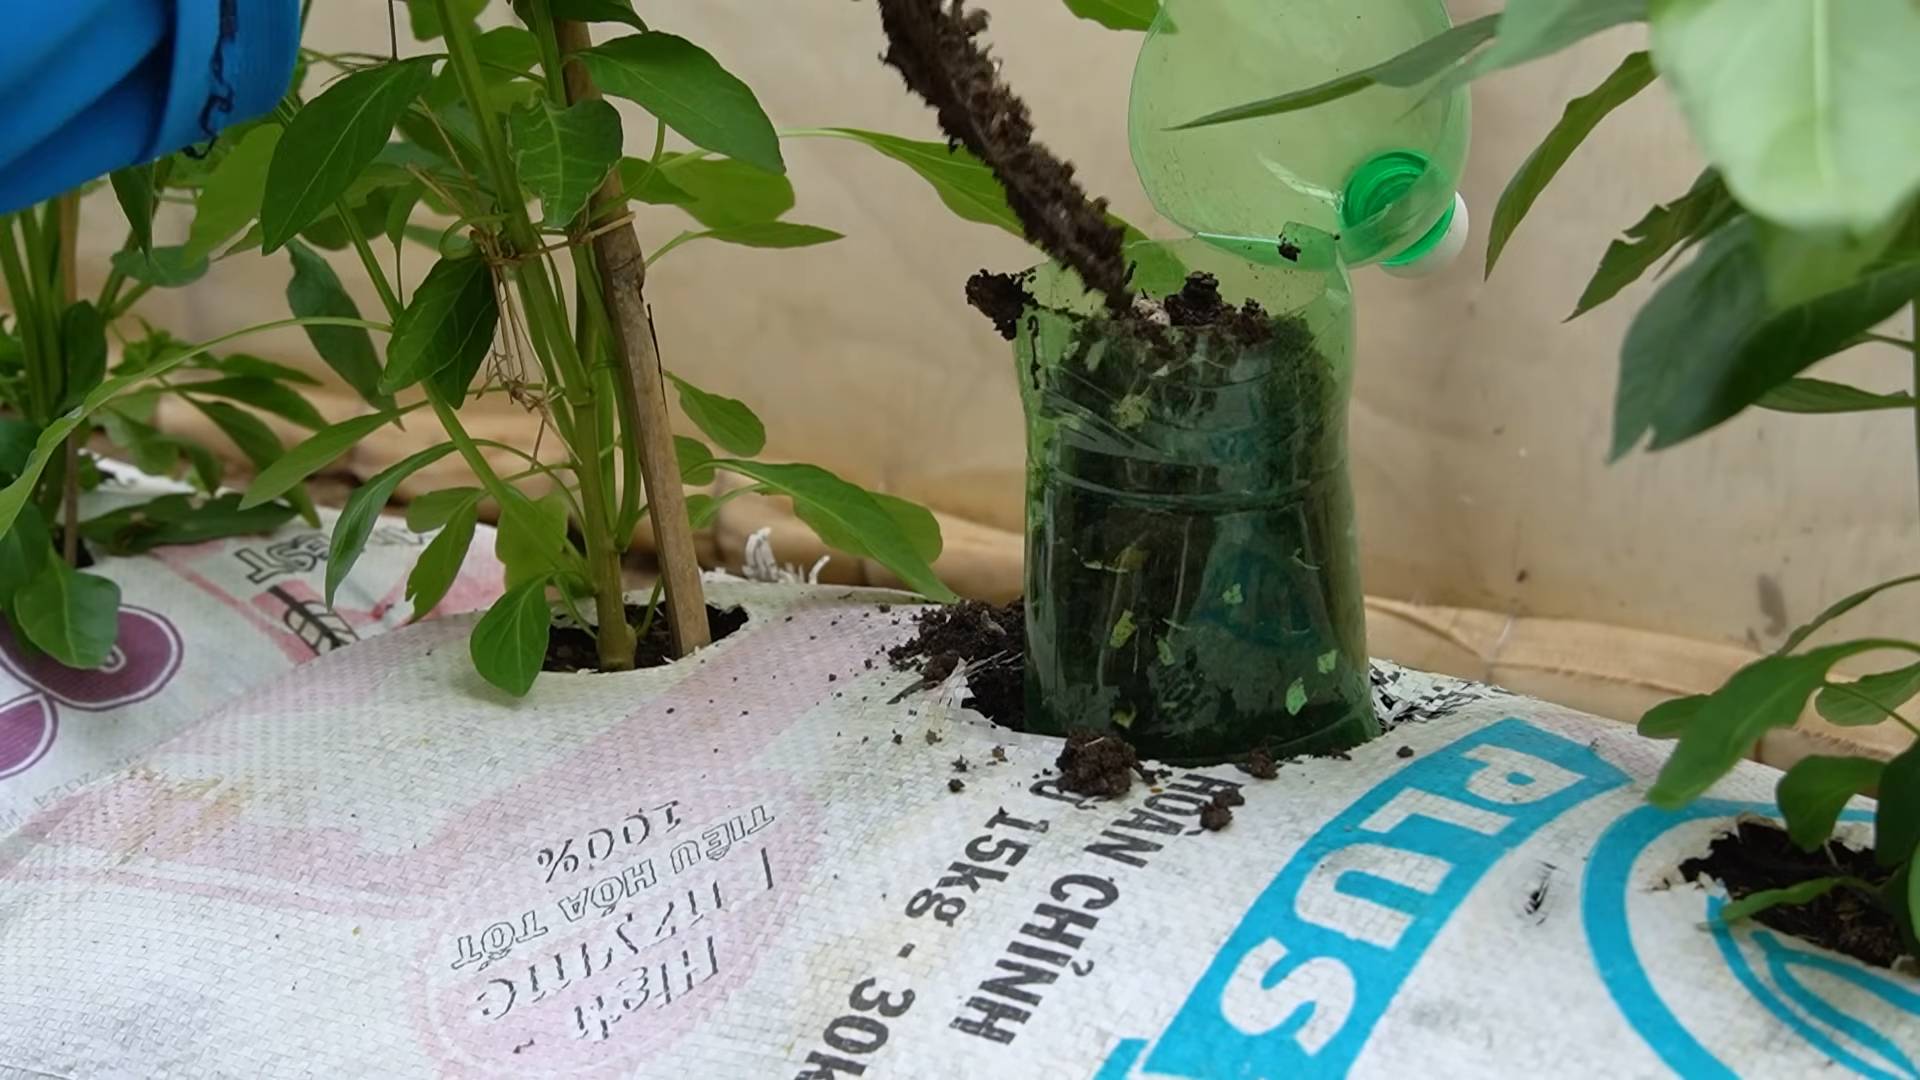
* Drainage: This is crucial! The soil bag needs to have adequate drainage to prevent waterlogging, which can lead to root rot. We’ll be adding drainage holes ourselves, but it’s good to start with a bag that’s not completely sealed.
* Potting Mix: The type of potting mix inside the bag is also important. Avoid bags filled with heavy garden soil, as it doesn’t drain well and can compact over time. Look for a potting mix that’s specifically designed for containers.
Step-by-Step Instructions: Planting Your Chili Peppers
Alright, let’s get our hands dirty! Here’s how to plant your chili peppers directly in the soil bag:
1. Prepare the Soil Bag: Lay the bag of potting mix flat on the ground in the location where you want to grow your chili peppers. Choose a spot that gets at least 6-8 hours of sunlight per day. This is crucial for healthy growth and abundant pepper production.
2. Create Drainage Holes: This is super important! Using your sharp knife or scissors, carefully cut several drainage holes in the bottom of the bag. I usually make about 6-8 holes, spaced evenly apart. Make sure the holes are large enough to allow water to drain freely, but not so large that the soil will fall out.
3. Cut Planting Holes: Now, it’s time to create the planting holes. Decide how many chili pepper plants you want to grow in the bag. I usually plant 2-3 plants in a large bag. Using your knife or scissors, carefully cut circular or square holes in the top of the bag, spaced at least 12-18 inches apart. The size of the holes should be large enough to accommodate the root balls of your chili pepper seedlings.
4. Prepare the Planting Holes: Gently loosen the soil inside the bag around each planting hole. This will make it easier for the roots of your chili pepper plants to penetrate the soil. You can also add a handful of compost or slow-release fertilizer to each hole to give your plants a boost.
5. Plant the Chili Pepper Seedlings: Carefully remove the chili pepper seedlings from their containers. Gently loosen the root balls with your fingers. Place each seedling into a planting hole, making sure the top of the root ball is level with the surface of the soil.
6. Fill in the Gaps: Fill in the gaps around the seedlings with potting mix from the bag. Gently press down on the soil to secure the plants in place.
7. Water Thoroughly: Water the chili pepper plants thoroughly after planting. This will help to settle the soil and encourage root growth. Make sure the water drains freely from the drainage holes.
8. Add Support (Optional): If you’re growing taller varieties of chili peppers, you may want to add stakes or cages to provide support. This will prevent the plants from falling over under the weight of the peppers. Insert the stakes or cages into the soil near the plants, being careful not to damage the roots.
Watering and Fertilizing
Watering and fertilizing are key to keeping your chili plants happy and productive.
* Watering: Water your chili pepper plants regularly, especially during hot, dry weather. Check the soil moisture by sticking your finger into the soil. If the top inch of soil feels dry, it’s time to water. Water deeply, until the water drains freely from the drainage holes. Avoid overwatering, as this can lead to root rot.
* Fertilizing: Chili peppers are heavy feeders, so they need regular fertilization. Start fertilizing your plants about 2-3 weeks after planting. Use a balanced fertilizer or one specifically formulated for peppers and tomatoes. Follow the instructions on the fertilizer package. You can also add compost or other organic matter to the soil to provide additional nutrients. I like to use a liquid fertilizer every couple of weeks during the growing season.
Dealing with Pests and Diseases
Even in a soil bag, your chili plants can be susceptible to pests and diseases. Here’s how to deal with them:
* Pests: Common chili pepper pests include aphids, spider mites, and whiteflies. You can control these pests by spraying your plants with insecticidal soap or neem oil. You can also introduce beneficial insects, such as ladybugs, to your garden to prey on the pests.
* Diseases: Common chili pepper diseases include fungal diseases like powdery mildew and blossom end rot. You can prevent these diseases by providing good air circulation, avoiding overwatering, and using a fungicide if necessary. Blossom end rot is often caused by calcium deficiency, so you can add calcium to the soil or use a calcium-rich fertilizer.
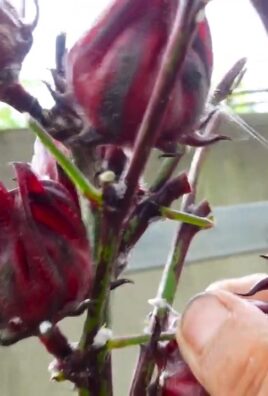
Harvesting Your Chili Peppers
The best part! Knowing when to harvest is crucial for getting the best flavor and heat from your peppers.
* When to Harvest: The time it takes for chili peppers to mature depends on the variety. Generally, chili peppers are ready to harvest when they have reached their mature size and color. The color will vary depending on the variety, but common colors include green, red, yellow, and orange. You can also test the ripeness by gently squeezing the pepper. If it feels firm and slightly yields to pressure, it’s probably ready to harvest.
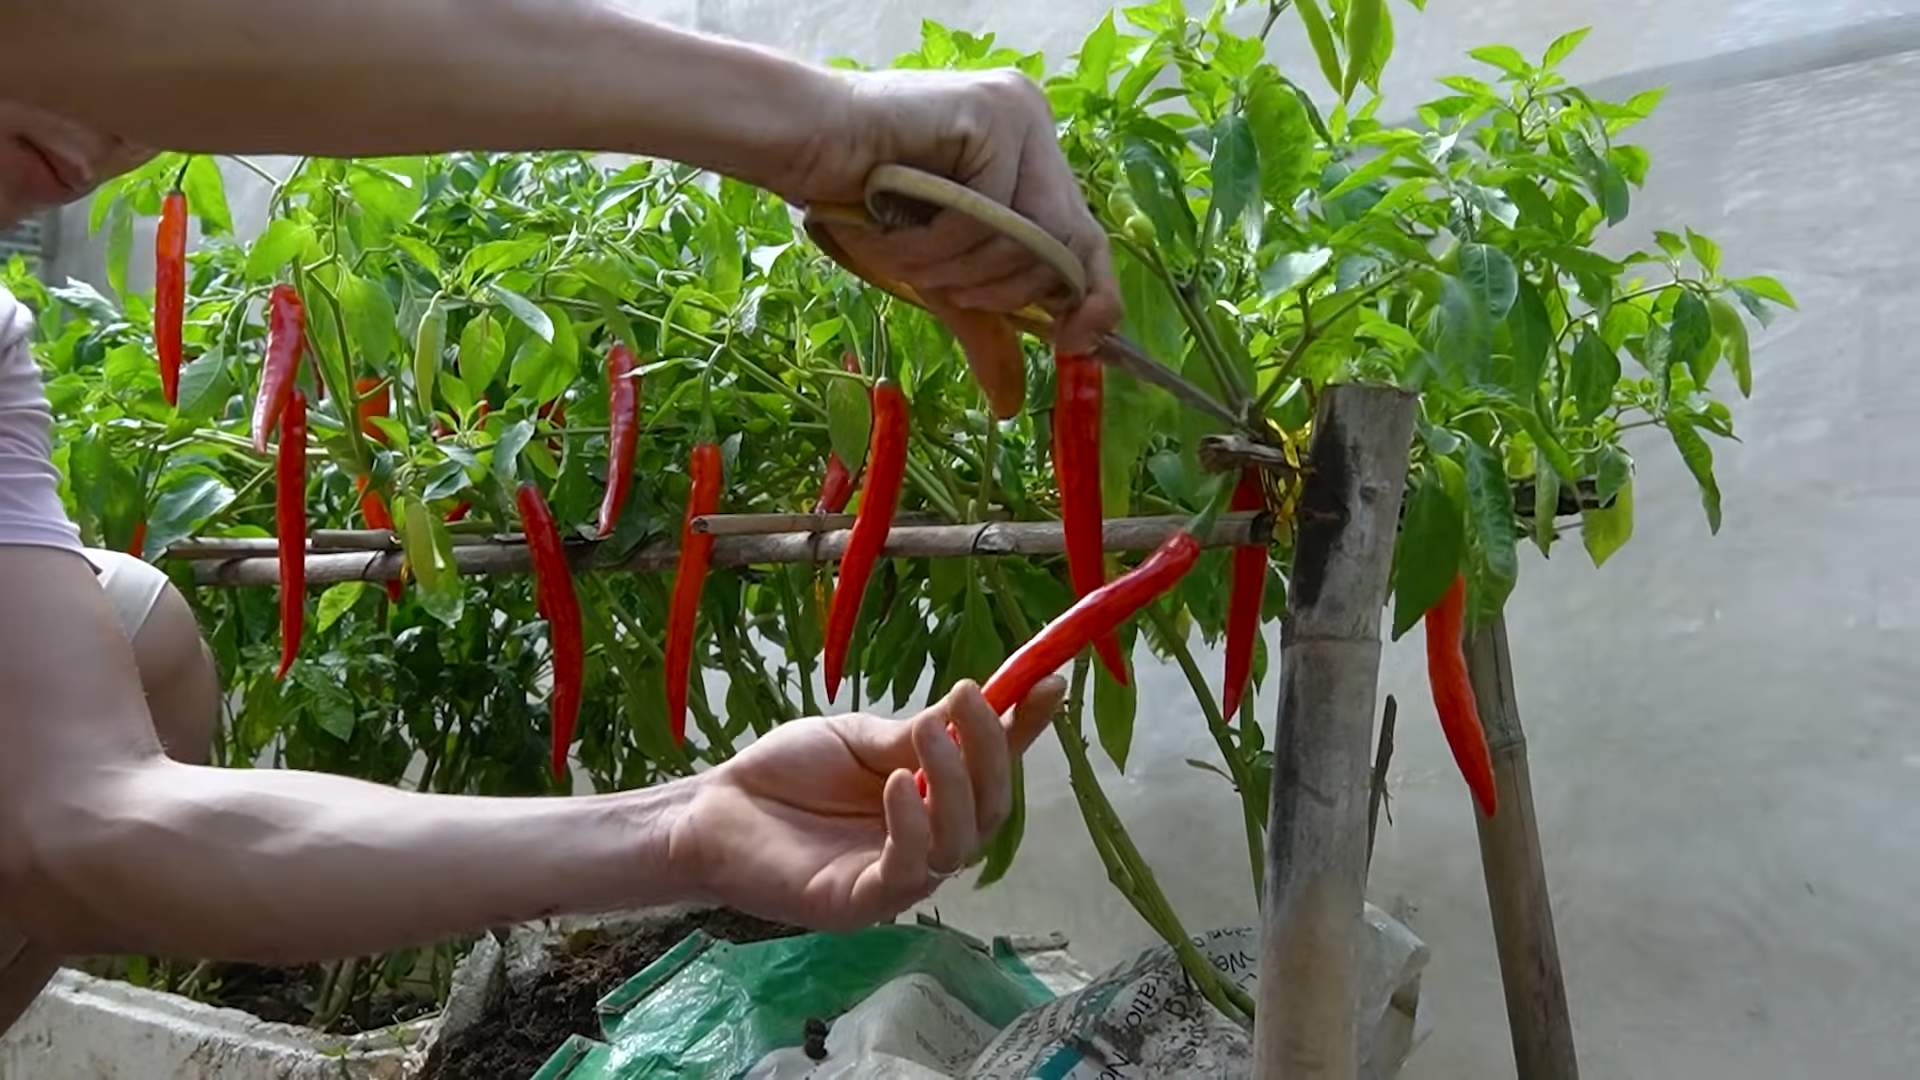
* How to Harvest: Use a sharp knife or scissors to cut the chili peppers from the plant. Leave a small piece of stem attached to the pepper. Be careful not to damage the plant when harvesting.
Tips for Success
Here are a few extra tips to help you grow the best chili peppers possible:
* Choose the Right Variety: Select chili pepper varieties that are well-suited to your climate and growing conditions. Some varieties are more heat-tolerant than others, while others are more resistant to pests and diseases.
* Provide Adequate Sunlight: Chili peppers need at least 6-8 hours of sunlight per day to thrive. Choose a location that gets plenty of sun.
* Protect from Frost: Chili peppers are sensitive to frost. If frost is predicted, cover your plants with a blanket or move them indoors.
* Prune Your Plants: Pruning your chili pepper plants can help to improve air circulation and encourage fruit production. Remove any dead or yellowing leaves. You can also pinch off the tips of the branches to encourage branching.
* Rotate Your Crops: Avoid planting chili peppers in the same location year after year. This can help to prevent the buildup of pests and diseases in the soil.
Troubleshooting
Even with the best care, you might encounter some problems. Here are a few common issues and how to fix them:
* Yellowing Leaves: This can be caused by a variety of factors, including nutrient deficiencies, overwatering, and pests. Check the soil moisture and nutrient levels. If necessary, fertilize your plants or treat them for pests.
* Blossom Drop: This is when the flowers fall off the plant without producing fruit. It can be caused by temperature stress, lack of pollination, or nutrient deficiencies. Make sure your plants are getting enough sunlight and water. You can also try hand-pollinating the
Conclusion
So, there you have it! Transforming a simple soil bag into a thriving chili garden is not just a cost-effective alternative to traditional pots; it’s a game-changer for chili enthusiasts of all levels. We’ve walked you through the easy steps, highlighting the benefits of this ingenious method. From superior drainage to excellent root aeration, the soil bag chili growing technique offers a surprisingly effective environment for your chili plants to flourish.
Why is this a must-try? Because it’s accessible, affordable, and incredibly rewarding. You don’t need fancy equipment or a sprawling garden. A bag of soil, a few chili seedlings (or seeds!), and a little bit of sunshine are all you need to embark on this exciting journey. Plus, the dark color of the soil bag helps to absorb heat, which chili plants absolutely love, leading to faster growth and more abundant harvests.
But the beauty of this method lies in its adaptability. Feel free to experiment with different types of soil. While a standard potting mix works wonders, you can also incorporate compost, perlite, or even coco coir to tailor the soil composition to your specific chili variety’s needs. Consider adding slow-release fertilizer granules directly into the soil bag before planting to provide a steady stream of nutrients throughout the growing season.
Variations to Explore:
* Vertical Gardening: Lean the soil bags against a wall or fence to create a vertical chili garden, maximizing space and adding a visually appealing element to your outdoor area.
* Companion Planting: Plant basil, marigolds, or other companion plants alongside your chili plants in the soil bag to deter pests and attract beneficial insects.
* Hydroponic Hybrid: While technically not a pure soil bag method, you could experiment with adding a self-watering reservoir at the bottom of the bag, using a wicking system to draw water up to the roots. This can be particularly useful in hotter climates.
* Chili Variety Mix: Plant multiple chili varieties in the same soil bag, ensuring they have similar water and nutrient requirements. This creates a vibrant and diverse chili garden in a single container.
We are confident that once you experience the ease and success of soil bag chili growing, you’ll be hooked. It’s a fantastic way to grow your own fresh chilies, adding a fiery kick to your culinary creations.
Don’t just take our word for it! We encourage you to give this DIY trick a try. Share your experiences, photos, and tips in the comments below. Let’s build a community of soil bag chili growers and learn from each other’s successes (and even the occasional challenges!). We can’t wait to see your chili plants thriving! Happy growing!
Frequently Asked Questions (FAQ)
What type of soil is best for soil bag chili growing?
The ideal soil for growing chilies in a soil bag is a well-draining potting mix. Look for a mix that contains ingredients like peat moss, perlite, and vermiculite. These components help to retain moisture while also providing adequate aeration for the roots. Avoid using garden soil directly in the bag, as it can become compacted and hinder drainage, potentially leading to root rot. You can amend a standard potting mix with compost to add extra nutrients and improve soil structure. Consider the specific needs of your chili variety; some may prefer slightly acidic soil, while others thrive in neutral conditions.
How do I water chili plants grown in a soil bag?
Watering is crucial for successful soil bag chili growing. The frequency of watering will depend on factors such as the climate, the size of the plant, and the type of soil used. Generally, you should water when the top inch of soil feels dry to the touch. Water deeply, ensuring that the entire soil bag is moistened. Avoid overwatering, as this can lead to root rot. The drainage holes you created in the bag will help prevent waterlogging. During hot weather, you may need to water more frequently, possibly even daily. Check the soil moisture regularly and adjust your watering schedule accordingly. A good rule of thumb is to water thoroughly until you see water draining from the bottom of the bag.
How much sunlight do chili plants need when grown in a soil bag?
Chili plants are sun-loving vegetables and require at least 6-8 hours of direct sunlight per day to thrive. When choosing a location for your soil bag chili garden, select a spot that receives ample sunlight throughout the day. If you live in a particularly hot climate, providing some afternoon shade can help prevent the plants from getting scorched. Insufficient sunlight can lead to leggy growth, reduced flowering, and smaller chili yields. Monitor your plants closely and adjust their position if necessary to ensure they are receiving enough sunlight.
What kind of fertilizer should I use for chili plants in a soil bag?
Chili plants are heavy feeders and benefit from regular fertilization. A balanced fertilizer with an NPK ratio (nitrogen, phosphorus, potassium) of 10-10-10 or 14-14-14 is a good starting point. You can also use a fertilizer specifically formulated for tomatoes or peppers, as these plants have similar nutrient requirements. Apply fertilizer according to the package instructions, typically every 2-4 weeks during the growing season. Consider using a slow-release fertilizer at planting time to provide a steady supply of nutrients. Supplement with liquid fertilizer applications throughout the growing season to boost growth and fruit production. Organic options like compost tea or fish emulsion are also excellent choices.
How do I prevent pests and diseases in my soil bag chili garden?
Prevention is key when it comes to pests and diseases. Start by using healthy, disease-free seedlings or seeds. Ensure good air circulation around your plants by spacing the soil bags appropriately. Regularly inspect your plants for signs of pests or diseases, such as aphids, spider mites, or fungal infections. If you spot any problems, address them promptly. Insecticidal soap or neem oil can be effective for controlling many common pests. For fungal diseases, consider using a copper-based fungicide. Companion planting with herbs like basil or marigolds can also help deter pests. Proper watering and fertilization practices can help keep your plants healthy and more resistant to diseases.
Can I reuse the soil bag for growing chilies next year?
While you can technically reuse the soil bag, it’s generally recommended to replace the soil each year. Over time, the soil can become depleted of nutrients and may harbor pests or diseases. If you choose to reuse the soil bag, amend it with fresh compost and fertilizer to replenish the nutrients. Consider sterilizing the soil by baking it in the oven or solarizing it in the sun to kill any potential pathogens. However, for best results, starting with fresh soil each year will provide your chili plants with the optimal growing environment. The old soil can be used in other parts of your garden as a soil amendment.
How do I know when my chilies are ready to harvest?
The time it takes for chilies to mature will vary depending on the variety. Generally, chilies are ready to harvest when they have reached their mature color and size. The color will depend on the specific variety; some chilies turn red, while others turn yellow, orange, or even purple. The skin should be firm and glossy. You can also test the ripeness by gently squeezing the chili; if it gives slightly, it’s likely ready to harvest. Use pruning shears or scissors to cut the chilies from the plant, leaving a small stem attached. Harvesting regularly will encourage the plant to produce more chilies.
Leave a Comment