
Spinach Growing Plastic Bottles: Who knew turning trash into treasure could be so delicious and nutritious? I’m so excited to share this incredibly simple and rewarding DIY project with you! Forget fancy gardening equipment and sprawling plots of land. We’re going back to basics, embracing sustainability, and growing our own fresh spinach using something we all have lying around: plastic bottles!
The concept of repurposing materials for gardening isn’t new. Throughout history, resourceful gardeners have always found innovative ways to cultivate food, often out of necessity. From ancient civilizations utilizing terracotta pots to modern-day urban farmers embracing vertical gardening, the spirit of ingenuity has always been at the heart of growing your own food. This method of spinach growing plastic bottles is a modern take on that tradition, combining environmental consciousness with the joy of fresh, homegrown produce.
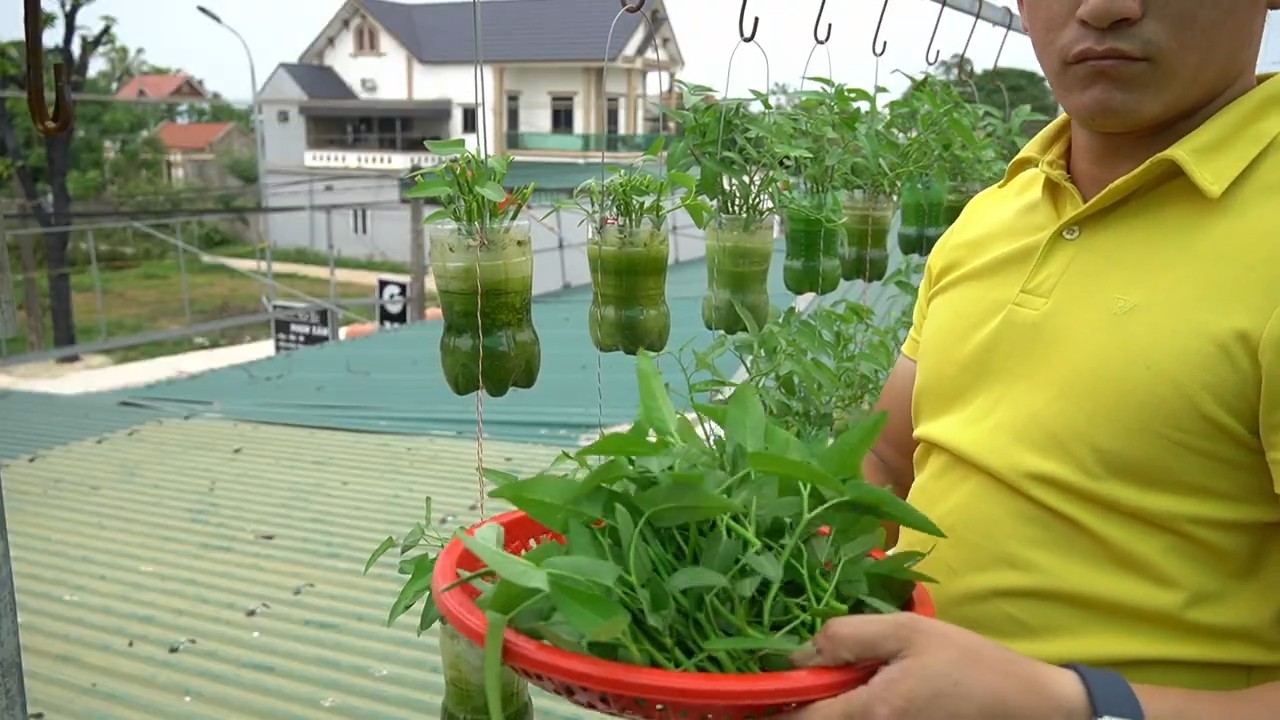
Why is this DIY trick so essential? Well, for starters, it’s incredibly space-saving, making it perfect for apartment dwellers, balcony gardeners, or anyone with limited outdoor space. Plus, it’s a fantastic way to reduce plastic waste and contribute to a more sustainable lifestyle. Imagine the satisfaction of harvesting your own vibrant green spinach leaves, knowing you grew them yourself using recycled materials! More than that, you’ll have access to fresh, healthy spinach whenever you need it, avoiding those wilted bags from the grocery store. So, let’s dive in and learn how to transform those plastic bottles into thriving spinach gardens!
Spinat Anbauen in Plastikflaschen: Ein DIY-Gartenprojekt für Jedermann
Hallo liebe Gartenfreunde! Habt ihr Lust, frischen Spinat direkt vor eurer Haustür zu ernten, auch wenn ihr keinen großen Garten habt? Dann seid ihr hier genau richtig! Ich zeige euch, wie ihr aus einfachen Plastikflaschen einen vertikalen Spinatgarten zaubern könnt. Das ist nicht nur super platzsparend, sondern auch eine tolle Möglichkeit, Plastikmüll zu recyceln und gleichzeitig eure Ernährung aufzupeppen. Los geht’s!
Was ihr braucht:
* Plastikflaschen: Am besten eignen sich 1,5-Liter- oder 2-Liter-Flaschen. Je mehr, desto größer euer Spinatgarten! Achtet darauf, dass sie sauber und trocken sind.
* Spinatsamen: Wählt eine Sorte, die für den Anbau im Topf geeignet ist. Es gibt viele tolle Sorten, die auch im Halbschatten gut gedeihen.
* Erde: Eine gute Blumenerde oder Gemüseerde ist ideal. Ihr könnt auch eure eigene Erde mischen, z.B. aus Kompost, Gartenerde und Sand.
* Schere oder Messer: Zum Schneiden der Flaschen.
* Bohrmaschine oder Nagel und Hammer: Zum Anbringen von Löchern für die Aufhängung und den Wasserablauf.
* Schnur, Draht oder Kabelbinder: Zum Aufhängen der Flaschen.
* Gießkanne oder Sprühflasche: Zum Bewässern der Spinatpflanzen.
* Optional: Handschuhe, um eure Hände sauber zu halten.
Vorbereitung der Plastikflaschen
1. Reinigung: Zuerst müsst ihr die Plastikflaschen gründlich reinigen. Entfernt alle Etiketten und spült sie mit warmem Wasser und Spülmittel aus. Lasst sie anschließend gut trocknen. Das ist wichtig, damit keine Rückstände die Keimung der Samen beeinträchtigen.
2. Schneiden: Jetzt kommt der spaßige Teil! Nehmt eure Schere oder euer Messer und schneidet die Flaschen horizontal durch. Ihr könnt sie entweder in der Mitte teilen oder etwas mehr vom oberen Teil abschneiden, je nachdem, wie tief eure Pflanzgefäße sein sollen. Ich persönlich finde es praktischer, den oberen Teil etwas kürzer zu lassen, da die Pflanzen dann mehr Platz zum Wachsen haben.
3. Löcher bohren: Damit das Wasser gut ablaufen kann und sich keine Staunässe bildet, müsst ihr Löcher in den Boden der Flaschen bohren. Nehmt eure Bohrmaschine oder einen Nagel und Hammer und macht ein paar kleine Löcher. Achtet darauf, dass die Löcher nicht zu groß sind, damit die Erde nicht herausfällt. Ich empfehle, 3-4 Löcher pro Flasche zu machen.
4. Aufhängung vorbereiten: Wenn ihr die Flaschen aufhängen wollt, müsst ihr auch Löcher für die Aufhängung bohren. Macht zwei Löcher an den Seiten der Flaschen, etwas unterhalb des oberen Randes. Die Löcher sollten groß genug sein, um eure Schnur, euren Draht oder eure Kabelbinder hindurchzufädeln.
Das Befüllen und Bepflanzen der Flaschen
1. Erde einfüllen: Jetzt könnt ihr die Flaschen mit Erde befüllen. Füllt die Erde locker ein und drückt sie nicht zu fest an. Lasst oben einen kleinen Rand frei, damit ihr beim Gießen nicht gleich alles überschwemmt.
2. Samen säen: Verteilt die Spinatsamen gleichmäßig auf der Erde. Achtet darauf, dass die Samen nicht zu dicht beieinander liegen, da die Pflanzen sonst nicht genug Platz zum Wachsen haben. Ich säe meistens 3-4 Samen pro Flasche.
3. Samen bedecken: Bedeckt die Samen mit einer dünnen Schicht Erde. Drückt die Erde leicht an und befeuchtet sie mit einer Sprühflasche. Die Erde sollte feucht, aber nicht nass sein.
4. Beschriften: Vergesst nicht, eure Flaschen zu beschriften! So wisst ihr immer, welche Sorte Spinat ihr wo gesät habt. Ihr könnt einfach einen wasserfesten Stift nehmen und die Sorte auf die Flasche schreiben.
Die Aufhängung und Platzierung
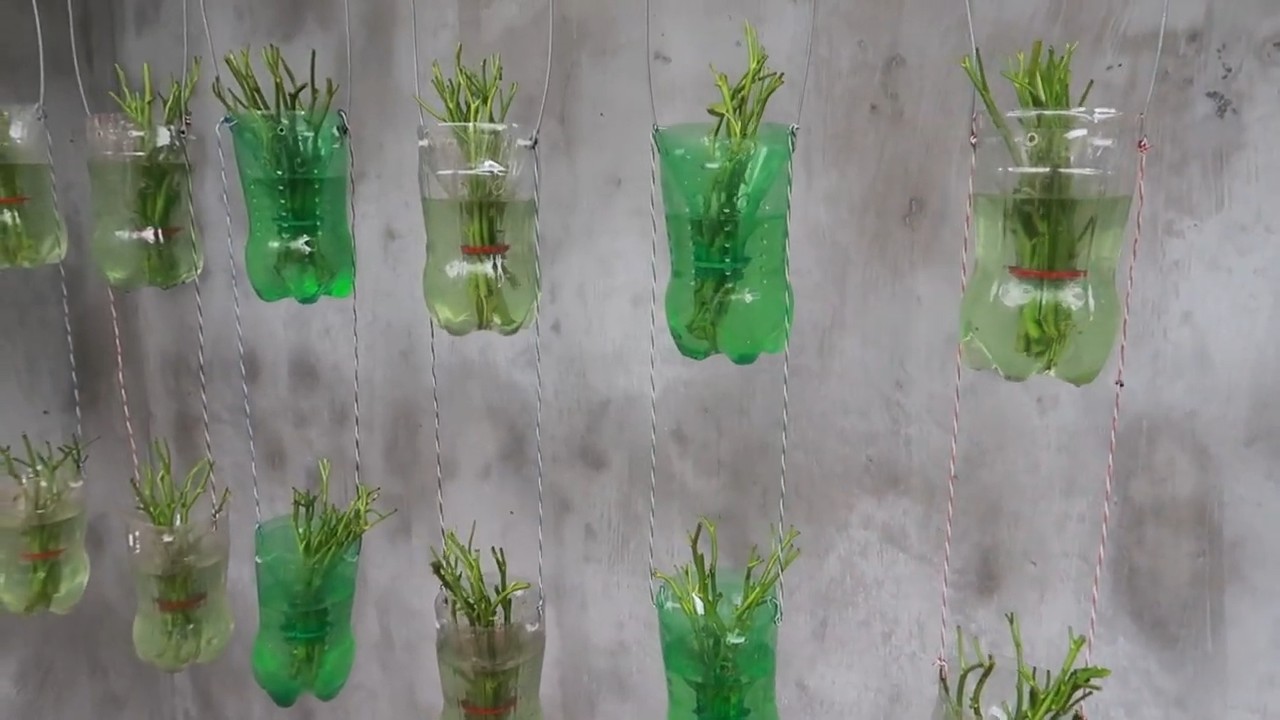
1. Aufhängung anbringen: Fädelt eure Schnur, euren Draht oder eure Kabelbinder durch die Löcher an den Seiten der Flaschen. Knotet die Enden fest zusammen, sodass die Flaschen sicher hängen.
2. Platzierung: Sucht euch einen geeigneten Platz für euren vertikalen Spinatgarten. Spinat mag es hell, aber nicht zu sonnig. Ein halbschattiger Platz ist ideal. Achtet darauf, dass der Platz windgeschützt ist, damit die Flaschen nicht herunterfallen. Ihr könnt die Flaschen an einem Zaun, einer Wand, einem Balkongeländer oder sogar an einem Ast aufhängen.
Pflege eures Spinatgartens
1. Bewässerung: Spinat braucht regelmäßig Wasser, besonders in den Sommermonaten. Gießt die Pflanzen, sobald die Erde sich trocken anfühlt. Achtet darauf, dass das Wasser gut ablaufen kann, damit sich keine Staunässe bildet.
2. Düngung: Um das Wachstum der Spinatpflanzen zu fördern, könnt ihr sie regelmäßig düngen. Verwendet einen organischen Flüssigdünger oder Komposttee. Düngt die Pflanzen alle 2-3 Wochen.
3. Schutz vor Schädlingen: Spinat kann von verschiedenen Schädlingen befallen werden, z.B. Blattläusen oder Schnecken. Kontrolliert eure Pflanzen regelmäßig und entfernt Schädlinge gegebenenfalls von Hand. Ihr könnt auch natürliche Schädlingsbekämpfungsmittel verwenden, z.B. Brennnesseljauche oder Knoblauchspray.
4. Ernte: Nach etwa 6-8 Wochen könnt ihr euren ersten Spinat ernten. Schneidet die Blätter mit einem Messer oder einer Schere ab. Lasst die inneren Blätter stehen, damit die Pflanze weiterwachsen kann.
Zusätzliche Tipps und Tricks
* Verschiedene Sorten: Probiert verschiedene Spinatsorten aus, um herauszufinden, welche euch am besten schmecken und am besten in eurem Klima gedeihen.
* Mehrere Pflanzungen: Um kontinuierlich Spinat ernten zu können, könnt ihr alle paar Wochen neue Samen säen.
* Winteranbau: In milden Wintern könnt ihr Spinat auch im Winter anbauen. Stellt die Flaschen an einen geschützten Ort oder deckt sie mit Vlies ab.
* Kreative Gestaltung: Bemalt die Plastikflaschen mit bunten Farben oder beklebt sie mit Mustern, um euren Spinatgarten noch individueller zu gestalten.
* Upcycling: Verwendet auch andere Plastikbehälter, z.B. Joghurtbecher oder Eisdosen, um euren Spinatgarten zu erweitern.
Häufige Probleme und Lösungen
* Gelbe Blätter: Gelbe Blätter können ein Zeichen für Nährstoffmangel sein. Düngt die Pflanzen mit einem geeigneten Dünger.
* Schlechte Keimung: Wenn die Samen nicht keimen, kann das an zu trockener oder zu nasser Erde liegen. Achtet darauf, dass die Erde feucht, aber nicht nass ist.
* Schädlinge: Kontrolliert eure Pflanzen regelmäßig auf Schädlinge und entfernt sie gegebenenfalls.
* Staunässe: Staunässe kann zu Wurzelfäule führen. Achtet darauf, dass das Wasser gut ablaufen kann.
Warum Spinat anbauen in Plastikflaschen eine tolle Idee ist:
* Platzsparend: Ideal für Balkone, Terrassen oder kleine Gärten.
* Nachhaltig: Recycelt Plastikmüll und reduziert den Bedarf an neuen Pflanzgefäßen.
* Kostengünstig: Benötigt nur wenige Materialien und ist einfach umzusetzen.
* Gesund: Frischer Spinat ist reich an Vitaminen und Mineralstoffen.
* Dekorativ: Ein vertikaler Spinatgarten ist ein echter Hingucker.
Ich hoffe, diese Anleitung hat euch inspiriert, euren eigenen Spinatgarten in Plastikflaschen anzulegen. Es ist ein tolles Projekt, das Spaß macht und euch mit frischem, gesundem Spinat belohnt. Viel Erfolg beim Gärtnern!
Conclusion
So, there you have it! Transforming discarded plastic bottles into thriving vertical gardens for spinach is not just a clever upcycling project; it’s a game-changer for anyone looking to enjoy fresh, homegrown greens regardless of space constraints. This DIY spinach growing method offers a multitude of benefits, from reducing plastic waste and promoting sustainable gardening to providing a readily available source of nutritious spinach right at your fingertips.
Why is this a must-try? Because it’s incredibly accessible. You likely already have the primary ingredient – plastic bottles – lying around. The setup is simple, requiring minimal tools and effort. And the results? A cascade of vibrant green spinach, bursting with flavor and packed with vitamins. Imagine stepping outside your door and harvesting fresh spinach for your salads, smoothies, or stir-fries. The taste difference between store-bought and homegrown is undeniable, and the satisfaction of nurturing your own food is immeasurable.
But the beauty of this DIY project lies in its adaptability. Feel free to experiment with different bottle sizes and configurations. You could create a single, towering spinach tower or a series of smaller, interconnected gardens. Consider painting the bottles to add a splash of color to your balcony or patio. For those in hotter climates, using lighter-colored bottles can help reflect sunlight and prevent the soil from overheating. You can also explore different soil mixes to find what works best for your local climate and spinach variety. Adding compost or other organic matter will enrich the soil and promote healthy growth.
Beyond spinach, you can adapt this method for other leafy greens like lettuce, kale, or even herbs like basil and parsley. The possibilities are endless! The key is to choose plants with shallow root systems that thrive in well-draining soil.
We wholeheartedly encourage you to give this DIY spinach growing project a try. It’s a rewarding experience that connects you with nature, promotes sustainability, and provides you with delicious, healthy food. Don’t be afraid to get your hands dirty and experiment. Every garden is unique, and the learning process is part of the fun.
Once you’ve created your own plastic bottle spinach garden, we’d love to hear about your experience! Share your photos, tips, and challenges in the comments below. Let’s build a community of resourceful gardeners and inspire others to embrace sustainable living. Your insights could help someone else discover the joy of growing their own food and reducing their environmental impact. Let’s turn those discarded plastic bottles into a flourishing testament to the power of DIY and the bounty of nature. This method of **spinach growing** is not only economical but also environmentally friendly.
Frequently Asked Questions (FAQ)
What type of plastic bottles are best for growing spinach?
Ideally, you should use food-grade plastic bottles, such as those that previously contained water, juice, or soda. Avoid bottles that held harsh chemicals or cleaning products, as these could contaminate the soil and affect the spinach. PET (Polyethylene Terephthalate) bottles, commonly used for water and soda, are a good choice. Ensure the bottles are thoroughly cleaned and rinsed before use to remove any residue. The size of the bottle will depend on the space you have available and the desired size of your spinach plants. Larger bottles will provide more room for root growth.
What kind of soil should I use for growing spinach in plastic bottles?
Spinach thrives in well-draining, nutrient-rich soil. A good potting mix specifically formulated for vegetables is an excellent choice. You can also create your own mix by combining equal parts of garden soil, compost, and perlite or vermiculite. The compost will provide essential nutrients, while the perlite or vermiculite will improve drainage and aeration. Avoid using heavy clay soil, as it can become waterlogged and hinder root growth. Before planting, consider testing the soil pH to ensure it’s slightly acidic to neutral (around 6.0 to 7.0).
How often should I water my spinach plants in plastic bottles?
Watering frequency will depend on the climate, the type of soil you’re using, and the size of the bottles. Generally, you should water your spinach plants when the top inch of soil feels dry to the touch. Avoid overwatering, as this can lead to root rot. Ensure the bottles have adequate drainage holes to prevent water from accumulating at the bottom. During hot weather, you may need to water more frequently, possibly even daily. Check the soil moisture regularly and adjust your watering schedule accordingly.
How much sunlight do spinach plants need when grown in plastic bottles?
Spinach needs at least 4-6 hours of direct sunlight per day to thrive. Choose a location that receives ample sunlight, such as a sunny balcony, patio, or windowsill. If you’re growing spinach indoors, you may need to supplement with artificial grow lights. Rotate the bottles regularly to ensure all sides of the plants receive equal sunlight. In hotter climates, providing some afternoon shade can help prevent the leaves from wilting or burning.
How do I fertilize my spinach plants in plastic bottles?
Spinach is a heavy feeder, so regular fertilization is essential for healthy growth. You can use a balanced liquid fertilizer specifically formulated for vegetables, following the instructions on the label. Alternatively, you can amend the soil with compost or other organic matter before planting. During the growing season, fertilize every 2-3 weeks to provide the plants with the nutrients they need. Avoid over-fertilizing, as this can lead to excessive leaf growth and reduced flavor.
How do I prevent pests and diseases from affecting my spinach plants in plastic bottles?
Regularly inspect your spinach plants for signs of pests or diseases. Common pests that affect spinach include aphids, spider mites, and slugs. You can control these pests by handpicking them off the plants, spraying them with insecticidal soap, or using diatomaceous earth. To prevent diseases, ensure good air circulation around the plants and avoid overwatering. Remove any infected leaves promptly to prevent the spread of disease. Consider using organic pest control methods to protect the environment and your health.
When is the best time to harvest my spinach from plastic bottles?
You can start harvesting spinach leaves when they are about 4-6 inches long. Harvest the outer leaves first, leaving the inner leaves to continue growing. This will allow you to enjoy a continuous harvest over several weeks. Avoid harvesting during the hottest part of the day, as the leaves may wilt quickly. Wash the harvested leaves thoroughly before eating.
Can I grow spinach in plastic bottles during the winter?
Yes, you can grow spinach in plastic bottles during the winter, especially in milder climates. However, you may need to provide some protection from frost and cold temperatures. You can move the bottles indoors or cover them with a plastic sheet or row cover. Choose a cold-hardy variety of spinach for winter growing. Ensure the plants receive adequate sunlight or supplement with grow lights.
How long will my spinach plants last in plastic bottles?
With proper care, your spinach plants can last for several weeks or even months in plastic bottles. However, spinach is a cool-season crop, so it will eventually bolt (go to seed) when the weather gets too hot. Once the plants bolt, the leaves will become bitter and less palatable. To extend the harvest, plant new seeds every few weeks to ensure a continuous supply of fresh spinach.
What are some creative ways to decorate my plastic bottle spinach garden?
There are many creative ways to decorate your plastic bottle spinach garden. You can paint the bottles with bright colors or patterns. You can also add decorative elements such as ribbons, beads, or shells. Consider creating a vertical garden by hanging the bottles from a wall or fence. You can also arrange the bottles in different shapes and sizes to create a visually appealing display. Let your imagination run wild and create a unique and personalized spinach garden that reflects your style.


Leave a Comment