
Sprouting Beans with Peanuts: Unlock a secret to supercharging your garden’s growth! Have you ever wondered how to give your bean sprouts an extra boost, making them healthier and more productive? Well, you’re in for a treat! This DIY guide reveals a simple yet incredibly effective trick that combines the power of legumes – beans and peanuts – to create a nutrient-rich environment for your plants.
The practice of using natural ingredients to enhance plant growth isn’t new. Farmers and gardeners throughout history have experimented with various methods to improve their yields. While the exact origins of combining beans and peanuts for sprouting are difficult to pinpoint, the underlying principle draws from ancient agricultural wisdom – understanding the symbiotic relationships between plants and the soil.
Why should you try this? Because everyone wants a thriving garden without relying on harsh chemicals! Sprouting Beans with Peanuts provides a natural and sustainable way to enrich the soil, providing essential nutrients like nitrogen that beans crave. This DIY trick is perfect for beginners and experienced gardeners alike, offering a cost-effective and eco-friendly solution for healthier, more abundant bean harvests. Plus, it’s a fun and rewarding project that connects you with the natural world. Let’s get started and watch your bean sprouts flourish!
Sprouting Beans with Peanuts: A DIY Guide to Nutrient-Packed Goodness
Hey there, fellow food adventurers! Ever wanted to grow your own superfood right in your kitchen? Well, today I’m going to walk you through a fun and incredibly rewarding DIY project: sprouting beans with peanuts! This isn’t just about growing food; it’s about unlocking a nutritional powerhouse. Sprouting increases the vitamin content and makes the nutrients more bioavailable, meaning your body can absorb them more easily. Plus, the peanuts add a delicious nutty flavor and extra protein. Let’s get started!
Why Sprout Beans and Peanuts Together?
Before we dive in, let’s talk about why this combination works so well. Beans are packed with protein, fiber, and essential minerals. Peanuts, technically legumes themselves, contribute healthy fats, protein, and a unique flavor profile. Sprouting both together creates a synergistic effect, enhancing the nutritional value and creating a delicious, crunchy addition to salads, stir-fries, or even just as a snack.
What You’ll Need
Here’s a list of everything you’ll need to embark on this sprouting adventure:
* Beans: Choose small beans like mung beans, adzuki beans, or lentils. These sprout quickly and easily. I personally love using mung beans for their mild flavor and high sprout rate.
* Raw, Unsalted Peanuts: Make sure they are raw and unsalted. Roasted or salted peanuts won’t sprout.
* Sprouting Jar or Container: A wide-mouth mason jar works perfectly. You can also use a plastic container with drainage holes.
* Sprouting Lid or Cheesecloth: A sprouting lid is ideal, but cheesecloth secured with a rubber band works just as well.
* Water: Filtered water is best to avoid any contaminants.
* Bowl: For soaking the beans and peanuts.
* Colander: For rinsing the sprouts.
* Clean Towel: To cover the jar during the initial soaking period.
Step-by-Step Sprouting Guide
Alright, let’s get our hands dirty (or rather, wet!). Here’s the breakdown of the sprouting process:
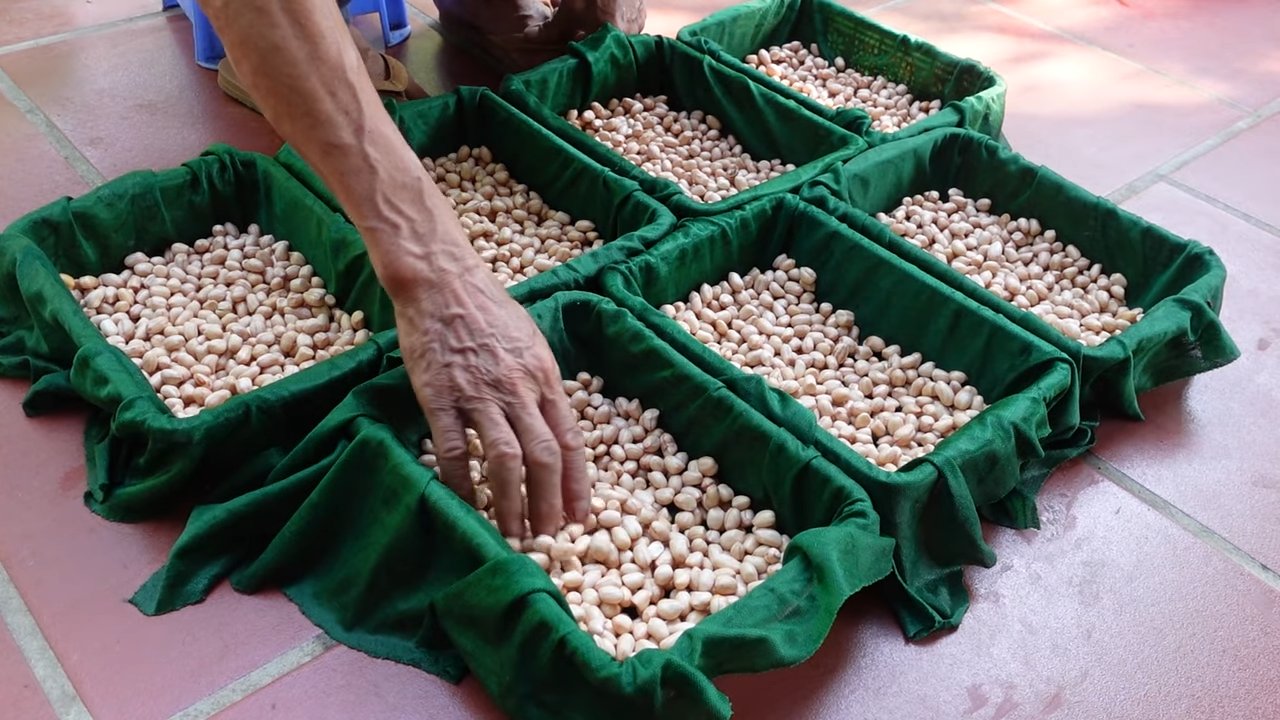
Phase 1: Soaking
This is where we wake up our little seeds and get them ready to sprout.
1. Combine Beans and Peanuts: In your bowl, combine about 1/2 cup of beans and 1/4 cup of peanuts. You can adjust the ratio to your liking, but this is a good starting point.
2. Rinse Thoroughly: Rinse the bean and peanut mixture under cool water, removing any debris or broken pieces. This helps prevent mold growth later on.
3. Soak in Water: Cover the mixture with plenty of cool, filtered water. The beans and peanuts will absorb water and expand, so make sure they have enough room.
4. Cover and Soak: Cover the bowl with a clean towel and let it soak for 8-12 hours, or overnight. This allows the beans and peanuts to fully hydrate and begin the germination process. I usually soak them before I go to bed so they’re ready to go in the morning.
Phase 2: Sprouting
This is where the magic happens! We’ll provide the right conditions for those little sprouts to emerge.
1. Drain and Rinse: After soaking, drain the water and rinse the beans and peanuts thoroughly with cool water.
2. Transfer to Sprouting Jar: Transfer the rinsed mixture to your sprouting jar or container.
3. Secure Sprouting Lid or Cheesecloth: If you’re using a sprouting lid, screw it on tightly. If you’re using cheesecloth, secure it over the mouth of the jar with a rubber band.
4. Invert and Drain: Invert the jar and let the excess water drain out completely. This is crucial to prevent the sprouts from becoming waterlogged and developing mold.
5. Position for Air Circulation: Place the jar in a location with good air circulation, away from direct sunlight. A kitchen counter or windowsill works well. I usually lean the jar at a 45-degree angle to allow for better drainage and air flow.
6. Rinse and Drain Regularly: This is the most important part! Rinse the sprouts with cool water 2-3 times a day. After each rinse, drain the water thoroughly. This keeps the sprouts hydrated and prevents mold growth. Think of it as giving them a refreshing shower!
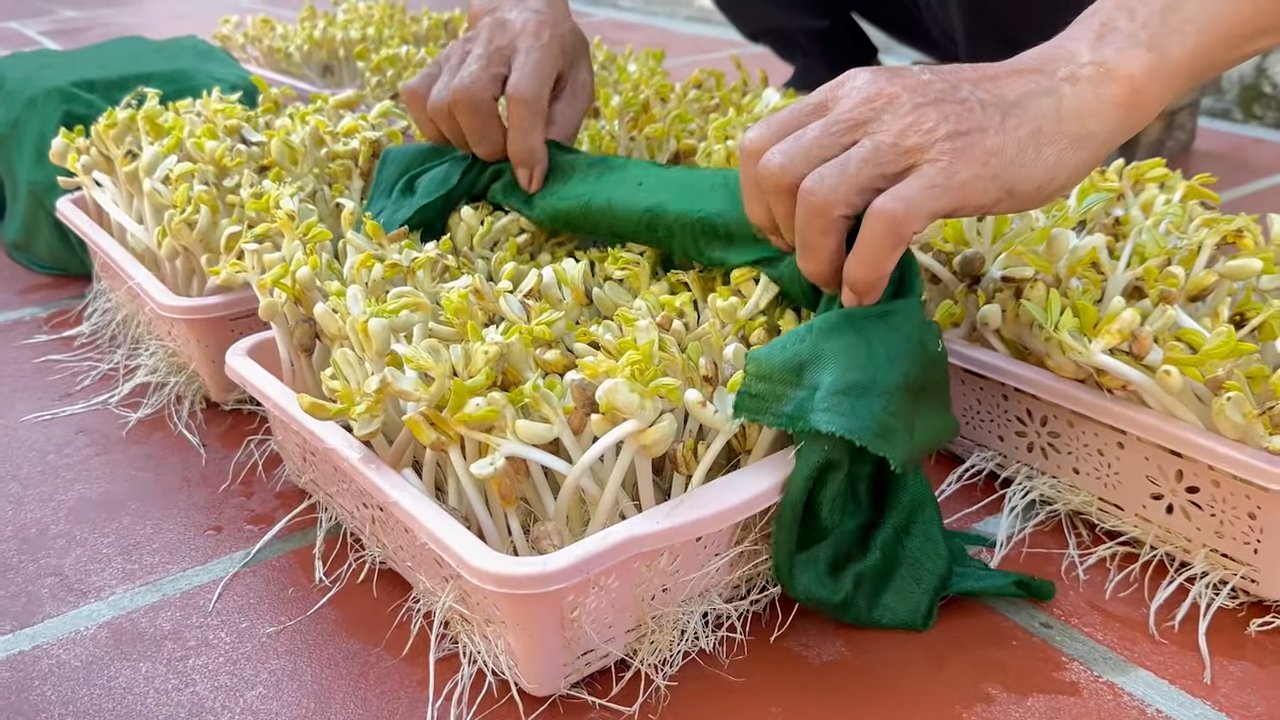
7. Observe and Monitor: Keep an eye on your sprouts. You should start to see tiny sprouts emerging within 1-2 days. The peanuts may take a little longer to sprout than the beans.
Phase 3: Harvesting and Storing
Time to reap the rewards of your sprouting efforts!
1. Harvest When Ready: The sprouts are ready to harvest when they have tails about 1/2 to 1 inch long. You can harvest them earlier or later depending on your preference. I like mine when they have a good crunch.
2. Final Rinse: Give the sprouts a final rinse with cool water.
3. Remove Hulls (Optional): Some people prefer to remove the hulls (outer skins) of the beans. This is optional, but it can improve the texture. You can do this by gently rubbing the sprouts between your hands under running water.
4. Dry Thoroughly: This is crucial for preventing spoilage. Spread the sprouts on a clean towel and gently pat them dry. You can also use a salad spinner to remove excess water.
5. Store in the Refrigerator: Store the dried sprouts in an airtight container in the refrigerator. They should last for up to a week. I usually line the container with a paper towel to absorb any excess moisture.
Troubleshooting Tips
Even with the best intentions, things can sometimes go awry. Here are a few common issues and how to address them:
* Mold Growth: Mold is usually caused by insufficient rinsing or poor air circulation. If you see any mold, discard the entire batch. To prevent mold, make sure to rinse the sprouts thoroughly 2-3 times a day and ensure good air circulation.
* Slow Sprouting: Slow sprouting can be caused by cold temperatures or old seeds. Make sure the sprouts are in a warm location (around 70-75°F) and use fresh beans and peanuts.
* Unpleasant Odor: An unpleasant odor can indicate bacterial growth. This is usually caused by insufficient rinsing or contaminated water. Discard the batch and start over, using filtered water and rinsing more frequently.
* Peanuts Not Sprouting: Peanuts can be a bit finicky. Make sure you’re using raw, unsalted peanuts and that they’re not too old. Sometimes, even with the best efforts, some peanuts just won’t sprout. Don’t worry too much about it; the beans will still provide plenty of nutrients.
Creative Ways to Use Your Bean and Peanut Sprouts
Now that you have a batch of fresh, crunchy sprouts, it’s time to get creative in the kitchen! Here are a few of my favorite ways to use them:
* Salads: Add them to salads for a boost of protein and crunch. They pair well with Asian-inspired dressings.
* Stir-Fries: Toss them into stir-fries for a healthy and flavorful addition. Add them towards the end of cooking to retain their crunch.
* Sandwiches and Wraps: Use them as a filling in sandwiches and wraps for added texture and nutrients.
* Soups: Sprinkle them on top of soups for a crunchy garnish.
* Snacks: Enjoy them as a healthy and satisfying snack. You can even lightly sauté them with a little olive oil and spices.
* Smoothies: Add a small handful to your smoothies for a nutritional boost.
Nutritional Benefits of Sprouted Beans and Peanuts
Sprouting significantly enhances the nutritional value of beans and peanuts. Here are some of the key benefits:
* Increased Vitamin Content: Sprouting increases the levels of vitamins, especially B vitamins and vitamin C.
* Improved Digestibility: Sprouting breaks down complex carbohydrates, making the beans and peanuts easier to digest.
* Enhanced Mineral Absorption: Sprouting reduces the levels of phytic acid, which can inhibit the absorption of minerals like iron and zinc.
* Increased Protein Availability: Sprouting increases the availability of protein by breaking down enzyme inhibitors.
* Higher Enzyme Activity: Sprouting increases the activity of enzymes, which aid in digestion and nutrient absorption.
Final Thoughts
Sprouting beans and peanuts is a simple, affordable, and incredibly rewarding way to boost your nutrition and add a delicious crunch to your meals. It’s a fun project that anyone can do, and the results are well worth the effort. So, give it a try and discover the joy of growing your own superfood right in your kitchen! Happy sprouting!
Conclusion
So, there you have it! Sprouting beans with peanuts isn’t just a fun kitchen experiment; it’s a gateway to unlocking a world of flavor and nutrition. We’ve walked you through the simple steps, highlighting how easy it is to transform humble beans and peanuts into a vibrant, living food source. The benefits are undeniable: enhanced digestibility, increased nutrient availability, and a delightful textural contrast that elevates any dish.
But why is this DIY trick a must-try? Because it empowers you to take control of your food, to understand where it comes from, and to appreciate the magic of natural processes. In a world of processed foods and questionable ingredients, sprouting beans with peanuts offers a refreshing return to simplicity and wholesome goodness. It’s a small act of self-sufficiency that yields surprisingly big rewards.
Beyond the basic recipe, the possibilities are endless. Experiment with different types of beans – mung beans, lentils, chickpeas – each offering its unique flavor profile and nutritional benefits. Consider adding other nuts and seeds to the mix, such as sunflower seeds or almonds, for an even more diverse range of textures and tastes. For a spicy kick, try adding a pinch of chili flakes during the soaking process. Or, for a sweeter note, incorporate a touch of maple syrup or honey. The key is to be creative and adapt the recipe to your own preferences.
Think about incorporating your sprouted beans and peanuts into salads, stir-fries, wraps, or even as a crunchy topping for soups. They add a delightful freshness and a satisfying bite that will transform your meals. You can also blend them into smoothies for a nutrient boost or use them as a base for homemade dips and spreads.
Don’t be intimidated by the process. Sprouting beans with peanuts is surprisingly forgiving, and even if your first attempt isn’t perfect, you’ll still end up with a delicious and nutritious product. The most important thing is to start, to experiment, and to learn from your experiences.
We are confident that once you try this simple DIY trick, you’ll be hooked. It’s a fun, rewarding, and incredibly healthy way to add variety and vitality to your diet. So, gather your beans, grab your peanuts, and get sprouting!
We encourage you to embark on this culinary adventure and discover the joys of sprouting for yourself. And most importantly, we want to hear about your experiences! Share your tips, your variations, and your favorite ways to use your sprouted beans and peanuts in the comments below. Let’s build a community of sprouting enthusiasts and inspire each other to embrace the power of homemade, healthy food. What are you waiting for? Start your sprouting journey today!
Frequently Asked Questions (FAQ)
What types of beans are best for sprouting with peanuts?
Mung beans are often considered the easiest and most popular choice for sprouting, as they sprout quickly and reliably. However, you can also experiment with other types of beans, such as lentils, chickpeas, adzuki beans, and even soybeans. Each type of bean will have a slightly different flavor and texture when sprouted. When choosing peanuts, opt for raw, unsalted peanuts to avoid any unwanted additives or flavors.
How long does it take to sprout beans and peanuts?
The sprouting time can vary depending on the type of bean, the temperature, and the humidity. Generally, mung beans will sprout in 2-3 days, while other beans may take 3-5 days. Peanuts typically sprout a bit slower than beans, so it’s important to monitor them closely. Look for small sprouts emerging from the beans and peanuts as an indication that they are ready.
What is the best way to prevent mold growth during sprouting?
Mold growth is a common concern when sprouting, but it can be easily prevented by following a few simple guidelines. First, ensure that you are using clean equipment and fresh water. Rinse the beans and peanuts thoroughly at least twice a day to remove any bacteria or mold spores. Good air circulation is also crucial, so avoid overcrowding the sprouting container and ensure that it is well-ventilated. If you notice any signs of mold, discard the entire batch immediately.
Can I eat the sprouts raw?
Yes, sprouted beans and peanuts can be eaten raw, and many people prefer them that way for their fresh, crunchy texture. However, it’s important to note that raw sprouts can sometimes carry bacteria, so it’s essential to rinse them thoroughly before consumption. If you are concerned about food safety, you can lightly cook the sprouts by steaming or stir-frying them for a few minutes. This will kill any potential bacteria while still preserving their nutritional value.
How do I store sprouted beans and peanuts?
Once your beans and peanuts have sprouted to your desired length, you can store them in the refrigerator for up to a week. To prevent them from drying out, place them in a sealed container lined with a damp paper towel. Rinse them again before using.
Are there any health benefits to sprouting beans and peanuts?
Yes, sprouting beans and peanuts offers several health benefits. Sprouting increases the bioavailability of nutrients, making them easier for your body to absorb. It also reduces the levels of phytic acid, an antinutrient that can interfere with mineral absorption. Sprouted beans and peanuts are also a good source of enzymes, which aid in digestion. Furthermore, sprouting can increase the levels of certain vitamins and antioxidants.
Can I sprout beans and peanuts together in the same container?
Yes, you can sprout beans and peanuts together in the same container. However, it’s important to monitor them closely, as peanuts may sprout at a slightly slower rate than some beans. Ensure that both the beans and peanuts are rinsed thoroughly and that the container is well-ventilated to prevent mold growth.
What if my beans don’t sprout?
If your beans don’t sprout, there could be several reasons. First, make sure that you are using fresh beans and peanuts. Old beans may have a lower germination rate. Also, ensure that the water temperature is not too hot or too cold. The ideal temperature for sprouting is around 70-75°F (21-24°C). Finally, make sure that the beans are not overcrowded in the sprouting container and that they are getting enough air circulation.
Can I use tap water for sprouting?
While tap water is generally safe to use, it may contain chlorine or other chemicals that can inhibit sprouting. If you are concerned about the quality of your tap water, you can use filtered water or let the tap water sit for 24 hours to allow the chlorine to evaporate.
What are some creative ways to use sprouted beans and peanuts in my meals?
Sprouted beans and peanuts are incredibly versatile and can be used in a variety of dishes. Add them to salads for a crunchy texture and a boost of nutrients. Use them in stir-fries or wraps for a healthy and flavorful filling. Blend them into smoothies for a protein-rich and nutrient-packed drink. Or, use them as a topping for soups or salads for added texture and flavor. You can even use them to make homemade dips and spreads. The possibilities are endless!

Leave a Comment