
Unique Melon Variety: Ever dreamt of biting into a melon so extraordinary, it makes your taste buds sing? I know I have! Forget the same old cantaloupe and watermelon routine. We’re diving headfirst into the exciting world of cultivating your very own unique melon variety right in your backyard. This isn’t just about growing food; it’s about embarking on a delicious adventure!
Melons have a rich history, stretching back thousands of years, with evidence suggesting their cultivation in Africa and Asia as early as 2000 BC. They were prized by ancient civilizations for their sweetness and hydrating properties. Today, while readily available in supermarkets, the sheer diversity of melons remains largely unexplored by the average home gardener. That’s where this DIY guide comes in.
Why settle for the ordinary when you can have the extraordinary? Growing a unique melon variety offers a multitude of benefits. Imagine impressing your friends and family with a vibrant, flavorful melon they’ve never seen before. Think of the satisfaction of nurturing a plant from seed to fruit, knowing you’ve created something truly special. Plus, many heirloom and lesser-known melon varieties boast superior flavor and nutritional value compared to their commercially grown counterparts. This DIY guide will equip you with the knowledge and confidence to successfully cultivate these hidden gems, transforming your garden into a haven for delicious and unusual melons. Let’s get growing!
DIY: Wassermelonen-Schnitzkunst – Verwandle deine Melone in ein Kunstwerk!
Hey Leute! Habt ihr auch genug von langweiligen Melonenstücken? Ich zeige euch heute, wie ihr aus einer einfachen Wassermelone ein echtes Kunstwerk zaubern könnt. Keine Angst, es ist einfacher als es aussieht! Wir werden eine wunderschöne Melonen-Schnitzerei erstellen, die auf jeder Party der absolute Hingucker sein wird. Lasst uns loslegen!
Was du brauchst:
* Eine reife, ovale Wassermelone (am besten ohne Dellen oder Flecken)
* Ein scharfes Küchenmesser (am besten ein Ausbeinmesser oder ein kleines, flexibles Messer)
* Ein Melonenausstecher (optional, aber sehr hilfreich für Kugeln)
* Ein Gemüseschäler
* Ein Bleistift oder wasserfester Stift
* Ein Schneidebrett
* Ein Löffel
* Küchenpapier
* Eine Schüssel für das Fruchtfleisch
* Vorlagen für Designs (optional, aber hilfreich für Anfänger)
* Geduld und Kreativität!
Vorbereitung ist alles: Die Basis schaffen
Bevor wir mit dem eigentlichen Schnitzen beginnen, müssen wir die Melone vorbereiten. Das ist wichtig, damit sie stabil steht und wir eine gute Arbeitsfläche haben.
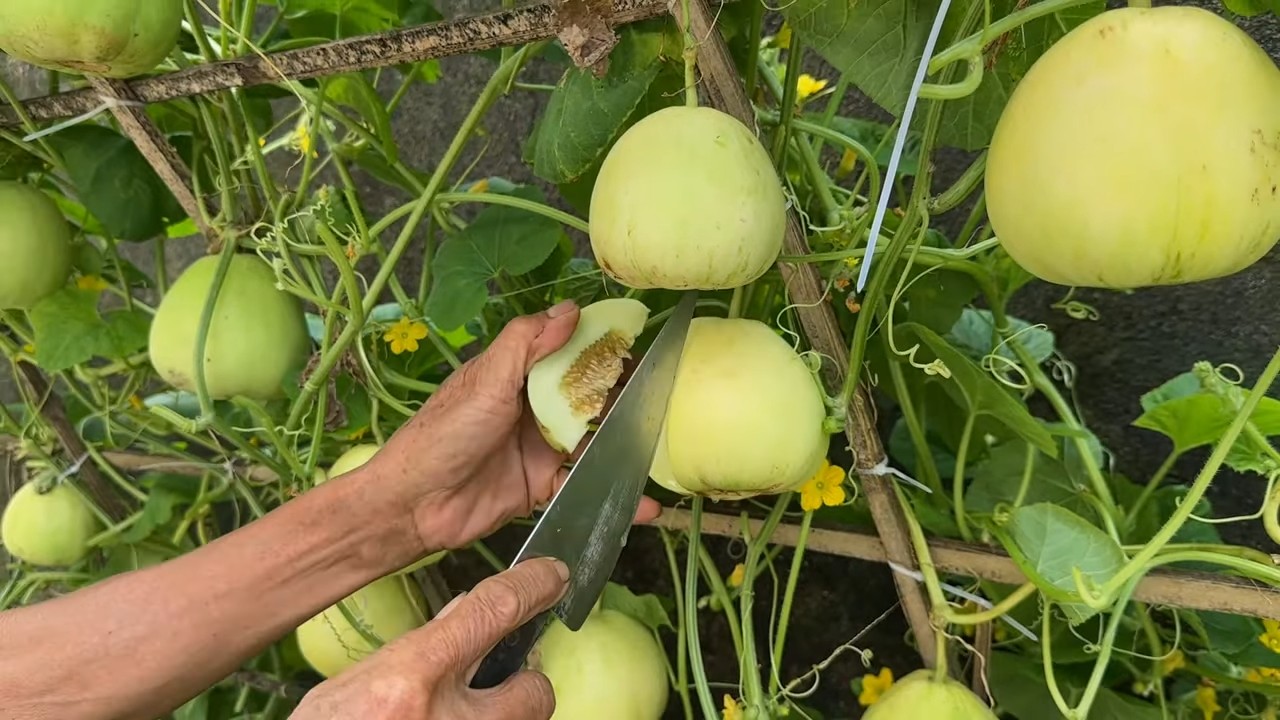
1. Melone waschen: Zuerst waschen wir die Melone gründlich unter kaltem Wasser ab. So entfernen wir Schmutz und Bakterien von der Oberfläche.
2. Boden begradigen: Jetzt kommt der wichtigste Schritt für die Stabilität. Wir schneiden ein kleines Stück vom Boden der Melone ab, sodass sie sicher steht. Achtung: Nicht zu viel abschneiden, sonst wird die Melone instabil! Am besten nur so viel, dass eine flache Fläche entsteht.
3. Deckel vorbereiten (optional): Wenn du eine Schüssel aus der Melone machen möchtest, schneide einen Deckel ab. Die Höhe des Deckels hängt davon ab, wie tief deine Schüssel sein soll. Ich empfehle, den Deckel nicht zu dick zu machen, damit er nicht zu schwer ist.
4. Fruchtfleisch entfernen: Mit einem Löffel höhlen wir die Melone aus. Das Fruchtfleisch können wir entweder direkt essen (mmmh, lecker!) oder für einen erfrischenden Melonen-Smoothie verwenden. Achte darauf, dass du die Melone nicht zu dünn aushöhlst, sonst wird sie instabil. Lass etwa 2-3 cm Fruchtfleisch an der Wand stehen.
5. Innenwände glätten: Mit einem Löffel oder einem Messer glätten wir die Innenwände der Melone. So sieht es später sauberer aus.
6. Melone trocknen: Mit Küchenpapier trocknen wir die Melone innen und außen gründlich ab.
Das Design: Was soll es werden?
Jetzt kommt der spaßige Teil: Wir überlegen uns, was wir schnitzen wollen! Hier sind ein paar Ideen:
* Einfache Muster: Blumen, Sterne, Herzen, geometrische Formen
* Tiere: Delfine, Fische, Vögel
* Logos oder Schriftzüge: Für Geburtstage oder andere Anlässe
* Gesichter: Lustige Gesichter oder sogar Porträts (etwas schwieriger)
* Abstrakte Designs: Lass deiner Kreativität freien Lauf!
Wenn du Anfänger bist, empfehle ich dir, mit einfachen Mustern zu beginnen. Du kannst dir auch Vorlagen aus dem Internet ausdrucken und auf die Melone übertragen.
1. Design übertragen: Mit einem Bleistift oder wasserfesten Stift zeichnen wir das Design auf die Melone. Wenn du eine Vorlage verwendest, kannst du sie mit Klebeband fixieren und die Konturen mit einem Stift nachzeichnen.
Die Schnitzkunst: Schritt für Schritt zum Meisterwerk
Jetzt geht es ans Eingemachte! Wir schnitzen unser Design in die Melone.
1. Konturen nachziehen: Mit einem scharfen Messer ziehen wir die Konturen unseres Designs vorsichtig nach. Achte darauf, dass du nicht zu tief schneidest, sondern nur die Oberfläche anritzt.
2. Details ausarbeiten: Jetzt können wir die Details unseres Designs ausarbeiten. Hier ist Präzision gefragt! Arbeite langsam und vorsichtig, um Fehler zu vermeiden.
3. Schälen: Mit einem Gemüseschäler schälen wir die Bereiche, die wir freilegen wollen. Achte darauf, dass du nicht zu viel Fruchtfleisch entfernst, sonst wird die Melone instabil.
4. Tiefer schneiden: Wenn du bestimmte Bereiche tiefer schneiden möchtest, kannst du das jetzt tun. Achte darauf, dass du das Messer immer in einem Winkel hältst, um saubere Kanten zu erhalten.
5. Feinarbeit: Mit einem kleinen Messer oder einem Melonenausstecher können wir die letzten Details ausarbeiten. Hier können wir unserer Kreativität freien Lauf lassen!
6. Reinigen: Mit einem feuchten Tuch reinigen wir die Melone von Fruchtfleischresten.
Spezielle Techniken für Fortgeschrittene
Wenn du schon etwas Erfahrung hast, kannst du dich an komplexere Techniken wagen:
* Reliefschnitzerei: Hier schnitzen wir verschiedene Ebenen in die Melone, um einen 3D-Effekt zu erzielen.
* Durchbruchmuster: Hier schneiden wir Löcher in die Melone, um ein filigranes Muster zu erzeugen.
* Verwendung von verschiedenen Messern: Für verschiedene Details können wir verschiedene Messer verwenden, z.B. ein Ausbeinmesser für feine Linien und ein größeres Messer für größere Flächen.
Tipps und Tricks für perfekte Melonen-Schnitzereien
* Scharfes Messer: Ein scharfes Messer ist das A und O für saubere Schnitte.
* Geduld: Nimm dir Zeit und arbeite langsam und sorgfältig.
* Übung macht den Meister: Je öfter du schnitzt, desto besser wirst du!
* Inspiration: Lass dich von anderen Melonen-Schnitzereien inspirieren.
* Kühl lagern: Die fertige Melonen-Schnitzerei sollte im Kühlschrank gelagert werden.
* Nicht zu lange lagern: Die Melone sollte innerhalb von 1-2 Tagen verzehrt werden.
* Sicherheit geht vor: Achte beim Schnitzen immer auf deine Finger!
Präsentation: So wird deine Melone zum Star
Die fertige Melonen-Schnitzerei ist ein echter Hingucker! Hier sind ein paar Ideen, wie du sie präsentieren kannst:
* Als Tischdekoration: Stelle die Melone auf den Tisch und dekoriere sie mit Blumen oder anderen Dekorationen.
* Als Obstschale: Fülle die Melone mit anderen Früchten, z.B. Erdbeeren, Blaubeeren oder Weintrauben.
* Als Getränkebehälter: Fülle die Melone mit einem erfrischenden Getränk, z.B. Melonen-Limonade oder Sangria.
* Mit Beleuchtung: Stelle eine kleine LED-Lichterkette in die Melone, um sie zum Leuchten zu bringen.
Reinigung und Aufbewahrung
Nachdem die Party vorbei ist, musst du die Melone reinigen und aufbewahren.
1. Reste entfernen: Entferne alle Fruchtfleischreste aus der Melone.
2. Reinigen: Spüle die Melone mit warmem Wasser und Spülmittel aus.
3. Trocknen: Trockne die Melone gründlich ab.
4. Aufbewahren: Die Melone kann im Kühlschrank aufbewahrt werden, aber sie sollte innerhalb von 1-2 Tagen verzehrt werden.
Ich hoffe, diese Anleitung hat dir geholfen, deine eigene Melonen-Schnitzerei zu erstellen. Viel Spaß beim Schnitzen und Genießen! Zeig mir gerne eure Ergebnisse!
Conclusion
So, there you have it! Mastering this simple yet transformative DIY trick for enjoying your unique melon variety is more than just a culinary shortcut; it’s about unlocking a whole new level of flavor and presentation. We’ve shown you how to elevate your melon experience from ordinary to extraordinary, and the best part is, it’s incredibly easy and accessible.
Why is this a must-try? Because it allows you to fully appreciate the nuanced flavors and textures that your chosen unique melon variety has to offer. Whether you’re dealing with a delicate honeydew, a vibrant cantaloupe, or an exotic Galia melon, this method ensures that every bite is bursting with freshness and perfectly complements any dish or snack. Think about it: no more struggling with uneven slices, messy rinds, or wasted fruit. This DIY approach is all about efficiency, elegance, and maximizing the enjoyment of your melon.
But the fun doesn’t stop there! Feel free to experiment with different variations to suit your personal preferences. For a refreshing summer salad, try cubing the melon and tossing it with mint, feta cheese, and a light vinaigrette. Or, for a sophisticated appetizer, use a melon baller to create bite-sized spheres and serve them with prosciutto and balsamic glaze. You could even blend the melon into a smoothie with yogurt and a touch of honey for a healthy and delicious breakfast. The possibilities are truly endless!
Don’t be afraid to get creative and personalize this DIY trick to your liking. The key is to have fun and discover new ways to enjoy the incredible flavors of your unique melon variety.
We are confident that once you try this method, you’ll never go back to the old way of preparing melons. It’s a game-changer that will save you time, reduce waste, and enhance your overall culinary experience.
So, what are you waiting for? Grab your favorite unique melon variety, follow our simple steps, and prepare to be amazed. We encourage you to try this DIY trick and share your experience with us! Let us know what variations you’ve tried, what dishes you’ve created, and what your favorite ways are to enjoy your perfectly prepared melon. Share your photos and stories on social media using [Your Hashtag Here] – we can’t wait to see what you come up with!
Remember, the best way to truly appreciate the unique characteristics of your chosen melon is to prepare it with care and attention. This DIY trick is the perfect way to do just that. Happy melon-ing!
Frequently Asked Questions (FAQ)
Q: What types of melons does this DIY trick work best for?
A: This DIY trick is incredibly versatile and works well for a wide range of melons, including cantaloupe, honeydew, watermelon, Galia melon, and even smaller varieties like Charentais. The key is to adjust your technique slightly depending on the size and shape of the melon. For example, with a large watermelon, you might want to cut it in half first before proceeding with the slicing or cubing. For smaller melons, you can adapt the method to create smaller, more manageable pieces. The beauty of this DIY approach is its adaptability to any unique melon variety you choose.
Q: What tools do I need for this DIY trick?
A: The essential tools are quite simple: a sharp chef’s knife, a cutting board, and optionally, a melon baller or a vegetable peeler. A good quality chef’s knife is crucial for making clean, even cuts, which will not only improve the presentation of your melon but also make it easier to handle. A sturdy cutting board will provide a stable surface for slicing and prevent your knife from slipping. A melon baller is perfect for creating uniform spheres of melon, which are great for salads, appetizers, or garnishes. A vegetable peeler can be helpful for removing the rind from certain types of melons, especially those with tough or uneven skins.
Q: How do I know if my melon is ripe enough to use this DIY trick?
A: Determining the ripeness of a melon can be tricky, but there are a few telltale signs to look for. For cantaloupe and honeydew, check for a sweet aroma at the stem end. The melon should also feel slightly heavy for its size and yield slightly to gentle pressure. For watermelon, look for a dull, rather than shiny, surface. The underside of the watermelon (where it rested on the ground) should have a creamy yellow spot. When you thump the watermelon, it should sound hollow. Remember, a ripe melon will be easier to cut and will have a more intense flavor, making this DIY trick even more rewarding.
Q: Can I use this DIY trick to prepare melon ahead of time?
A: Yes, you can definitely prepare melon ahead of time using this DIY trick. However, it’s important to store the cut melon properly to maintain its freshness and prevent it from drying out. The best way to store cut melon is in an airtight container in the refrigerator. This will help to keep it moist and prevent it from absorbing odors from other foods. Cut melon is best consumed within 2-3 days of preparation. If you’re planning to store the melon for longer, consider freezing it. Melon can be frozen in cubes or balls and used in smoothies or frozen desserts.
Q: What are some creative ways to use melon prepared with this DIY trick?
A: The possibilities are endless! As mentioned earlier, you can use cubed melon in salads, appetizers, or desserts. Melon balls are perfect for adding a touch of elegance to fruit platters or cocktails. You can also blend melon into smoothies, juices, or gazpacho. For a savory twist, try grilling melon slices and serving them with grilled chicken or fish. Melon can also be used to make jams, chutneys, or even pickled. Don’t be afraid to experiment and discover new and exciting ways to enjoy your perfectly prepared unique melon variety.
Q: Is there a way to prevent the melon from slipping while I’m cutting it?
A: Absolutely! A simple trick to prevent the melon from slipping is to place a damp paper towel or a non-slip mat underneath the cutting board. This will provide extra grip and prevent the cutting board from sliding around on your countertop. Additionally, make sure your knife is sharp and that you’re using a firm, controlled grip. If you’re cutting a large melon, you might want to start by cutting off a small slice from the bottom to create a flat, stable surface.
Q: What if I don’t have a melon baller? Can I still achieve a similar effect?
A: Yes, definitely! While a melon baller is a convenient tool for creating uniform spheres, you can easily achieve a similar effect using a small spoon or a paring knife. Simply scoop out small portions of the melon with the spoon or carefully carve out small balls with the paring knife. The key is to be patient and take your time. Even if the melon balls aren’t perfectly round, they’ll still look beautiful and taste delicious.
Q: Can I use this DIY trick to prepare melon for freezing?
A: Yes, this DIY trick is perfect for preparing melon for freezing. Simply cut the melon into cubes or balls using the method described above, then spread the pieces out on a baking sheet lined with parchment paper. Freeze the melon for a few hours, or until solid, then transfer it to a freezer bag or airtight container. This will prevent the melon from clumping together and make it easier to use later. Frozen melon is best used in smoothies, frozen desserts, or as a refreshing addition to iced drinks.

Leave a Comment