
Vertical Cabbage Bottle Garden: Ever dreamed of a lush, overflowing garden, even if you’re short on space? I know I have! Imagine vibrant green cabbages cascading down a wall, a balcony, or even a sunny corner of your kitchen. It sounds like something out of a fairytale, right? Well, it doesn’t have to be! This DIY project will show you how to create your very own stunning vertical cabbage bottle garden, transforming recycled plastic bottles into a thriving edible oasis.
The concept of vertical gardening isn’t new; cultures around the world have been utilizing vertical space for centuries. From the Hanging Gardens of Babylon (one of the Seven Wonders of the Ancient World!) to the more modern green walls popping up in urban landscapes, the idea of growing upwards has always captivated us. But what makes this particular project so special is its accessibility and sustainability. We’re taking something often discarded – plastic bottles – and giving them a new life, all while growing delicious and nutritious food.
Why do you need this DIY trick? Because a vertical cabbage bottle garden is the perfect solution for anyone with limited space, a desire to recycle, or simply a love for fresh, homegrown produce. Whether you live in an apartment, have a tiny balcony, or just want to add a unique touch to your existing garden, this project is for you. Plus, growing your own cabbages means you’ll have access to fresh, organic vegetables right at your fingertips, saving you money and reducing your carbon footprint. So, let’s get started and turn those empty bottles into a beautiful and bountiful vertical garden!
DIY Vertical Cabbage Bottle Garden: A Thrifty and Green Project
Hey there, fellow gardening enthusiasts! I’m super excited to share this awesome DIY project with you: a vertical cabbage bottle garden! It’s a fantastic way to grow your own delicious cabbage, even if you’re short on space. Plus, it’s a great way to recycle those plastic bottles piling up. Let’s get started!
What You’ll Need
Before we dive in, let’s gather all the necessary materials. Trust me, having everything ready beforehand will make the whole process much smoother.
* Plastic Bottles: You’ll need a good number of plastic bottles, preferably the 2-liter kind. The exact number depends on how tall you want your vertical garden to be. I usually aim for at least 6-8 bottles for a decent-sized garden. Make sure they’re clean and dry!
* Cabbage Seedlings: Choose your favorite cabbage variety! I personally love growing both green and red cabbage for a colorful harvest. You can either start your own seedlings or buy them from a local nursery.
* Potting Soil: Good quality potting soil is crucial for healthy cabbage growth. Avoid using garden soil, as it can be too heavy and compact.
* Scissors or Utility Knife: For cutting the plastic bottles. Be careful!
* Drill or Awl: To create drainage holes and holes for the rope or wire.
* Rope or Wire: To hang the bottles vertically. I prefer using strong nylon rope, but wire works too. Just make sure it’s sturdy enough to support the weight of the bottles and soil.
* Measuring Tape or Ruler: To ensure consistent spacing between the holes.
* Marker or Pen: To mark the cutting lines on the bottles.
* Gloves: To protect your hands from dirt and sharp edges.
* Watering Can: For watering your cabbage plants.
* Optional: Landscape Fabric or Burlap: To line the inside of the bottles and help retain moisture.
* Optional: Gravel or Small Stones: To place at the bottom of each bottle for improved drainage.
Preparing the Bottles
This is where the fun begins! We’re going to transform those ordinary plastic bottles into mini cabbage planters.
1. Clean and Dry the Bottles: Make sure all the bottles are thoroughly cleaned and dried. Remove any labels or sticky residue.
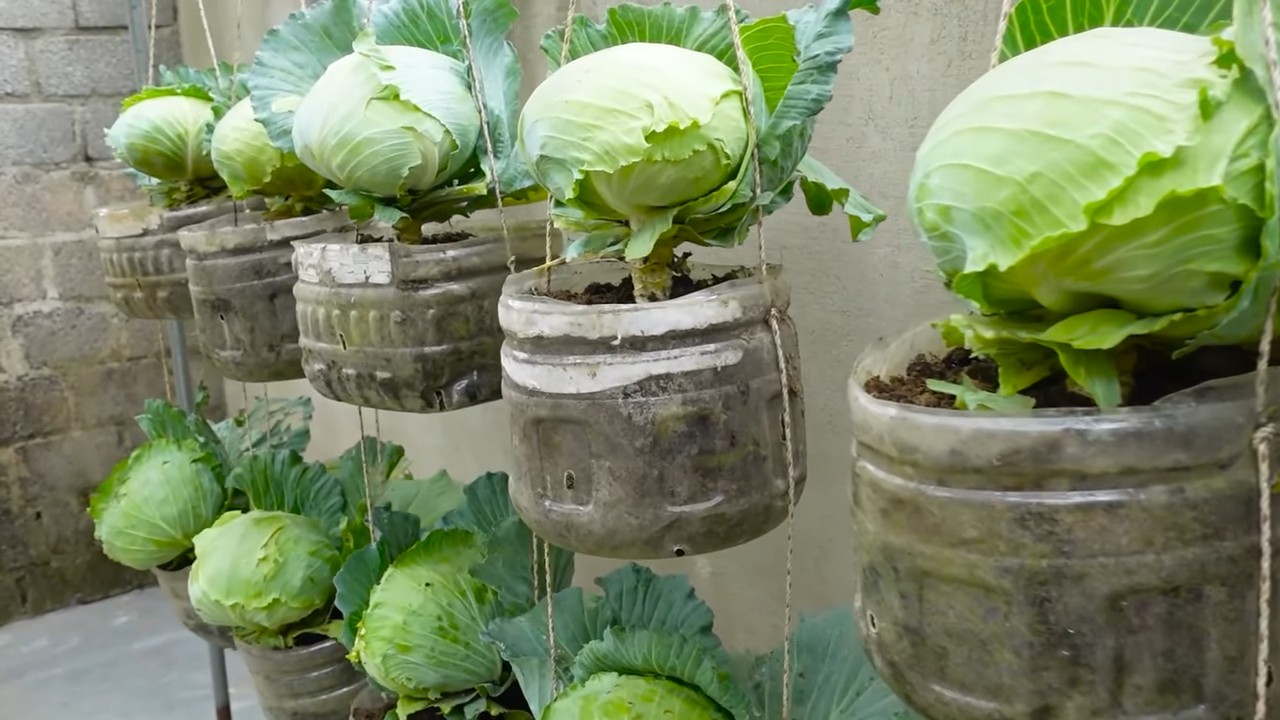
2. Cut the Bottles: Using your marker and ruler, draw a horizontal line around each bottle, about 3-4 inches from the top. This will be the cutting line. Carefully cut along the line with your scissors or utility knife. You’ll be creating a “bowl” shape.
3. Create Drainage Holes: Use your drill or awl to create several drainage holes in the bottom of each bottle. This is essential to prevent waterlogging and root rot. I usually make about 4-5 holes per bottle.
4. Optional: Line the Bottles: If you’re using landscape fabric or burlap, cut pieces that are slightly larger than the inside of the bottles. Line each bottle with the fabric, making sure it covers the drainage holes. This will help retain moisture and prevent soil from washing out.
5. Add Gravel (Optional): Place a layer of gravel or small stones at the bottom of each bottle. This will further improve drainage and prevent the drainage holes from becoming clogged.
Assembling the Vertical Garden
Now comes the exciting part: putting everything together to create your vertical cabbage garden!
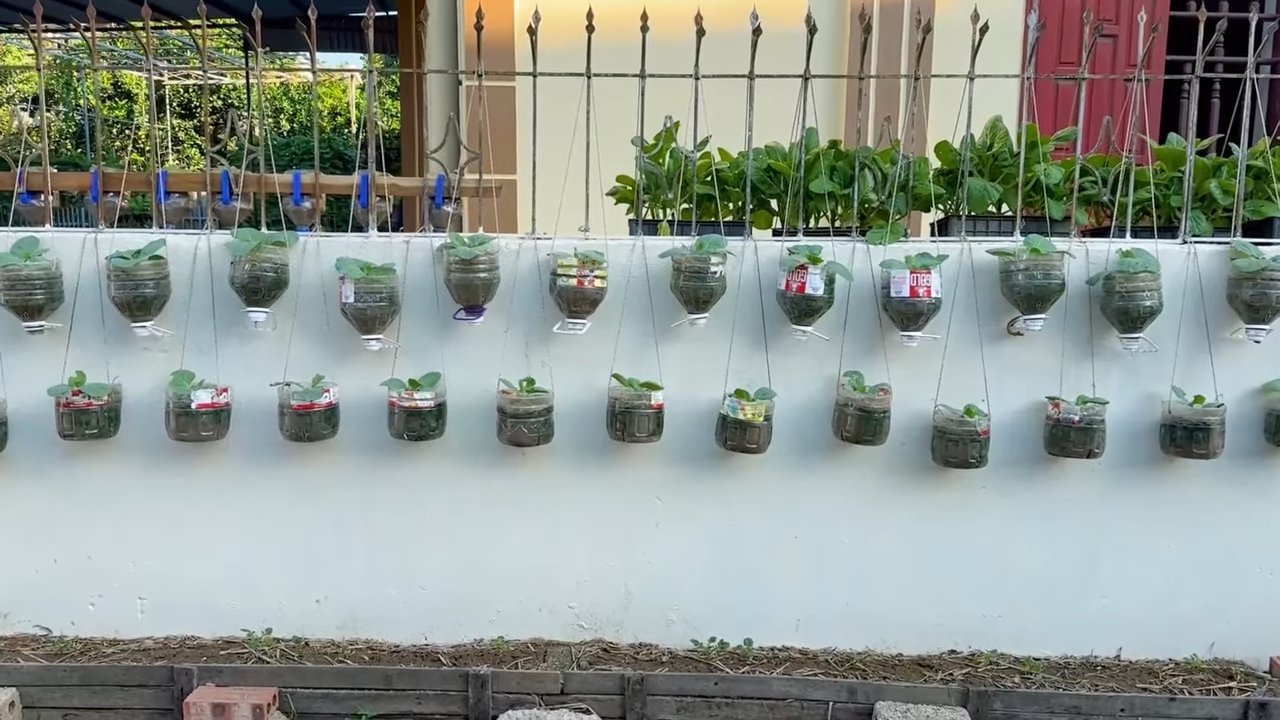
1. Create Hanging Holes: On each bottle, drill or poke two holes on opposite sides, near the top edge. These holes will be used to thread the rope or wire through. Make sure the holes are large enough for your rope or wire to pass through easily.
2. Thread the Rope or Wire: Cut a long piece of rope or wire, long enough to hang all your bottles vertically with some extra length for hanging. Thread the rope or wire through the holes in the first bottle, creating a loop at the top for hanging.
3. Add the Next Bottle: Position the second bottle below the first one, overlapping the bottom of the first bottle slightly. Thread the rope or wire through the holes in the second bottle, securing it in place.
4. Repeat the Process: Continue adding bottles in the same way, overlapping each bottle slightly and securing them with the rope or wire. Maintain a consistent spacing between the bottles for a visually appealing look. I usually aim for about 6-8 inches of space between each bottle.
5. Secure the Bottom: Once you’ve added all the bottles, tie a knot at the bottom of the rope or wire to prevent the bottles from sliding off.
6. Test the Structure: Before adding soil and plants, test the stability of your vertical garden. Hang it up and make sure it’s sturdy and can support the weight of the bottles.
Planting the Cabbage Seedlings
Time to get your hands dirty and plant those cabbage seedlings!
1. Fill the Bottles with Potting Soil: Carefully fill each bottle with potting soil, leaving about an inch of space at the top. Gently pat down the soil to remove any air pockets.
2. Plant the Seedlings: Dig a small hole in the center of each bottle and carefully transplant a cabbage seedling into the hole. Make sure the roots are covered with soil.
3. Water Thoroughly: Water the seedlings thoroughly after planting. This will help settle the soil and encourage root growth.
4. Add More Soil if Needed: After watering, the soil may settle. If necessary, add more potting soil to fill any gaps.
Caring for Your Cabbage Plants
Now that your vertical cabbage garden is complete, it’s important to provide proper care to ensure healthy growth and a bountiful harvest.
1. Sunlight: Cabbage plants need at least 6 hours of sunlight per day. Choose a location that receives plenty of sunlight. If you don’t have a sunny spot, you can supplement with grow lights.
2. Watering: Water your cabbage plants regularly, especially during hot and dry weather. Check the soil moisture by sticking your finger into the soil. If the soil feels dry, it’s time to water. Avoid overwatering, as this can lead to root rot.
3. Fertilizing: Cabbage plants are heavy feeders and require regular fertilization. Use a balanced fertilizer or a fertilizer specifically formulated for vegetables. Follow the instructions on the fertilizer package. I like to use a liquid fertilizer diluted in water every two weeks.
4. Pest Control: Keep an eye out for pests such as cabbage worms, aphids, and slugs. Handpick any pests you find or use organic pest control methods such as insecticidal soap or neem oil.
5. Weeding: Remove any weeds that may grow in the bottles. Weeds can compete with your cabbage plants for nutrients and water.
6. Support: As your cabbage plants grow, they may become top-heavy. Provide support by staking the plants or using plant ties.
7. Harvesting: Cabbage is typically ready to harvest in 60-100 days, depending on the variety. Harvest when the heads are firm and tightly packed. Cut the heads off at the base of the plant.
Troubleshooting
Even with the best care, you might encounter some challenges along the way. Here are a few common problems and how to address them:
* Yellowing Leaves: This could be a sign of nutrient deficiency. Try fertilizing your plants with a balanced fertilizer.
* Slow Growth: This could be due to insufficient sunlight or poor soil. Make sure your plants are getting enough sunlight and that the soil is well-draining and nutrient-rich.
* Pest Infestation: Regularly inspect your plants for pests and take action immediately if you find any.
* Root Rot: This is caused by overwatering. Make sure your bottles have adequate drainage and avoid watering too frequently.
Tips for Success
Here are a few extra tips to help you succeed with your vertical cabbage bottle garden:
* Choose the Right Cabbage Variety: Some cabbage varieties are better suited for container gardening than others. Look for compact varieties that don’t get too large.
* Use High-Quality Potting Soil: Don’t skimp on the potting soil. Good quality potting soil will provide your plants with the nutrients they need to thrive.
* Water Regularly: Cabbage plants need consistent moisture. Water deeply and regularly, especially during hot weather.
* Fertilize Regularly: Cabbage plants are heavy feeders and need regular fertilization.
* Protect from Pests: Keep an eye out for pests and take action immediately if you find any.
* Rotate Your Crops: If you’re growing cabbage in the same bottles year after year, rotate your crops to prevent soilborne diseases.
Enjoy Your Harvest!
Growing your own cabbage in a vertical bottle garden is a rewarding experience. Not only will you have fresh
Conclusion
So, there you have it! Transforming discarded plastic bottles and a humble cabbage into a thriving vertical garden is not just a fun project; it’s a powerful statement about sustainability, resourcefulness, and the joy of growing your own food. This DIY vertical cabbage bottle garden offers a unique and space-saving solution for anyone, regardless of their gardening experience or the size of their living space. Whether you have a sprawling backyard or a tiny balcony, this method allows you to cultivate fresh, organic cabbage right at your fingertips.
But why is this particular DIY trick a must-try? Beyond the obvious environmental benefits of recycling plastic and reducing your carbon footprint, this method offers several compelling advantages. Firstly, it’s incredibly cost-effective. You’re repurposing materials that would otherwise end up in a landfill, significantly reducing the financial investment required for traditional gardening. Secondly, it’s remarkably efficient in terms of space utilization. The vertical design allows you to maximize your growing area, making it ideal for urban dwellers or anyone with limited outdoor space. Thirdly, it’s a fantastic educational opportunity, especially for children. It teaches them about plant life cycles, the importance of recycling, and the satisfaction of growing their own food.
Furthermore, the vertical structure promotes better air circulation around the cabbage plants, reducing the risk of fungal diseases and pests. The bottles also provide excellent drainage, preventing waterlogging and ensuring healthy root development. And let’s not forget the aesthetic appeal! A vertical garden bursting with lush green cabbage adds a touch of natural beauty to any environment.
Looking for variations? Absolutely! While cabbage is the star of this show, you can easily adapt this method to grow other leafy greens like lettuce, spinach, or kale. You can also experiment with different types of cabbage, such as red cabbage, savoy cabbage, or napa cabbage, to add variety to your harvest. Consider adding companion plants like marigolds or basil to deter pests and attract beneficial insects. You can even paint the bottles with vibrant colors or add decorative elements to personalize your vertical garden and make it a true reflection of your style.
Don’t be afraid to get creative and experiment with different configurations and designs. You can create a single vertical column or arrange multiple columns in a row to form a living wall. You can also adjust the spacing between the bottles to accommodate different plant sizes and growth habits. The possibilities are endless!
We wholeheartedly encourage you to try this DIY vertical cabbage bottle garden. It’s a rewarding project that offers numerous benefits, from environmental sustainability to fresh, homegrown produce. It’s a chance to connect with nature, learn new skills, and create something beautiful and functional.
Once you’ve built your own vertical cabbage garden, we’d love to hear about your experience! Share your photos, tips, and challenges in the comments section below. Let’s create a community of vertical gardeners and inspire others to embrace sustainable living. What kind of soil did you use? Did you encounter any pests? What was your biggest success? Your insights can help others succeed and make this DIY project even better. So, grab your bottles, your cabbage seedlings, and your gardening gloves, and let’s get growing!
Frequently Asked Questions (FAQ)
What type of plastic bottles are best for this project?
Ideally, you should use sturdy, food-grade plastic bottles. Two-liter soda bottles or similar-sized water bottles work well. Avoid using bottles that have contained harsh chemicals or cleaning products, as these may contaminate the soil and harm your plants. Make sure to thoroughly clean the bottles with soap and water before using them. The thickness of the plastic is also important; thicker bottles will be more durable and less likely to crack or break under the weight of the soil and plants.
What kind of soil should I use for my vertical cabbage garden?
A well-draining potting mix is essential for successful cabbage growth. A mixture of equal parts compost, peat moss (or coco coir), and perlite or vermiculite is a good starting point. The compost provides nutrients, the peat moss (or coco coir) retains moisture, and the perlite or vermiculite improves drainage. Avoid using garden soil, as it can be too heavy and compacted, hindering root growth. You can also add slow-release fertilizer to the potting mix to provide a steady supply of nutrients to your cabbage plants.
How often should I water my vertical cabbage garden?
The watering frequency will depend on several factors, including the weather, the type of soil you’re using, and the size of your cabbage plants. Generally, you should water your plants when the top inch of soil feels dry to the touch. Avoid overwatering, as this can lead to root rot. When watering, make sure to thoroughly saturate the soil in each bottle, allowing excess water to drain out. Consider using a watering can with a long spout to reach the plants in the upper bottles.
How much sunlight does my vertical cabbage garden need?
Cabbage plants need at least 6 hours of direct sunlight per day to thrive. Choose a location for your vertical garden that receives ample sunlight. If you don’t have a sunny spot, you can supplement with grow lights. Rotate the vertical garden regularly to ensure that all sides receive equal sunlight. If you live in a hot climate, provide some shade during the hottest part of the day to prevent the plants from wilting.
How do I prevent pests and diseases in my vertical cabbage garden?
Regularly inspect your plants for signs of pests or diseases. Common cabbage pests include aphids, cabbage worms, and slugs. You can control these pests with organic methods such as handpicking, insecticidal soap, or Bacillus thuringiensis (Bt). To prevent fungal diseases, ensure good air circulation around the plants and avoid overwatering. You can also apply a fungicide if necessary. Companion planting with herbs like rosemary or thyme can also help deter pests.
Can I grow other plants besides cabbage in this vertical garden?
Yes, you can grow other leafy greens like lettuce, spinach, kale, or herbs like parsley, cilantro, and basil. Choose plants that have similar growing requirements to cabbage, such as well-draining soil, ample sunlight, and regular watering. Avoid planting plants that are too large or have aggressive root systems, as they may outcompete the cabbage plants.
How do I harvest my cabbage from the vertical garden?
Harvest your cabbage when the heads are firm and compact. Use a sharp knife to cut the head from the stem, leaving a few outer leaves intact. You can harvest the outer leaves as needed for salads or cooking. After harvesting the main head, the plant may produce smaller side shoots that you can also harvest.
How long will my vertical cabbage garden last?
The lifespan of your vertical cabbage garden will depend on the quality of the materials you use and the care you provide. With proper maintenance, the plastic bottles can last for several seasons. The cabbage plants themselves will typically last for one growing season. You can replant new cabbage seedlings each year to keep your vertical garden thriving.
How do I deal with the weight of the soil and plants in the bottles?
The weight of the soil and plants can be significant, especially when the bottles are fully watered. Make sure to use a sturdy support structure for your vertical garden. You can use metal rods, wooden posts, or even a strong fence to support the bottles. Distribute the weight evenly to prevent the structure from collapsing. Consider using lighter-weight potting mix to reduce the overall weight.
What do I do with the vertical garden during the winter months?
If you live in a climate with cold winters, you may need to protect your vertical cabbage garden from frost and freezing temperatures. You can move the garden indoors to a sunny location or a greenhouse. Alternatively, you can cover the garden with a frost blanket or burlap to provide insulation. If the ground freezes, you may need to insulate the bottom of the garden to prevent the roots from freezing. In some cases, it may be best to dismantle the garden and compost the plants, then rebuild it in the spring.


Leave a Comment