
Winged Bean Grocery Bill Hack: Imagine slashing your grocery bill while enjoying fresh, nutritious, and utterly delicious vegetables straight from your backyard. Sounds too good to be true? It’s not! I’m here to let you in on a little secret – the winged bean, also known as the Goa bean or asparagus pea, is your ticket to a more affordable and sustainable lifestyle.
For centuries, this remarkable legume has been a staple in Southeast Asian and Papua New Guinean cuisine, prized for its versatility and nutritional value. Every part of the plant, from the pods and leaves to the seeds and roots, is edible! Think of it as a complete garden package, offering a continuous harvest and minimizing waste.
In today’s world, where grocery prices seem to climb higher every week, finding ways to save money without sacrificing quality is crucial. That’s where this winged bean grocery bill hack comes in. By growing your own winged beans, you’re not just saving money; you’re also gaining access to a superfood packed with protein, vitamins, and minerals. Plus, you’ll be reducing your carbon footprint by cutting down on transportation and packaging. So, let’s dive into how you can easily cultivate this amazing plant and start reaping the rewards of a bountiful and budget-friendly harvest!
Winged Bean Grocery Bill Hack: Grow Your Own!
Hey there, fellow budget-conscious foodies! Are you tired of seeing your grocery bill skyrocket, especially when you’re trying to eat healthy and diverse foods? I totally get it! That’s why I’m so excited to share my favorite grocery bill hack: growing your own winged beans! These amazing legumes are not only delicious and nutritious, but they’re also surprisingly easy to grow, even if you don’t have a huge garden. Trust me, the satisfaction of harvesting your own food and saving money is unbeatable. Let’s dive in!
What are Winged Beans and Why Grow Them?
Winged beans (Psophocarpus tetragonolobus), also known as goa beans or asparagus peas, are a tropical legume native to Southeast Asia. The entire plant is edible – pods, leaves, flowers, seeds, and even the tubers! They’re packed with protein, vitamins, and minerals, making them a fantastic addition to any diet.
Here’s why I think you should consider growing them:
* Nutritional Powerhouse: Winged beans are a great source of protein, fiber, vitamins A and C, and minerals like calcium and iron.
* Versatile in the Kitchen: You can eat the young pods raw in salads, stir-fry them, steam them, or add them to soups and stews. The leaves can be used like spinach, and the flowers are edible too! The dried seeds can be roasted and ground into flour or used as a coffee substitute.
* Beautiful and Functional: The plants are vining and produce beautiful, fragrant flowers, making them a lovely addition to your garden. They also fix nitrogen in the soil, which is beneficial for other plants.
* Grocery Bill Savings: Let’s be honest, this is a big one! Growing your own winged beans can significantly reduce your grocery bill, especially if you enjoy eating them regularly.
* Sustainable Gardening: Growing your own food reduces your reliance on industrial agriculture and promotes a more sustainable lifestyle.
Getting Started: What You’ll Need
Before we get our hands dirty, let’s gather the necessary supplies. Don’t worry, you probably already have some of these items!
* Winged Bean Seeds: You can find these online or at some specialty nurseries. Make sure to choose a variety that’s suitable for your climate.
* Potting Soil: A good quality potting mix is essential for starting your seeds indoors.
* Seed Starting Trays or Small Pots: These will be used to germinate the seeds.
* Trellis or Support Structure: Winged beans are vining plants and need something to climb on. A trellis, fence, or even a sturdy bamboo pole will work.
* Gardening Gloves: To protect your hands.
* Watering Can or Hose: For watering your plants.
* Compost or Organic Fertilizer: To enrich the soil.
* A Sunny Location: Winged beans need at least 6-8 hours of sunlight per day.
* Optional:
* Seed Starting Heat Mat: This can help speed up germination, especially in cooler climates.
* Grow Lights: If you’re starting your seeds indoors and don’t have enough natural light.
Step-by-Step Guide to Growing Winged Beans
Okay, let’s get started! I’ve broken down the process into easy-to-follow steps.
Phase 1: Seed Starting (Indoors or Direct Sowing)
You have two options for starting your winged bean seeds: indoors or directly in the ground. I prefer starting them indoors, especially if you live in an area with a shorter growing season, as it gives them a head start.
Option 1: Starting Seeds Indoors
1. Soak the Seeds: Before planting, soak the winged bean seeds in warm water for 24 hours. This helps to soften the hard seed coat and improve germination rates. I usually put them in a small bowl and cover them with water.
2. Prepare the Seed Starting Trays: Fill your seed starting trays or small pots with potting soil. Gently press down on the soil to remove any air pockets.
3. Plant the Seeds: Make a small hole (about 1 inch deep) in the center of each pot or cell. Place one or two seeds in each hole and cover them with soil. Gently pat down the soil.
4. Water the Seeds: Water the seeds gently using a watering can or spray bottle. Make sure the soil is moist but not waterlogged.
5. Provide Warmth and Light: Place the seed starting trays in a warm location (ideally between 70-80°F). If you have a seed starting heat mat, place the trays on top of it. If you don’t have enough natural light, use grow lights.
6. Keep the Soil Moist: Check the soil daily and water as needed to keep it moist. Avoid overwatering, as this can lead to fungal diseases.
7. Transplant the Seedlings: Once the seedlings have developed a few sets of true leaves (usually after 4-6 weeks), they’re ready to be transplanted outdoors.
Option 2: Direct Sowing
1. Prepare the Soil: Choose a sunny location with well-drained soil. Amend the soil with compost or organic fertilizer to improve its fertility.
2. Soak the Seeds: As with starting seeds indoors, soak the winged bean seeds in warm water for 24 hours before planting.
3. Plant the Seeds: Sow the seeds directly into the ground, about 1 inch deep and 6-8 inches apart.
4. Water the Seeds: Water the seeds gently using a watering can or hose. Make sure the soil is moist but not waterlogged.
5. Keep the Soil Moist: Check the soil daily and water as needed to keep it moist.
6. Thin the Seedlings: Once the seedlings emerge, thin them to one plant per 6-8 inches.
Phase 2: Transplanting and Setting Up Support
Whether you started your seeds indoors or directly sowed them, it’s crucial to provide proper support for your winged bean plants.
1. Harden Off Seedlings (If Starting Indoors): Before transplanting your seedlings outdoors, you need to “harden them off.” This means gradually exposing them to outdoor conditions over a period of 7-10 days. Start by placing them in a sheltered location for a few hours each day, gradually increasing the amount of time they spend outdoors.
2. Prepare the Planting Area: Choose a sunny location with well-drained soil. Amend the soil with compost or organic fertilizer to improve its fertility.
3. Install the Trellis or Support Structure: Before transplanting, install your trellis or support structure. Make sure it’s sturdy enough to support the weight of the mature plants. I’ve used everything from simple bamboo poles to elaborate trellises, and they all work well.
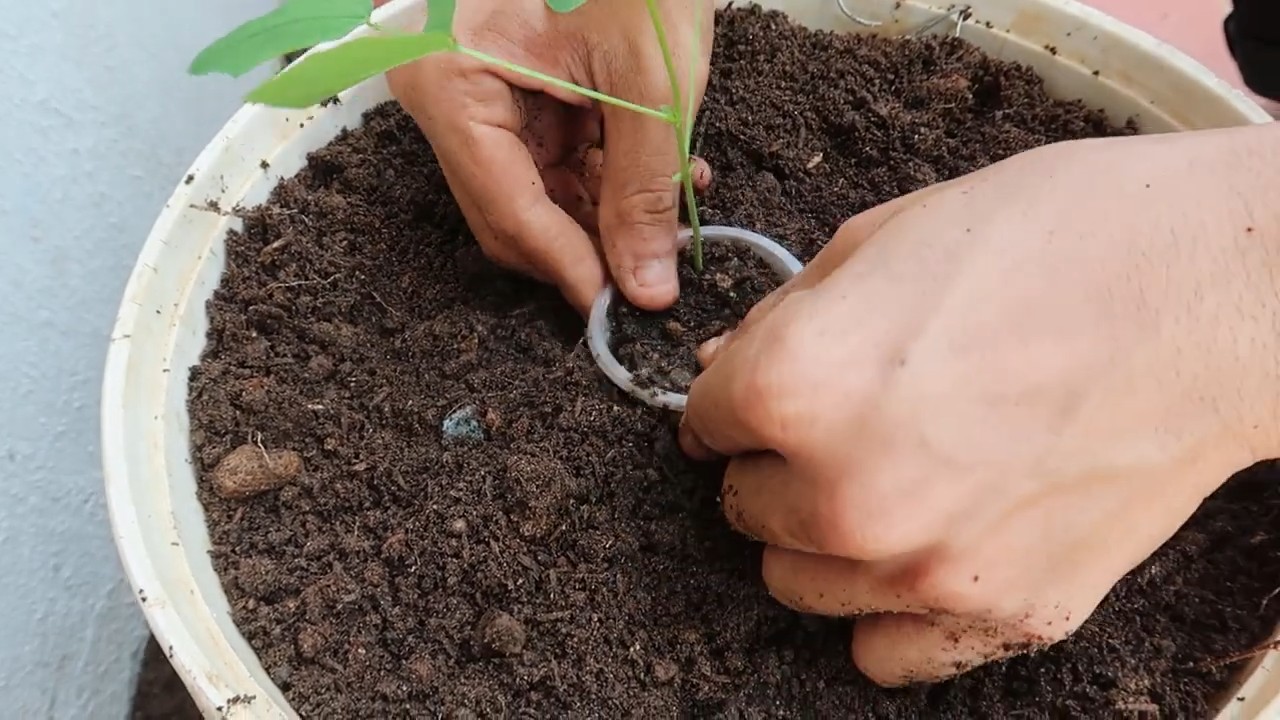
4. Transplant the Seedlings: Carefully dig a hole that’s slightly larger than the root ball of the seedling. Gently remove the seedling from its pot and place it in the hole. Backfill with soil and gently pat it down.
5. Water the Plants: Water the plants thoroughly after transplanting.
6. Guide the Vines: As the plants grow, gently guide the vines onto the trellis or support structure. They will eventually start to climb on their own.
Phase 3: Ongoing Care and Maintenance
Once your winged bean plants are established, they’re relatively low-maintenance. However, there are a few things you can do to ensure a bountiful harvest.
1. Watering: Water your plants regularly, especially during dry periods. Winged beans prefer consistently moist soil, but avoid overwatering.
2. Fertilizing: Fertilize your plants every few weeks with a balanced organic fertilizer. This will help promote healthy growth and pod production.
3.
Hey there, fellow budget-conscious foodies! Are you tired of seeing your grocery bill skyrocket, especially when you’re trying to eat healthy and diverse foods? I totally get it! That’s why I’m so excited to share my favorite grocery bill hack: growing your own winged beans! These amazing legumes are not only delicious and nutritious, but they’re also surprisingly easy to grow, even if you don’t have a huge garden. Trust me, the satisfaction of harvesting your own food and saving money is unbeatable. Let’s dive in!
What are Winged Beans and Why Grow Them?
Winged beans (Psophocarpus tetragonolobus), also known as goa beans or asparagus peas, are a tropical legume native to Southeast Asia. The entire plant is edible – pods, leaves, flowers, seeds, and even the tubers! They’re packed with protein, vitamins, and minerals, making them a fantastic addition to any diet.
Here’s why I think you should consider growing them:
* Nutritional Powerhouse: Winged beans are a great source of protein, fiber, vitamins A and C, and minerals like calcium and iron.
* Versatile in the Kitchen: You can eat the young pods raw in salads, stir-fry them, steam them, or add them to soups and stews. The leaves can be used like spinach, and the flowers are edible too! The dried seeds can be roasted and ground into flour or used as a coffee substitute.
* Beautiful and Functional: The plants are vining and produce beautiful, fragrant flowers, making them a lovely addition to your garden. They also fix nitrogen in the soil, which is beneficial for other plants.
* Grocery Bill Savings: Let’s be honest, this is a big one! Growing your own winged beans can significantly reduce your grocery bill, especially if you enjoy eating them regularly.
* Sustainable Gardening: Growing your own food reduces your reliance on industrial agriculture and promotes a more sustainable lifestyle.
Getting Started: What You’ll Need
Before we get our hands dirty, let’s gather the necessary supplies. Don’t worry, you probably already have some of these items!
* Winged Bean Seeds: You can find these online or at some specialty nurseries. Make sure to choose a variety that’s suitable for your climate.
* Potting Soil: A good quality potting mix is essential for starting your seeds indoors.
* Seed Starting Trays or Small Pots: These will be used to germinate the seeds.
* Trellis or Support Structure: Winged beans are vining plants and need something to climb on. A trellis, fence, or even a sturdy bamboo pole will work.
* Gardening Gloves: To protect your hands.
* Watering Can or Hose: For watering your plants.
* Compost or Organic Fertilizer: To enrich the soil.
* A Sunny Location: Winged beans need at least 6-8 hours of sunlight per day.
* Optional:
* Seed Starting Heat Mat: This can help speed up germination, especially in cooler climates.
* Grow Lights: If you’re starting your seeds indoors and don’t have enough natural light.
Step-by-Step Guide to Growing Winged Beans
Okay, let’s get started! I’ve broken down the process into easy-to-follow steps.
Phase 1: Seed Starting (Indoors or Direct Sowing)
You have two options for starting your winged bean seeds: indoors or directly in the ground. I prefer starting them indoors, especially if you live in an area with a shorter growing season, as it gives them a head start.
Option 1: Starting Seeds Indoors
1. Soak the Seeds: Before planting, soak the winged bean seeds in warm water for 24 hours. This helps to soften the hard seed coat and improve germination rates. I usually put them in a small bowl and cover them with water.
2. Prepare the Seed Starting Trays: Fill your seed starting trays or small pots with potting soil. Gently press down on the soil to remove any air pockets.
3. Plant the Seeds: Make a small hole (about 1 inch deep) in the center of each pot or cell. Place one or two seeds in each hole and cover them with soil. Gently pat down the soil.
4. Water the Seeds: Water the seeds gently using a watering can or spray bottle. Make sure the soil is moist but not waterlogged.
5. Provide Warmth and Light: Place the seed starting trays in a warm location (ideally between 70-80°F). If you have a seed starting heat mat, place the trays on top of it. If you don’t have enough natural light, use grow lights.
6. Keep the Soil Moist: Check the soil daily and water as needed to keep it moist. Avoid overwatering, as this can lead to fungal diseases.
7. Transplant the Seedlings: Once the seedlings have developed a few sets of true leaves (usually after 4-6 weeks), they’re ready to be transplanted outdoors.
Option 2: Direct Sowing
1. Prepare the Soil: Choose a sunny location with well-drained soil. Amend the soil with compost or organic fertilizer to improve its fertility.
2. Soak the Seeds: As with starting seeds indoors, soak the winged bean seeds in warm water for 24 hours before planting.
3. Plant the Seeds: Sow the seeds directly into the ground, about 1 inch deep and 6-8 inches apart.
4. Water the Seeds: Water the seeds gently using a watering can or hose. Make sure the soil is moist but not waterlogged.
5. Keep the Soil Moist: Check the soil daily and water as needed to keep it moist.
6. Thin the Seedlings: Once the seedlings emerge, thin them to one plant per 6-8 inches.
Phase 2: Transplanting and Setting Up Support
Whether you started your seeds indoors or directly sowed them, it’s crucial to provide proper support for your winged bean plants.
1. Harden Off Seedlings (If Starting Indoors): Before transplanting your seedlings outdoors, you need to “harden them off.” This means gradually exposing them to outdoor conditions over a period of 7-10 days. Start by placing them in a sheltered location for a few hours each day, gradually increasing the amount of time they spend outdoors.
2. Prepare the Planting Area: Choose a sunny location with well-drained soil. Amend the soil with compost or organic fertilizer to improve its fertility.
3. Install the Trellis or Support Structure: Before transplanting, install your trellis or support structure. Make sure it’s sturdy enough to support the weight of the mature plants. I’ve used everything from simple bamboo poles to elaborate trellises, and they all work well.
4. Transplant the Seedlings: Carefully dig a hole that’s slightly larger than the root ball of the seedling. Gently remove the seedling from its pot and place it in the hole. Backfill with soil and gently pat it down.
5. Water the Plants: Water the plants thoroughly after transplanting.
6. Guide the Vines: As the plants grow, gently guide the vines onto the trellis or support structure. They will eventually start to climb on their own.
Phase 3: Ongoing Care and Maintenance
Once your winged bean plants are established, they’re relatively low-maintenance. However, there are a few things you can do to ensure a bountiful harvest.
1. Watering: Water your plants regularly, especially during dry periods. Winged beans prefer consistently moist soil, but avoid overwatering.
2. Fertilizing: Fertilize your plants every few weeks with a balanced organic fertilizer. This will help promote healthy growth and pod production.
3. Weeding: Keep the area around your plants free of weeds. Weeds can compete with your plants for nutrients and water.
4. Pest and Disease Control: Winged beans are generally resistant to pests and diseases, but it’s always a good idea to keep an eye out for any problems. If you notice any pests or diseases, treat them promptly with an appropriate organic solution. I’ve occasionally had issues with aphids, but a simple spray of soapy water usually takes care of them.
5. Pruning: Prune your plants as needed to encourage branching and pod production. You can also remove any yellowing or dead leaves.
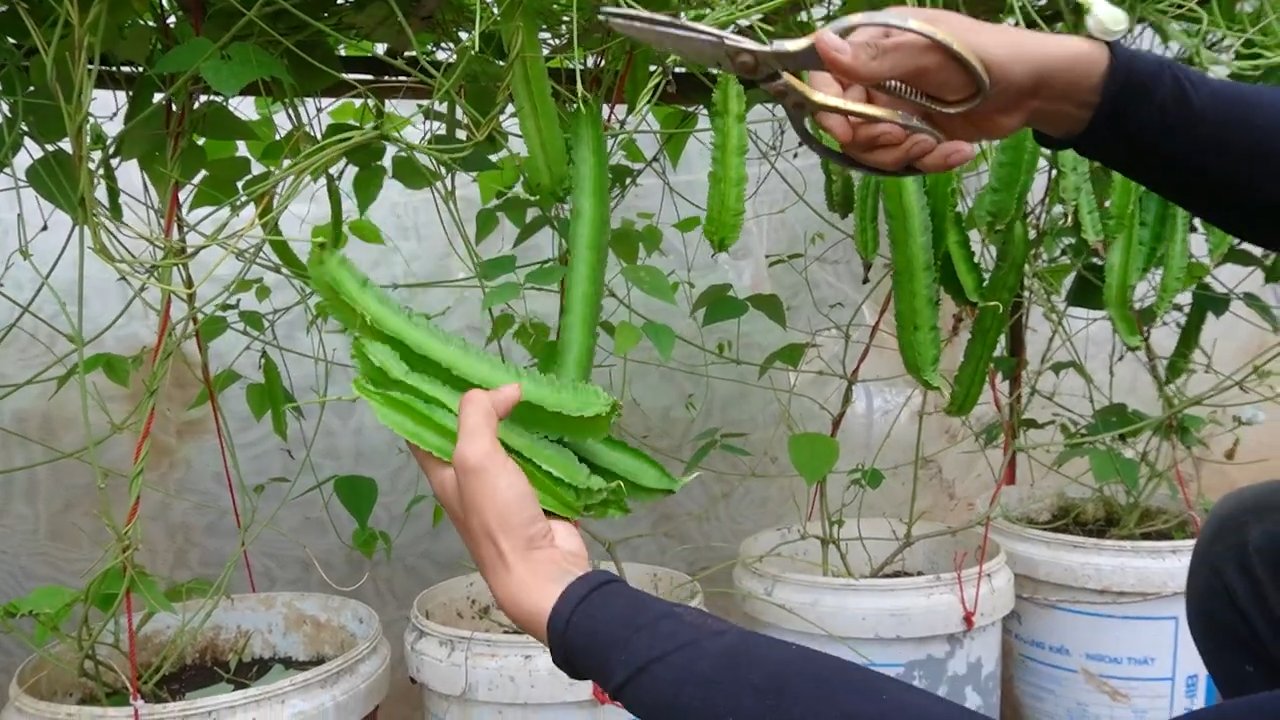
Phase 4: Harvesting and Enjoying Your Winged Beans
This is the most rewarding part! You’ve put in the work, and now it’s time to reap the benefits.
1. Harvesting the Pods: You can start harvesting the young pods when they are about 4-6 inches long and still tender. The
Conclusion
So, there you have it! This Winged Bean Grocery Bill Hack isn’t just a clever idea; it’s a game-changer for anyone looking to eat healthy, sustainably, and affordably. We’ve explored how incorporating winged beans into your diet, specifically by growing your own, can significantly reduce your grocery expenses while simultaneously providing you with a nutrient-rich and versatile food source.
Think about it: no more exorbitant prices for exotic vegetables at the supermarket. No more questioning the freshness or origin of your produce. Instead, you’ll have a thriving winged bean plant right in your backyard (or even on your balcony!), offering a continuous supply of delicious and nutritious beans, leaves, flowers, and even tubers.
But the benefits extend beyond just cost savings. By growing your own winged beans, you’re actively participating in a more sustainable food system. You’re reducing your carbon footprint by eliminating transportation costs and supporting local food production. You’re also gaining a deeper connection to your food, understanding where it comes from and how it’s grown.
This DIY trick is a must-try because it empowers you to take control of your food budget and your health. It’s a simple yet effective way to embrace a more self-sufficient and sustainable lifestyle.
Looking for variations? Absolutely! Consider these ideas to personalize your winged bean growing experience:
* Vertical Gardening: If you’re short on space, train your winged bean plant to climb a trellis or fence. This not only maximizes your growing area but also adds a beautiful vertical element to your garden.
* Companion Planting: Winged beans are known to be good companions for other plants, such as corn and sunflowers. Experiment with different combinations to see what works best in your garden.
* Seed Saving: Once your winged bean plants mature, save some of the seeds for future planting. This will ensure a continuous supply of winged beans for years to come.
* Different Varieties: Explore different varieties of winged beans. Some are more heat-tolerant, while others produce larger beans. Find the variety that best suits your climate and preferences.
* Culinary Exploration: Don’t limit yourself to just using the beans! Experiment with the leaves, flowers, and tubers in your cooking. Each part of the plant offers a unique flavor and texture. Try stir-frying the leaves, adding the flowers to salads, or roasting the tubers like potatoes.
We are confident that this Winged Bean Grocery Bill Hack will transform the way you think about food and gardening. It’s an investment in your health, your wallet, and the planet.
So, what are you waiting for? Grab some winged bean seeds, find a sunny spot in your garden, and get growing! We’re eager to hear about your experiences. Share your photos, tips, and recipes on social media using #WingedBeanHack. Let’s build a community of winged bean enthusiasts and inspire others to embrace this amazing DIY trick. We are sure you will find that this is a great way to save money and eat healthier.
FAQ
What exactly are winged beans, and why should I grow them?
Winged beans (Psophocarpus tetragonolobus) are a legume native to Southeast Asia, known for their exceptional nutritional value and versatility. Every part of the plant – the beans, leaves, flowers, and tubers – is edible and packed with protein, vitamins, and minerals. Growing them yourself offers a significant advantage in terms of freshness, cost savings, and control over growing practices. You avoid the high prices and potential pesticides associated with store-bought produce, ensuring a healthy and sustainable food source right in your backyard. Plus, they are beautiful plants that add visual interest to any garden.
How easy is it to grow winged beans? I don’t have a green thumb!
Winged beans are relatively easy to grow, even for beginners. They thrive in warm climates with plenty of sunshine and well-drained soil. The most important thing is to provide them with a trellis or other support to climb on, as they are vining plants. Start by soaking the seeds overnight to improve germination. Plant them in a sunny location after the last frost. Water regularly, especially during dry spells. With a little care, you’ll be harvesting your own winged beans in no time. Don’t be discouraged if your first attempt isn’t perfect; gardening is a learning process.
What kind of climate do winged beans need? Can I grow them in a cooler region?
Winged beans are tropical plants that prefer warm temperatures and plenty of sunshine. They thrive in USDA hardiness zones 9-11. However, with some extra care, you can still grow them in cooler regions. Start the seeds indoors 6-8 weeks before the last expected frost. Transplant them outdoors after the weather has warmed up and there is no more risk of frost. Choose a sunny location and provide them with protection from strong winds. You may also need to use row covers or a greenhouse to extend the growing season. Even if you can’t grow them year-round, you can still enjoy a harvest of winged beans during the warmer months.
How much space do I need to grow winged beans? I only have a small balcony.
Winged beans are vining plants that can grow quite large, but they can still be grown in small spaces with proper planning. A large pot or container (at least 12 inches in diameter) is sufficient for a single plant. The key is to provide them with a trellis or other support to climb on. This will allow them to grow vertically, maximizing your growing space. You can even train them to grow up a balcony railing or fence. With a little creativity, you can enjoy fresh winged beans even in the smallest of spaces.
How long does it take for winged beans to mature and produce beans?
Winged beans typically take about 120-150 days to mature and produce beans. However, this can vary depending on the climate, growing conditions, and variety. You can start harvesting the young pods when they are about 6-8 inches long. The leaves and flowers can be harvested at any time. The tubers take longer to mature, typically around 6-8 months. Be patient, and you’ll be rewarded with a bountiful harvest of delicious and nutritious winged beans.
Are there any pests or diseases that commonly affect winged beans?
Winged beans are generally resistant to pests and diseases, but they can be susceptible to certain problems, such as aphids, spider mites, and fungal diseases. Regularly inspect your plants for any signs of infestation or disease. If you notice any problems, take action immediately. You can use organic pest control methods, such as insecticidal soap or neem oil, to control pests. To prevent fungal diseases, ensure good air circulation and avoid overwatering.
How do I store winged beans after harvesting them?
Fresh winged beans can be stored in the refrigerator for up to a week. For longer storage, you can blanch them and freeze them. To blanch, boil the beans for 2-3 minutes, then immediately transfer them to an ice bath to stop the cooking process. Drain the beans and store them in freezer bags. Frozen winged beans can be stored for up to a year. You can also dry the beans for long-term storage.
Can I eat the entire winged bean plant? Are there any parts that are poisonous?
Yes, every part of the winged bean plant is edible, including the beans, leaves, flowers, and tubers. However, it’s important to cook the mature beans before eating them, as they contain trypsin inhibitors that can interfere with protein digestion. Cooking deactivates these inhibitors, making the beans safe to eat. The leaves and flowers can be eaten raw or cooked. The tubers can be roasted, boiled, or fried. There are no poisonous parts of the winged bean plant.
Where can I find winged bean seeds?
Winged bean seeds can be found at some nurseries, garden centers, and online seed suppliers. Look for reputable sources that offer high-quality seeds. You can also save seeds from your own plants for future planting.
What are some good recipes for using winged beans?
Winged beans are incredibly versatile and can be used in a variety of dishes. They can be stir-fried, steamed, boiled, or added to soups and stews. The leaves can be used in salads or cooked like spinach. The flowers can be added to salads or used as a garnish. The tubers can be roasted, boiled, or fried like potatoes. Some popular winged bean recipes include winged bean stir-fry, winged bean curry, and winged bean salad. Don’t be afraid to experiment and create your own unique winged bean dishes.


Leave a Comment