
Winged Bean Growing Tips: Unlock the secrets to cultivating this extraordinary and nutritious legume right in your own backyard! Have you ever dreamt of harvesting a vegetable that’s not only delicious but also boasts an impressive array of health benefits? Well, look no further! This comprehensive guide is your passport to successfully growing winged beans, a crop that’s gaining popularity for its versatility and ease of cultivation.
The winged bean, also known as the Goa bean or asparagus pea, has a rich history, particularly in Southeast Asia and Papua New Guinea, where it has been a staple food source for centuries. Traditionally, every part of the plant – from the pods and beans to the leaves, flowers, and even the roots – is utilized, showcasing its incredible value. But you don’t need to travel to the tropics to enjoy this amazing plant!
In today’s world, where sustainability and healthy eating are paramount, learning winged bean growing tips is more relevant than ever. Many gardeners are looking for ways to diversify their crops and incorporate nutrient-rich foods into their diets. Winged beans are a fantastic option because they are relatively easy to grow, require minimal maintenance, and offer a complete protein source. Plus, they’re a beautiful addition to any garden, with their vibrant flowers and unique, winged pods. I’m excited to share my knowledge and help you embark on your own winged bean growing adventure!
DIY: Anbau von Flügelbohnen – Mein umfassender Leitfaden für eine reiche Ernte
Hallo Gartenfreunde! Ich bin so aufgeregt, euch heute in die Welt der Flügelbohnen einzuführen. Diese faszinierende Pflanze, auch bekannt als Goa-Bohne oder Spargelbohne, ist nicht nur unglaublich nahrhaft, sondern auch ein echter Hingucker im Garten. Ich habe in den letzten Jahren viel mit Flügelbohnen experimentiert und möchte meine Erfahrungen und Tipps mit euch teilen, damit auch ihr eine reiche Ernte erzielen könnt.
Was sind Flügelbohnen und warum solltest du sie anbauen?
Flügelbohnen sind mehr als nur eine hübsche Pflanze. Sie sind eine wahre Nährstoffbombe! Alle Teile der Pflanze – die Bohnen, Blätter, Blüten, Wurzeln und sogar die Schoten – sind essbar und reich an Proteinen, Vitaminen und Mineralien. Außerdem sind sie relativ einfach anzubauen, wenn man ein paar grundlegende Dinge beachtet.
Vorteile des Anbaus von Flügelbohnen:
* Nährstoffreich: Eine hervorragende Quelle für Proteine, Vitamine und Mineralien.
* Vielseitig: Alle Teile der Pflanze sind essbar.
* Attraktiv: Die Pflanze ist mit ihren geflügelten Schoten und hübschen Blüten ein echter Blickfang.
* Relativ pflegeleicht: Mit den richtigen Bedingungen wachsen sie fast von selbst.
* Bodenverbesserer: Wie andere Hülsenfrüchte fixieren Flügelbohnen Stickstoff im Boden.
Die richtige Vorbereitung ist der Schlüssel zum Erfolg
Bevor wir mit dem Pflanzen beginnen, ist es wichtig, die richtigen Vorbereitungen zu treffen. Das betrifft die Auswahl des Standorts, die Vorbereitung des Bodens und die Auswahl der richtigen Sorte.
Standortwahl:
* Sonnenschein: Flügelbohnen lieben die Sonne! Wähle einen Standort, der mindestens 6-8 Stunden Sonnenlicht pro Tag erhält.
* Windschutz: Da die Pflanzen relativ hoch werden und empfindliche Schoten haben, ist ein windgeschützter Standort ideal. Eine Mauer, ein Zaun oder eine Hecke können hier helfen.
* Platz: Flügelbohnen brauchen Platz zum Klettern. Plane genügend Raum für ein Rankgerüst oder eine andere Kletterhilfe ein.
Boden vorbereiten:
* Gut durchlässig: Flügelbohnen mögen keinen stehenden Wasser. Stelle sicher, dass der Boden gut durchlässig ist.
* Nährstoffreich: Füge dem Boden Kompost oder gut verrotteten Mist hinzu, um ihn mit Nährstoffen anzureichern.
* pH-Wert: Der ideale pH-Wert für Flügelbohnen liegt zwischen 6,0 und 7,0.
Sortenwahl:
* Es gibt verschiedene Sorten von Flügelbohnen, die sich in Größe, Farbe und Reifezeit unterscheiden. Informiere dich, welche Sorte am besten für dein Klima und deine Bedürfnisse geeignet ist. Ich persönlich habe gute Erfahrungen mit der Sorte ‘Chimbu’ gemacht.
Schritt-für-Schritt-Anleitung zum Anbau von Flügelbohnen
Jetzt geht es ans Eingemachte! Hier ist meine detaillierte Anleitung, wie du Flügelbohnen erfolgreich anbauen kannst:
1. Samen vorbereiten:
* Einweichen: Weiche die Samen vor dem Pflanzen für 24 Stunden in lauwarmem Wasser ein. Das hilft, die Keimung zu beschleunigen.
* Anritzen: Ritze die Samenschale vorsichtig mit einem Messer oder einer Feile an. Achte darauf, den Keimling nicht zu beschädigen. Das Anritzen erleichtert das Eindringen von Wasser und fördert die Keimung.
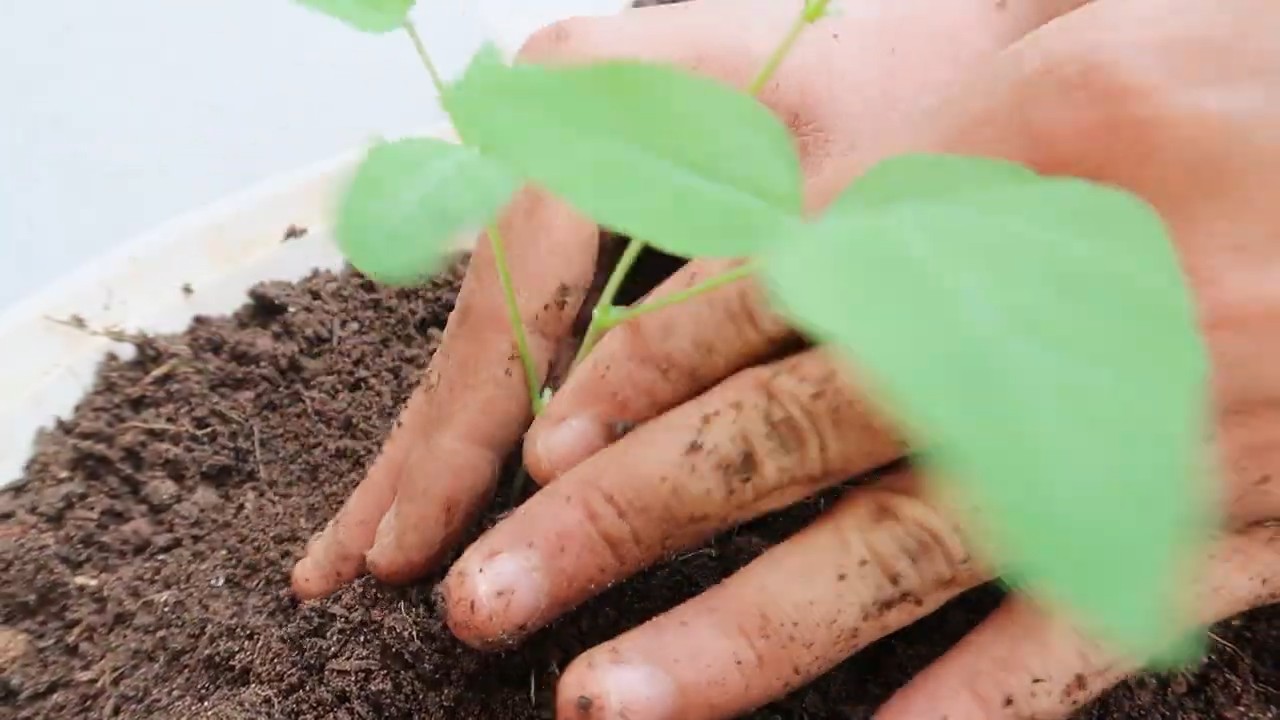
2. Aussaat:
* Direktsaat oder Vorkultur: Du kannst die Samen entweder direkt ins Beet säen oder sie in Töpfen vorziehen. Ich bevorzuge die Vorkultur, da sie mir mehr Kontrolle über die Keimung gibt und die Pflanzen einen Vorsprung haben.
* Vorkultur: Säe die Samen in Töpfen mit Anzuchterde aus. Bedecke sie mit etwa 2 cm Erde und halte sie feucht. Stelle die Töpfe an einen warmen, hellen Ort.
* Direktsaat: Säe die Samen direkt ins Beet, sobald die Bodentemperatur mindestens 18°C beträgt. Lege 2-3 Samen pro Pflanzstelle aus und bedecke sie mit Erde. Halte den Boden feucht.
3. Pflanzen:
* Vorgezogene Pflanzen: Sobald die Pflanzen etwa 15-20 cm hoch sind und die Gefahr von Frost vorüber ist, kannst du sie ins Beet pflanzen.
* Abstand: Halte einen Abstand von etwa 30-45 cm zwischen den Pflanzen ein.
* Pflanzloch: Grabe ein Loch, das groß genug ist, um den Wurzelballen aufzunehmen. Setze die Pflanze ein und fülle das Loch mit Erde. Drücke die Erde leicht an und gieße die Pflanze gründlich.
4. Rankhilfe installieren:
* Flügelbohnen sind Kletterpflanzen und benötigen eine Rankhilfe. Du kannst ein Rankgerüst, einen Zaun, eine Pergola oder sogar einen Baum als Kletterhilfe verwenden.
* Stabilität: Stelle sicher, dass die Rankhilfe stabil genug ist, um das Gewicht der Pflanzen und der Schoten zu tragen.
* Anleitung: Leite die jungen Pflanzen an der Rankhilfe entlang, damit sie sich daran festhalten können.
5. Pflege:
* Gießen: Gieße die Pflanzen regelmäßig, besonders während trockener Perioden. Achte darauf, dass der Boden nicht austrocknet.
* Düngen: Dünge die Pflanzen alle 2-3 Wochen mit einem organischen Dünger. Ich verwende gerne Komposttee oder verdünnte Brennnesseljauche.
* Unkrautbekämpfung: Halte das Beet unkrautfrei, um die Konkurrenz um Nährstoffe und Wasser zu minimieren.
* Schädlinge und Krankheiten: Flügelbohnen sind relativ resistent gegen Schädlinge und Krankheiten. Gelegentlich können Blattläuse auftreten. Diese lassen sich in der Regel einfach mit einem Wasserstrahl oder einer Seifenlösung bekämpfen.
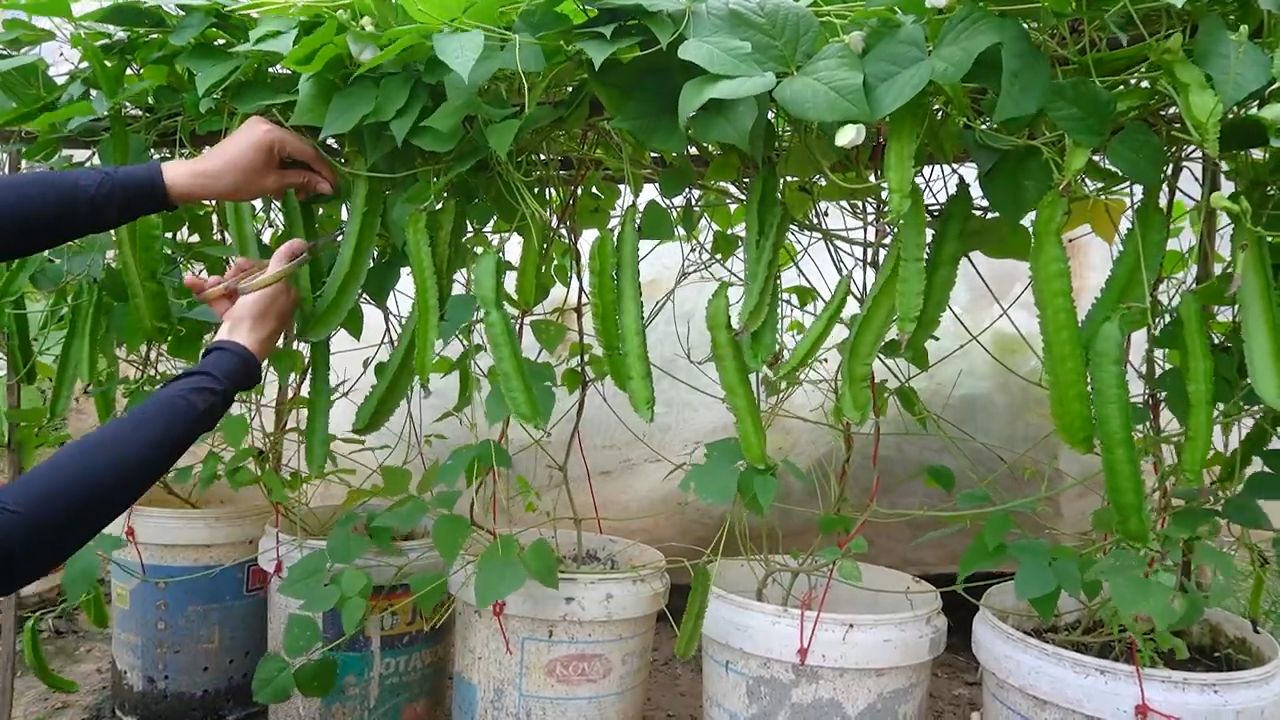
Erntezeit – Der Lohn der Mühe
Nach etwa 2-3 Monaten kannst du mit der Ernte beginnen. Die Schoten sind erntereif, wenn sie etwa 15-20 cm lang sind und noch zart.
Erntetipps:
* Regelmäßig ernten: Ernte die Schoten regelmäßig, um die Produktion neuer Schoten anzuregen.
* Zarte Schoten: Die Schoten sind am besten, wenn sie noch jung und zart sind. Ältere Schoten können faserig werden.
* Blätter und Blüten: Auch die Blätter und Blüten können geerntet und in Salaten oder Suppen verwendet werden.
* Wurzeln: Die Wurzeln können ebenfalls geerntet und wie Kartoffeln zubereitet werden.
Kulinarische Verwendung von Flügelbohnen
Flügelbohnen sind unglaublich vielseitig in der Küche. Hier sind ein paar Ideen, wie du sie zubereiten kannst:
* Gedünstet oder gebraten: Die Schoten können gedünstet, gebraten oder in Wok-Gerichten verwendet werden.
* Salate: Die Blätter und Blüten können roh in Salaten verwendet werden.
* Suppen und Eintöpfe: Die Schoten, Blätter und Wurzeln können in Suppen und Eintöpfen verwendet werden.
* Samen: Die reifen Samen können geröstet und als Snack gegessen werden.
Häufige Probleme und Lösungen
Auch beim Anbau von Flügelbohnen können Probleme auftreten. Hier sind ein paar häufige Probleme und wie du sie lösen kannst:
* Schlechte Keimung: Wenn die Samen nicht keimen, kann das an zu niedrigen Temperaturen, zu trockener Erde oder zu alten Samen liegen. Stelle sicher, dass die Bedingungen optimal sind und verwende frische Samen.
* Gelbe Blätter: Gelbe Blätter können auf Nährstoffmangel hindeuten. Dünge die Pflanzen mit einem organischen Dünger.
* Blattläuse: Blattläuse können mit einem Wasserstrahl oder einer Seifenlösung bekämpft werden.
* Schnecken: Schnecken können junge Pflanzen anfressen.
Conclusion
So, there you have it! Mastering the art of growing winged beans doesn’t require a green thumb blessed by the garden gods. It’s about understanding their needs, providing the right support, and being patient. This DIY approach, focusing on creating the ideal trellis system and optimizing soil conditions, is a game-changer for anyone serious about cultivating these unique and nutritious legumes.
Why is this a must-try? Because store-bought winged beans are often hard to find and can be quite expensive. Growing your own guarantees freshness, allows you to control the growing environment (pesticide-free, anyone?), and provides a deeply satisfying connection to your food. Plus, the vibrant purple flowers and the uniquely shaped pods add a touch of exotic beauty to your garden.
But don’t stop there! Experiment with different trellis designs. Perhaps a teepee structure for a more whimsical look, or a sturdy A-frame for maximum pod production. Consider companion planting with nitrogen-fixing plants like beans or peas to further enrich the soil. You could also try different varieties of winged beans – some are more heat-tolerant, while others offer different flavor profiles. The possibilities are endless!
We’ve armed you with the knowledge and the inspiration. Now it’s your turn to get your hands dirty and experience the joy of growing your own winged beans. We are confident that with these winged bean growing tips, you’ll be harvesting a bountiful crop in no time.
Don’t be shy! Share your experiences with us. What challenges did you face? What triumphs did you celebrate? What unique variations did you try? Post pictures of your winged bean plants, share your favorite recipes, and let’s build a community of winged bean enthusiasts! Your insights could inspire others to embark on this rewarding gardening adventure. Happy growing!
Frequently Asked Questions (FAQ)
What exactly are winged beans, and why should I grow them?
Winged beans (Psophocarpus tetragonolobus), also known as Goa beans or asparagus peas, are a tropical legume prized for their nutritional value and versatility. Every part of the plant is edible – the pods, leaves, flowers, seeds, and even the tubers. They are packed with protein, vitamins, and minerals, making them a healthy addition to your diet. Growing your own winged beans ensures access to fresh, organic produce that is often difficult to find in stores. Plus, they are a beautiful and unique addition to any garden.
How much sunlight do winged beans need?
Winged beans thrive in full sun, requiring at least 6-8 hours of direct sunlight per day. Insufficient sunlight can lead to stunted growth, reduced flowering, and lower pod production. Choose a sunny location in your garden that is sheltered from strong winds. If you live in a particularly hot climate, some afternoon shade can be beneficial to prevent scorching.
What kind of soil is best for growing winged beans?
Winged beans prefer well-drained, fertile soil with a slightly acidic to neutral pH (around 6.0 to 7.0). Amend your soil with compost or well-rotted manure before planting to improve drainage and nutrient content. Avoid heavy clay soils, as they can become waterlogged and inhibit root growth. If your soil is poor, consider growing winged beans in raised beds or containers with a high-quality potting mix.
How often should I water my winged bean plants?
Water your winged bean plants regularly, especially during hot and dry periods. Keep the soil consistently moist, but avoid overwatering, which can lead to root rot. Water deeply at the base of the plants, rather than overhead, to prevent fungal diseases. Mulching around the plants can help retain moisture and suppress weeds.
When is the best time to plant winged beans?
Winged beans are a warm-season crop and should be planted after the last frost when the soil has warmed up to at least 65°F (18°C). In tropical and subtropical climates, they can be grown year-round. In cooler climates, start seeds indoors 4-6 weeks before the last frost and transplant them outdoors once the weather is warm enough.
What kind of trellis should I use for winged beans?
Winged beans are vigorous climbers and require a strong trellis to support their growth. A sturdy trellis made of wood, bamboo, or metal is ideal. The trellis should be at least 6-8 feet tall to accommodate the plant’s climbing habit. You can also use a fence or a wall as a trellis. Ensure the trellis is securely anchored to the ground to prevent it from collapsing under the weight of the plants.
How long does it take for winged beans to mature?
Winged beans typically take 90-120 days to mature from planting to harvest. The exact time will depend on the variety, climate, and growing conditions. You can start harvesting the pods when they are young and tender, about 6-8 inches long. Regular harvesting will encourage the plant to produce more pods.
Are there any common pests or diseases that affect winged beans?
Winged beans are generally resistant to pests and diseases, but they can be susceptible to aphids, spider mites, and fungal diseases like powdery mildew. Inspect your plants regularly for signs of infestation or disease. Treat any problems promptly with organic pesticides or fungicides. Good air circulation and proper watering practices can help prevent fungal diseases.
Can I grow winged beans in containers?
Yes, you can grow winged beans in containers, but you will need a large container (at least 15-20 gallons) with good drainage. Use a high-quality potting mix and provide a sturdy trellis for the plants to climb on. Water and fertilize regularly, as container-grown plants tend to dry out and deplete nutrients more quickly than those grown in the ground.
How do I harvest winged beans?
Harvest winged beans when the pods are young and tender, about 6-8 inches long. Use scissors or pruning shears to cut the pods from the plant. Regular harvesting will encourage the plant to produce more pods. You can also harvest the leaves, flowers, and seeds for culinary use. The tubers can be harvested after the plant has finished producing pods.
How do I store winged beans?
Freshly harvested winged beans can be stored in the refrigerator for up to a week. For longer storage, you can blanch and freeze the pods. The seeds can be dried and stored in an airtight container. The tubers can be stored in a cool, dry place like potatoes.
What are some ways to cook with winged beans?
Winged beans are incredibly versatile in the kitchen. The young pods can be eaten raw in salads or stir-fried, steamed, or boiled. The leaves can be used like spinach. The flowers can be added to salads or used as a garnish. The seeds can be roasted and eaten like nuts or ground into flour. The tubers can be cooked like potatoes. Experiment with different recipes and find your favorite way to enjoy this nutritious and delicious legume.

Leave a Comment